
xr2toxj's Jeep Build:

Thread Starter
Senior Member
Joined: Dec 2008
Posts: 532
Likes: 1
From: Leeds, Maine
Year: 1999
Model: Cherokee
Engine: 4.0
4/26/2009: I got a little more done on my system. I found out that my cousin has a couple of sheet metal brakes, so I went to visit him today.
I showed him my sketch and we both agreed the way the brake is set up it would be hard to bend some of the bends that were close together. We got it pretty close so I took it home and used a big hammer & the vise to get it closer. Then I took the grinder to it, sanded, primed and painted it.
After it was dry I layed out the bolt pattern for the tank & mounting holes.
I'm pretty happy with the results.


You can see I added the manifold to the bottom of the tray with a quick coupling for hoses, etc. I've got to do some more with the manifold, but I'm waiting for parts.
Unfortunately, I had a setback. I noticed antifreeze on the garage floor this morning, and when I cleaned the engine bay I noticed a lot of steam for a long time, so I investigated and the plastic tanks on both sides of the radiator are leaking.
I started taking it apart and realized I needed a special tool to disconnect the condenser & ATM lines so I ordered that from Sears.

I think I�m going to buy a Silla All aluminum replacement. Anyone have any other thoughts?


I showed him my sketch and we both agreed the way the brake is set up it would be hard to bend some of the bends that were close together. We got it pretty close so I took it home and used a big hammer & the vise to get it closer. Then I took the grinder to it, sanded, primed and painted it.
After it was dry I layed out the bolt pattern for the tank & mounting holes.
I'm pretty happy with the results.
You can see I added the manifold to the bottom of the tray with a quick coupling for hoses, etc. I've got to do some more with the manifold, but I'm waiting for parts.
Unfortunately, I had a setback. I noticed antifreeze on the garage floor this morning, and when I cleaned the engine bay I noticed a lot of steam for a long time, so I investigated and the plastic tanks on both sides of the radiator are leaking.
I started taking it apart and realized I needed a special tool to disconnect the condenser & ATM lines so I ordered that from Sears.
I think I�m going to buy a Silla All aluminum replacement. Anyone have any other thoughts?
Thread Starter
Senior Member
Joined: Dec 2008
Posts: 532
Likes: 1
From: Leeds, Maine
Year: 1999
Model: Cherokee
Engine: 4.0
4/29/09: My box of fittings came from Discount Hydraulics:
Discount Hydraulic Hose.com
I can't say enough about them. Quick shipments, quality stuff & far below the prices I've seen locally.
So I decided to do all the plumbing. The previous pics were sort of a mock-up. I bought some yellow Teflon tape. It's rated for Gas so I figured it was better.

I used the push-in tube fittings which are nice. I hope they hold under pressure.
I mounted a liquid filled gauge on the manifold.(vibrations don't affect it as much)

Here you can see from left to right the quick coupling for the air lines, the pressure gauge, the air line run to the front bumper with a quick coupling, the next fitting is to the rear ARB solenoid which in the future I'll add a tee & front ARB solenoid, and last the line to the gauge in the console.

I also added a brace from the pump mount to the tray for the tank, this really stiffened things up:

This is how I ran the lines to the rear locker & the front bumper coupling. When the time comes, I'll add a 3rd line to the front ARB.

So the only thing left is the wiring of the relays, solenoid & pressure switch.

Comments, advice are more than welcome!
Discount Hydraulic Hose.com
I can't say enough about them. Quick shipments, quality stuff & far below the prices I've seen locally.
So I decided to do all the plumbing. The previous pics were sort of a mock-up. I bought some yellow Teflon tape. It's rated for Gas so I figured it was better.
I used the push-in tube fittings which are nice. I hope they hold under pressure.
I mounted a liquid filled gauge on the manifold.(vibrations don't affect it as much)
Here you can see from left to right the quick coupling for the air lines, the pressure gauge, the air line run to the front bumper with a quick coupling, the next fitting is to the rear ARB solenoid which in the future I'll add a tee & front ARB solenoid, and last the line to the gauge in the console.
I also added a brace from the pump mount to the tray for the tank, this really stiffened things up:
This is how I ran the lines to the rear locker & the front bumper coupling. When the time comes, I'll add a 3rd line to the front ARB.
So the only thing left is the wiring of the relays, solenoid & pressure switch.
Comments, advice are more than welcome!
Thread Starter
Senior Member
Joined: Dec 2008
Posts: 532
Likes: 1
From: Leeds, Maine
Year: 1999
Model: Cherokee
Engine: 4.0
5/10/09: I was planning on finishing the wiring on the OBA today, but got a bit sidetracked. My Z24 decided the pass side CV shaft was done, so I pulled that apart & couldn't find one, so I ordered it from NAPA.
When I got up this morning there was a box sitting on the porch with the new radiator. I was impressed with Radiator Barn. I ordered it Thursday night, and it was here Sat. So I decided to work on that. It's a 3 core HD all metal CSF.


Here�s the old one. You can see where it was leaking around the plastic tanks on each end.

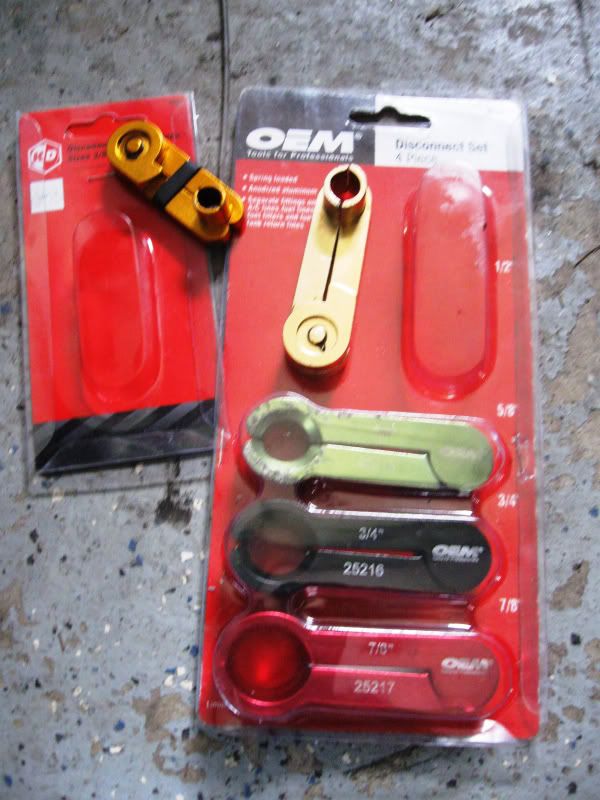
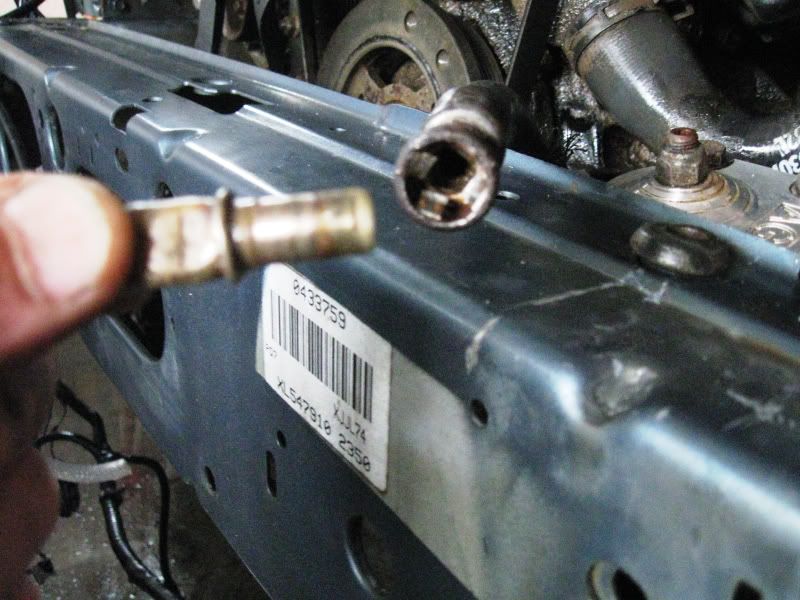
Some of these fittings for the AC condensor & ATM cooler lines are a PITA, but I bought a set of fuel line tools & finally got things apart.

Here's how they work:
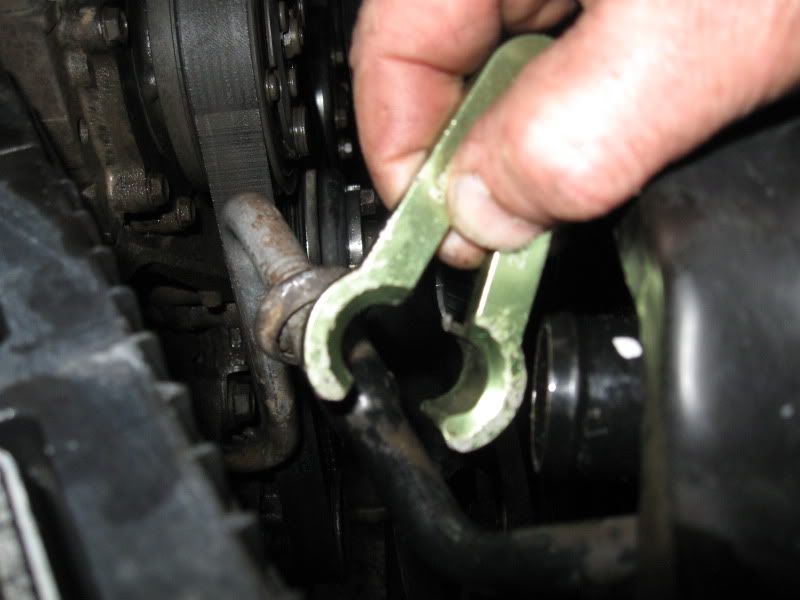
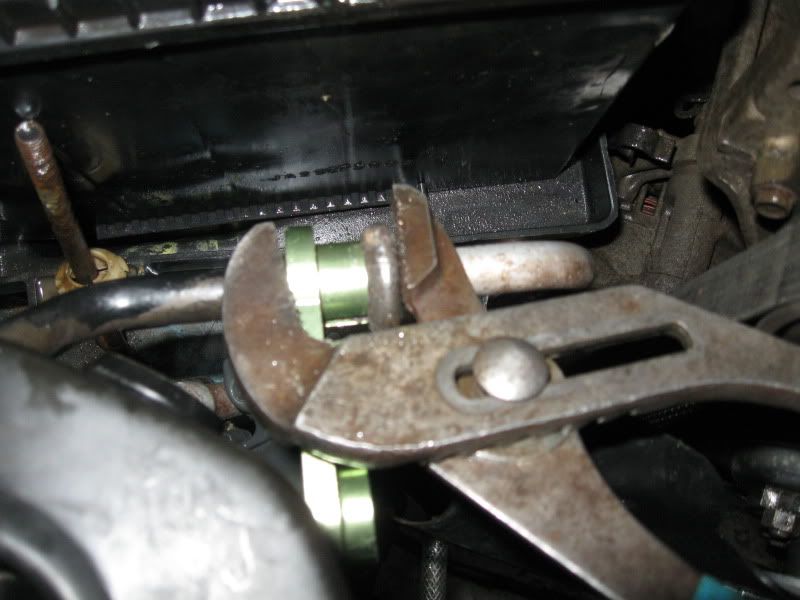
I found that I had to squeeze the tool with Channelocks to get the fittings to release:
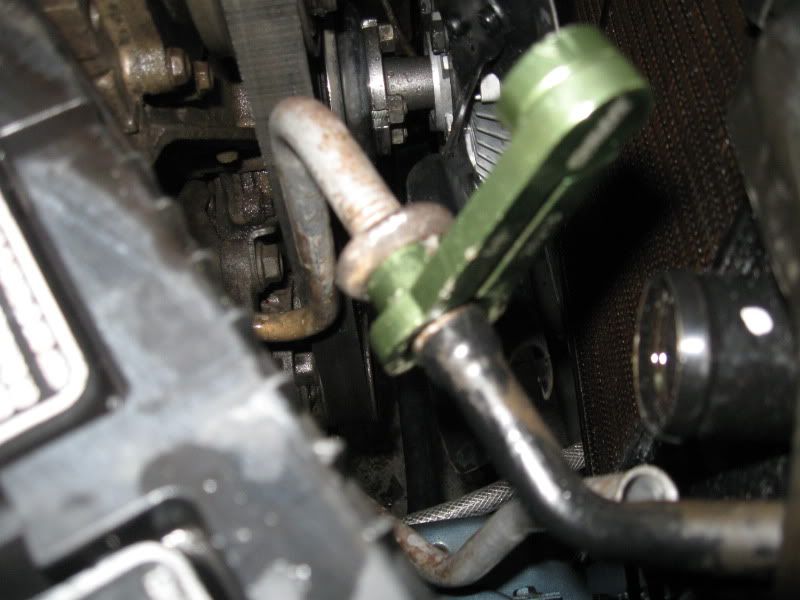
This is the one I had the hardest time with; it�s at the bottom of the radiator for the ATM cooler lines.
I ended up cutting the line coming out of the radiator & making my own tool out of some aluminum tubing to depress the spring clip inside.

Once I got that piece out, the new one wouldn�t go back in. After some inspection, I sanded the paint off the new piece, took a 3/8 drill bit and ran it in & out of the fitting to clean out the crap in there. It was still tough getting it back together, but I ended up tapping it with Channelocks to get it to seat. After struggling with it, I decided to take the clip out & slide it on the radiator end. That worked a lot better.


Here�s the new radiator with the fan etc bolted back on.

Here it is all ready for the antifreeze I forgot to buy. DOH.

I did get a little more done on the wiring too. Mounted the ARB switch in the console. I added an aux fuse block for acccessories. Nice little unit I got from Arlington Products on Ebay. They were fast & good to deal with & have a lot of electrical stuff.


Also hooked up the bulkhead fitting on the rearend & replaced the 1/4" line with a 3/8" line to the front bumper area for air tools, etc.

Also cleaned up & painted my steelies & bought some cheap stock size tires for inspection time. I'm probably going to have a couple of 31's for sale. I have 4, but 2 are worn on the inside. The other 2 have good tread. They're Goodyear RTS, if anyone is interested.
When I got up this morning there was a box sitting on the porch with the new radiator. I was impressed with Radiator Barn. I ordered it Thursday night, and it was here Sat. So I decided to work on that. It's a 3 core HD all metal CSF.
Here�s the old one. You can see where it was leaking around the plastic tanks on each end.
Some of these fittings for the AC condensor & ATM cooler lines are a PITA, but I bought a set of fuel line tools & finally got things apart.
Here's how they work:
I found that I had to squeeze the tool with Channelocks to get the fittings to release:
This is the one I had the hardest time with; it�s at the bottom of the radiator for the ATM cooler lines.
I ended up cutting the line coming out of the radiator & making my own tool out of some aluminum tubing to depress the spring clip inside.
Once I got that piece out, the new one wouldn�t go back in. After some inspection, I sanded the paint off the new piece, took a 3/8 drill bit and ran it in & out of the fitting to clean out the crap in there. It was still tough getting it back together, but I ended up tapping it with Channelocks to get it to seat. After struggling with it, I decided to take the clip out & slide it on the radiator end. That worked a lot better.
Here�s the new radiator with the fan etc bolted back on.
Here it is all ready for the antifreeze I forgot to buy. DOH.
I did get a little more done on the wiring too. Mounted the ARB switch in the console. I added an aux fuse block for acccessories. Nice little unit I got from Arlington Products on Ebay. They were fast & good to deal with & have a lot of electrical stuff.
Also hooked up the bulkhead fitting on the rearend & replaced the 1/4" line with a 3/8" line to the front bumper area for air tools, etc.
Also cleaned up & painted my steelies & bought some cheap stock size tires for inspection time. I'm probably going to have a couple of 31's for sale. I have 4, but 2 are worn on the inside. The other 2 have good tread. They're Goodyear RTS, if anyone is interested.
Thread Starter
Senior Member
Joined: Dec 2008
Posts: 532
Likes: 1
From: Leeds, Maine
Year: 1999
Model: Cherokee
Engine: 4.0
5/26/09: I got everything hooked up, wired up & operating correctly. It took a lot of time to get things right.
When I first started it, I had no air, so I suspected the check valve was in backwards. I took that apart & after some investigating found out that it was the Wilkerson filter/regulator that needed to be adjusted. You lift the **** on the top, turn it CCW, start the pump, & keep turning it CW until the pressure gets up to where you want it. I had a brass fitting that was cracked on the manifold & a push in fitting that was leaking.
I still have to do a soapy water test. I have a slight leak somewhere that only loses 10 psi over an 8 hour period, but I�ll find it; I don�t want it to leak at all.
I ran a 3/8� flexible hose that I got at Home Depot, good for 225psi. I ran that along where the fuel lines run until I got to the transmission. I decided to cross over to the pass side & run along the frame rail. I have a quick coupling that I�ll put on the bumper when I get it.
So here�s the finished product:


I was pretty happy with the Pressure switch wiring. I ran everything under the molding along the door sill & used wire loom as much as I could.
Here�s how I did the solenoid which is ty-wrapped onto the tray. I used the mounting bolts for my grounds, so all electrical points were in the same area. There�s grounds for the compressor, pressure switch, & solenoid.

The wiring for the illumination of the ARB switch & gauge was pretty easy. I bought some good quality Scotch locks & tapped into the hots for the console lights. I also used the hot for the cigarette lighter in the same area for the switch feed for the compressor.


This is the spot I chose for the switches I installed. Top one is for future, 2nd one down is the compressor which needs the key on to operate, and the bottom one is for the KC driving lights. I wired these off of the aux fuse block so they are available all the time, not just with high beams. I�ve got to say they (KC) do an excellent job with the harness. I slapped it in in no time, & everything fit very well.

Here�s where I mounted the relay for the lights, right behind the stock fuse block. The harness was the perfect length & ran with the other wiring for the compressor & ARB. Very simple install.


The only thing I didn�t like is the fork terminals. Ring terminals are much better. See what happens with these when you tighten them? And they should be tight.

Here�s the wire loom harness I made & rang where the factory wiring is:

And this is where I entered the cab, there�s a spot next to the brake booster that�s an 1 �� plug & is perfect to get wiring through. I ran wiring to the back pump along the trim by the door sills, & it was easy to get to the switches:


And when it was finished I stuffed some foam insulation around the wiring

BTW, that is an 1 �� romex connector. I am an electrician you know. LOL
I did get a new header panel from carpartswholesale.com along with a fan shroud & HL door for $122 shipped. I didn�t think that was bad. The header is not a perfect fit but I can make it work for the price.

You can see in this picture that it�s lower than the hood. I had to use a rasp to get it to fit the contour of the hood & fenders. I can ream a few holes & pull it up to hood level. It�s a trail rig for God�s sake.

That�s about it so far. I�m going to concentrate on getting it painted now, which will be a big step in the right direction. I�m close but need to go over it one more time & prep it.
I�ve been trying to save the battery, but have come to the conclusion that an Optima yellow top is in my future. Anyone tried the Exide Orbital?
When I first started it, I had no air, so I suspected the check valve was in backwards. I took that apart & after some investigating found out that it was the Wilkerson filter/regulator that needed to be adjusted. You lift the **** on the top, turn it CCW, start the pump, & keep turning it CW until the pressure gets up to where you want it. I had a brass fitting that was cracked on the manifold & a push in fitting that was leaking.
I still have to do a soapy water test. I have a slight leak somewhere that only loses 10 psi over an 8 hour period, but I�ll find it; I don�t want it to leak at all.
I ran a 3/8� flexible hose that I got at Home Depot, good for 225psi. I ran that along where the fuel lines run until I got to the transmission. I decided to cross over to the pass side & run along the frame rail. I have a quick coupling that I�ll put on the bumper when I get it.
So here�s the finished product:
I was pretty happy with the Pressure switch wiring. I ran everything under the molding along the door sill & used wire loom as much as I could.
Here�s how I did the solenoid which is ty-wrapped onto the tray. I used the mounting bolts for my grounds, so all electrical points were in the same area. There�s grounds for the compressor, pressure switch, & solenoid.
The wiring for the illumination of the ARB switch & gauge was pretty easy. I bought some good quality Scotch locks & tapped into the hots for the console lights. I also used the hot for the cigarette lighter in the same area for the switch feed for the compressor.
This is the spot I chose for the switches I installed. Top one is for future, 2nd one down is the compressor which needs the key on to operate, and the bottom one is for the KC driving lights. I wired these off of the aux fuse block so they are available all the time, not just with high beams. I�ve got to say they (KC) do an excellent job with the harness. I slapped it in in no time, & everything fit very well.
Here�s where I mounted the relay for the lights, right behind the stock fuse block. The harness was the perfect length & ran with the other wiring for the compressor & ARB. Very simple install.
The only thing I didn�t like is the fork terminals. Ring terminals are much better. See what happens with these when you tighten them? And they should be tight.
Here�s the wire loom harness I made & rang where the factory wiring is:
And this is where I entered the cab, there�s a spot next to the brake booster that�s an 1 �� plug & is perfect to get wiring through. I ran wiring to the back pump along the trim by the door sills, & it was easy to get to the switches:
And when it was finished I stuffed some foam insulation around the wiring
BTW, that is an 1 �� romex connector. I am an electrician you know. LOL
I did get a new header panel from carpartswholesale.com along with a fan shroud & HL door for $122 shipped. I didn�t think that was bad. The header is not a perfect fit but I can make it work for the price.
You can see in this picture that it�s lower than the hood. I had to use a rasp to get it to fit the contour of the hood & fenders. I can ream a few holes & pull it up to hood level. It�s a trail rig for God�s sake.
That�s about it so far. I�m going to concentrate on getting it painted now, which will be a big step in the right direction. I�m close but need to go over it one more time & prep it.
I�ve been trying to save the battery, but have come to the conclusion that an Optima yellow top is in my future. Anyone tried the Exide Orbital?

Thread Starter
Senior Member
Joined: Dec 2008
Posts: 532
Likes: 1
From: Leeds, Maine
Year: 1999
Model: Cherokee
Engine: 4.0
Thanks! I love it so far. I took it out in the driveway & then in the backyard to see how the locker worked. It's instant for locking & unlocking which is nice. I was afraid the pump would be really loud, but it isn't bad & doesn't come on when using the lockers until I get down to below 100psi.
Senior Member
Joined: Mar 2009
Posts: 671
Likes: 0
From: Telford PA
Year: 1997
Model: Grand Cherokee
Engine: 4.0L I6
Great job man! I really like the air tank that is well done. I am thinking about doing that to mine one day and i like how you have yours layed out. Keep it up! 

