
The Unnamed

Thread Starter
Senior Member
Joined: Nov 2010
Posts: 976
Likes: 5
From: Cloquet, MN
Year: 2000 Ltd.
Model: Cherokee
Engine: 4.0L I6
Picked up a couple goodies at the JY a few weeks ago. First was an OEM Subaru subwoofer/amp unit.
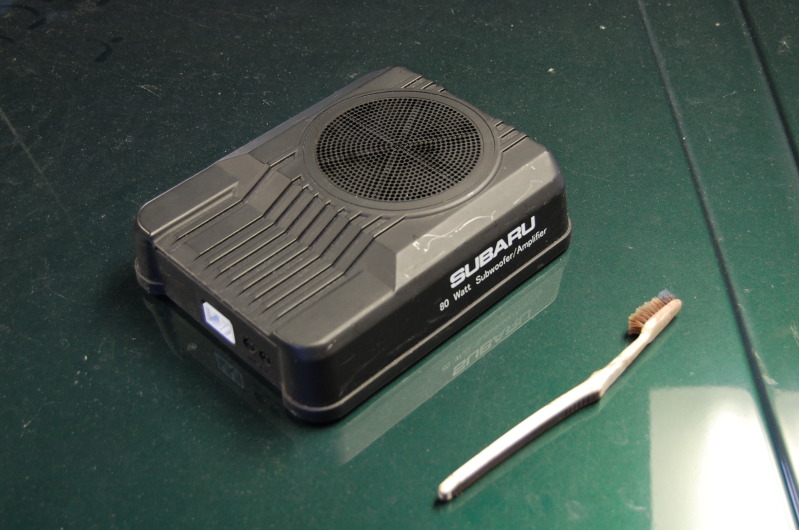
I put a tooth brush in the picture to show the size. It fits perfectly under the passenger seat (is under the driver seat in the Subarus). The great thing about it is that its super easy to hook up. It taps into the leads for the rear speakers and the 12V source and ground wires that plug in to the back of the radio. The thing won't rattle your teeth out by any means (didn't want that) but it makes the radio sound GREAT. Provides the bass that's really needed for good sounding music.
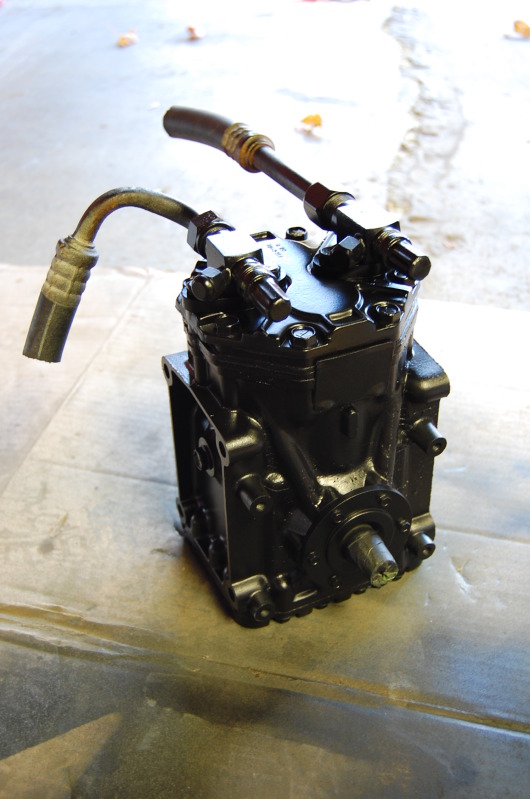
I also picked up a York 210 compressor out of an AMC Eagle. Seems to work when turned over so I brought it home and cleaned it up. Not sure how I want to hook it up or if I even will, but for $40 for both the sub and compressor I'm not complaining.
I put a tooth brush in the picture to show the size. It fits perfectly under the passenger seat (is under the driver seat in the Subarus). The great thing about it is that its super easy to hook up. It taps into the leads for the rear speakers and the 12V source and ground wires that plug in to the back of the radio. The thing won't rattle your teeth out by any means (didn't want that) but it makes the radio sound GREAT. Provides the bass that's really needed for good sounding music.
I also picked up a York 210 compressor out of an AMC Eagle. Seems to work when turned over so I brought it home and cleaned it up. Not sure how I want to hook it up or if I even will, but for $40 for both the sub and compressor I'm not complaining.
Last edited by Northwoods Snowman; Oct 9, 2012 at 04:07 PM.
Thread Starter
Senior Member
Joined: Nov 2010
Posts: 976
Likes: 5
From: Cloquet, MN
Year: 2000 Ltd.
Model: Cherokee
Engine: 4.0L I6
No pictures for this update, but I installed a Durango gear box. Made a steel spacer to replace the aluminum OEM unit out of 1/4 steel and 3/4 spacers welded to it. I've only driven it around the block but so far it seems to have loosened up the steering wheel a bit more to where it should be (was stiff from tightening up old gear box to take out slop). It doesn't seem to have taken out the play at center in the steering wheel (noticed the original unit I pulled out didn't have any play once I got it out) so I'll have to drive it on the highway to see how it responds. I also am going to have to trim the ends of the drag link adjustment because I bottomed it out and the wheel is still 45 degrees to the right, lol.
Took for ever to find a Durango or a Dakota that I could get the gear box out of. The one I got had 136,000 miles but it seemed every other I could check the mileage on was over 200,000, and the ones I couldn't check (no key) had WAY too much play in them just from turning the steering shaft a little.
Took for ever to find a Durango or a Dakota that I could get the gear box out of. The one I got had 136,000 miles but it seemed every other I could check the mileage on was over 200,000, and the ones I couldn't check (no key) had WAY too much play in them just from turning the steering shaft a little.
Thread Starter
Senior Member
Joined: Nov 2010
Posts: 976
Likes: 5
From: Cloquet, MN
Year: 2000 Ltd.
Model: Cherokee
Engine: 4.0L I6
An update on the Durango steering gear: I changed the sector shaft/pitman shaft bearing and it helped a little with the lateral play, but not much. I talked with Matt at West Texas Off-Road about getting the bearing for it and he said it was just a BH2020 and suggested I just get one locally at a bearing supplier. That's what I did; ran about $7 and change. He said that is the fatal flaw of those gear boxes; everyone likes them as an "upgrade" since they're larger, but they don't support the sector shaft properly and can have what he guessed .020" play laterally (he's never actually measured it). I verified that with my new bearing. Wish I would have know that before spending half the day scrounging the JY and pulling the box.
My main goal was to remove the play in the play in the steering wheel so that was a bust. I'll leave the box in however because I only spent $40 on it and the steering is much lighter than with my original box that I had adjusted up, so it's at least some improvement. Right now it's not worth spending over $100 or $200 to really try and tighten up the steering with a rebuilt unit (auto parts unit or professionally done unit).
Thread Starter
Senior Member
Joined: Nov 2010
Posts: 976
Likes: 5
From: Cloquet, MN
Year: 2000 Ltd.
Model: Cherokee
Engine: 4.0L I6
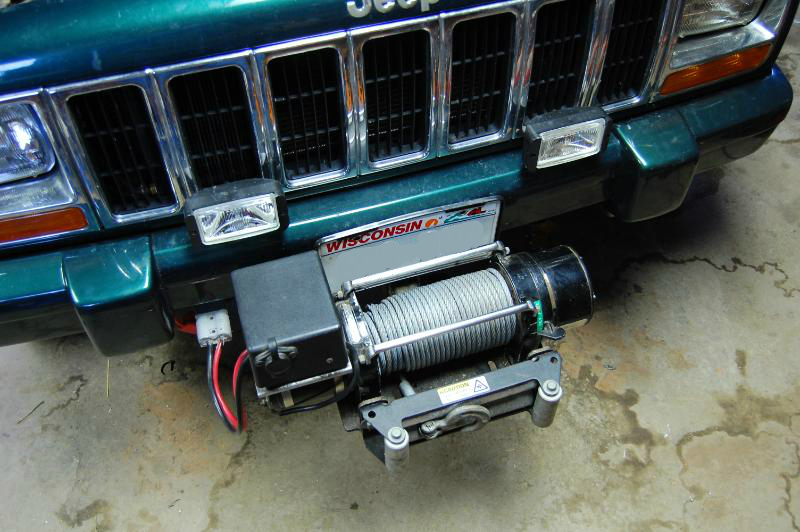
Alright, I got some updates! Been busy the last few weeks, but I got a winch! Found an older Ramsey REP8000 that came on a hitch cradle and included another tree strap on craigslist. I can either run this cradle (hidden hitch) or I can use the Warn cradle that I already had. I'll sell which ever I decide not to use. This is one of the ones that only draws 280 Amps at full load. Not super fast, but I like the lower current draw (especially) for rear winching. If I'm stuck, I'm not too particular about how fast I get unstuck!
So I have my front and rear hitches and now I have the winch. One problem though; I don't have any way to power the stupid thing. That's what most of this post is going to be about.... wiring up the winch.
A few things I should cover first. Most people just run the winch leads directly to the battery but I don't like that. I want to have some protection for the circuit. I wanted to put a fuse in line somewhere so that if one of the wires were to chafe through and short (or if I got in an accident and crushed a cable) I would not set my rig on fire. I also didn't want to have hot leads at both ends of the Jeep that would accelerate corrosion, and be a source for someone to steal my battery juice. The solution for this was a disconnect.
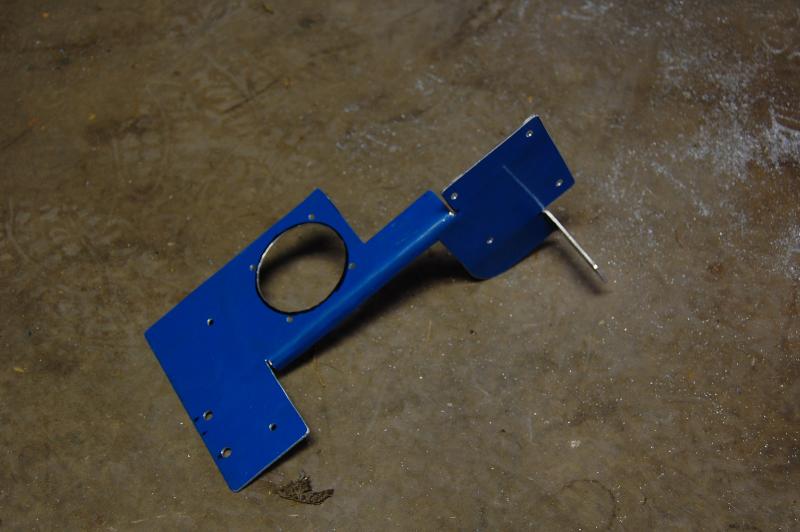
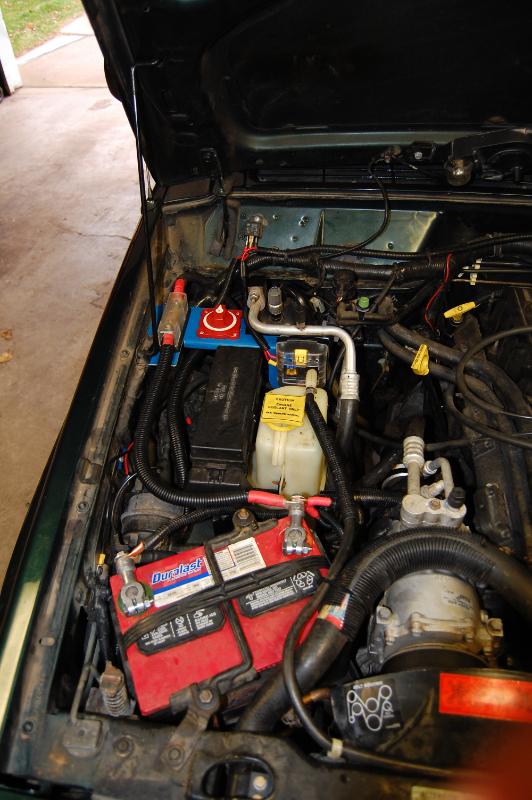
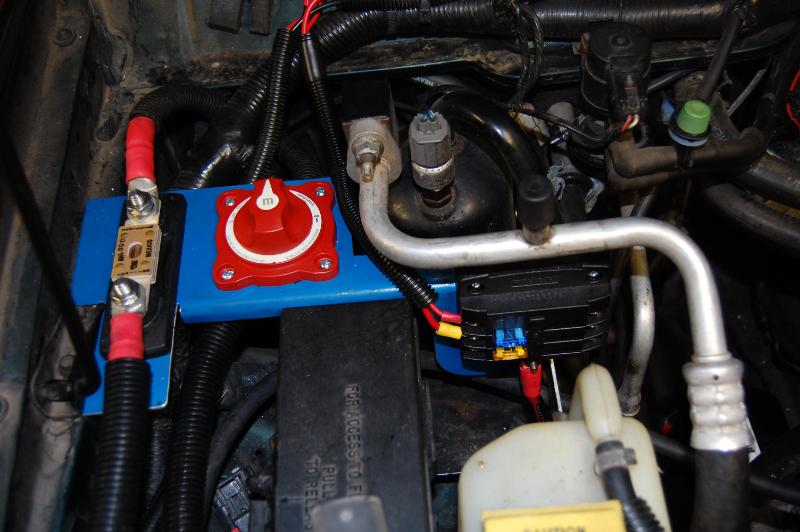
Now, I spent many hours researching and pondering how I wanted to accomplish my goals. I learned I have a totally awesome electronics distributor in town called Electronic Industries that is I guess the largest distributor for Blue Sea Systems in the country. I was able to source a an ANL fuse block rated at 300A (and fuse), a manual disconnect switch rated for 300A continuous, and while I was at it I picked up a 6 circuit distribution fuse block since the prices were far below even that of eBay. Then the problem was how the heck do I mount my new hardware???
The answer is by designing a custom mounting bracket! (It's blue because it was power coated aluminum that I used and I didn't feel like repainting it.)
Here it is with my new goodies installed on it...
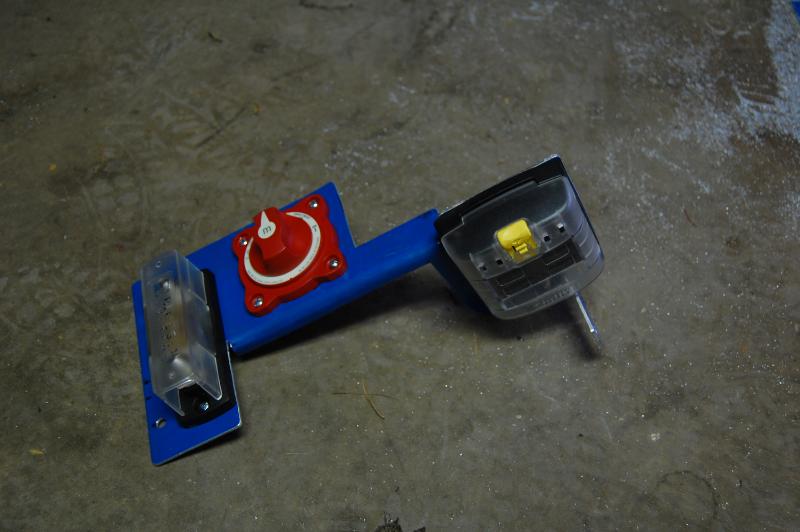
I wanted it fairly close to the battery so I could minimize the amount of 1/0 welding cable I had to use. I mounted the parts right next to the OEM fuse/relay block. The bracket attached to the hood support bolts and the rear bolt for the coolant bottle.
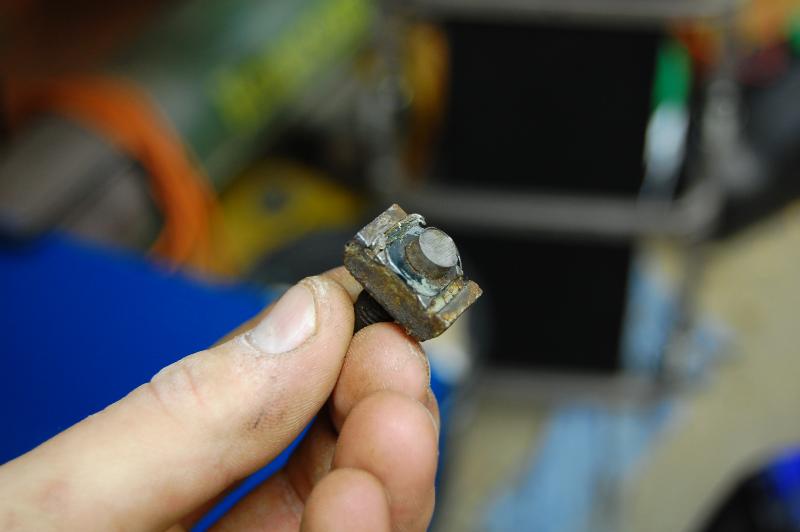
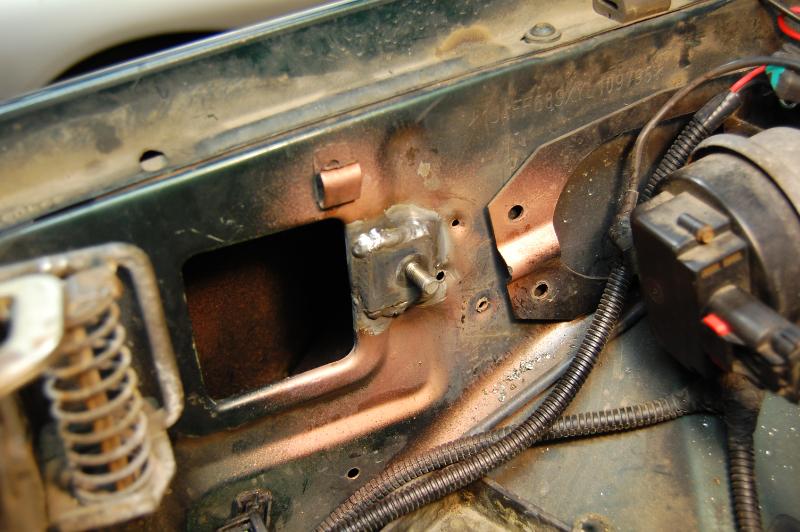
Now, when I learned how much 1/0 welding cable cost I about crapped my pants. This also REALLY made me not want to run two cables all the way to the back! So, I chose to use the chassis as the ground connection. Now, this can easily be done, but it has to be done RIGHT! First, the ground connection points have to be solid, and direct to the chassis. No attaching to bumpers, or hitches etc. I started with the ground in the engine compartment. As luck would have it (and it didn't matter anyway as I was going to upgrade it) the stock ground bolt next to the battery was seized up. The little welded tab on the back side of the sheet metal broke away and started to spin resulting in me cutting off the bolt. Here's what broke off...
For my ground I welded a piece of 3/16 steel to the body with a bolt run through it and welded on the back side. After welding the loose paint was cleaned off the back side and the entire back was sealed up with body seam sealer.
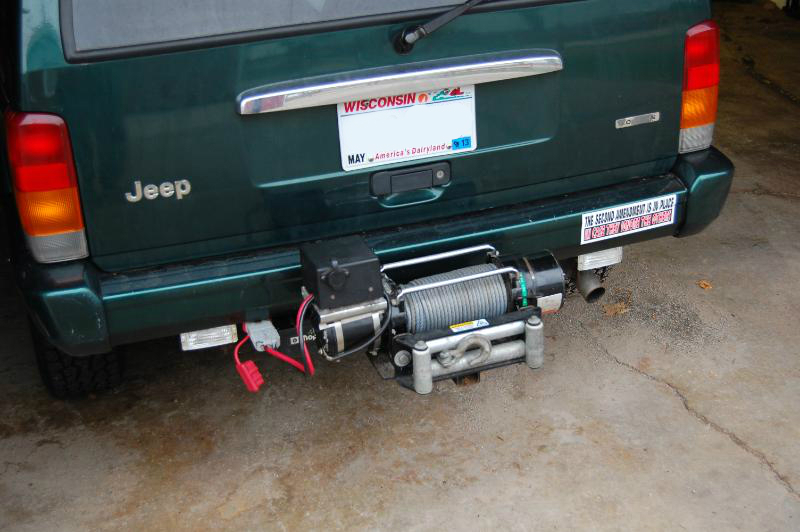
I did a similar setup on the rear where I welded a plate to the body in the center behind the bumper.
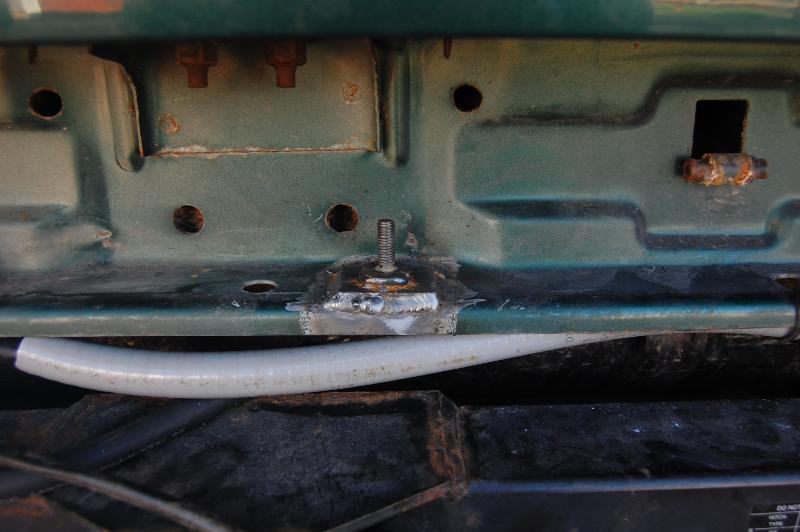
The advantage of welding these plates on is that is distributes the current out over more sheet metal and reduces the current load at the stud. It also gives a 100% solid connection that can't corrode (more on this later).
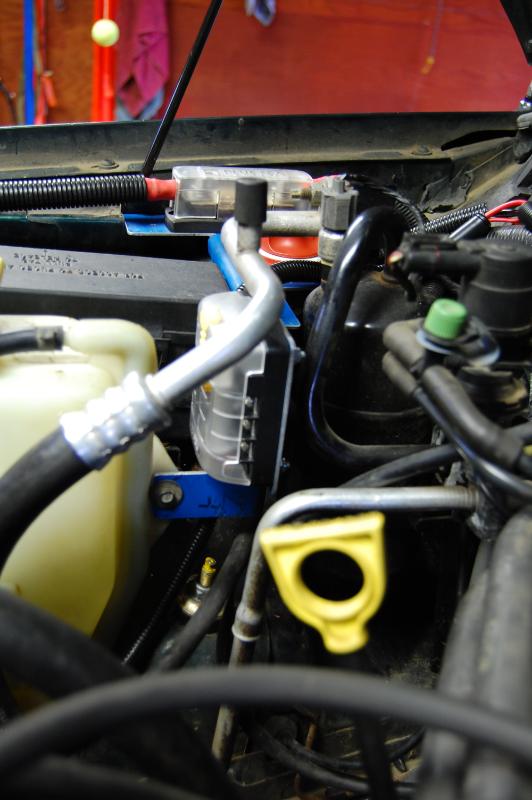
I also had fun deciding how the heck to route the cable back to the rear of the Jeep. There are a few formidable obstacles for this. The main thing is that I wanted the cable protected. This meant not running it outside of the frame rails. I also had to stay away from the exhaust (muffler specifically) so that made running down the inboard side of the passenger frame rail a bad idea. I also didn't want up to 300A in the passenger compartment, not did I want that kind of current running next to my fuel lines! See the problem yet? Well, the guy I bought the winch from said he ran his cables inside the passenger side frame rail. This is what I ended up doing, with some modification of course. I also wanted to protect the cable more than what you get with the black split loom you typically see in automotive. The solution was non-metallic water tight flexible conduit. I picked some up at Menards. At the engine bay I attached it to the bracket that holds the A/C dryer(?) with a 1/2" rigid conduit clamp.
Then I routed it down past the lower control arm mount.
And then down along the frame rail until right before the transmission cross member. There are two holes here and I elongated the top one to fit the conduit. I attached the conduit to the frame rail with another clamp to keep it tight to the body and out of harms way with the suspension and engine.
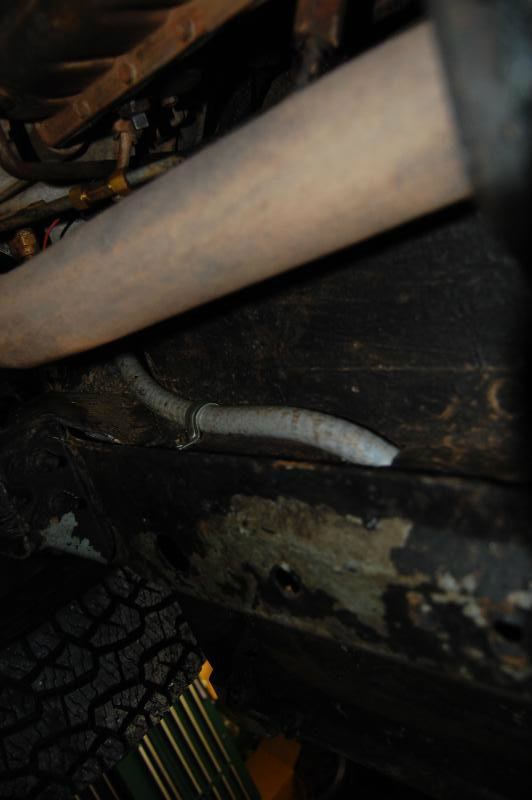
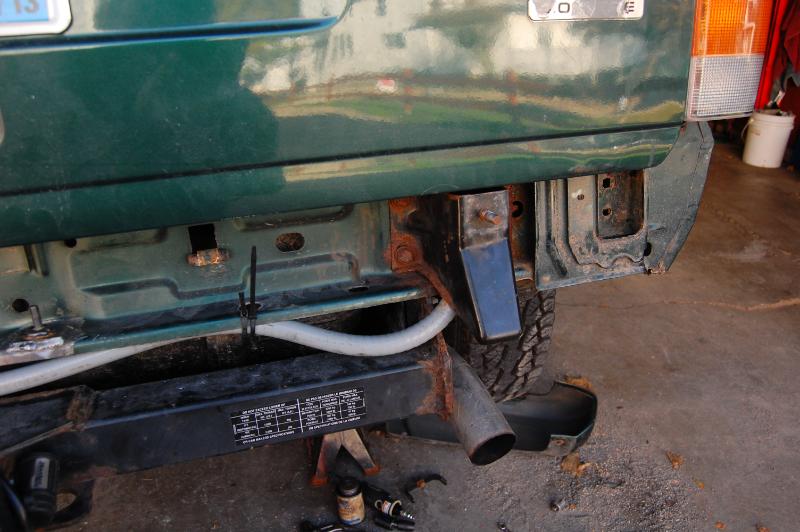
I ran the conduit all the way back and out behind the bumper mounts. I had to open the hole up to fit the conduit here too. Then I ran it across to the drive side where I mounted my plug to an angle bracket I made and attached to the hitch wiring plug guard.
It's hard to see in the second picture, but after bolting the negative cable to the ground point I completely sealed the entire connection and steel plate with black RTV to keep the elements out. I learned this from my experience building military trucks.
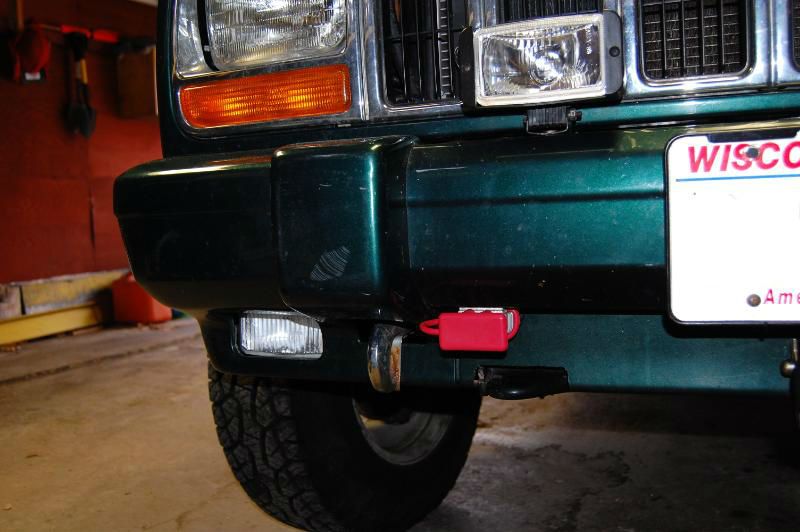
For the front I mounted the plug on the bottom side of the bumper. I was able to feed the cables over the hitch and then up to the battery. Sorry, no detailed pics on this, just this one.
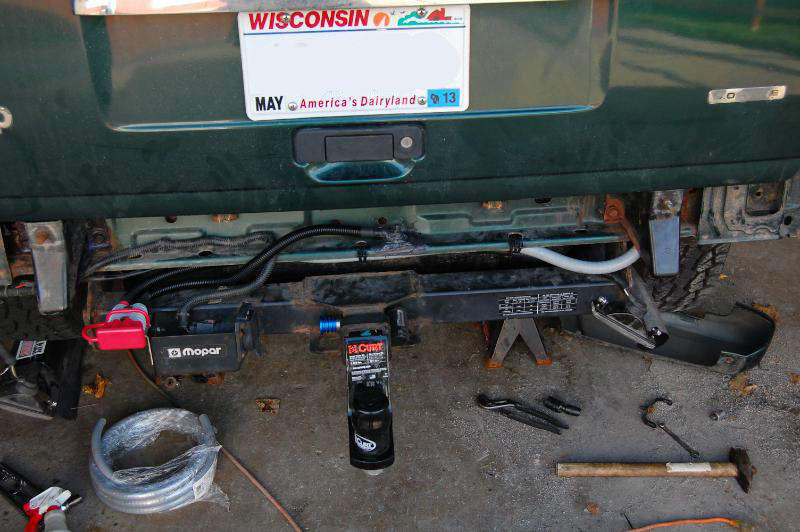
You can't really see it in the engine bay picture further up, but I'll explain how I set up my cables for the battery. The front winch negative cable bolts to the ground stud I welded in, and a 1/0 cable runs to the battery from there. On the positive side, I upgraded the starter cable to 1/0 since I had the cable and the end of the OEM cable was corroded. I ran a 1/0 cable from the positive post to the fuse, and then from the fuse to the input side of the disconnect switch. The output side of the switch has one cable that runs to the front and one to the back. This way I shut off both plugs when I don't need them, and my fuse protects the entire circuit including disconnect switch.
I also used a chunk of the OEM starter cable to run from the positive post of the battery to my accessory fuse block. I only have my driving lights and roof lights to hook up to the fuse block right now.
Here's the final product.
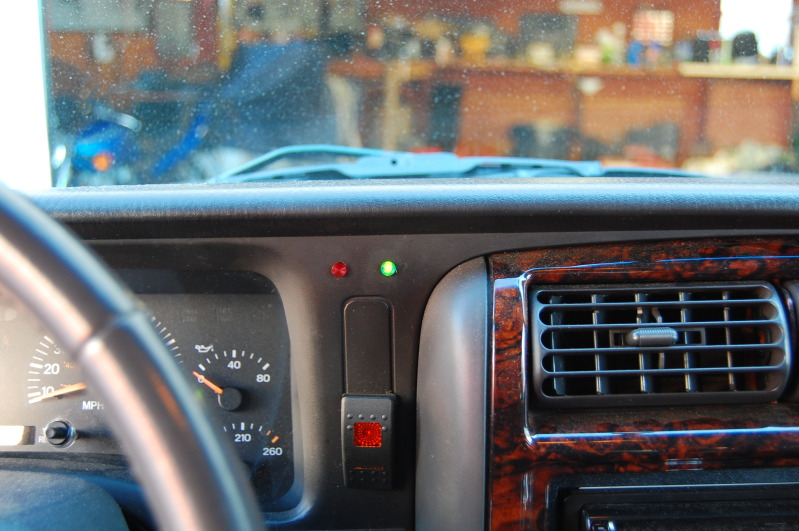
A few other notes to add. I used all black cable but used red and black adhesive backed shrink tube to color code positive and negative cables. I also RTV'ed the front ground post the same as the rear to seal it. The ends of the conduit are also RTV'ed to keep moisture from collecting between the conduit and cable. The install is complete except I want to add an indicator light to the dash to tell me when the circuit is energized. I added a red LED above my high idle switch to tell me when the roof lights were on so I don't accidentally turn them on and melt my covers.
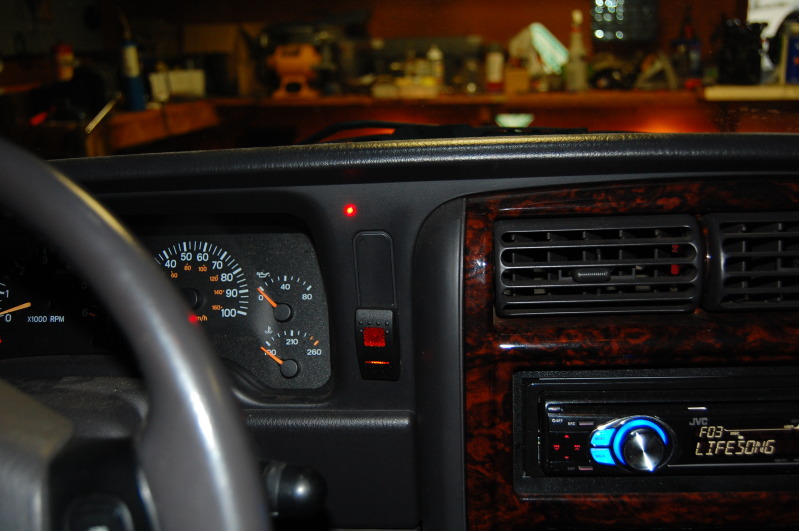
I want to put a green LED next to it for the winch circuit. With the disconnect being manual I have to make sure I turn it on BEFORE I get stuck. I don't want to bury the front end in a mud hole only to have to pop the hood, crawl around to the passenger side and turn on the power to the winch hooked up in the rear! This way I will be able to tell if the circuit is turned off before getting stuck, or be able to tell if I forget to turn it off after wheeling. I have the LED, but I want to get a bulkhead plug to start running my wires through the firewall instead of having to use grommets and running a solid wires everywhere. I've maxed out the hood latch grommet.
Another goodie I picked up at the JY is a hood light from a late 80's/early 90's Chevy truck. This guy has an ON/OFF switch, but the light is on an 18' (yes, that's 18 feet) retractable cord. This will be nice when I'm working on the rig and have the hood up since it won't run down the battery, but I can also take the light anywhere around the vehicle to work on something in the dark if I have to.
So I have my front and rear hitches and now I have the winch. One problem though; I don't have any way to power the stupid thing.
That's what most of this post is going to be about.... wiring up the winch.A few things I should cover first. Most people just run the winch leads directly to the battery but I don't like that. I want to have some protection for the circuit. I wanted to put a fuse in line somewhere so that if one of the wires were to chafe through and short (or if I got in an accident and crushed a cable) I would not set my rig on fire.
I also didn't want to have hot leads at both ends of the Jeep that would accelerate corrosion, and be a source for someone to steal my battery juice. The solution for this was a disconnect. Now, I spent many hours researching and pondering how I wanted to accomplish my goals. I learned I have a totally awesome electronics distributor in town called Electronic Industries that is I guess the largest distributor for Blue Sea Systems in the country. I was able to source a an ANL fuse block rated at 300A (and fuse), a manual disconnect switch rated for 300A continuous, and while I was at it I picked up a 6 circuit distribution fuse block since the prices were far below even that of eBay. Then the problem was how the heck do I mount my new hardware???
The answer is by designing a custom mounting bracket! (It's blue because it was power coated aluminum that I used and I didn't feel like repainting it.)
Here it is with my new goodies installed on it...
I wanted it fairly close to the battery so I could minimize the amount of 1/0 welding cable I had to use. I mounted the parts right next to the OEM fuse/relay block. The bracket attached to the hood support bolts and the rear bolt for the coolant bottle.
Now, when I learned how much 1/0 welding cable cost I about crapped my pants. This also REALLY made me not want to run two cables all the way to the back! So, I chose to use the chassis as the ground connection. Now, this can easily be done, but it has to be done RIGHT! First, the ground connection points have to be solid, and direct to the chassis. No attaching to bumpers, or hitches etc. I started with the ground in the engine compartment. As luck would have it (and it didn't matter anyway as I was going to upgrade it) the stock ground bolt next to the battery was seized up. The little welded tab on the back side of the sheet metal broke away and started to spin resulting in me cutting off the bolt. Here's what broke off...
For my ground I welded a piece of 3/16 steel to the body with a bolt run through it and welded on the back side. After welding the loose paint was cleaned off the back side and the entire back was sealed up with body seam sealer.
I did a similar setup on the rear where I welded a plate to the body in the center behind the bumper.
The advantage of welding these plates on is that is distributes the current out over more sheet metal and reduces the current load at the stud. It also gives a 100% solid connection that can't corrode (more on this later).
I also had fun deciding how the heck to route the cable back to the rear of the Jeep. There are a few formidable obstacles for this. The main thing is that I wanted the cable protected. This meant not running it outside of the frame rails. I also had to stay away from the exhaust (muffler specifically) so that made running down the inboard side of the passenger frame rail a bad idea. I also didn't want up to 300A in the passenger compartment, not did I want that kind of current running next to my fuel lines! See the problem yet? Well, the guy I bought the winch from said he ran his cables inside the passenger side frame rail. This is what I ended up doing, with some modification of course. I also wanted to protect the cable more than what you get with the black split loom you typically see in automotive. The solution was non-metallic water tight flexible conduit. I picked some up at Menards. At the engine bay I attached it to the bracket that holds the A/C dryer(?) with a 1/2" rigid conduit clamp.
Then I routed it down past the lower control arm mount.
And then down along the frame rail until right before the transmission cross member. There are two holes here and I elongated the top one to fit the conduit. I attached the conduit to the frame rail with another clamp to keep it tight to the body and out of harms way with the suspension and engine.
I ran the conduit all the way back and out behind the bumper mounts. I had to open the hole up to fit the conduit here too. Then I ran it across to the drive side where I mounted my plug to an angle bracket I made and attached to the hitch wiring plug guard.
It's hard to see in the second picture, but after bolting the negative cable to the ground point I completely sealed the entire connection and steel plate with black RTV to keep the elements out. I learned this from my experience building military trucks.
For the front I mounted the plug on the bottom side of the bumper. I was able to feed the cables over the hitch and then up to the battery. Sorry, no detailed pics on this, just this one.
You can't really see it in the engine bay picture further up, but I'll explain how I set up my cables for the battery. The front winch negative cable bolts to the ground stud I welded in, and a 1/0 cable runs to the battery from there. On the positive side, I upgraded the starter cable to 1/0 since I had the cable and the end of the OEM cable was corroded. I ran a 1/0 cable from the positive post to the fuse, and then from the fuse to the input side of the disconnect switch. The output side of the switch has one cable that runs to the front and one to the back. This way I shut off both plugs when I don't need them, and my fuse protects the entire circuit including disconnect switch.
I also used a chunk of the OEM starter cable to run from the positive post of the battery to my accessory fuse block. I only have my driving lights and roof lights to hook up to the fuse block right now.
Here's the final product.
A few other notes to add. I used all black cable but used red and black adhesive backed shrink tube to color code positive and negative cables. I also RTV'ed the front ground post the same as the rear to seal it. The ends of the conduit are also RTV'ed to keep moisture from collecting between the conduit and cable. The install is complete except I want to add an indicator light to the dash to tell me when the circuit is energized. I added a red LED above my high idle switch to tell me when the roof lights were on so I don't accidentally turn them on and melt my covers.
I want to put a green LED next to it for the winch circuit. With the disconnect being manual I have to make sure I turn it on BEFORE I get stuck. I don't want to bury the front end in a mud hole only to have to pop the hood, crawl around to the passenger side and turn on the power to the winch hooked up in the rear! This way I will be able to tell if the circuit is turned off before getting stuck, or be able to tell if I forget to turn it off after wheeling. I have the LED, but I want to get a bulkhead plug to start running my wires through the firewall instead of having to use grommets and running a solid wires everywhere. I've maxed out the hood latch grommet.
Another goodie I picked up at the JY is a hood light from a late 80's/early 90's Chevy truck. This guy has an ON/OFF switch, but the light is on an 18' (yes, that's 18 feet) retractable cord. This will be nice when I'm working on the rig and have the hood up since it won't run down the battery, but I can also take the light anywhere around the vehicle to work on something in the dark if I have to.
Last edited by Northwoods Snowman; Dec 1, 2012 at 03:10 PM.
Thread Starter
Senior Member
Joined: Nov 2010
Posts: 976
Likes: 5
From: Cloquet, MN
Year: 2000 Ltd.
Model: Cherokee
Engine: 4.0L I6
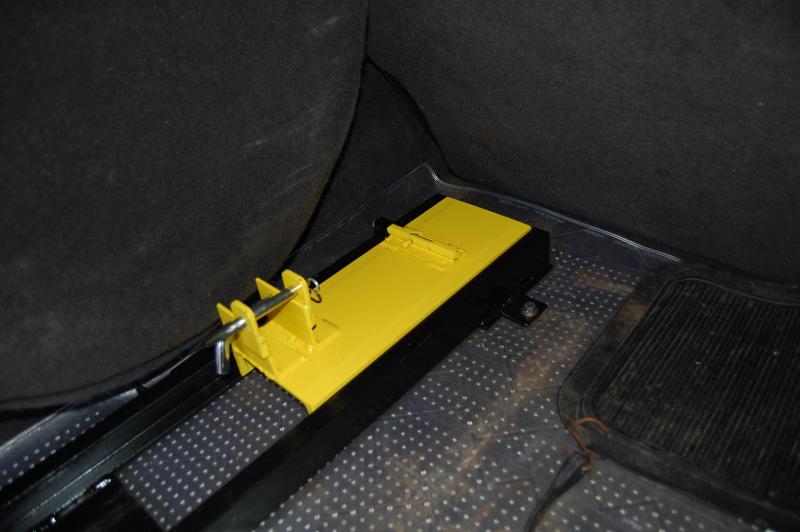
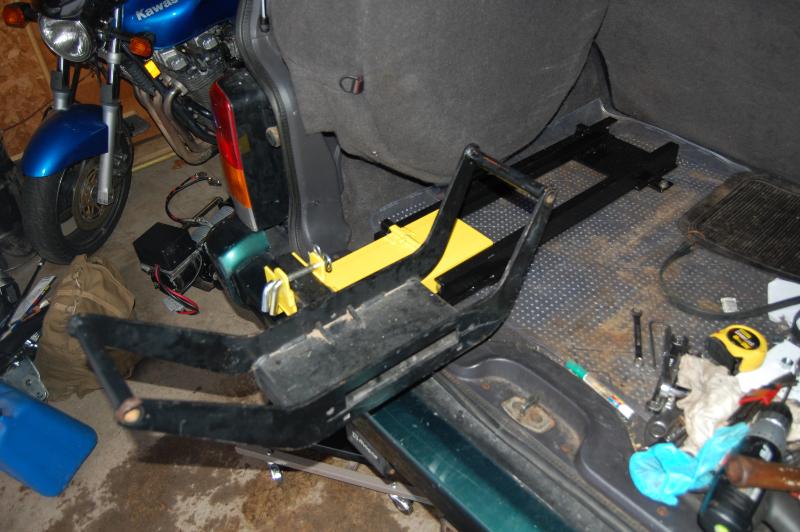
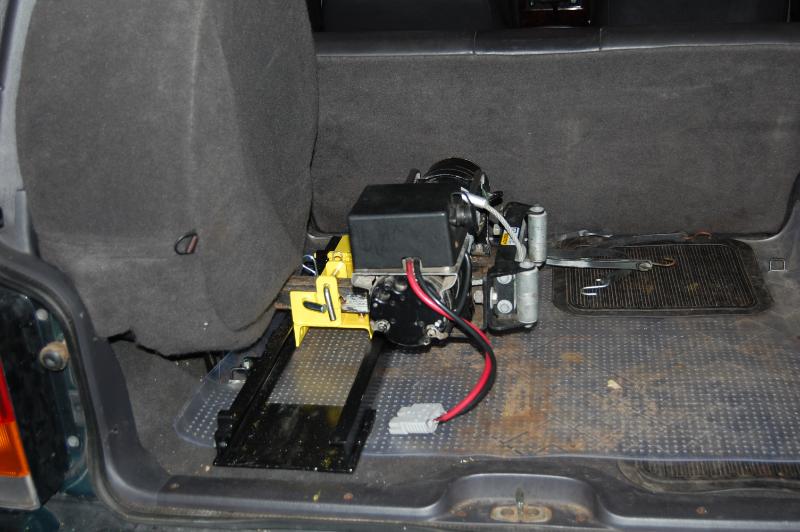
Now that I have a winch I wanted some way to bolt it down in the back of the Jeep when I'm not using it. Especially when off-road I don't want a 100# winch bouncing around loose in the back, and in the event of an accident I don't want it killing anyone. I had a few challenges in deciding how to mount it. My plan was to just make a "hitch" in the back that I could slide it into and pin it, but I'm planning to build a drawer system in the back too. After much head scratching I settled on mounting the winch longitudinally in the Jeep so I can bolt it directly to the body and put the drawer next to it. This was the best solution for keeping the most cargo space available but had two main issues. I couldn't just slide the winch into a hitch tube, and I didn't want to be bending over to fetch the winch out of the Jeep and throw my back out. It's not too bad when the Jeep in the garage, but when the front is sliding down an incline or something it makes it more of a pain (pun intended). My solution was to slide the winch out on a rail system.
Here's the base plate mounted down to the floor.
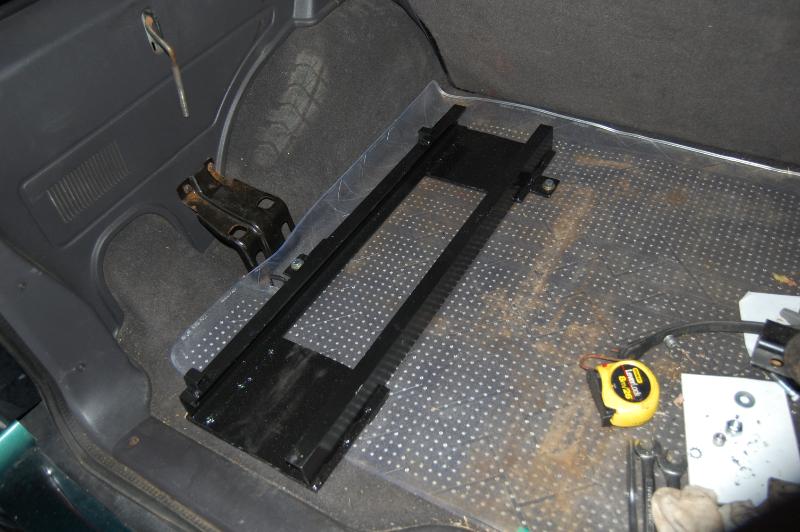
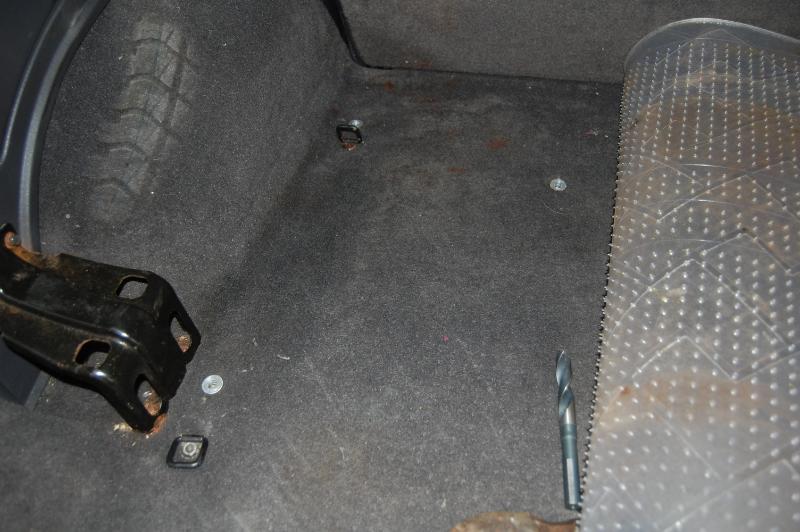
I put two bolts through the floor next to the wall and put a nutsert in the floor in the rear toward the inboard side. It goes through the floor directly above the brackets for the shocks. Two notes with this. 1) I had to cut spacers (can be seen in the picture below) to account for the approximately 1/2 inch of insulation under the carpet and 2) I had to put a heavy washer under the floor sheet metal to reinforce around the nutsert to keep it from pulling out. I tried to tighten it up without the spacers or the backing washer and it pulled out.
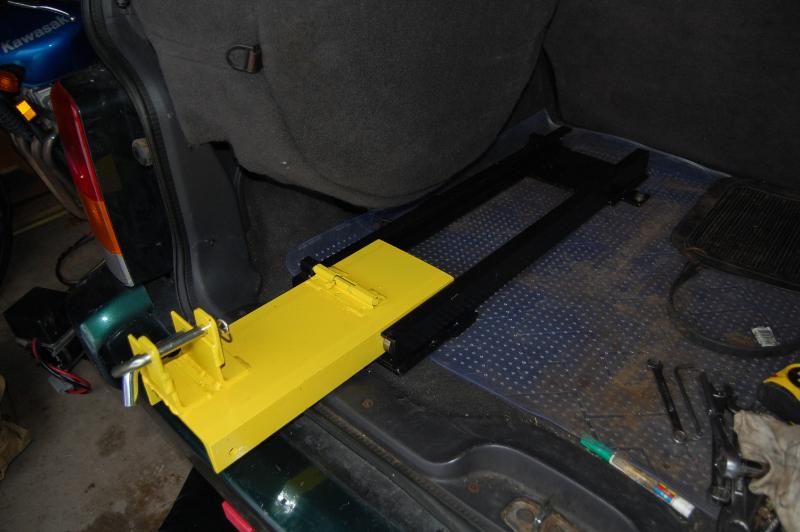
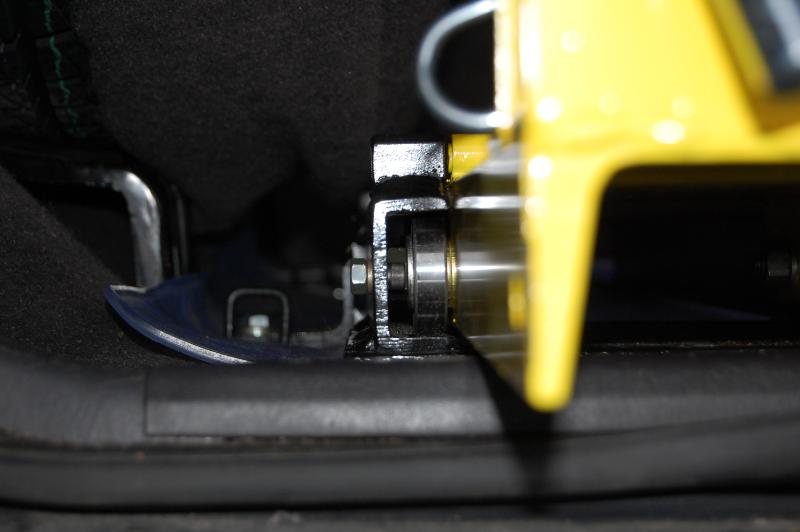
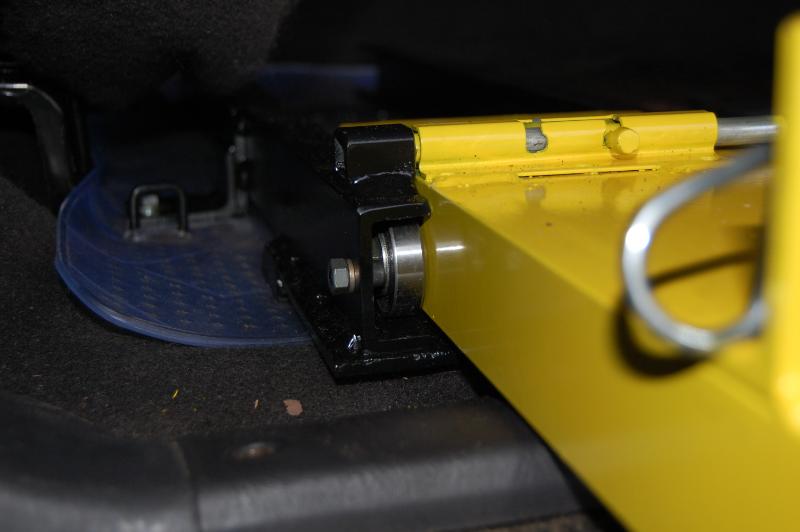
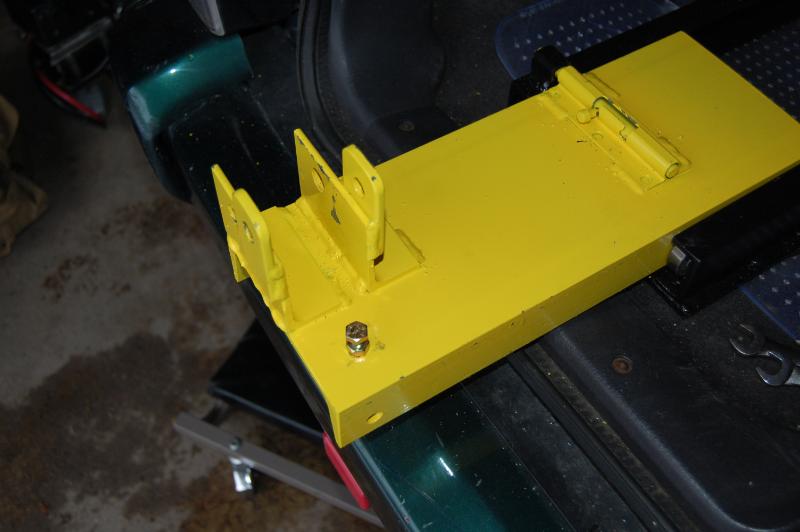
This is the carriage I built. I used 6" c-channel as the main plate and then welded on angle for the winch mount. This is designed so that the winch can be removed vertically instead of horizontally to allow the widest possible drawer in the future. The 5/8" pin goes through the hole in the winch cradle, and the 1/2" pin on top is what keep the winch from bouncing up.
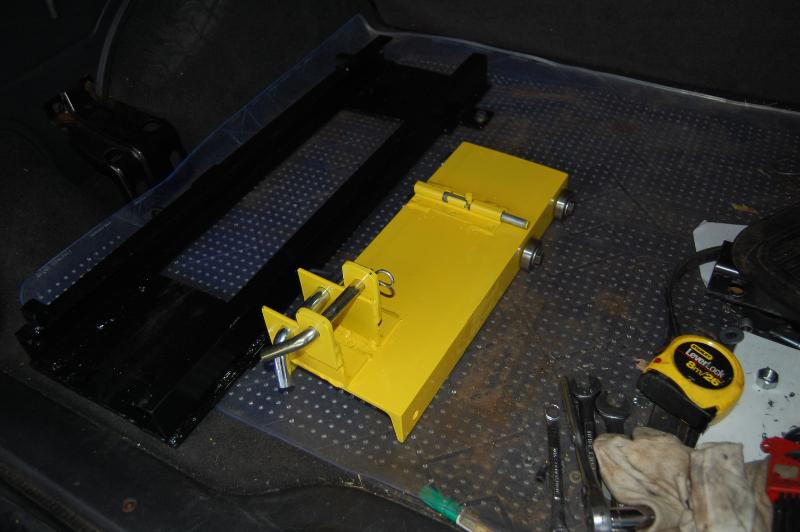

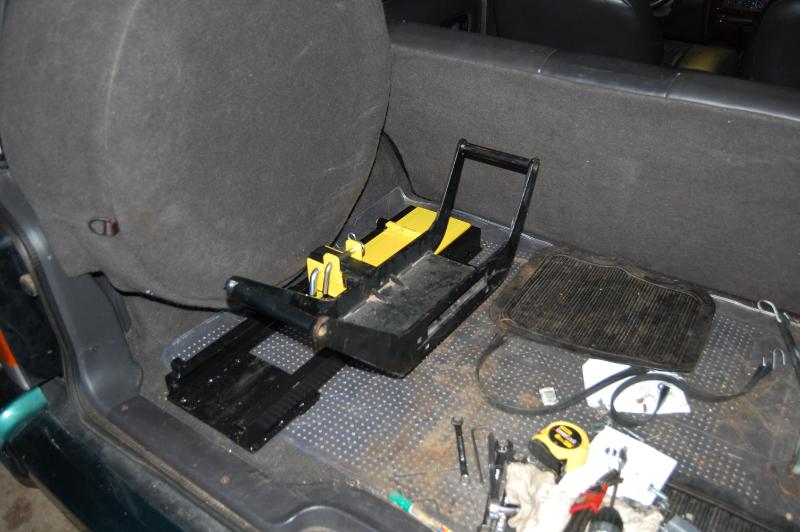
When stowed the carriage locks in place with the gate bolt.
Then when needed it is pulled out to the end and then locked in place to prevent it from rolling back into the Jeep when reloading the winch or when sitting on an incline.
There are hard stops on both ends of the rails to keep the carriage from coming all the way out or too far back into the Jeep.
I can simply remove the bolt when I'm not carrying the winch and the carriage will come right out and I can leave it in the garage. The rails are the only thing that will stay in the Jeep all the time.
Here's my Warn cradle mounted up to it. I'll eventually move to this cradle since it has the handles but I don't have a fairlead with 10" spacing. The Hidden Hitch cradle the winch is currently on has the 11" spacing.
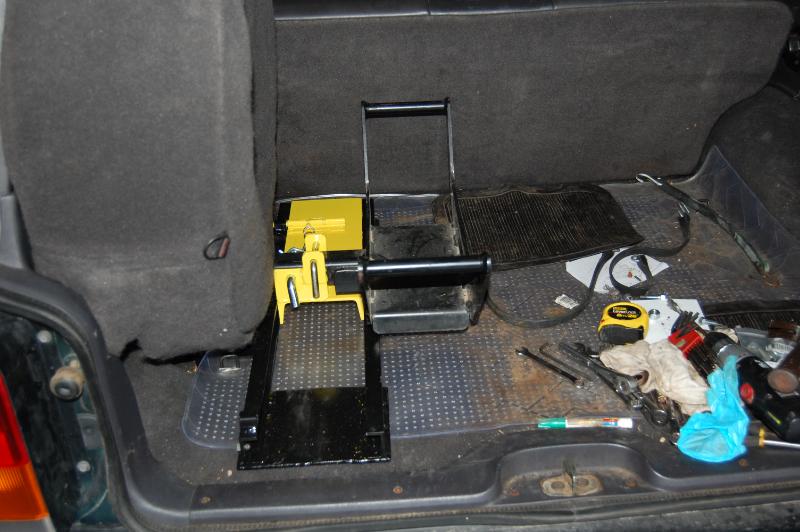
The way the Warn cradle is designed it rests flat on the carriage. My Hidden Hitch unit is different and required me to put this bolt in in order to keep the winch horizontal.
Here's the winch in place with the Hidden Hitch cradle. The only thing I need to do it cut about an inch off the cradle to clear the spare tire since it's longer than the Warn unit.

Here's the base plate mounted down to the floor.
I put two bolts through the floor next to the wall and put a nutsert in the floor in the rear toward the inboard side. It goes through the floor directly above the brackets for the shocks. Two notes with this. 1) I had to cut spacers (can be seen in the picture below) to account for the approximately 1/2 inch of insulation under the carpet and 2) I had to put a heavy washer under the floor sheet metal to reinforce around the nutsert to keep it from pulling out. I tried to tighten it up without the spacers or the backing washer and it pulled out.
This is the carriage I built. I used 6" c-channel as the main plate and then welded on angle for the winch mount. This is designed so that the winch can be removed vertically instead of horizontally to allow the widest possible drawer in the future. The 5/8" pin goes through the hole in the winch cradle, and the 1/2" pin on top is what keep the winch from bouncing up.
When stowed the carriage locks in place with the gate bolt.
Then when needed it is pulled out to the end and then locked in place to prevent it from rolling back into the Jeep when reloading the winch or when sitting on an incline.
There are hard stops on both ends of the rails to keep the carriage from coming all the way out or too far back into the Jeep.
I can simply remove the bolt when I'm not carrying the winch and the carriage will come right out and I can leave it in the garage. The rails are the only thing that will stay in the Jeep all the time.
Here's my Warn cradle mounted up to it. I'll eventually move to this cradle since it has the handles but I don't have a fairlead with 10" spacing. The Hidden Hitch cradle the winch is currently on has the 11" spacing.
The way the Warn cradle is designed it rests flat on the carriage. My Hidden Hitch unit is different and required me to put this bolt in in order to keep the winch horizontal.
Here's the winch in place with the Hidden Hitch cradle. The only thing I need to do it cut about an inch off the cradle to clear the spare tire since it's longer than the Warn unit.

Newbie
Joined: Dec 2012
Posts: 14
Likes: 0
From: ohio
Year: 1994
Model: Cherokee
Engine: 4.0 high output
that is an awesome winch set up. I plan to do something similar with my 94 country.excellent use of pics to explain your projects. I am a welder fabricator myself, unfortunatly, I use almost entirely alluminum at my job. I haven't welded steel in quite a while, I miss it.
Newbie
Joined: Dec 2012
Posts: 14
Likes: 0
From: ohio
Year: 1994
Model: Cherokee
Engine: 4.0 high output
Picked up a couple goodies at the JY a few weeks ago. First was an OEM Subaru subwoofer/amp unit.

I put a tooth brush in the picture to show the size. It fits perfectly under the passenger seat (is under the driver seat in the Subarus). The great thing about it is that its super easy to hook up. It taps into the leads for the rear speakers and the 12V source and ground wires that plug in to the back of the radio. The thing won't rattle your teeth out by any means (didn't want that) but it makes the radio sound GREAT. Provides the bass that's really needed for good sounding music.
I also picked up a York 210 compressor out of an AMC Eagle. Seems to work when turned over so I brought it home and cleaned it up. Not sure how I want to hook it up or if I even will, but for $40 for both the sub and compressor I'm not complaining.
Thread Starter
Senior Member
Joined: Nov 2010
Posts: 976
Likes: 5
From: Cloquet, MN
Year: 2000 Ltd.
Model: Cherokee
Engine: 4.0L I6
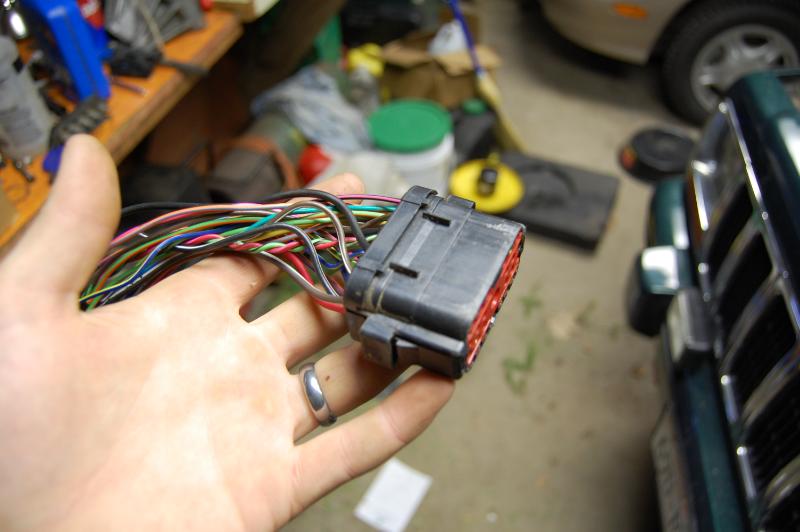
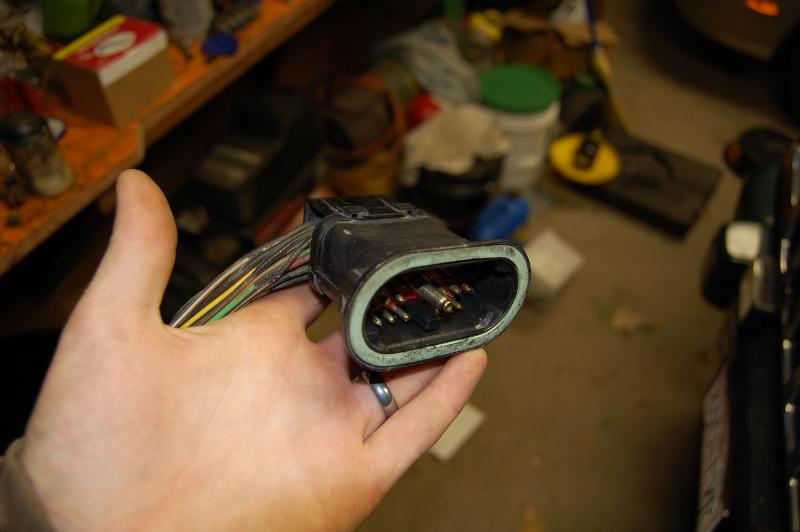
I think they are in most of them from the 90's and 2000's with the premium sound system. I got mine out of a Legacy, but when I was researching the wiring connections the same part is used in WRX's also. I don't know about the newer vehicles, but the easy way to find one in the 90's models is to look for the door tweeters. The premium system has the door tweeters and the sub is located under the driver seat. I only grabbed the plug and about 6" of the harness when I grabbed mine. In hind site I would have grabbed the whole harness; it just runs up under the center console and ends behind the radio. It has the wiring already setup to plug in between the speaker wiring harness and the radio (just have to have adapters, or cut the plugs off and solder to what you need). I ended up just building a harness and soldering the wires to the my adapter set for the aftermarket radio.
Thread Starter
Senior Member
Joined: Nov 2010
Posts: 976
Likes: 5
From: Cloquet, MN
Year: 2000 Ltd.
Model: Cherokee
Engine: 4.0L I6
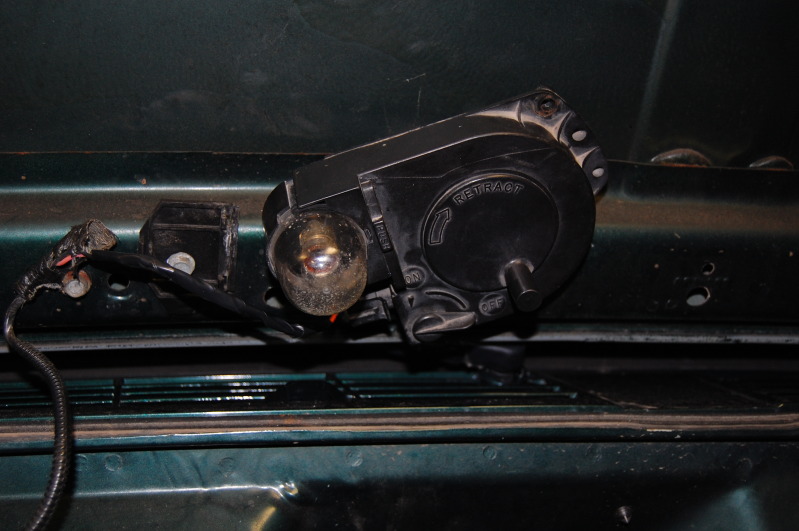
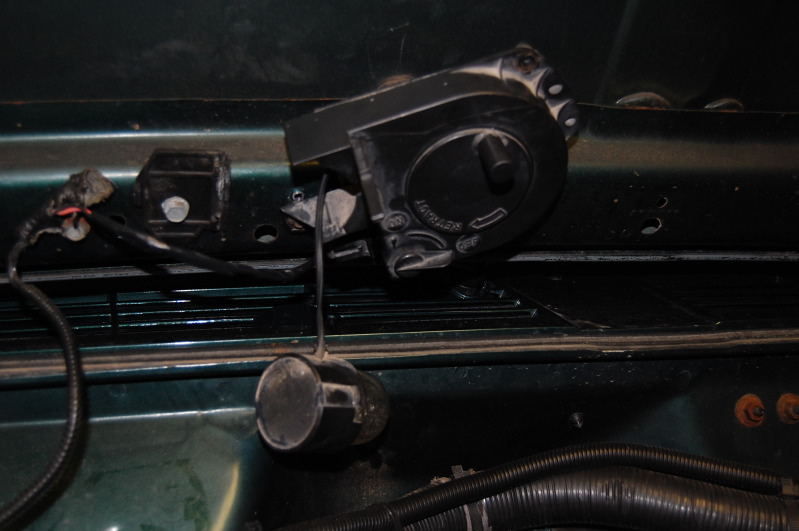
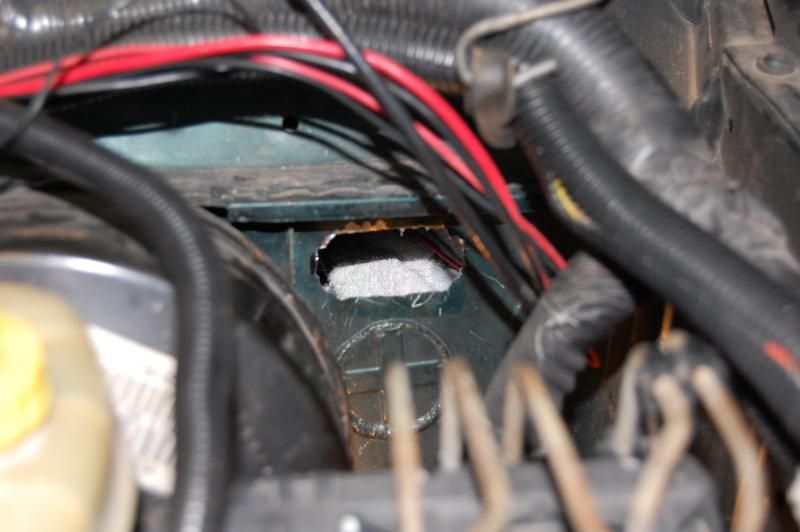
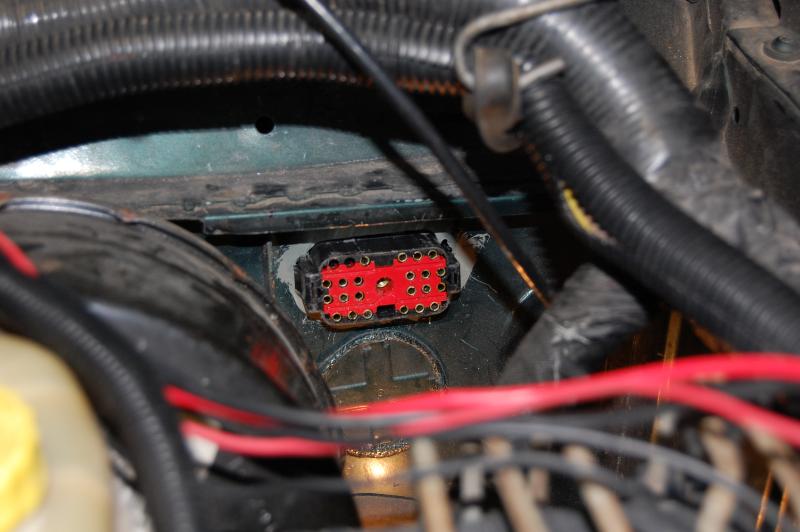
Added a few more things to the Jeep. First, I'm tired of trying to find ways to run wires through the firewall. My solution was to pick up a firewall bulkhead plug/connector from a 1993 F150.

The inside part snaps into place in the firewall.
And the outside part has a seal to keep all the elements out. All the wires coming into the connector are also sealed.
There's a few 12 AWG wires but most are 16 or 18 AWG; perfect for signal wires for relays.
I cut a hole above where the OEM harness runs through, next to the grommet for the hood release. Primed the bare metal and installed the connector after soldering my 6 wires to it.
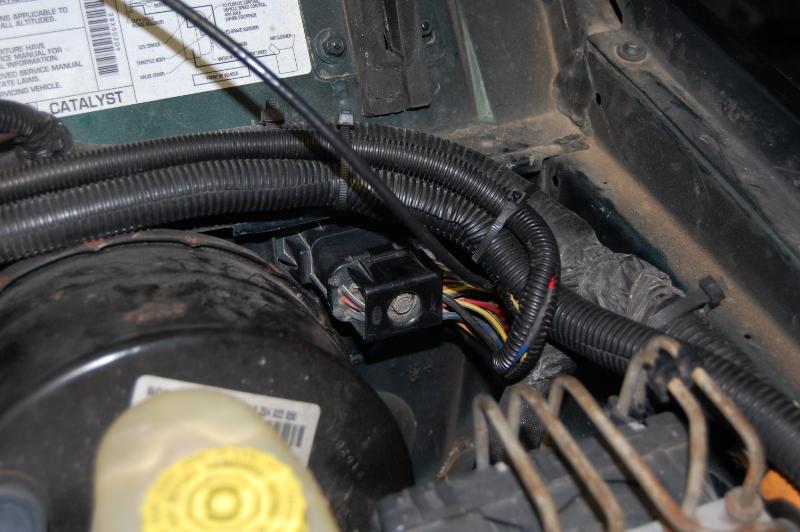
In the process I also wired up my green indicator LED for when the winch power circuit is turned on.
The inside part snaps into place in the firewall.
And the outside part has a seal to keep all the elements out. All the wires coming into the connector are also sealed.
There's a few 12 AWG wires but most are 16 or 18 AWG; perfect for signal wires for relays.
I cut a hole above where the OEM harness runs through, next to the grommet for the hood release. Primed the bare metal and installed the connector after soldering my 6 wires to it.
In the process I also wired up my green indicator LED for when the winch power circuit is turned on.