Project: Keeping It Clean
 02-18-2019, 12:43 AM
#76
Seasoned Member
Thread Starter
Join Date: Nov 2012
Location: Fort Collins, Colorado
Posts: 327
Likes: 0
Received 4 Likes
on
3 Posts
Year: 1998 (buggy), 1998 DD
Model: Cherokee
So the next step, was kind of dual fold.
I have a Dirtbound DIY rear bumper, that has the incorporated frame nut mounts. In company with that, I have a HD Offroad Shackle hanger kit, which uses those same holes.
So, I went ahead and got the bumper tacked together and put aside for some additional work later. I got the frame mounts test fitted, and burned together. This way, the HD Offroad Shackle hangers can be installed, and the bumper bolted on later when it gets finished.
So, we'll go through the install of a set of HD Offroad Shackle Hangers.
I traded Brian some LED stuff for these, and have been looking forward to getting them installed. Funnily enough, I was probably one of the first to have made a bolt in shackle hanger box (with the help of a former NAXJA member, CagedXJ)...somewhere around 15 years ago now. I got flooded with people asking me to build them a set...but being a high schooler getting ready to head off to college...not happening.
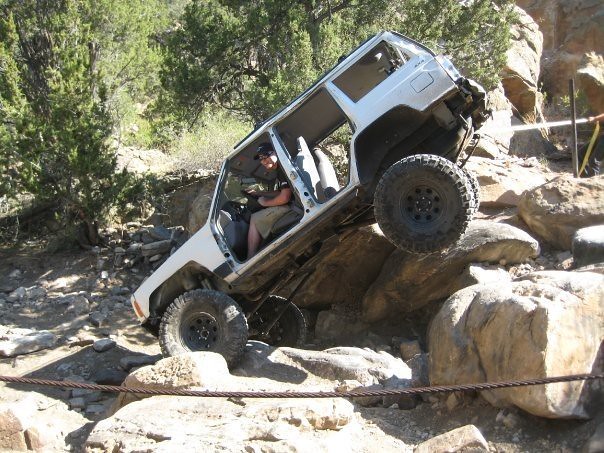
You can kinda almost see them in this picture
Never the less, I'm glad someone finally stepped up to the plate and made a killer product like Brian does, that works well and is proven. I wouldn't hesitate to recommend anyone order a set.
So, I got off to assembling things...
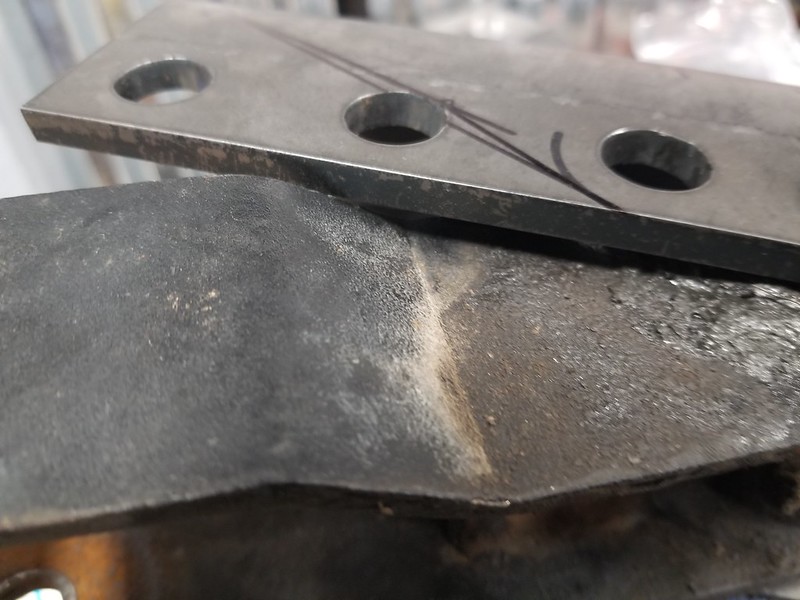
First, the bumper frame mounts.
Some burn in:

Hey, not too shabby...
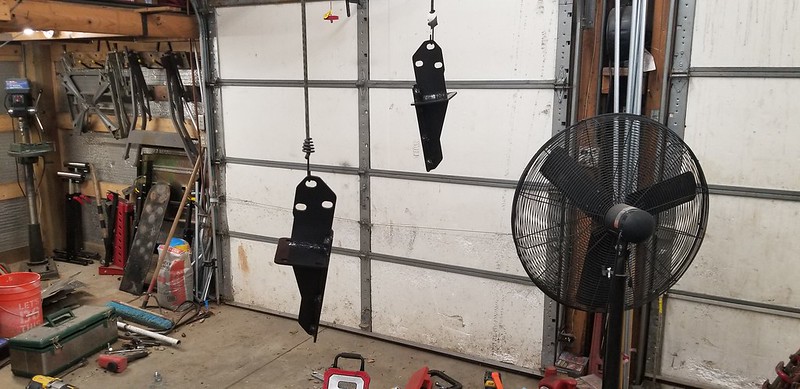
And then some Self Etching Primer, followed by Rustoleum Hammered:
I have a Dirtbound DIY rear bumper, that has the incorporated frame nut mounts. In company with that, I have a HD Offroad Shackle hanger kit, which uses those same holes.
So, I went ahead and got the bumper tacked together and put aside for some additional work later. I got the frame mounts test fitted, and burned together. This way, the HD Offroad Shackle hangers can be installed, and the bumper bolted on later when it gets finished.
So, we'll go through the install of a set of HD Offroad Shackle Hangers.
I traded Brian some LED stuff for these, and have been looking forward to getting them installed. Funnily enough, I was probably one of the first to have made a bolt in shackle hanger box (with the help of a former NAXJA member, CagedXJ)...somewhere around 15 years ago now. I got flooded with people asking me to build them a set...but being a high schooler getting ready to head off to college...not happening.
You can kinda almost see them in this picture
Never the less, I'm glad someone finally stepped up to the plate and made a killer product like Brian does, that works well and is proven. I wouldn't hesitate to recommend anyone order a set.
So, I got off to assembling things...
First, the bumper frame mounts.
Some burn in:
Hey, not too shabby...
And then some Self Etching Primer, followed by Rustoleum Hammered:
Last edited by Freerider15; 02-18-2019 at 12:49 AM.
 02-18-2019, 12:44 AM
#77
Seasoned Member
Thread Starter
Join Date: Nov 2012
Location: Fort Collins, Colorado
Posts: 327
Likes: 0
Received 4 Likes
on
3 Posts
Year: 1998 (buggy), 1998 DD
Model: Cherokee
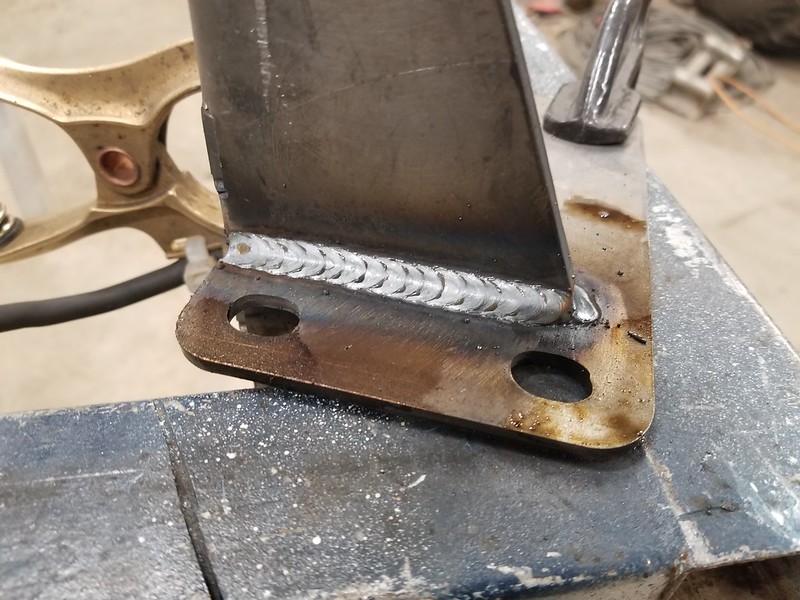
So, after fitting up the hangers, threw some weld on them.

Though not required, I like them being 100% in place. Though not pictured, I also added more weld to the 1/2" bolt heads, since I planned on torquing these down to spec.
So, the only gripe I'd say I remotely had with the HD Offroad setup, was the shackle bolt holes. Now, for 99% of people, they probably don't care and it will work just fine. But, me being **** retentive, just couldn't let it sit.
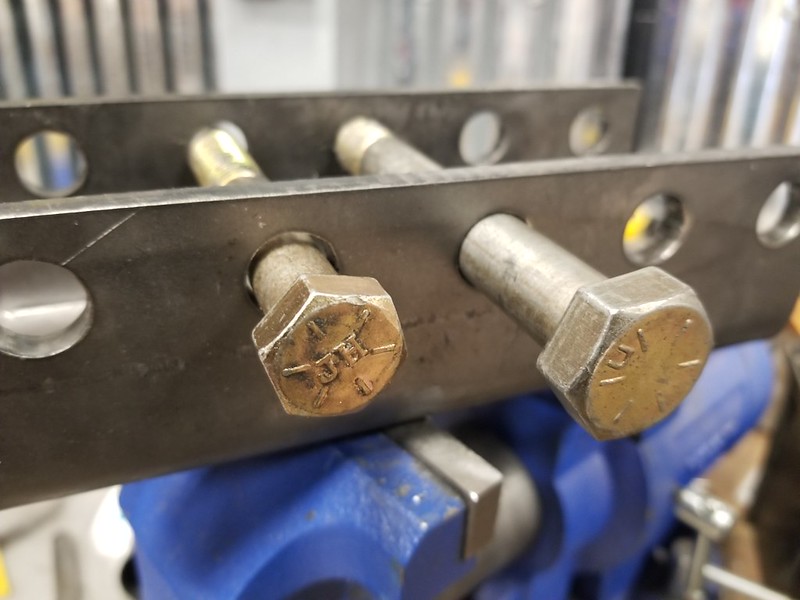
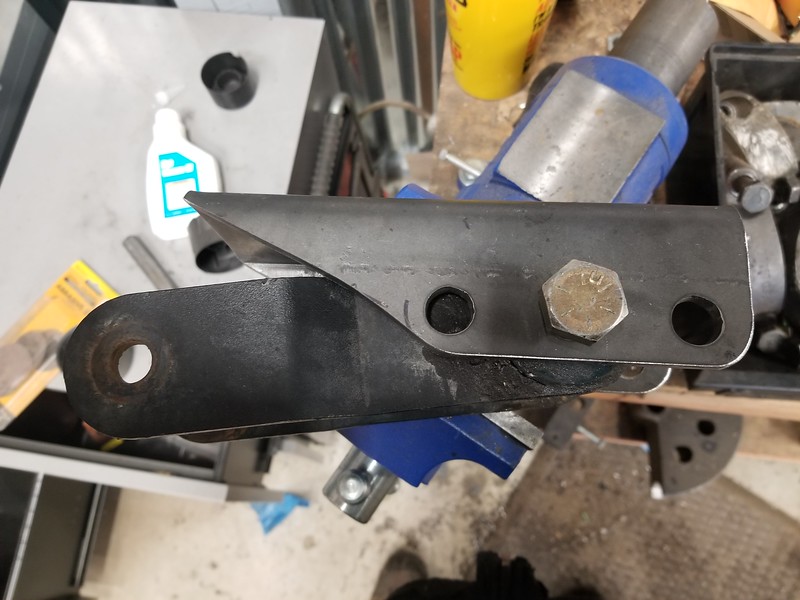
The bolt holes on the piece that bolts up, were a bit large for an OEM sized bolt, as well as the bolt size provided. I noticed they we're very very close to 5/8", and with just...and a mean just...a touch of a 5/8" bit...they were there.
5/8" bolt on the right, bolt (near OEM size) on the left:
Well, obviously the stock shackle hanger bushing sleeves aren't 5/8"...so what about those?
Well, I just so happened to have some 3/4" OD, 1/2" ID tubing laying around. A quick drill out to 5/8" and I had my own bushing sleeves.

Lathe would have been real nice to have there...
The old bushing sleeves on the shackles, actually ended up in the lead springs. I had to cut one bolt out in order to get on of the shackles free. The bolt had seized to the sleeve...fun stuff.
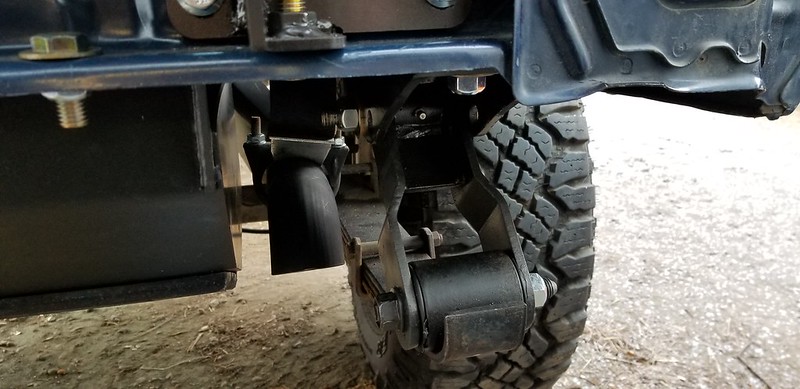
So, this is how far the shackle can go up during uptravel...rather limited.

So, with a few cuts and cleanup (didn't cut away more in order to retain structural integrity), we have a much better range achieved:
Next was a bit of work, before install could start to begin the next day or two.
Small things I can't let go, tend to add to my project time. I didn't like the condition the shackles were in (dirty and small areas of powdercoat missing)...so I completely disassembled the shackles and:
- cleaned all the grease off of them
- gave them a quick sandblast in a few areas
- gave them a fresh coat of paint
- installed new grease zerks
- cleaned the bushing thoroughly and gave them a new freshening of grease
Hell, even the bolts going back on all got run through a tap, wire wheeled, and a coat of paint:

So then finally came the install today. First thing was to clean out the previous owners overzealousness with grease from where the hangers would install. So there went 20 minutes with some rags and mineral spirits cleaning out the hangers.
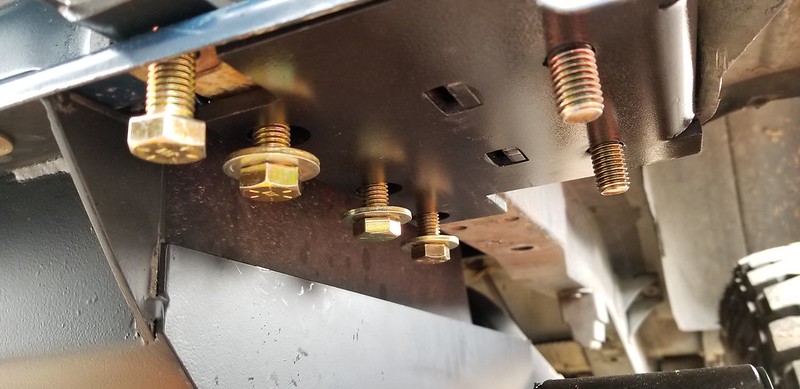
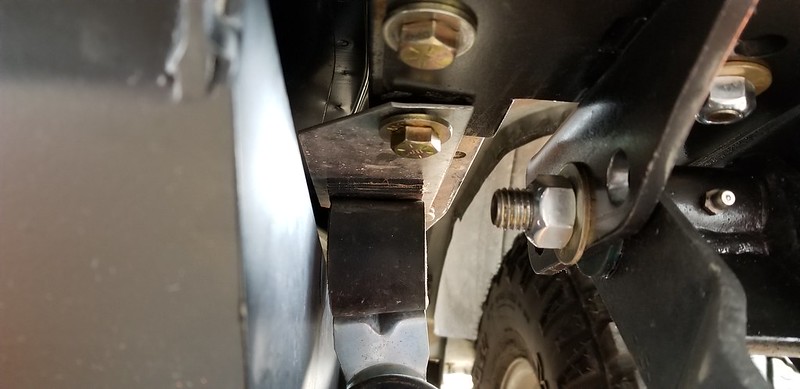
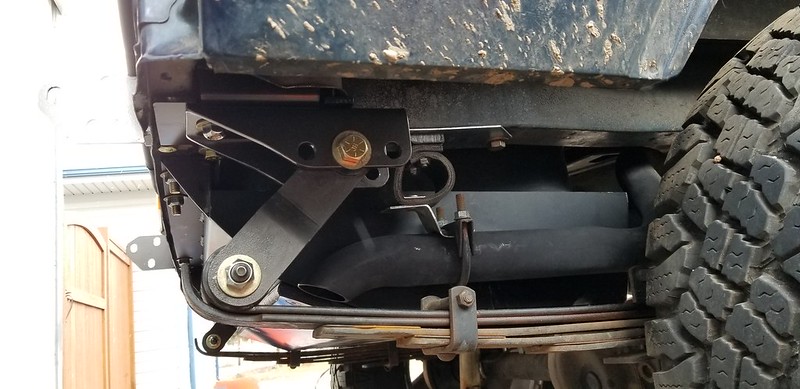
You'll note in the following picture, that the holes that the hangers bolt up into, are all over sized (for good reason to accommodate the variability in the frame). So, I went ahead and used thick washers, since the 1/2" bolt heads would actually be capable of being pulled into the holes themselves.
The hardware supplied with the Dirtbound bumper for these was all Grade 5. Perfectly fine, but I'm not one for...variety in that accord. I like it all Grade 8...because...well because I can.
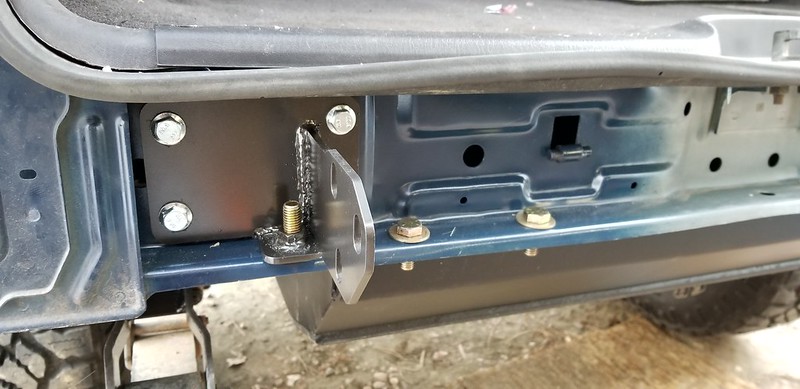
Bumper mounts / Shackle hole mounts on (yeah, they've got some weld spatter, but since they'll be hidden...and I don't get as much time in the shop as I used to, I said fukk it):

The hardware for the 4 rear frame holes on the bumper / shackle mounts was replaced with some Grade 10.9 (metric) bolts. Ran a tap through all the holes to make life easier. No way was I going to re-use the stock crusty stuff.
All of the 1/2" bolts for the bumper/shackle hanger (other than the front most), got torqued to spec (~107 ft. lbs.). They aren't going...anywhere.
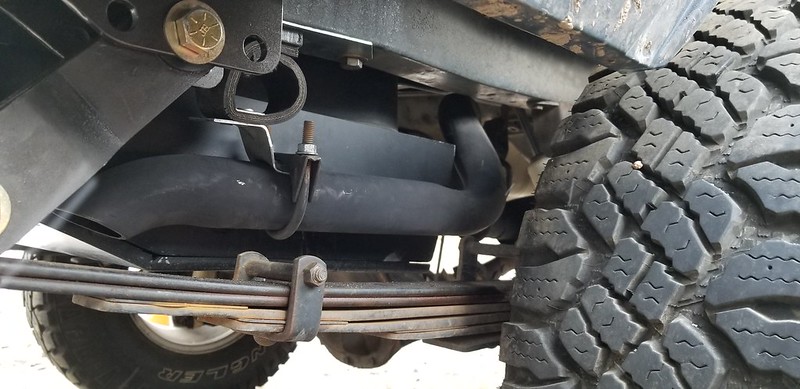
I was (unsurprisingly) running into an issue with the exhaust. The rear kink towards the passenger side would hit the bolt, and if I moved it any more to the drivers, it would hit the tank skid.
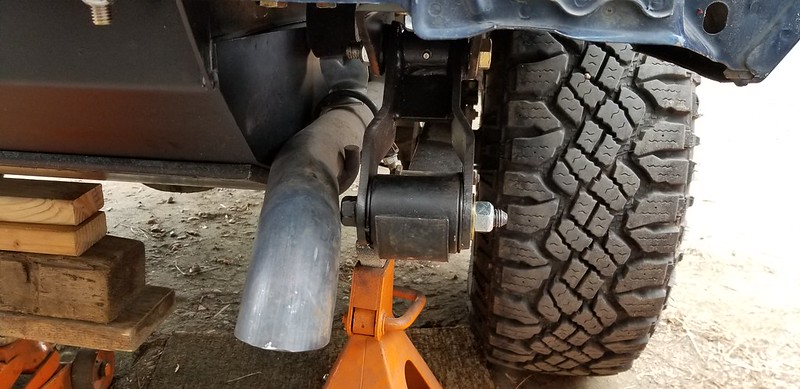
So, the exhaust got pulled, and a little snip snip:
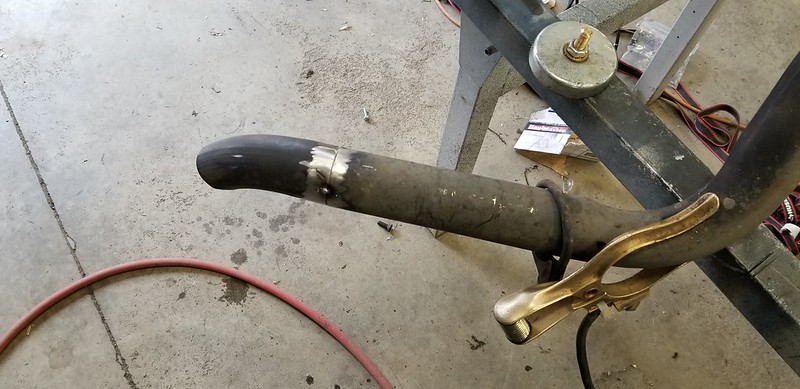
A little flap disc and high temp paint, and it's like it never happened:
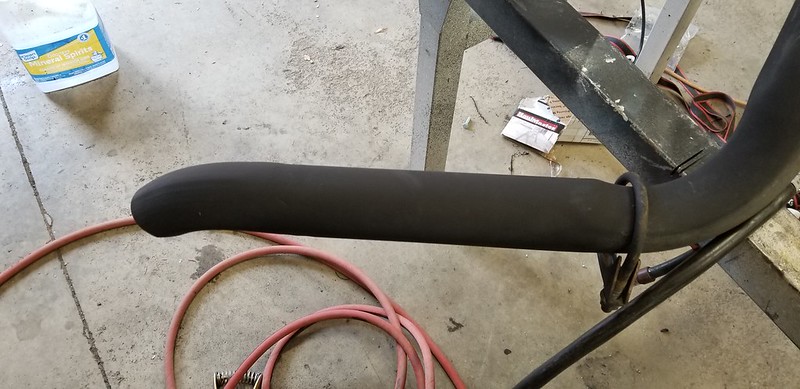
Took me longer to swap the wire out than to get that done...damn .024" wire that wants to poof the moment it slips from your grip...
I did add a 1/2" UHMW spacer to the exhaust hanger, to help keep the muffler out of the floor. But, bolted back in, and clearance for days! Install complete!

Nice 45* shackle angle:

A few last notes, since I myself like follow and details on anything others might think of.
Some might notice, I don't use a whole lot of regular nuts. I like stover nuts personally (metal deforming lock nuts). The chance of them coming loose is far less, and makes me feel a bit better. I use them all over on the buggy, since a worked loose bolt on that, could make for a VERY bad and possibly rather expensive day.
As well, in the case of the shackles, I don't need to wrench it down so tight. When you really torque those down, it doesn't allow for as much flex in the bushings as they need, and somewhat puts undue stress on them. I tighten until snug, then go maybe another turn after.
With bolts going into bushing sleeves, a little anti-seize is your friend. Some went on each bolt going into a sleeve, as well as the existing frame pocket bolt that loves to seize to the nut in the frame, and make life a PITA.
Though not required, I like them being 100% in place. Though not pictured, I also added more weld to the 1/2" bolt heads, since I planned on torquing these down to spec.
So, the only gripe I'd say I remotely had with the HD Offroad setup, was the shackle bolt holes. Now, for 99% of people, they probably don't care and it will work just fine. But, me being **** retentive, just couldn't let it sit.
The bolt holes on the piece that bolts up, were a bit large for an OEM sized bolt, as well as the bolt size provided. I noticed they we're very very close to 5/8", and with just...and a mean just...a touch of a 5/8" bit...they were there.
5/8" bolt on the right, bolt (near OEM size) on the left:
Well, obviously the stock shackle hanger bushing sleeves aren't 5/8"...so what about those?
Well, I just so happened to have some 3/4" OD, 1/2" ID tubing laying around. A quick drill out to 5/8" and I had my own bushing sleeves.
Lathe would have been real nice to have there...
The old bushing sleeves on the shackles, actually ended up in the lead springs. I had to cut one bolt out in order to get on of the shackles free. The bolt had seized to the sleeve...fun stuff.
So, this is how far the shackle can go up during uptravel...rather limited.
So, with a few cuts and cleanup (didn't cut away more in order to retain structural integrity), we have a much better range achieved:
Next was a bit of work, before install could start to begin the next day or two.
Small things I can't let go, tend to add to my project time. I didn't like the condition the shackles were in (dirty and small areas of powdercoat missing)...so I completely disassembled the shackles and:
- cleaned all the grease off of them
- gave them a quick sandblast in a few areas
- gave them a fresh coat of paint
- installed new grease zerks
- cleaned the bushing thoroughly and gave them a new freshening of grease
Hell, even the bolts going back on all got run through a tap, wire wheeled, and a coat of paint:
So then finally came the install today. First thing was to clean out the previous owners overzealousness with grease from where the hangers would install. So there went 20 minutes with some rags and mineral spirits cleaning out the hangers.
You'll note in the following picture, that the holes that the hangers bolt up into, are all over sized (for good reason to accommodate the variability in the frame). So, I went ahead and used thick washers, since the 1/2" bolt heads would actually be capable of being pulled into the holes themselves.
The hardware supplied with the Dirtbound bumper for these was all Grade 5. Perfectly fine, but I'm not one for...variety in that accord. I like it all Grade 8...because...well because I can
.Bumper mounts / Shackle hole mounts on (yeah, they've got some weld spatter, but since they'll be hidden...and I don't get as much time in the shop as I used to, I said fukk it):
The hardware for the 4 rear frame holes on the bumper / shackle mounts was replaced with some Grade 10.9 (metric) bolts. Ran a tap through all the holes to make life easier. No way was I going to re-use the stock crusty stuff.
All of the 1/2" bolts for the bumper/shackle hanger (other than the front most), got torqued to spec (~107 ft. lbs.). They aren't going...anywhere.
I was (unsurprisingly) running into an issue with the exhaust. The rear kink towards the passenger side would hit the bolt, and if I moved it any more to the drivers, it would hit the tank skid.
So, the exhaust got pulled, and a little snip snip:
A little flap disc and high temp paint, and it's like it never happened:
Took me longer to swap the wire out than to get that done...damn .024" wire that wants to poof the moment it slips from your grip...
I did add a 1/2" UHMW spacer to the exhaust hanger, to help keep the muffler out of the floor. But, bolted back in, and clearance for days! Install complete!
Nice 45* shackle angle:
A few last notes, since I myself like follow and details on anything others might think of.
Some might notice, I don't use a whole lot of regular nuts. I like stover nuts personally (metal deforming lock nuts). The chance of them coming loose is far less, and makes me feel a bit better. I use them all over on the buggy, since a worked loose bolt on that, could make for a VERY bad and possibly rather expensive day.
As well, in the case of the shackles, I don't need to wrench it down so tight. When you really torque those down, it doesn't allow for as much flex in the bushings as they need, and somewhat puts undue stress on them. I tighten until snug, then go maybe another turn after.
With bolts going into bushing sleeves, a little anti-seize is your friend. Some went on each bolt going into a sleeve, as well as the existing frame pocket bolt that loves to seize to the nut in the frame, and make life a PITA.
02-18-2019, 12:45 AM
#78
Seasoned Member
Thread Starter
Join Date: Nov 2012
Location: Fort Collins, Colorado
Posts: 327
Likes: 0
Received 4 Likes
on
3 Posts
Year: 1998 (buggy), 1998 DD
Model: Cherokee
So, now that parts have begun to land for the buggy...other than getting the front driveshaft completely gone through and installed, it will get driven and used until the buggy is back on all 4!
08-04-2020, 09:28 AM
#80
Seasoned Member
Thread Starter
Join Date: Nov 2012
Location: Fort Collins, Colorado
Posts: 327
Likes: 0
Received 4 Likes
on
3 Posts
Year: 1998 (buggy), 1998 DD
Model: Cherokee
Yeah, got busy and forgot updates trying to get it ready for a trip last year, then focusing back on the buggy.
I'll get some updates with pictures as I got them, but got the bumpers made up and painted (color matched) and some other things.
Just got a 6 switch panel in from Custom3DProducts, and this winter will likely start the D30 build and 8.8 swap, since I'm done with most things tow rig/buggy related.
Just been driving it as a DD to and from work mostly, not much wheeling in it at this time other than one multi-day trip.
Looking forward to the regear, since its a bit of a slow pig.
08-04-2020, 03:59 PM
#81
Seasoned Member

How did all the sound deadening inside the interior turn out? I am in the process of the same thing and am using some of the materials you posted awhile back.
08-05-2020, 02:13 PM
#82
Seasoned Member
Thread Starter
Join Date: Nov 2012
Location: Fort Collins, Colorado
Posts: 327
Likes: 0
Received 4 Likes
on
3 Posts
Year: 1998 (buggy), 1998 DD
Model: Cherokee
I've got a vibration at idle, that's worse with the A/C on that I need to track down. Between that and the Duratracs, it's not all *that* quiet.
My wife's Limited '96 is far quieter to be honest (and likely to become a DD for me in the next year).
I will say I did do sound deadening in my truck (f-350 7.3L). I did a whole lot of CLD all over the interior, new carpet that was mass backed (since I really didn't feel like doing the two stage and was already on a very very very tight timeline), but didn't do much of anything to the firewall even after a newer model dash swap.
I took the interior dB From ~75 to 62/63...pretty big difference.