
View Poll Results: Grille color


Multiple Choice Poll. Voters: 7. You may not vote on this poll
Project: Clockwork Orange


Thread Starter
Member
Joined: Sep 2009
Posts: 136
Likes: 0
From: Colorado Springs, CO
Year: 2000
Model: Cherokee
Engine: 4.0
The exhaust I assume you mean?
It's a VHT ceramic header paint.

Says it's good to 2000F, if properly cured. Will see. I have no idea how long it will last, but hopefully it will give my exhaust at least a few days before it starts to rust.
Probably not going to do too much on the Heep today, think I'm gonna take the dogs to play in the snow, before it's all gone.
Thread Starter
Member
Joined: Sep 2009
Posts: 136
Likes: 0
From: Colorado Springs, CO
Year: 2000
Model: Cherokee
Engine: 4.0
Well, I kinda got some stuff done. I got her thrown together and rolling on Sat night.
Sun was spent doing a bunch of odds and ends. Today was more of the same.

This pic pretty much sums up my weekend- Got the rear axle, rear springs, rear shocks, and wheels re-attached to the truck. Built a new exhaust and installed it. Burned in my HD ORE no lift shackle brackets. Put my trailer hitch back on. Drove it around the block.
Not happy. Shocks seem too long. Rode like a garbage truck. Hmmmm. Break in?
Senior Member
Joined: Dec 2013
Posts: 591
Likes: 0
From: Mooresville, NC
Year: 1999
Model: Cherokee
Engine: 4.0 i6
By far my favortie build ever and then the orange, holy ****. ITS AWESOME. Question though, you went as far as painting the leafs and everything so perfectly (which I love) but didn't even touch the axle?
CF Veteran

Joined: Jan 2013
Posts: 19,219
Likes: 45
From: west chester, pa
Year: 1999
Engine: 4.0
i think he's gonna swap the axles soon. He only put the axle back on so he can move the jeep around until then
Member
Joined: Apr 2014
Posts: 202
Likes: 0
From: The Isle of Long, in happy and sunny New York.
Year: 1999
Model: Cherokee
Engine: Supercharged 440 Magnum punched .60 - yeah right.. 4.0 like everyone else.
Looks great! Are you putting in an 8.25c? What size tires/rims are on there. I'd like to get the same set-up for mine.
I have a D35 as well.. I'm looking to swap it out for the 8.25. I'm doing it mostly for insurance... I just wonder about that D35. PO already had it rebuilt once...
I'm in the middle of a whole front-end rebuilt.. the usual bushings, bearings, u-joints... etc. Then I'm going for the Zone Offroad 3", with Quickies, new lower control arms/track bar (Iron rock) and the WJ Tie-rod upgrade should tighten everything up nicely.
I like the beadliner spray idea... might do that as well.
Thanks for the info and great ideas.
James
Senior Member
Joined: Dec 2013
Posts: 591
Likes: 0
From: Mooresville, NC
Year: 1999
Model: Cherokee
Engine: 4.0 i6
Looks great! Are you putting in an 8.25c? What size tires/rims are on there. I'd like to get the same set-up for mine.
I have a D35 as well.. I'm looking to swap it out for the 8.25. I'm doing it mostly for insurance... I just wonder about that D35. PO already had it rebuilt once...
I'm in the middle of a whole front-end rebuilt.. the usual bushings, bearings, u-joints... etc. Then I'm going for the Zone Offroad 3", with Quickies, new lower control arms/track bar (Iron rock) and the WJ Tie-rod upgrade should tighten everything up nicely.
I like the beadliner spray idea... might do that as well.
Thanks for the info and great ideas.
James
I have a D35 as well.. I'm looking to swap it out for the 8.25. I'm doing it mostly for insurance... I just wonder about that D35. PO already had it rebuilt once...
I'm in the middle of a whole front-end rebuilt.. the usual bushings, bearings, u-joints... etc. Then I'm going for the Zone Offroad 3", with Quickies, new lower control arms/track bar (Iron rock) and the WJ Tie-rod upgrade should tighten everything up nicely.
I like the beadliner spray idea... might do that as well.
Thanks for the info and great ideas.
James
Thread Starter
Member
Joined: Sep 2009
Posts: 136
Likes: 0
From: Colorado Springs, CO
Year: 2000
Model: Cherokee
Engine: 4.0
Yeah, the rear axle will come back out soon, when I go to swap in either the new one, or at least when the new rear springs go on. So, it will get purdied up then. I did just throw it back together so I can move it around. I only went the step of painting the leafs and stuff, as I was hoping I might get away with them, but they are too soft being one leaf down, and since they were already apart...
The wheels are 15x8, with 3.5bs (I think, have to verify)and 33/12.50's. Fortunately, they do clear my WJ Akebono calipers in front.
I will probably start on the front end this week, or weekend. Have to strip everything off, zap on the front frame stiffeners, and build some brackets to extend the front bumper mounts back into more of the frame. Then the new longarms, new axle, etc will get thrown in, and I start working out the rest of the steering and track bar.
Hope to have this thing back on the street by the end of June...
Thread Starter
Member
Joined: Sep 2009
Posts: 136
Likes: 0
From: Colorado Springs, CO
Year: 2000
Model: Cherokee
Engine: 4.0
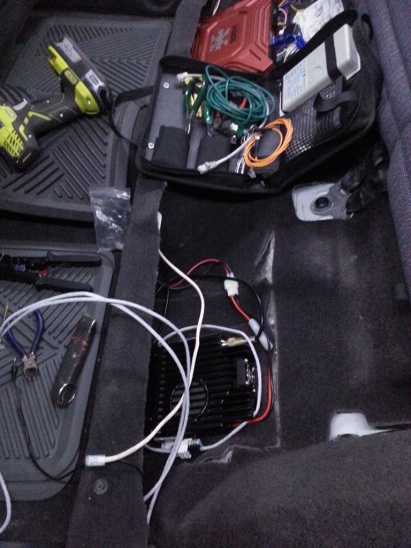
Been a week or so since I have updated... because, there hasn't been much to update. Mostly been working on more wiring (boring), getting my new VHF radio installed (everything takes 3x as long since I HAVE to customize everything).
Useless filler pic.

Otherwise, I did a quick mod/repair of my rear shock mount a few days ago (sorry no pics). Had two convergent probs. The passenger shock mount stud snapped off when I tried to remove the old shock last year. I had a few shock studs laying around, but had to cut off the remaining old one, and drill for the new one. Got the hole crooked, and coupled with the angle from the degree shims, the stud was pointing up at about a 20Deg angle. Made getting the shock on a real *****, and really torqued the bushing. So, I cut about a 1/4" wedge out of the sides of the rear shock mounts, and beat them to where the studs were roughly 90deg to the ground, then welded them back together.
Hope to start on tearing out the front suspension this weekend, but will see how things go.
Useless filler pic.
Otherwise, I did a quick mod/repair of my rear shock mount a few days ago (sorry no pics). Had two convergent probs. The passenger shock mount stud snapped off when I tried to remove the old shock last year. I had a few shock studs laying around, but had to cut off the remaining old one, and drill for the new one. Got the hole crooked, and coupled with the angle from the degree shims, the stud was pointing up at about a 20Deg angle. Made getting the shock on a real *****, and really torqued the bushing. So, I cut about a 1/4" wedge out of the sides of the rear shock mounts, and beat them to where the studs were roughly 90deg to the ground, then welded them back together.
Hope to start on tearing out the front suspension this weekend, but will see how things go.
Thread Starter
Member
Joined: Sep 2009
Posts: 136
Likes: 0
From: Colorado Springs, CO
Year: 2000
Model: Cherokee
Engine: 4.0
Not much done today. Finished up some more wiring, figured out the mounts and mechanism for my powered antenna bar (so I can lay them flat and not tear them off pulling into the garage or low hanging trees). Hope to get that built next week.
Also cut out some 10Ga, and zapped on some mini skids for the front LCA Mounts. Would have liked to use 3/16, but didn't have any. May decide to double it up.


Also cut out some 10Ga, and zapped on some mini skids for the front LCA Mounts. Would have liked to use 3/16, but didn't have any. May decide to double it up.


Thread Starter
Member
Joined: Sep 2009
Posts: 136
Likes: 0
From: Colorado Springs, CO
Year: 2000
Model: Cherokee
Engine: 4.0
Thread Starter
Member
Joined: Sep 2009
Posts: 136
Likes: 0
From: Colorado Springs, CO
Year: 2000
Model: Cherokee
Engine: 4.0
Ok.. Finally a couple updates. Been busy with lots of home/garden stuff the last several weeks, and haven't done a ton on the Jeep.
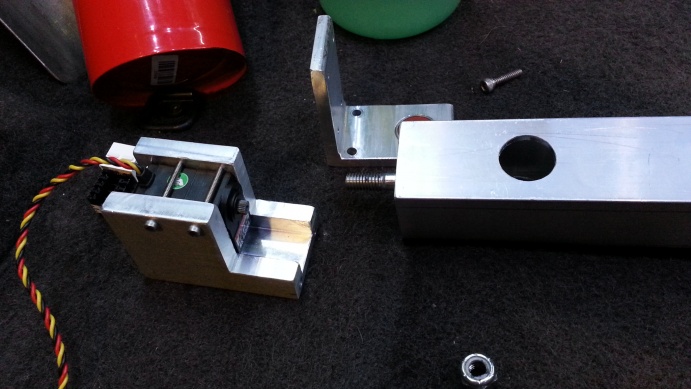
I did work on, and mostly finished my powered VHF antenna bar/mount. It's pretty simple, a 1.5" aluminum square tube, with 3 holes for 3/4" NMO antenna mounts. In the ends are pressed some machined centering dowels, which have 5/16" studs pressed into them. That pivots on some 1.5" x .25" aluminum end plates with bearings in them.

To that was attached a machined drive plate which interfaced with the drive servo.


The whole thing mounts to the front inside of my roof rack. I was a bit concerned initially that the servo would not have enough torque to rotate the mount with the antenna installed.

It could do it, but barely. The bigger problem was holding position. Since the setup would only be moving 90 degrees, the servo would have to try to hold the vertical position, which would be a lot of load and wear on it. Since it is a servo setup, it is directed by a PWM signal from the Arduino, telling it to move and keep that position. I didn't design in a mechanical position lock.
So, that setup went, in favor of a simpler, yet more robust setup. The drive is now done by a small power window motor, directly driving the shaft same as before. Since it is a window motor, it is a worm gear drive, which will not allow the motor to be back-driven (moved) without powering the motor, so it will hold whatever position it stops in. I regulated the voltage to it down to 3 volts, which slows the speed sufficiently. Also gone is the PWM control in favor of a simple polarity reversing switch. I will add some stops to the mount, and just drive the motor into the stop, to take any backlash out.
I just have to modify the mount for the new motor, and add the stops. I'll get some more pics once I get that done.
I did work on, and mostly finished my powered VHF antenna bar/mount. It's pretty simple, a 1.5" aluminum square tube, with 3 holes for 3/4" NMO antenna mounts. In the ends are pressed some machined centering dowels, which have 5/16" studs pressed into them. That pivots on some 1.5" x .25" aluminum end plates with bearings in them.

To that was attached a machined drive plate which interfaced with the drive servo.


The whole thing mounts to the front inside of my roof rack. I was a bit concerned initially that the servo would not have enough torque to rotate the mount with the antenna installed.
It could do it, but barely. The bigger problem was holding position. Since the setup would only be moving 90 degrees, the servo would have to try to hold the vertical position, which would be a lot of load and wear on it. Since it is a servo setup, it is directed by a PWM signal from the Arduino, telling it to move and keep that position. I didn't design in a mechanical position lock.
So, that setup went, in favor of a simpler, yet more robust setup. The drive is now done by a small power window motor, directly driving the shaft same as before. Since it is a window motor, it is a worm gear drive, which will not allow the motor to be back-driven (moved) without powering the motor, so it will hold whatever position it stops in. I regulated the voltage to it down to 3 volts, which slows the speed sufficiently. Also gone is the PWM control in favor of a simple polarity reversing switch. I will add some stops to the mount, and just drive the motor into the stop, to take any backlash out.
I just have to modify the mount for the new motor, and add the stops. I'll get some more pics once I get that done.
Thread Starter
Member
Joined: Sep 2009
Posts: 136
Likes: 0
From: Colorado Springs, CO
Year: 2000
Model: Cherokee
Engine: 4.0
So, I finally got my new leafs, and got them painted and thrown in. I was hoping I wouldn't have to spend the extra cash, but the old RE's were just too soft, especially being down one leaf.

The new springs are RC 8047's. They went right in, no real issues at all, and so far the ride is tremendously better. The only thing about them that I would change is the head of the centering pin is a bit on the short side- maybe .25" tall. I worry a little bit about it having enough to really solidly locate the spring in the locating hole. They came with some 2 degree shims installed, which I had to swap for my 4 degree units.

I was able to install them with my new heavy spring plates, and 5/8" U-bolts, so that helps me feel a bit better about it.
My initial plan was to swap the axle for an 8.8, so I could match the E-locker in the front and get discs, but a look in my wallet tells me that isn't happening soon. So, the 8.25 will get cleaned up and painted, and maybe a ZJ or KJ disc swap for now.
Thread Starter
Member
Joined: Sep 2009
Posts: 136
Likes: 0
From: Colorado Springs, CO
Year: 2000
Model: Cherokee
Engine: 4.0
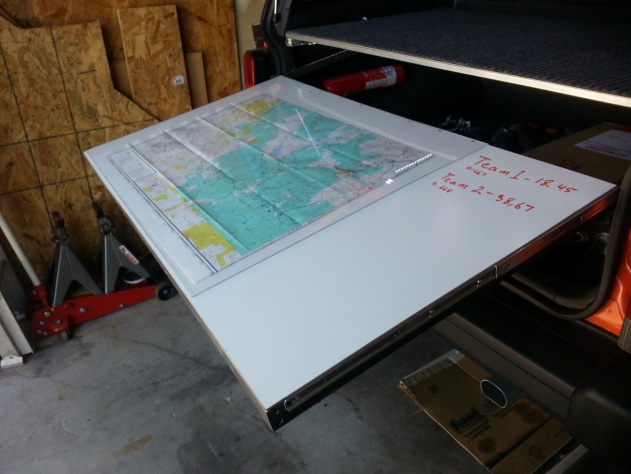
One other project I have nearly completed, is one many probably won't care about unless you are in SAR, and probably not even then, unless you work in mission management.
Basically, it's a pull-out work surface with storage space for maps, forms, pens, etc. Gives me a place to work IC/Plans on smaller incidents.
It is built into the package tray/shelf that I built for the jeep years ago, with this in mind.

The shelf is built all of aluminum, with 1.5" square tube for side and back rails, and 1/2" sold bars for the longitudinal spars. That is skinned with some .063, and carpet on top. It mounts in the front to some hinge plates that I built. They wrap around the upper seatback catches, and have a 1/2" dia pin that sticks out, into the front of the side rails. That allows me to lift the whole thing up, to give better access to my gear. The rear just rests on the near horizontal part of the rear trim.
The drawer was going to be all bent .063 aluminum, but again, $$. So it is framed with 1x poplar, and skinned with whiteboard. I added some more LED strips to the bottom of the shelf to illuminate my gear below.

The drawer mounts to some 100lb capacity long-travel sliders (26") which are mounted with some small studs, through slots cut in the side rails. The rear slots have a cut through the bottom at the back end, which allows the stud to drop out, and tilt the whole thing down. I added some stops to the sides of the tailgate opening that the slides rest on when dropped which support it.

The plexi on top gives me a place to put maps and other forms. This allows me to hold them down, and I can mark them up with whiteboard markers for search areas, trails, boundaries, etc. The section of just whiteboard gives me a place for notes. I also added a RJ11 jack at the rear, which splits the input to my radio microphone, so I can move the mike to the rear when I am working from there. Also threw in a 4-port 10A accessory socket for charging phones, etc.

I still have to finish the interior, put in some more dividers, and maybe some foam for the pen side, so they don't rattle around and drive me nuts. I may also decide to rip the whole thing down a bit, and make the drawer shallower, I probably don't really need the 1.5" of space inside.

Basically, it's a pull-out work surface with storage space for maps, forms, pens, etc. Gives me a place to work IC/Plans on smaller incidents.
It is built into the package tray/shelf that I built for the jeep years ago, with this in mind.

The shelf is built all of aluminum, with 1.5" square tube for side and back rails, and 1/2" sold bars for the longitudinal spars. That is skinned with some .063, and carpet on top. It mounts in the front to some hinge plates that I built. They wrap around the upper seatback catches, and have a 1/2" dia pin that sticks out, into the front of the side rails. That allows me to lift the whole thing up, to give better access to my gear. The rear just rests on the near horizontal part of the rear trim.
The drawer was going to be all bent .063 aluminum, but again, $$. So it is framed with 1x poplar, and skinned with whiteboard. I added some more LED strips to the bottom of the shelf to illuminate my gear below.

The drawer mounts to some 100lb capacity long-travel sliders (26") which are mounted with some small studs, through slots cut in the side rails. The rear slots have a cut through the bottom at the back end, which allows the stud to drop out, and tilt the whole thing down. I added some stops to the sides of the tailgate opening that the slides rest on when dropped which support it.

The plexi on top gives me a place to put maps and other forms. This allows me to hold them down, and I can mark them up with whiteboard markers for search areas, trails, boundaries, etc. The section of just whiteboard gives me a place for notes. I also added a RJ11 jack at the rear, which splits the input to my radio microphone, so I can move the mike to the rear when I am working from there. Also threw in a 4-port 10A accessory socket for charging phones, etc.
I still have to finish the interior, put in some more dividers, and maybe some foam for the pen side, so they don't rattle around and drive me nuts. I may also decide to rip the whole thing down a bit, and make the drawer shallower, I probably don't really need the 1.5" of space inside.

Last edited by mntnresq; Jun 24, 2014 at 03:55 PM.