Overland Build: Yellow Jeep XJ

 03-04-2017, 09:43 AM
#92
Junior Member
Thread Starter

Join Date: Nov 2015
Location: New Hampshire
Posts: 70
Likes: 0
Received 0 Likes
on
0 Posts
Year: 2001
Model: Cherokee
Engine: 242 CID 4.0 Inline 6 Chrysler MPI "High Output"
The build is a work in progress, with the overland trips dialing in what works and what doesn't through some trial and error. Still have a long way to go, but it's a fun build/overland project. And I'm excited at what is being planned as well, more ambitious trips in store for the future.
03-08-2017, 07:03 AM
#93
Seasoned Member
Thanks for the support man, much appreciated!
The build is a work in progress, with the overland trips dialing in what works and what doesn't through some trial and error. Still have a long way to go, but it's a fun build/overland project. And I'm excited at what is being planned as well, more ambitious trips in store for the future.
The build is a work in progress, with the overland trips dialing in what works and what doesn't through some trial and error. Still have a long way to go, but it's a fun build/overland project. And I'm excited at what is being planned as well, more ambitious trips in store for the future.
I'm looking at picking up a Cherokee "classic" in the next few months and building something very similar for our family.
We moved from WA state to central FL about nine months ago so all the toys and such had to get sold...I'm getting that ich to build again and I've always liked the look of the "modern" Cherokee over the the original.
Best of luck on your adventures and when I've got something capable I'll be sure to reach out!
03-11-2017, 08:43 AM
#94
Junior Member
Thread Starter
Join Date: Nov 2015
Location: New Hampshire
Posts: 70
Likes: 0
Received 0 Likes
on
0 Posts
Year: 2001
Model: Cherokee
Engine: 242 CID 4.0 Inline 6 Chrysler MPI "High Output"
Not a problem man, happy to support it.
I'm looking at picking up a Cherokee "classic" in the next few months and building something very similar for our family.
We moved from WA state to central FL about nine months ago so all the toys and such had to get sold...I'm getting that ich to build again and I've always liked the look of the "modern" Cherokee over the the original.
Best of luck on your adventures and when I've got something capable I'll be sure to reach out!
03-11-2017, 03:00 PM
#95
No, I don't lick fish.
Not a problem man, happy to support it.
I'm looking at picking up a Cherokee "classic" in the next few months and building something very similar for our family.
We moved from WA state to central FL about nine months ago so all the toys and such had to get sold...I'm getting that ich to build again and I've always liked the look of the "modern" Cherokee over the the original.
Best of luck on your adventures and when I've got something capable I'll be sure to reach out!
I'm looking at picking up a Cherokee "classic" in the next few months and building something very similar for our family.
We moved from WA state to central FL about nine months ago so all the toys and such had to get sold...I'm getting that ich to build again and I've always liked the look of the "modern" Cherokee over the the original.
Best of luck on your adventures and when I've got something capable I'll be sure to reach out!
If you're ever in the Ocala area, hit me up. Got a few really good spots to wheel at that you wouldn't believe are in FL.
03-12-2017, 08:50 PM
#96
Seasoned Member
I'm in Largo right now (looking to move when our lease is up in June) working at an office in St Pete (corner of 1st and 6th)
03-13-2017, 01:34 PM
#97
Junior Member
Thread Starter
Join Date: Nov 2015
Location: New Hampshire
Posts: 70
Likes: 0
Received 0 Likes
on
0 Posts
Year: 2001
Model: Cherokee
Engine: 242 CID 4.0 Inline 6 Chrysler MPI "High Output"
03-13-2017, 03:41 PM
#98
No, I don't lick fish.
Sweet!
 03-21-2017, 12:03 PM
#99
Junior Member
Thread Starter
Join Date: Nov 2015
Location: New Hampshire
Posts: 70
Likes: 0
Received 0 Likes
on
0 Posts
Year: 2001
Model: Cherokee
Engine: 242 CID 4.0 Inline 6 Chrysler MPI "High Output"
Front Driveshaft Upgrades, Issues and Solutions
When I upgraded my rear driveshaft, and I had intended to upgrade my front driveshaft as well. But to be honest it was working just fine, so I basically was going to ride it until it gave... and it did, well almost. It had an obscene amount of play, and was causing some severe driveline vibes, so time to upgrade.
Problem #1: Old Stock Front Driveshaft
The stock drive shaft is shot. So I measured ujoint cap to cap at 32" sitting at normal ride height with my broken in 4.5" long arm lift kit. I call up Tom Woods and order a heavy duty double cardan custom front driveshaft. Shows up a few days latter, installed and good to go. So I thought...
Problem #2: Clearance
So I start driving around town, nothing crazy. Just enjoying the lack of vibes. I live in New England so I catch a frost heave. Then I hear it: A loud spinning metal on metal noise. Just for a split second, then nothing. Drive around some more and I figure out it's the second my suspension compresses over a frost heave I hear it.
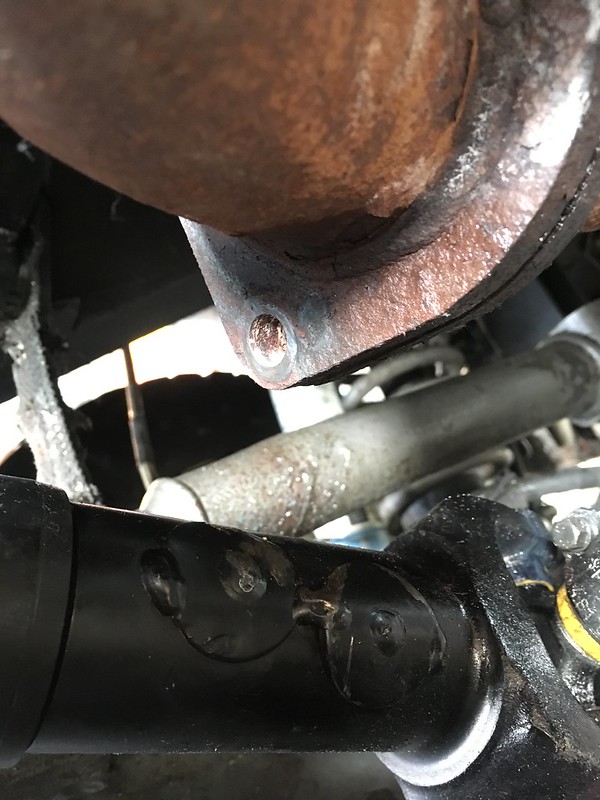
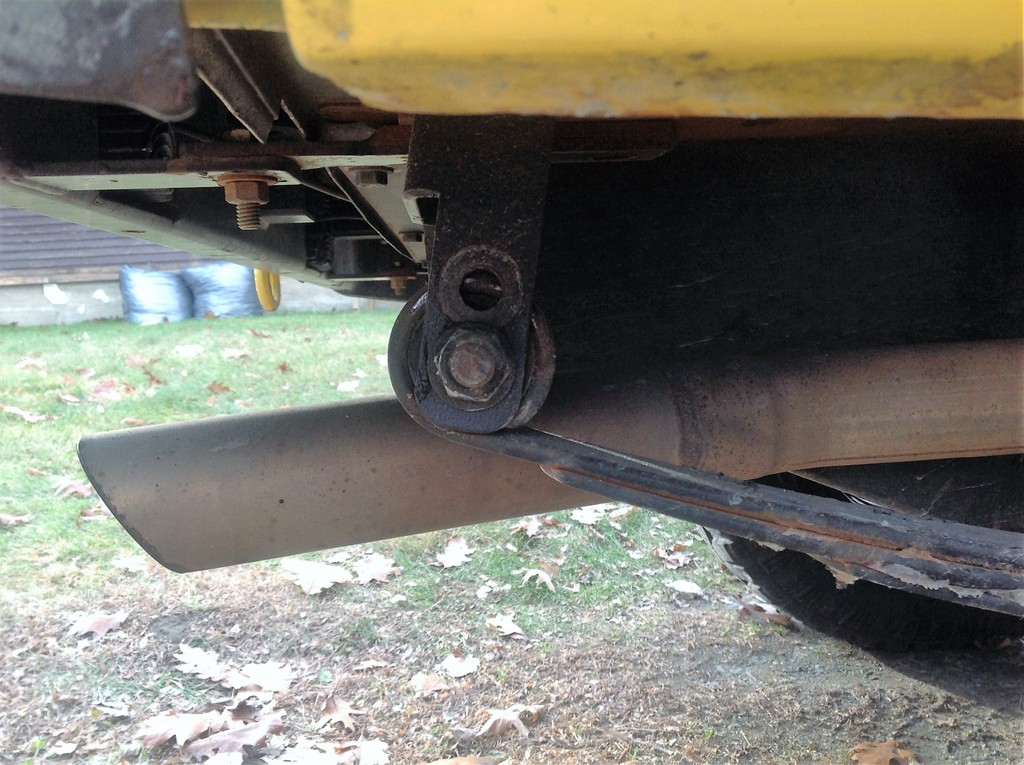
I get underneath the jeep, and I see a line of paint scraped off the front drive shaft where the weights are right next to the yolk. I look around, the only thing that could be hitting it is my exhaust flange where my pre-cats and front down pipe meet. Exhaust hasn't moved, so the only thing it can be is that because the new Tom Woods Drive Shaft is thicker than the stock one, my exhaust flange is now hitting the thicker drive shaft.
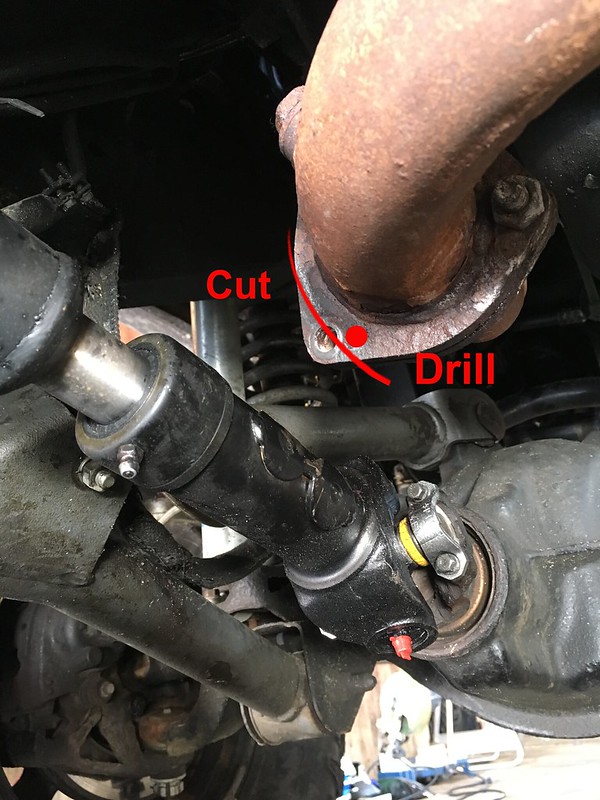
Solution: Cut the Flange
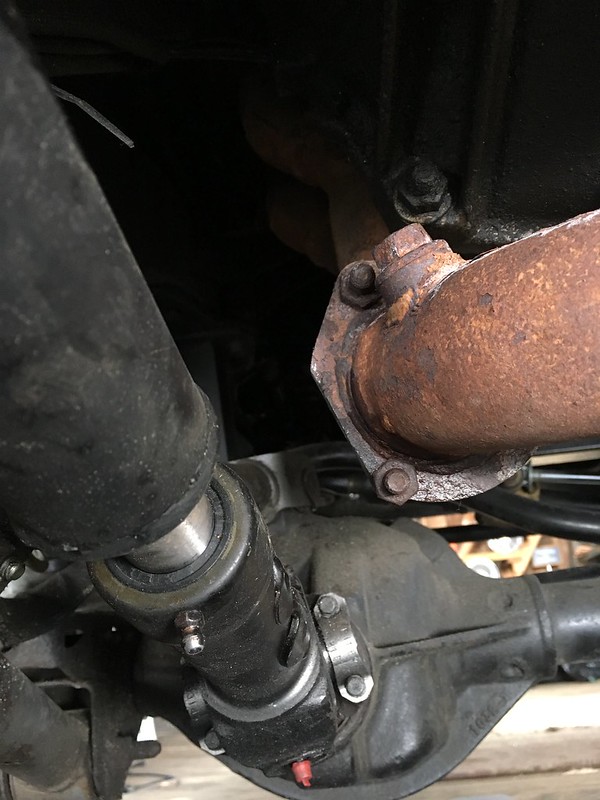
This is a triangular 3 flange that meets my precats to my front pipe that goes to the cat and muffler. There is enough meat on it, so we cut the corner off the flange that is hitting the drive shaft, and drill a new hole for the 3rd bolt. Got lucky with a 43 degree day, and made the cuts outside.
Front Driveshaft and Exhaust Flange
Cut and Drill
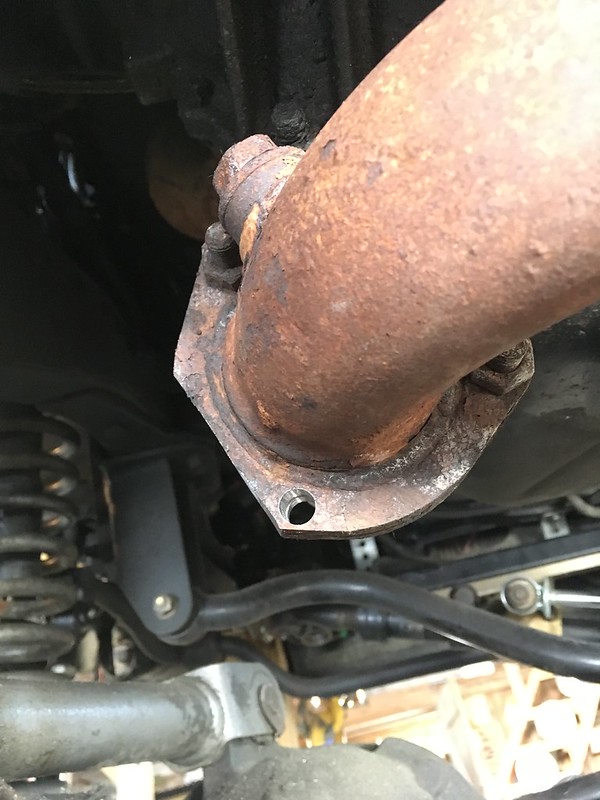
Finished Product:
When I upgraded my rear driveshaft, and I had intended to upgrade my front driveshaft as well. But to be honest it was working just fine, so I basically was going to ride it until it gave... and it did, well almost. It had an obscene amount of play, and was causing some severe driveline vibes, so time to upgrade.
Problem #1: Old Stock Front Driveshaft
The stock drive shaft is shot. So I measured ujoint cap to cap at 32" sitting at normal ride height with my broken in 4.5" long arm lift kit. I call up Tom Woods and order a heavy duty double cardan custom front driveshaft. Shows up a few days latter, installed and good to go. So I thought...
Problem #2: Clearance
So I start driving around town, nothing crazy. Just enjoying the lack of vibes. I live in New England so I catch a frost heave. Then I hear it: A loud spinning metal on metal noise. Just for a split second, then nothing. Drive around some more and I figure out it's the second my suspension compresses over a frost heave I hear it.
I get underneath the jeep, and I see a line of paint scraped off the front drive shaft where the weights are right next to the yolk. I look around, the only thing that could be hitting it is my exhaust flange where my pre-cats and front down pipe meet. Exhaust hasn't moved, so the only thing it can be is that because the new Tom Woods Drive Shaft is thicker than the stock one, my exhaust flange is now hitting the thicker drive shaft.
Solution: Cut the Flange
This is a triangular 3 flange that meets my precats to my front pipe that goes to the cat and muffler. There is enough meat on it, so we cut the corner off the flange that is hitting the drive shaft, and drill a new hole for the 3rd bolt. Got lucky with a 43 degree day, and made the cuts outside.
Front Driveshaft and Exhaust Flange
Cut and Drill
Finished Product:
Follow our adventures at Nomad Expeditions
For Wheeling, Overlanding and Travel Pics of the XJ in action
Last edited by TheF.N.G.; 03-22-2017 at 01:38 PM.
03-22-2017, 01:30 PM
#101
Junior Member
Thread Starter
Join Date: Nov 2015
Location: New Hampshire
Posts: 70
Likes: 0
Received 0 Likes
on
0 Posts
Year: 2001
Model: Cherokee
Engine: 242 CID 4.0 Inline 6 Chrysler MPI "High Output"
Shackle Bracket Relocation Kit
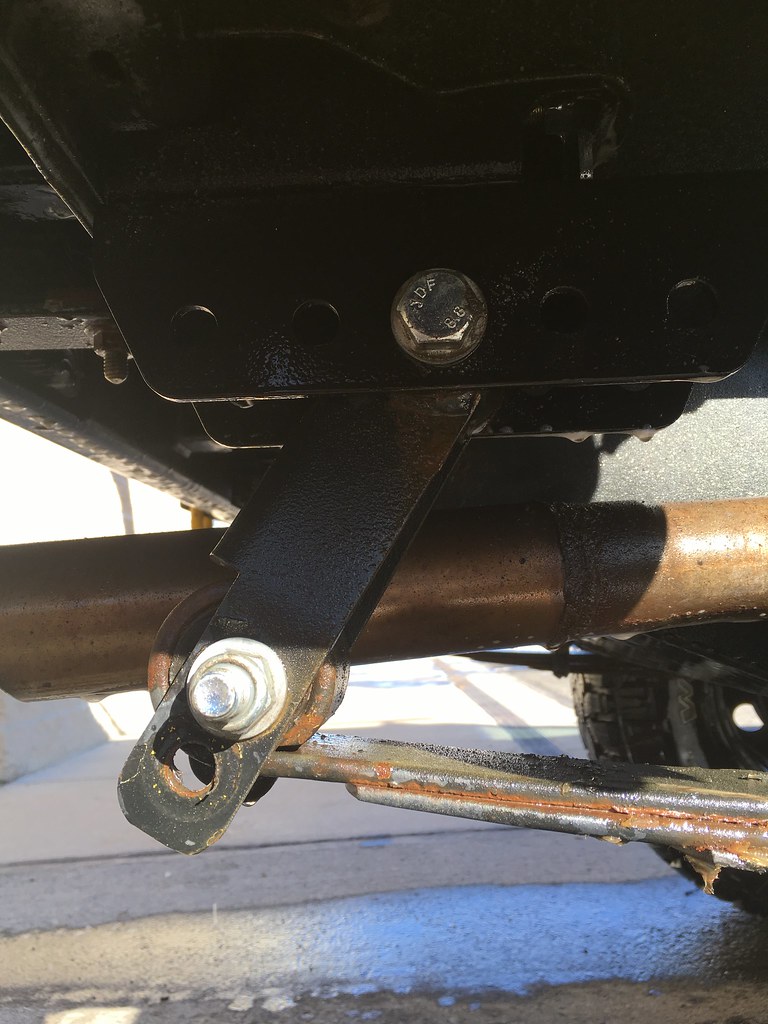
Didn't like my shackle angle at all, so I finally got around to installing a Leaf Spring Shackle Relocation Kit from Rough Country. Got a lot better shackle angle, and future proofed it due to the fact that the relocation kit has different settings to accommodate various lifts. It also boosted up the rear a bit, gave it some decent rake to compensate for when I have full gear for overlanding.
Didn't like my shackle angle at all, so I finally got around to installing a Leaf Spring Shackle Relocation Kit from Rough Country. Got a lot better shackle angle, and future proofed it due to the fact that the relocation kit has different settings to accommodate various lifts. It also boosted up the rear a bit, gave it some decent rake to compensate for when I have full gear for overlanding.
Before:
After:
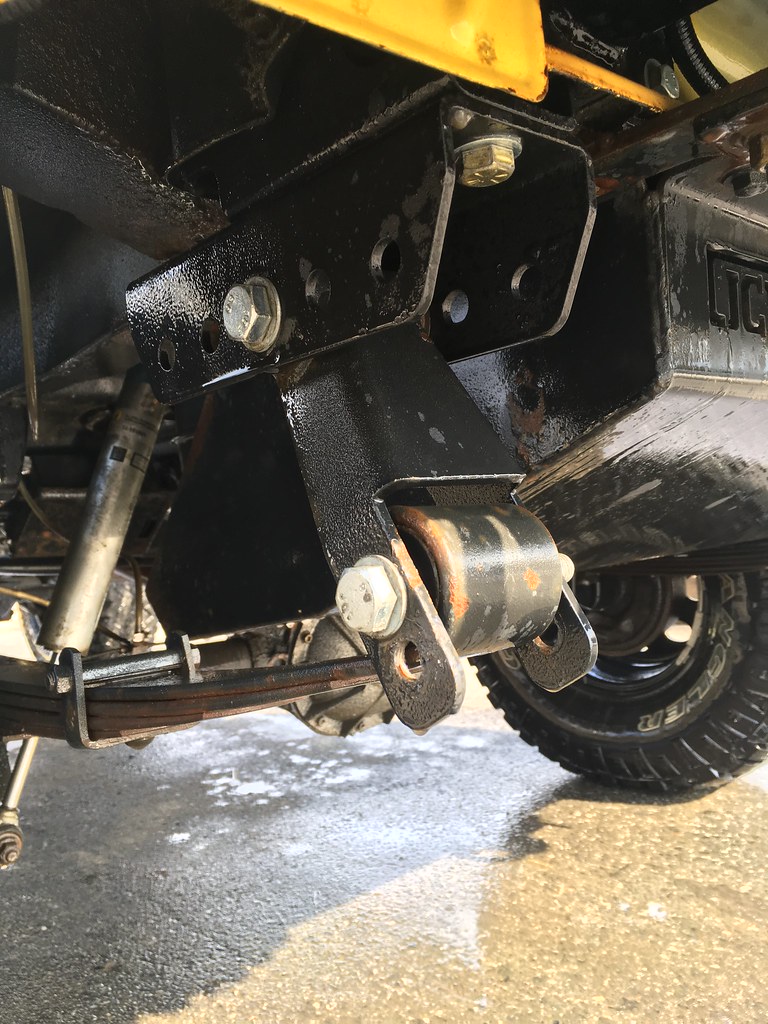
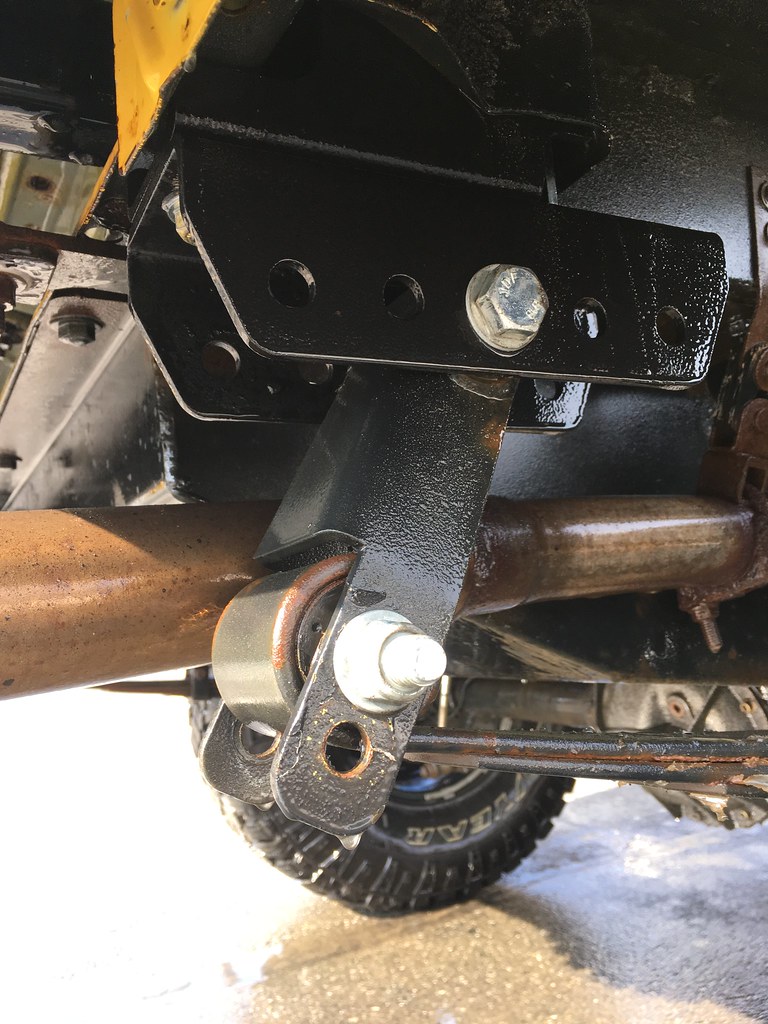
After:
Follow our adventures at Nomad Expeditions
For Wheeling, Overlanding and Travel Pics of the XJ in action
Last edited by TheF.N.G.; 03-23-2017 at 07:37 AM.
03-22-2017, 02:54 PM
#102
Seasoned Member
I installed the same brackets on my XJ, I really liked what they did for the spring position even with stock shackles. They also seemed to help the ride, granted my lift was a pieced together option with no name parts from the PO.
03-22-2017, 07:35 PM
#103
Junior Member
Thread Starter
Join Date: Nov 2015
Location: New Hampshire
Posts: 70
Likes: 0
Received 0 Likes
on
0 Posts
Year: 2001
Model: Cherokee
Engine: 242 CID 4.0 Inline 6 Chrysler MPI "High Output"
Follow our adventures at Nomad Expeditions
For Wheeling, Overlanding and Travel Pics of the XJ in action
03-23-2017, 08:21 AM
#104
Junior Member
Thread Starter
Join Date: Nov 2015
Location: New Hampshire
Posts: 70
Likes: 0
Received 0 Likes
on
0 Posts
Year: 2001
Model: Cherokee
Engine: 242 CID 4.0 Inline 6 Chrysler MPI "High Output"
Steering Upgrades
Since this is used as an Overland Vehicle, Trail Rig, and Daily Driver; this build runs a fine line. It needs to handle highway speeds, have good road manors, and handle a trail all at a moments notice. Which brings me back to steering...
Adjustable Track Bar
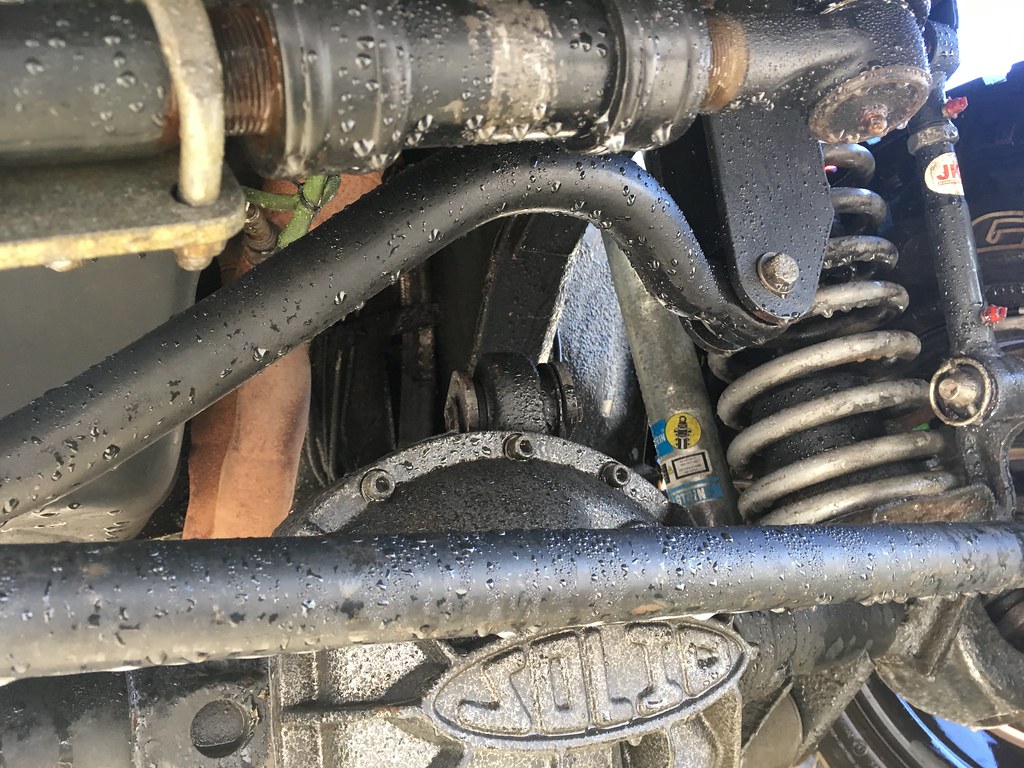
I was dealing with some clearance issues before I installed extended bumpstops. Noticed that the adjustable track bar that came with my long arm kit would connect with the top of my differential cover once the sway bar links were disconnected on the trail. I also didn't like the fact that any time I needed to adjust my track bar, I would have to disconnect the top end from the mount and rotate the heim joint. Plus the heim joint already had some play in it.
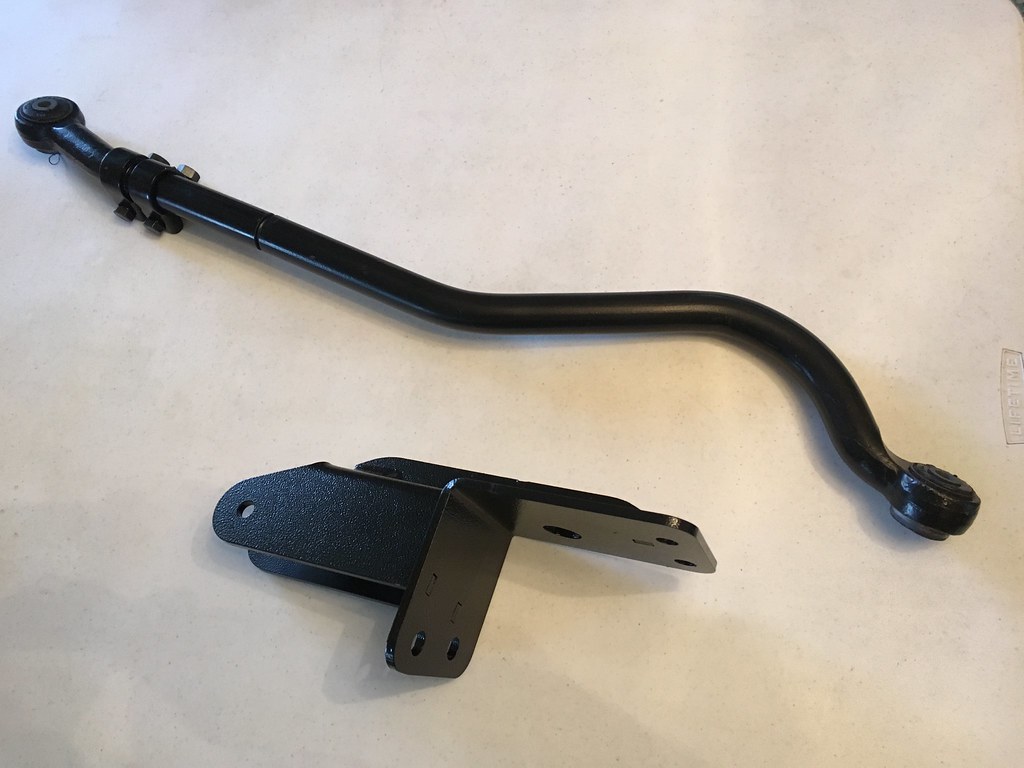
So I ordered a new Heavy Duty Adjustable Track Bar from Rough Country. Rugged 1.25" outside diamiter, curved at the diff, and it had a tie rod style adjustment so that I can adjust while mounted, without disconnecting.
Sector Shaft Brace
I had a steering box brace. But I always felt it was more for piece of mind than actually being useful. I do a lot of trails, around a lot of rocks, and find myself in a lot of mud. I am also looking to upgrade from 33" to 35" tires soon. So I was on the look out for something more solid to keep my steering box from peeling off my frame.
I was also having a bad run with remaned steering boxes having some play in them from the local stores. I went through 3 before I found one with the least amount of play. Not great, just the least amount. One had an 8 inch dead spot.
So I decided to get a Heavy Duty Sector Shaft Brace from Boostwerks Engineering. From their website:
"The design utilizes a large 1 1/4" pillow block bearing to brace the steering box from those hard hits and high loads that off-roading entails. The Ultimate Brace also effectively creates a truss between both Uni-Rails further stiffening the chassis. We've incorporated high profile recovery and trailer tie down points into the design as well."
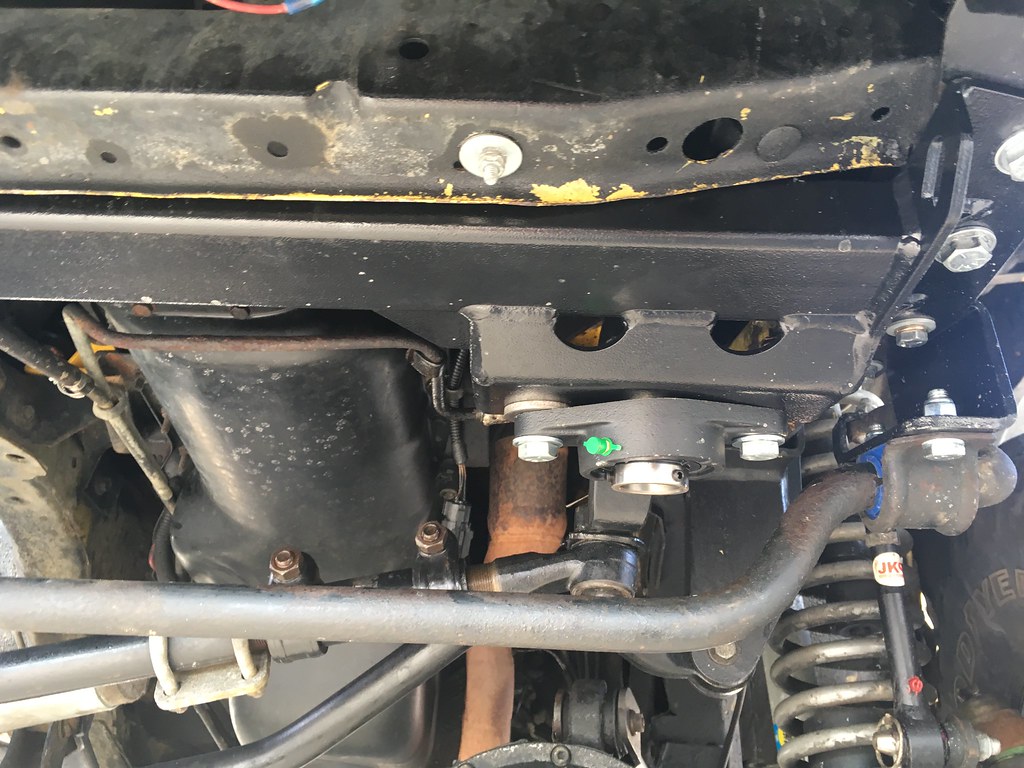
Rugged design, 3/16 steel, and Uni-Rail truss. And it helped dial in some steering play issues as well. I had to get drop down brackets for my sway bar links. But everything lined up and bolted in great. This, combined with my C-Rok 3/16" Steel Inside Frame Plate Steering Box Spacer which I had installed and mentioned previously in this build, gives me a lot more confidence in my steering setup now
Sector Shaft Brace and Adjustable Track Bar
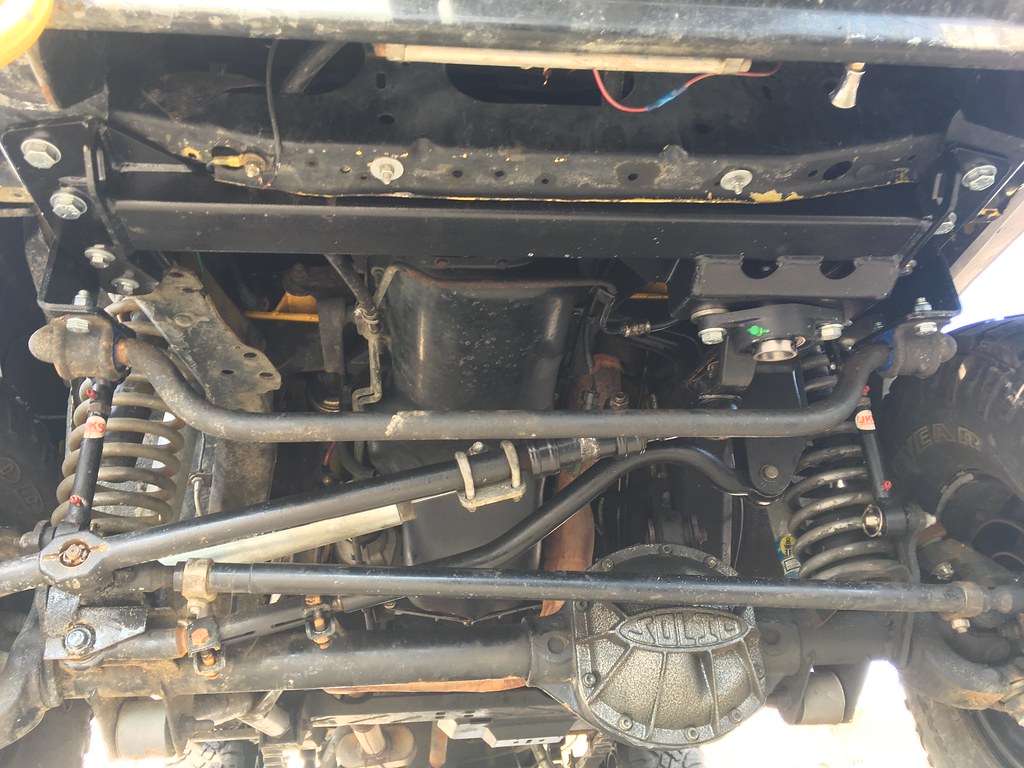
Boostwerks Sector Shaft Brace
Rough Country Adjustable Track Bar
Since this is used as an Overland Vehicle, Trail Rig, and Daily Driver; this build runs a fine line. It needs to handle highway speeds, have good road manors, and handle a trail all at a moments notice. Which brings me back to steering...
Adjustable Track Bar
I was dealing with some clearance issues before I installed extended bumpstops. Noticed that the adjustable track bar that came with my long arm kit would connect with the top of my differential cover once the sway bar links were disconnected on the trail. I also didn't like the fact that any time I needed to adjust my track bar, I would have to disconnect the top end from the mount and rotate the heim joint. Plus the heim joint already had some play in it.
So I ordered a new Heavy Duty Adjustable Track Bar from Rough Country. Rugged 1.25" outside diamiter, curved at the diff, and it had a tie rod style adjustment so that I can adjust while mounted, without disconnecting.
Sector Shaft Brace
I had a steering box brace. But I always felt it was more for piece of mind than actually being useful. I do a lot of trails, around a lot of rocks, and find myself in a lot of mud. I am also looking to upgrade from 33" to 35" tires soon. So I was on the look out for something more solid to keep my steering box from peeling off my frame.
I was also having a bad run with remaned steering boxes having some play in them from the local stores. I went through 3 before I found one with the least amount of play. Not great, just the least amount. One had an 8 inch dead spot.
So I decided to get a Heavy Duty Sector Shaft Brace from Boostwerks Engineering. From their website:
"The design utilizes a large 1 1/4" pillow block bearing to brace the steering box from those hard hits and high loads that off-roading entails. The Ultimate Brace also effectively creates a truss between both Uni-Rails further stiffening the chassis. We've incorporated high profile recovery and trailer tie down points into the design as well."
Rugged design, 3/16 steel, and Uni-Rail truss. And it helped dial in some steering play issues as well. I had to get drop down brackets for my sway bar links. But everything lined up and bolted in great. This, combined with my C-Rok 3/16" Steel Inside Frame Plate Steering Box Spacer which I had installed and mentioned previously in this build, gives me a lot more confidence in my steering setup now
Sector Shaft Brace and Adjustable Track Bar
Boostwerks Sector Shaft Brace
Rough Country Adjustable Track Bar
Follow our adventures at Nomad Expeditions
For Wheeling, Overlanding and Travel Pics of the XJ in action
Last edited by TheF.N.G.; 03-24-2017 at 11:00 AM.
03-24-2017, 08:15 AM
#105
Junior Member
Thread Starter
Join Date: Nov 2015
Location: New Hampshire
Posts: 70
Likes: 0
Received 0 Likes
on
0 Posts
Year: 2001
Model: Cherokee
Engine: 242 CID 4.0 Inline 6 Chrysler MPI "High Output"
Long Arm Suspension Joints
I was getting some clunking and popping noises from my floor boards, and it was handling a little funny. Now keep in mind I have a lot of noises going on, so trying to diagnose each one individually and address them can be a challenge. Turns out the flex joints on the upper and lower control arms were getting worn. I have a Rough County 4.5" Long Arm Lift Kit. So Rough Country hooked me up with a rebuild kit for uppers and lowers on both sides. Apparently it's a slightly newer style than the one I had installed a year or two ago. Seems to do the trick for now. Handles a little better as well.
If these go again, I may opt to go for Ballistic or Currie joints in the future.
No pictures on this one, just figured I'd share the build progress.
Follow our adventures at Nomad Expeditions
For Wheeling, Overlanding and Travel Pics of the XJ in action