
My unicorn


Thread Starter
Junior Member
Joined: May 2015
Posts: 46
Likes: 0
From: 70729
Year: 2001
Model: Cherokee
Engine: 4.0 I6
I'll start this by saying that I have to make everything "my own". I can't leave anything alone. There's always some way to improve it or at least make it more unique. For me, this is especially true with cars. I've never had an off-road vehicle since I don't hunt or do anything that would warrant a need for such a machine. But, I've been in plenty of situations where I would've liked at least more ground clearance. My current 13+ year project is an '02 S10 Xtreme (hence my scree name) that I bought almost new December '02 with 9,xxx miles. I've dumped a ridiculous amount of money and labor into it, but have learned a lot and am not afraid to cut on a vehicle. I melted a piston in the original 4.3 V6 at 43,xxx miles after running lean with a supercharger. I decided I'd do things right the next go around and swap in an LS V8. Of course, my original plans to use a stock 6.0 from an Escalade escalated because of the "while-I'm-in-here-I-may-as-well..." mentality. It became a high-compression head and cammed and all other supporting mods beast slated to put out at least 450HP/TQ, figuring fairly conservatively. I've been building up the S10 in preparation for the amount of power- beefier parts, suspension mods, and even a fuel tank relocation behind the axle for weight redistribution. It would still be a total street truck with full interior, A/C, stereo, etc. It's still in daily driver status, although I drive a company van daily for work. But it's not disassembled in a garage collecting dust. Since spending so much money and effort doing all these little things to give the truck a half-assed chance of being controllable on the street, the V8 still is't in it and I lost a lot of the drive to work on it. I decided that since I wouldn't be running slicks and a strip-only type suspension, a lot of that power wouldn't make it to the ground. I'd never be able to drive it on wet roads and God help me if I ever catch some loose gravel! I'm quite sure that I'd be happy with ~350 horses on the street from a mildly-modded 5.3 in that S10. The extra 100+ I'm giving up would never be used as it would just go up in tire smoke. I've also always wanted/needed something much more utilitarian. I also wanted something with more interior space as my girlfriend has two young girls. I'd love for us all to be able to go do some road tripping/light wheeling together.
A week ago last Wednesday, I saw a 19-hour-old craigslist ad for a super clean '01 XJ. It had 160K miles and "a rough idle and low brake pressure". I was certain and hoping it was a simple dry rotted brake booster hose causing a vacuum leak and hard pedal. The guy was asking $3,000 and was negotiable due to the problems it had and because he was moving out of state soon. So I was in a frenzy to come up with money ASAP and began contacting friends. I was able to look at the Jeep early that next morning. The guy had a lot of calls and phone offers, but I was the first to actually come out and see it. After a thorough examination (for the limited timeframe we had), I knew it was "the one". The problems it had weren't as simple as I had hoped for, but nothing I couldn't handle. Banking on it needing a new motor, I offered him $2,000. He asked if I could match a phone offer he had of $2,200. I could barely contain myself as we shook on the deal. Now I absolutely had to find a way to get cash! A friend of a friend was looking for a torquey motor for his newest project, a '68 C10. I got his number and we talked later that Thursday about the build specs and settled on a price for my motor. I met up with him at a car show that Saturday morning and he gave me the cash. I then went to my friend's house for him and I to take his truck and trail rig trailer to go pick up the XJ. I took a loss on selling that LQ9, but I'm not looking at it as such a negative. With what I sold my built motor for, I was able to purchase this Jeep AND have enough left over to buy a more sensible V8 (stock-ish 5.3, LQ4 6.0, etc.) to swap into my S10. I'd have my nice off-road family utility vehicle AND my fun S10 for the street.
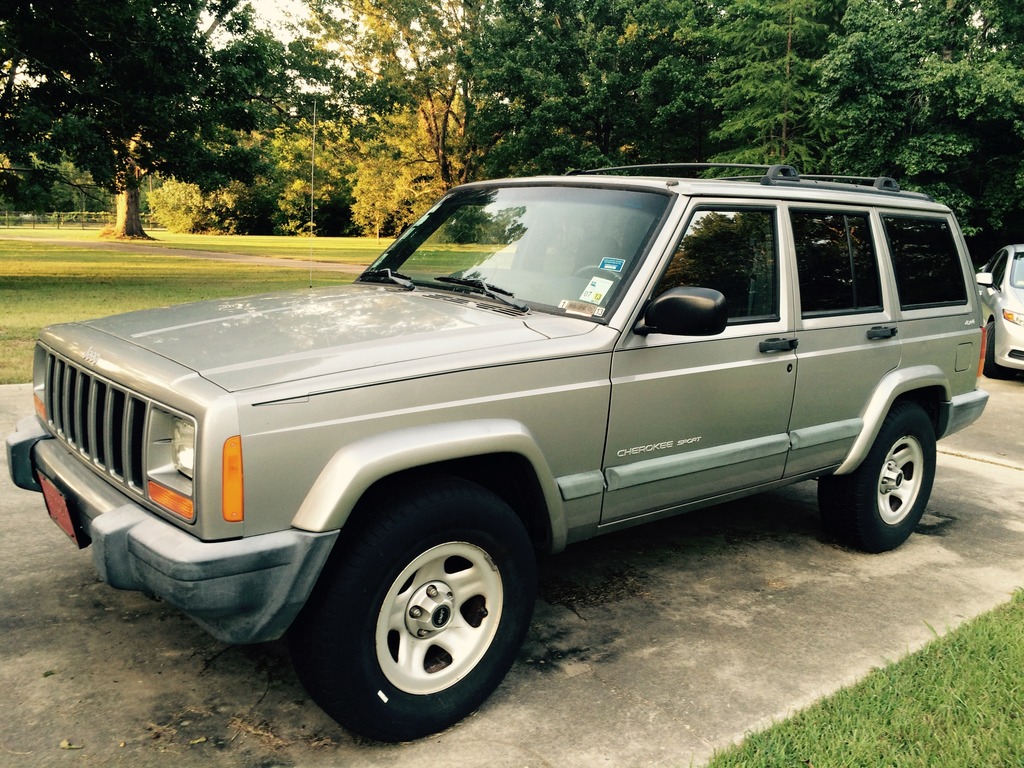
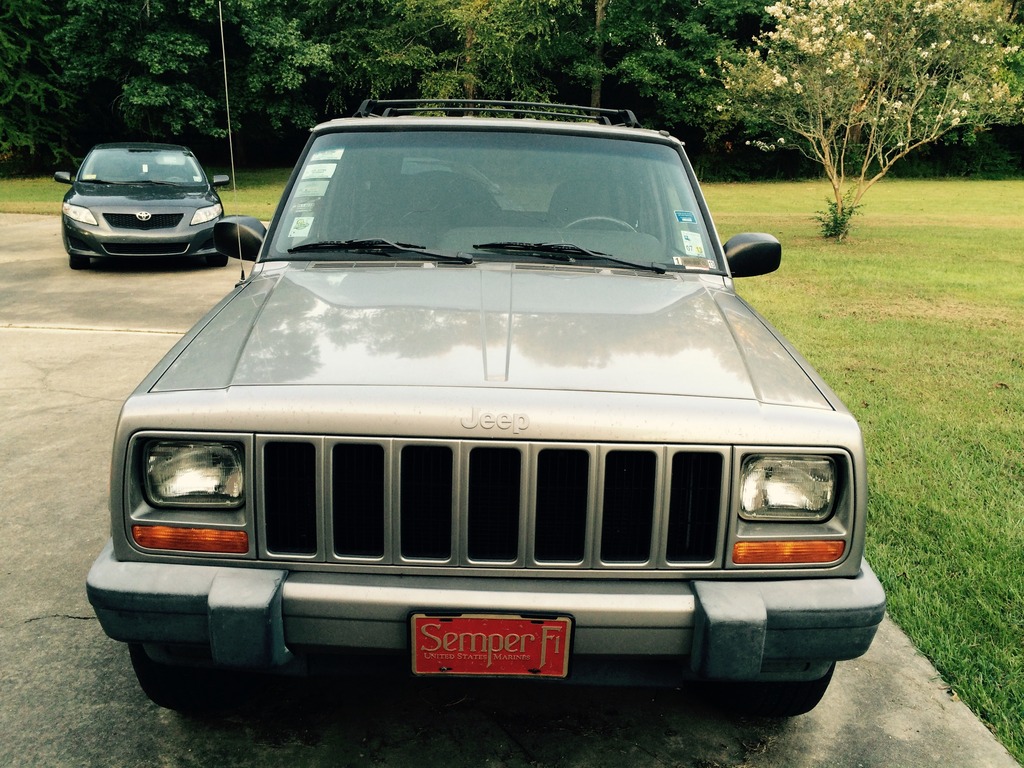
Now, on to the pics and why I refer to this XJ as my "unicorn"...
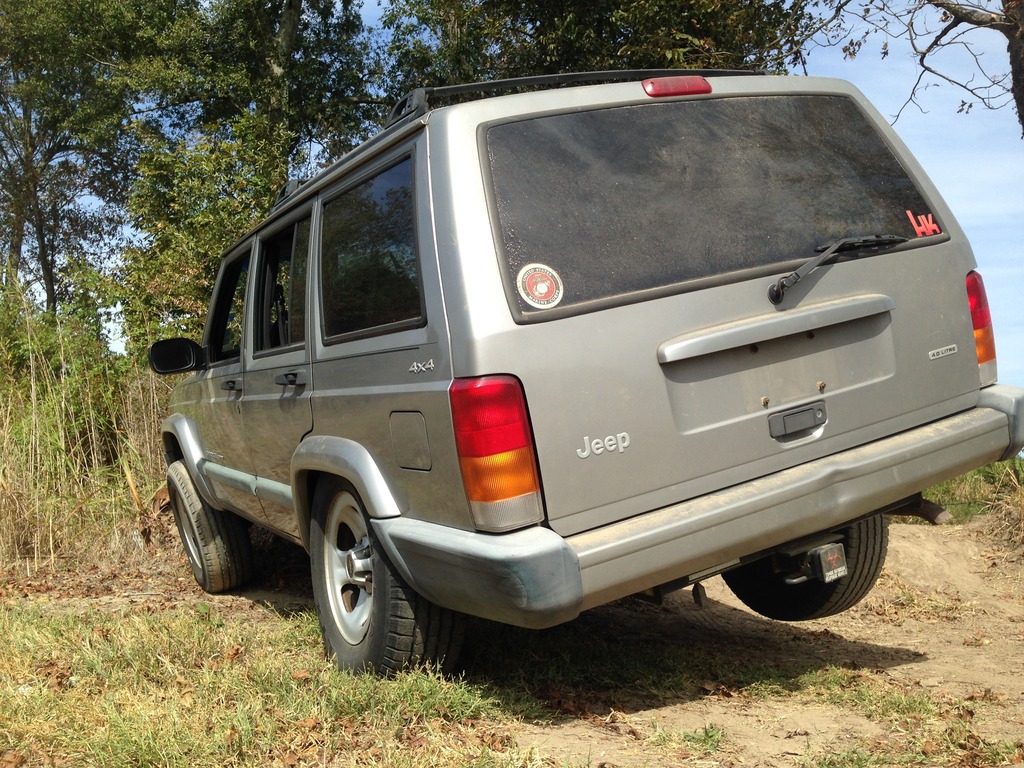
Here it is, almost 100% bone stock:
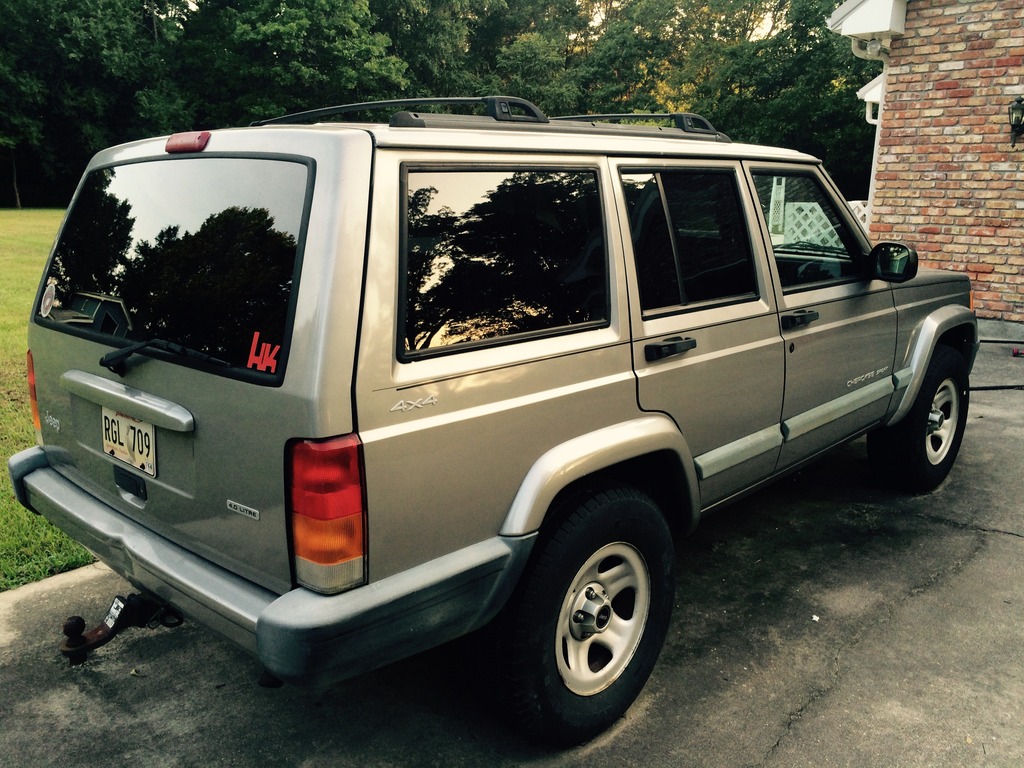
Rust is almost non-existent here and the little it has is mostly from the time period where it just sat. There's not a single dent or spot of rust on the underside of the unibody. I'll get some reinforcements on the rails before I do anything with it off road. From the looks of it, this thing has never been wheeled. It has two VERY small dings on the driver's side and I think I saw two VERY shallow ones on the hood. There's a few small spots within a 3 inch area on the back left corner of the roof where the paint is bubbled and has rust under neath. I'm thinking something chipped the paint off there, like the CB antenna, and it was never protected. The rain gutters have light surface rust in them. Other than that, the paint just has some minor scratches that appear to only be in the clearcoat.
It has cold A/C (recently replaced compressor and lines, possibly a condenser as well), hot heat, all the power goodies (that all work), and a super clean interior (with front, back, and cargo area Husky mats!). It needs a headliner (of course). No cracks or rips in the leather:
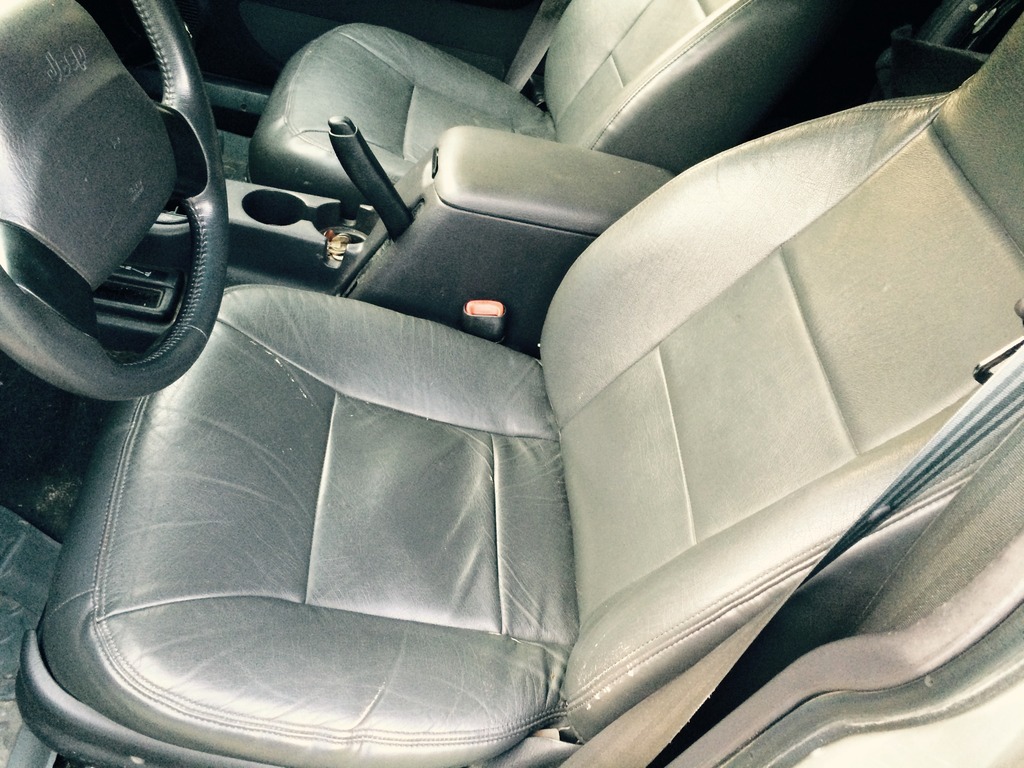
What I really love about it is this (No, not the CB radio and certainly not the crappy Alpine!):
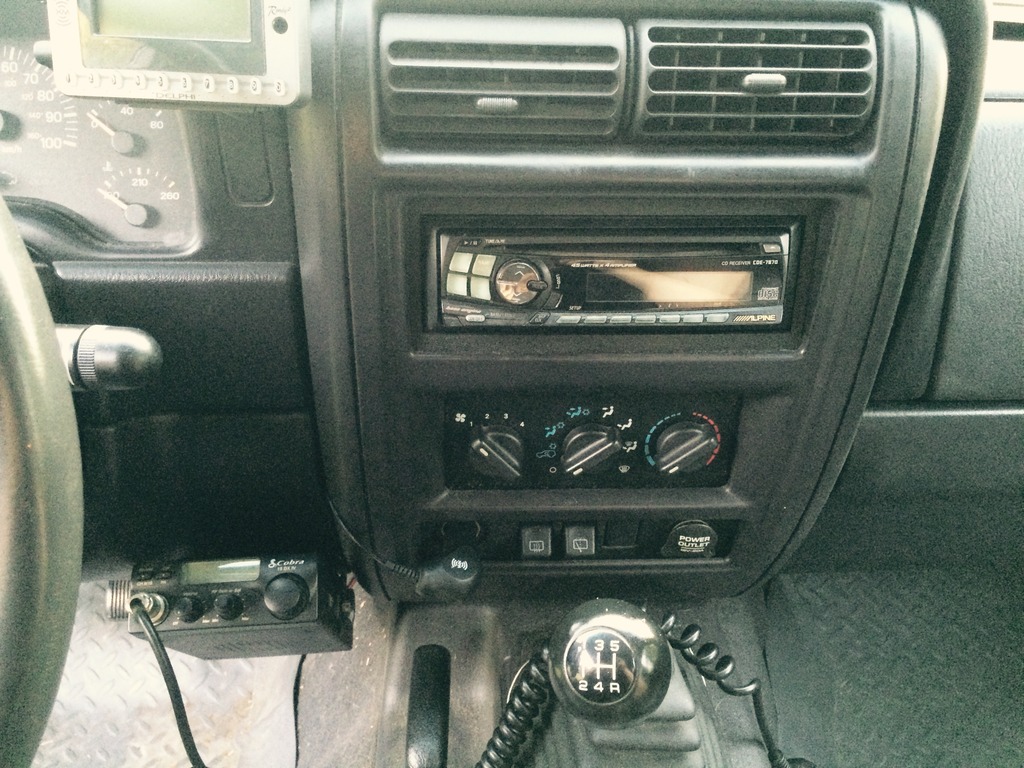
The clutch, shifting, and transfer case all seem to operate fine. From what I'm told, the combination of leather interior, 4WD and a manual transmission is rare, hence the unicorn reference.
MY PLANS-
Before I even had the cash to buy it, I was already getting leads from my friends on lift parts. One friend had some Rusty's 6.5" coils and a track bar layin around. The coils look fine and the track bar just needs bushings and a new adjustable end. Small price to pay for otherwise free parts! A few days later, another friend had some long travel radius arms that need some work. Again- free parts! At least the Johnny Joints are still solid. Best I can tell from Googling around, the arms are from Rough Country. Between my friends and I, we can build crossmembers, bracketry, and whatever else would be needed to mount everything up. One of 'em will be converting his XJ to links and coils in the rear this November, and said I can have his leaves. It's gonna have a sizable lift, but I'm not gonna beat it up on the rocks. It's gotta remain a clean and fully-functional daily driver that can be taken out to dinner on a Saturday night. I just wanna be able to hop those pesky speed bumps or occasionally crawl a parking bumper at the mall. (Just joking!). I'm gonna keep the current 8.25 and D30 for now as I feel they'll be fine with my intended uses and modest 33-34" tires. Plus I just don't have the funds for axles at the moment. Other than the lift, I plan to build all the expected and necessary armor- bumpers, sliders, etc. I have a decent collection of metal stock and heavy-duty universal parts. I know I'm gonna have much more fun fabbing up the heavy metal stuff than all the little light weight and space-constrained items I have to for my S10.
Free stuff:

Of course, my first goal is to get it running reliably. The brake problem turned out to be leaking wheel cylinders. The rotors don't look so healthy, either. I'll just give it full-on front and rear brake job and flush the system while I'm at it. Just a leisurely Saturday's work. That rough idle is what I attacked first. After verifying fuel and spark, I ran a compression test. I video'ed the testing of each cylinder for later comparison. All cylinders pumped to 75-ish on the first stroke, then 120-ish, then 150-ish, then peaked around 170-180 except for #4, it never registered on the gauge. I popped the valve cover and found this:
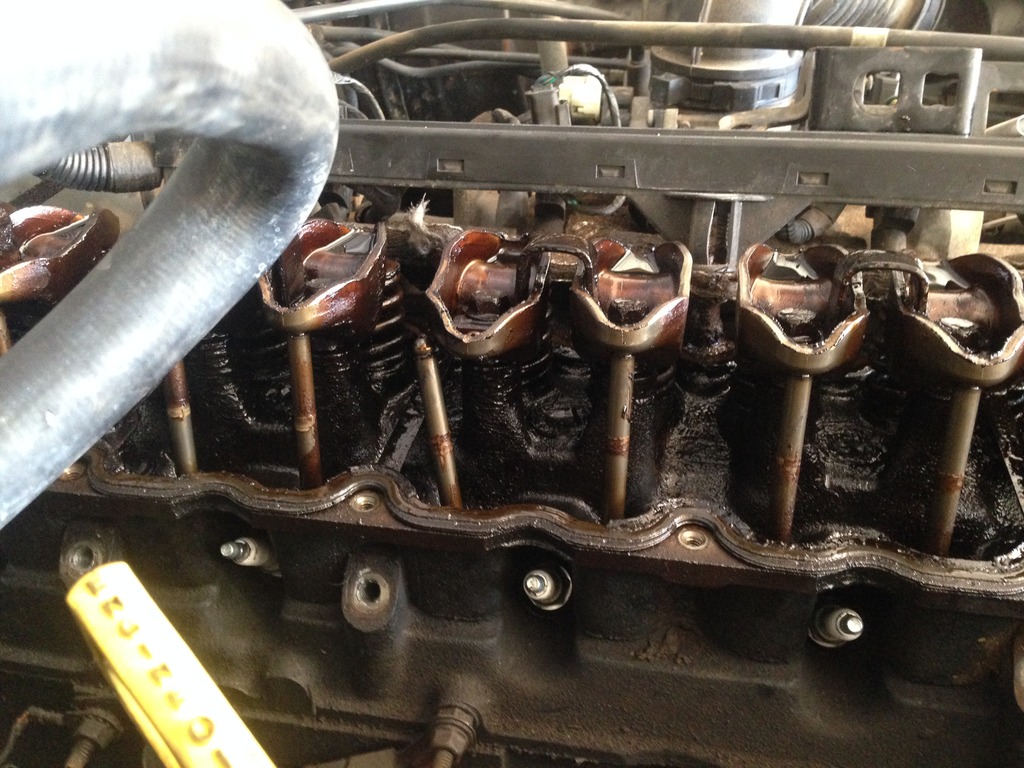
#4 intake pushrod just laying to the side. The rocker bolts were still torqued down and the pushrod wasn't bent. I unbolted the rockers, positioned the pushrod, then reinstalled the rockers. I ran fired it up with the valve cover off to watch it. The engine was now hitting on a 6 and idled so smoothly that I could barely tell it was running. My best guess is that during that time period it just sat, the oil drained from the lifters. When the guy finally started it, that one lifter was too slow to pump up and the rod fell out. Regardless, it's getting a set of new lifters. That's not the main concern, though. After reading up on these 331 heads being so prone to cracking around the #3 and #4 cylinders, I began inspecting it closely. It wasn't hard at all for me to find an expected crack:

I apologize if the vid quality is crappy. Photobucket has gotten bad lately. But, near the base of that rocker tower, you can see drops of coolant forming from the crack and running down into the oil flow. I'm hoping this amount isn't enough to have done any damage. The oil is dirty but not milky. I'm hoping that it hasn't been doing this for very long and that most of the coolant is burning off instead of mixing with and diluting the oil. At this point, I'm feeling pretty confident that I can just clean the block of the sludge, replace the lifters, slap on a new aftermarket or rebuilt TUPY head, and continue on for another 100K miles. I've already started a thread on this problem and have gotten some good input. I'm still weighing my options and more input is welcomed.
A week ago last Wednesday, I saw a 19-hour-old craigslist ad for a super clean '01 XJ. It had 160K miles and "a rough idle and low brake pressure". I was certain and hoping it was a simple dry rotted brake booster hose causing a vacuum leak and hard pedal. The guy was asking $3,000 and was negotiable due to the problems it had and because he was moving out of state soon. So I was in a frenzy to come up with money ASAP and began contacting friends. I was able to look at the Jeep early that next morning. The guy had a lot of calls and phone offers, but I was the first to actually come out and see it. After a thorough examination (for the limited timeframe we had), I knew it was "the one". The problems it had weren't as simple as I had hoped for, but nothing I couldn't handle. Banking on it needing a new motor, I offered him $2,000. He asked if I could match a phone offer he had of $2,200. I could barely contain myself as we shook on the deal. Now I absolutely had to find a way to get cash! A friend of a friend was looking for a torquey motor for his newest project, a '68 C10. I got his number and we talked later that Thursday about the build specs and settled on a price for my motor. I met up with him at a car show that Saturday morning and he gave me the cash. I then went to my friend's house for him and I to take his truck and trail rig trailer to go pick up the XJ. I took a loss on selling that LQ9, but I'm not looking at it as such a negative. With what I sold my built motor for, I was able to purchase this Jeep AND have enough left over to buy a more sensible V8 (stock-ish 5.3, LQ4 6.0, etc.) to swap into my S10. I'd have my nice off-road family utility vehicle AND my fun S10 for the street.
Now, on to the pics and why I refer to this XJ as my "unicorn"...
Here it is, almost 100% bone stock:


Rust is almost non-existent here and the little it has is mostly from the time period where it just sat. There's not a single dent or spot of rust on the underside of the unibody. I'll get some reinforcements on the rails before I do anything with it off road. From the looks of it, this thing has never been wheeled. It has two VERY small dings on the driver's side and I think I saw two VERY shallow ones on the hood. There's a few small spots within a 3 inch area on the back left corner of the roof where the paint is bubbled and has rust under neath. I'm thinking something chipped the paint off there, like the CB antenna, and it was never protected. The rain gutters have light surface rust in them. Other than that, the paint just has some minor scratches that appear to only be in the clearcoat.
It has cold A/C (recently replaced compressor and lines, possibly a condenser as well), hot heat, all the power goodies (that all work), and a super clean interior (with front, back, and cargo area Husky mats!). It needs a headliner (of course). No cracks or rips in the leather:

What I really love about it is this (No, not the CB radio and certainly not the crappy Alpine!):

The clutch, shifting, and transfer case all seem to operate fine. From what I'm told, the combination of leather interior, 4WD and a manual transmission is rare, hence the unicorn reference.
MY PLANS-
Before I even had the cash to buy it, I was already getting leads from my friends on lift parts. One friend had some Rusty's 6.5" coils and a track bar layin around. The coils look fine and the track bar just needs bushings and a new adjustable end. Small price to pay for otherwise free parts! A few days later, another friend had some long travel radius arms that need some work. Again- free parts! At least the Johnny Joints are still solid. Best I can tell from Googling around, the arms are from Rough Country. Between my friends and I, we can build crossmembers, bracketry, and whatever else would be needed to mount everything up. One of 'em will be converting his XJ to links and coils in the rear this November, and said I can have his leaves. It's gonna have a sizable lift, but I'm not gonna beat it up on the rocks. It's gotta remain a clean and fully-functional daily driver that can be taken out to dinner on a Saturday night. I just wanna be able to hop those pesky speed bumps or occasionally crawl a parking bumper at the mall. (Just joking!). I'm gonna keep the current 8.25 and D30 for now as I feel they'll be fine with my intended uses and modest 33-34" tires. Plus I just don't have the funds for axles at the moment. Other than the lift, I plan to build all the expected and necessary armor- bumpers, sliders, etc. I have a decent collection of metal stock and heavy-duty universal parts. I know I'm gonna have much more fun fabbing up the heavy metal stuff than all the little light weight and space-constrained items I have to for my S10.
Free stuff:

Of course, my first goal is to get it running reliably. The brake problem turned out to be leaking wheel cylinders. The rotors don't look so healthy, either. I'll just give it full-on front and rear brake job and flush the system while I'm at it. Just a leisurely Saturday's work. That rough idle is what I attacked first. After verifying fuel and spark, I ran a compression test. I video'ed the testing of each cylinder for later comparison. All cylinders pumped to 75-ish on the first stroke, then 120-ish, then 150-ish, then peaked around 170-180 except for #4, it never registered on the gauge. I popped the valve cover and found this:

#4 intake pushrod just laying to the side. The rocker bolts were still torqued down and the pushrod wasn't bent. I unbolted the rockers, positioned the pushrod, then reinstalled the rockers. I ran fired it up with the valve cover off to watch it. The engine was now hitting on a 6 and idled so smoothly that I could barely tell it was running. My best guess is that during that time period it just sat, the oil drained from the lifters. When the guy finally started it, that one lifter was too slow to pump up and the rod fell out. Regardless, it's getting a set of new lifters. That's not the main concern, though. After reading up on these 331 heads being so prone to cracking around the #3 and #4 cylinders, I began inspecting it closely. It wasn't hard at all for me to find an expected crack:
I apologize if the vid quality is crappy. Photobucket has gotten bad lately. But, near the base of that rocker tower, you can see drops of coolant forming from the crack and running down into the oil flow. I'm hoping this amount isn't enough to have done any damage. The oil is dirty but not milky. I'm hoping that it hasn't been doing this for very long and that most of the coolant is burning off instead of mixing with and diluting the oil. At this point, I'm feeling pretty confident that I can just clean the block of the sludge, replace the lifters, slap on a new aftermarket or rebuilt TUPY head, and continue on for another 100K miles. I've already started a thread on this problem and have gotten some good input. I'm still weighing my options and more input is welcomed.
Last edited by s10xtremist; Aug 8, 2015 at 12:00 PM.
Thread Starter
Junior Member
Joined: May 2015
Posts: 46
Likes: 0
From: 70729
Year: 2001
Model: Cherokee
Engine: 4.0 I6
Thank ya! Since the current tires are badly dry rotted, I'll be replacing them with something cheap to roll on after I get it running and braking. I'd like to get some used all-terrains or mud grips about 30" tall to fit the stock wheels and doing a 2" coil spacer and shackles. Spacers are cheap and I can make shackles. I'll call this "Stage 1". I won't be wheeling it like this. It'll just be to have some sort of off-road capability and presentable stance to get me around on the weekends over the next few months until I have every last nut and bolt for "Stage 2". This will be the REAL transformation with the 6.5" long arm lift and 33-34s.
Thread Starter
Junior Member
Joined: May 2015
Posts: 46
Likes: 0
From: 70729
Year: 2001
Model: Cherokee
Engine: 4.0 I6
Messing around in the interior was getting annoying due to my head constantly brushing the headliner. I found myself ducking every time I moved and it was making the interior feel cramped. So I removed the headliner and cleaned off all the crap. I started out rubbing the decomposed foam with my fingers, but it was taking way too long. I bought a long-handled plastic brush to scrub the crud off of my WJ's motor after I changed the valve cover gasket. The Supertech engine degreaser from WalMart worked so well that scrubbing wasn't necessary, so this brush was clean and unused. It took me about 5 minutes to completely clean off all the foam with this brush:
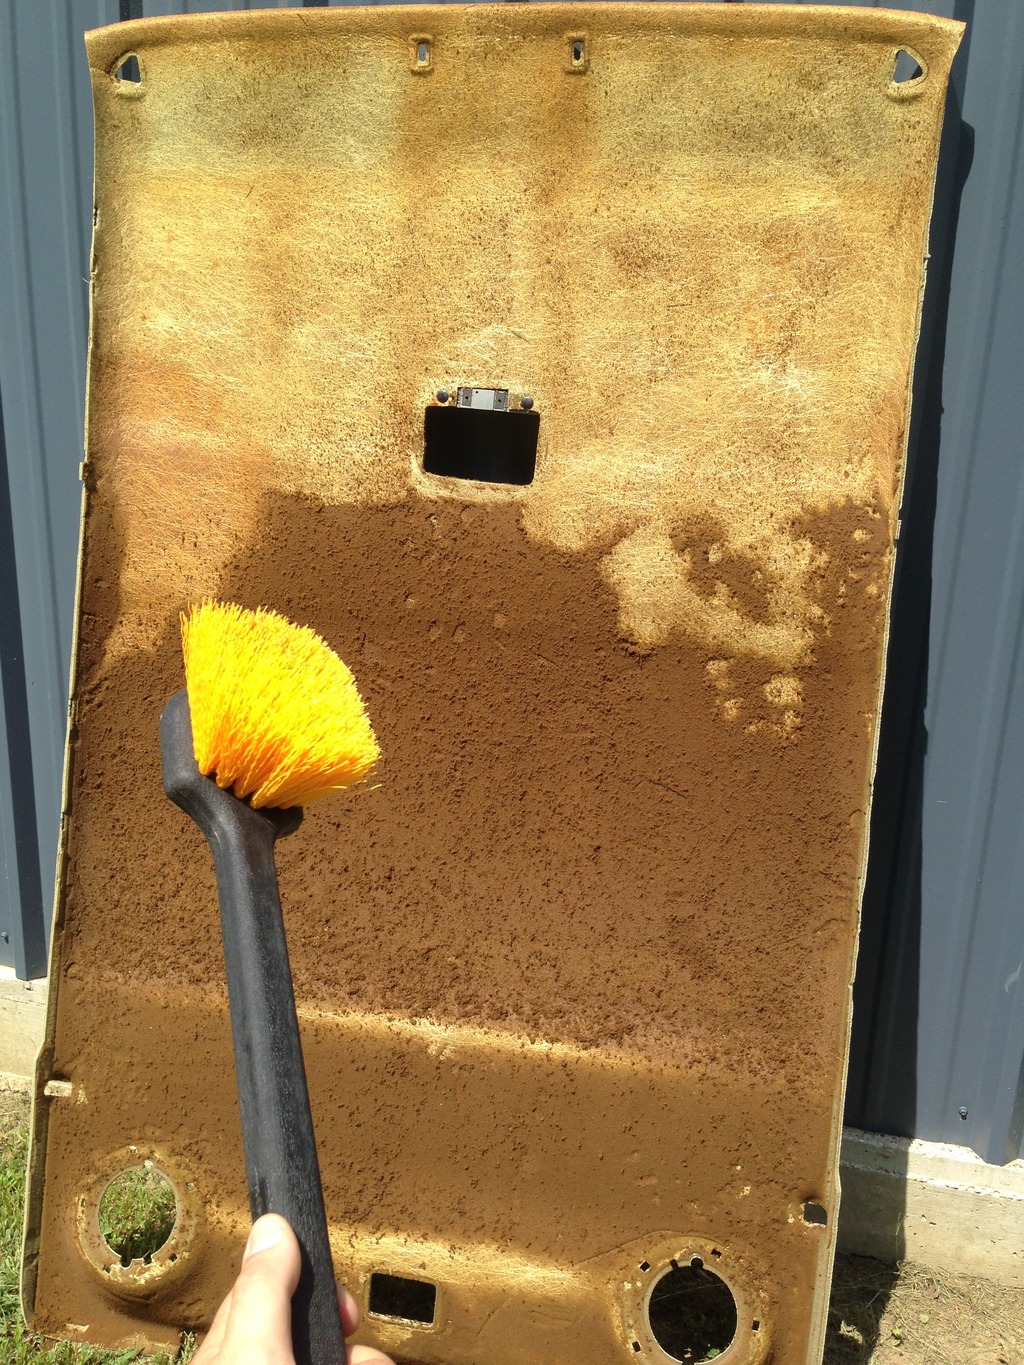
I cleaned off the remaining dust-like particles with my air compressor.
The original headliner was a light smoky gray color. I really want something to match the color of the trim plastic and seat leather. I could get something from a fabric or auto upholstery store and make this job easy. But I have a lot of leather-grained outdoor vinyl bought for other past projects and never used. It's straight black, though. It's also much heavier than almost any other better-suited material I could be using. After some research, it seems that this DAP Weldwood Contact Adhesive would solve the heat and bonding problems associated with such a heavy headliner material. I'm just not sure about the color difference. I'd like to use vinyl as it would compliment the leather interior as well as be much easier to clean. If an interior shop has some vinyl that better matches the leather and plastic trim color, I'll probably end up getting it if it's cheap enough. Otherwise, I'll use what I have. I mean, a black headliner would at least match the carpet, right?
Thread Starter
Junior Member
Joined: May 2015
Posts: 46
Likes: 0
From: 70729
Year: 2001
Model: Cherokee
Engine: 4.0 I6
The more I think about it, I should probably just use the vinyl. The color would look just fine and I really don't wanna buy more materials, especially since I have so much of this black vinyl that's been rolled up in a closet for years. I believe I did sufficient research on an adhesive. I'd rather go overboard than have to do this twice!
Thread Starter
Junior Member
Joined: May 2015
Posts: 46
Likes: 0
From: 70729
Year: 2001
Model: Cherokee
Engine: 4.0 I6
Got that gallon of adhesive and 3 yards of vinyl the other day. I may do the headliner tomorrow if I don't get any call-outs for work. I brought a piece of the plastic interior trim into the upholstery shop to compare it to their samples. I picked the best-matching color and texture, and it looked to be a very close match. Of course, by the time I got home, the vinyl had somehow gotten much more black. Oh well, I already bought it so I'm gonna use it.
Also this week, I picked up a set of 5 31x10.50R15 Goodyear Wranger Authority on OEM TJ wheels. The worst tire has about 50% tread and they're worn evenly with no cupping.
Also this week, I picked up a set of 5 31x10.50R15 Goodyear Wranger Authority on OEM TJ wheels. The worst tire has about 50% tread and they're worn evenly with no cupping.
Trending Topics
CF Veteran
Joined: Jul 2010
Posts: 4,930
Likes: 3
From: 802
Year: 99
Model: Cherokee
Engine: 4.0
Got that gallon of adhesive and 3 yards of vinyl the other day. I may do the headliner tomorrow if I don't get any call-outs for work. I brought a piece of the plastic interior trim into the upholstery shop to compare it to their samples. I picked the best-matching color and texture, and it looked to be a very close match. Of course, by the time I got home, the vinyl had somehow gotten much more black. Oh well, I already bought it so I'm gonna use it.
Also this week, I picked up a set of 5 31x10.50R15 Goodyear Wranger Authority on OEM TJ wheels. The worst tire has about 50% tread and they're worn evenly with no cupping.
Also this week, I picked up a set of 5 31x10.50R15 Goodyear Wranger Authority on OEM TJ wheels. The worst tire has about 50% tread and they're worn evenly with no cupping.
Thread Starter
Junior Member
Joined: May 2015
Posts: 46
Likes: 0
From: 70729
Year: 2001
Model: Cherokee
Engine: 4.0 I6
UPDATES!
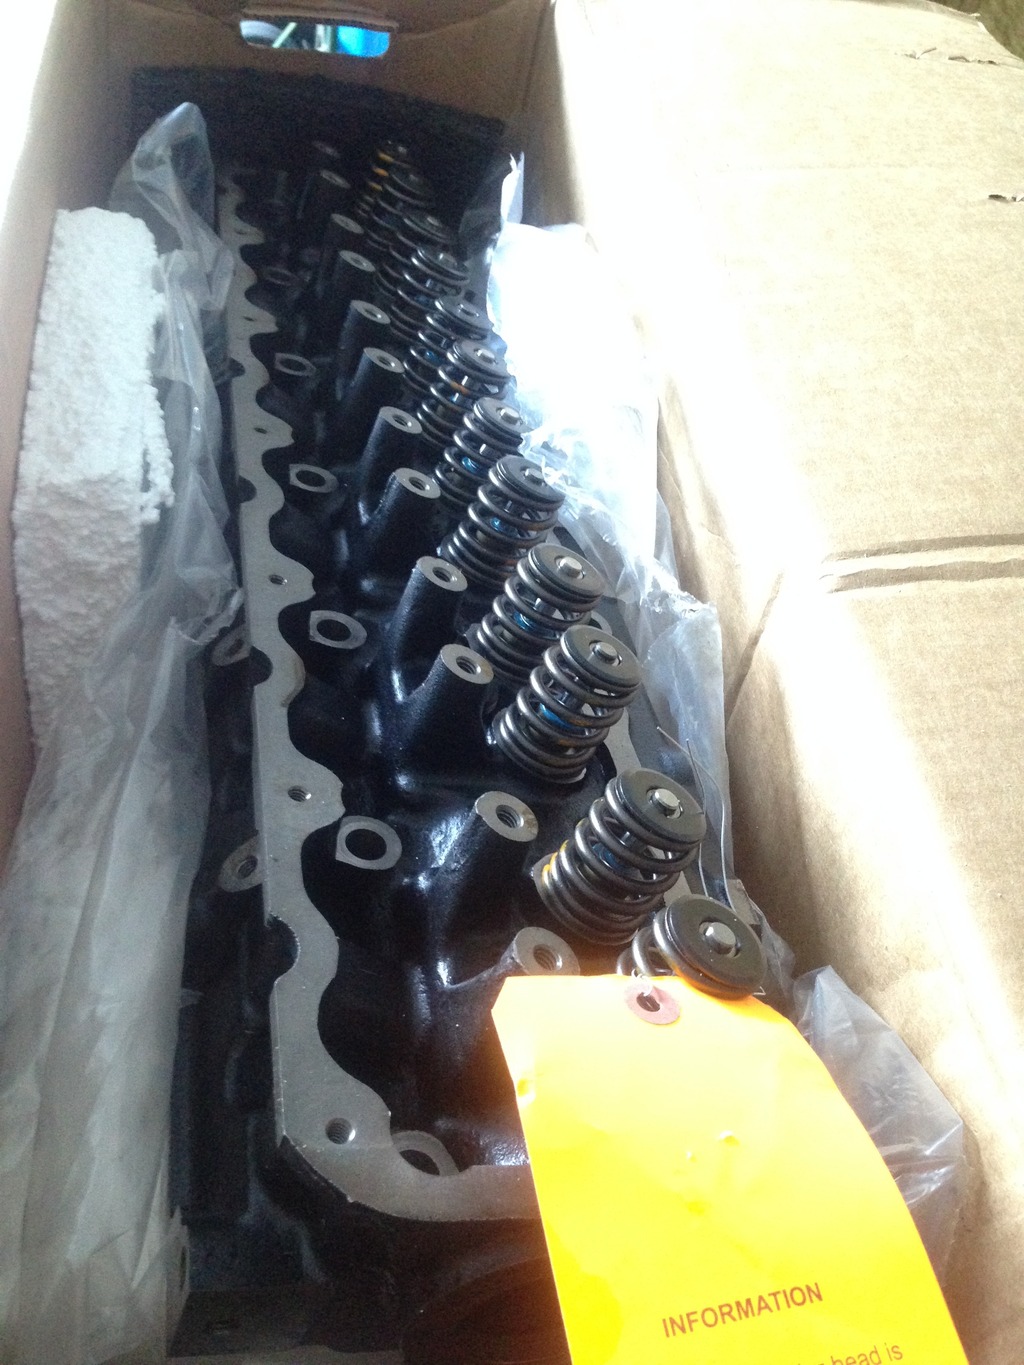
I got the blessing from Blackstone to clean up the block and replace the head. I have a full Victor Reinz gasket kit, VR head bolts and Sealed Power lifters. I picked up a Clearwater head Thursday night from a CF member that didn't need it. It looks nice, but I can't tell much difference between it and the original 0331 thickness-wise. Maybe I'm not looking in the right areas?:
Went to the salvage yard yesterday to take advantage of their half-off sale and got a handful of goodies-
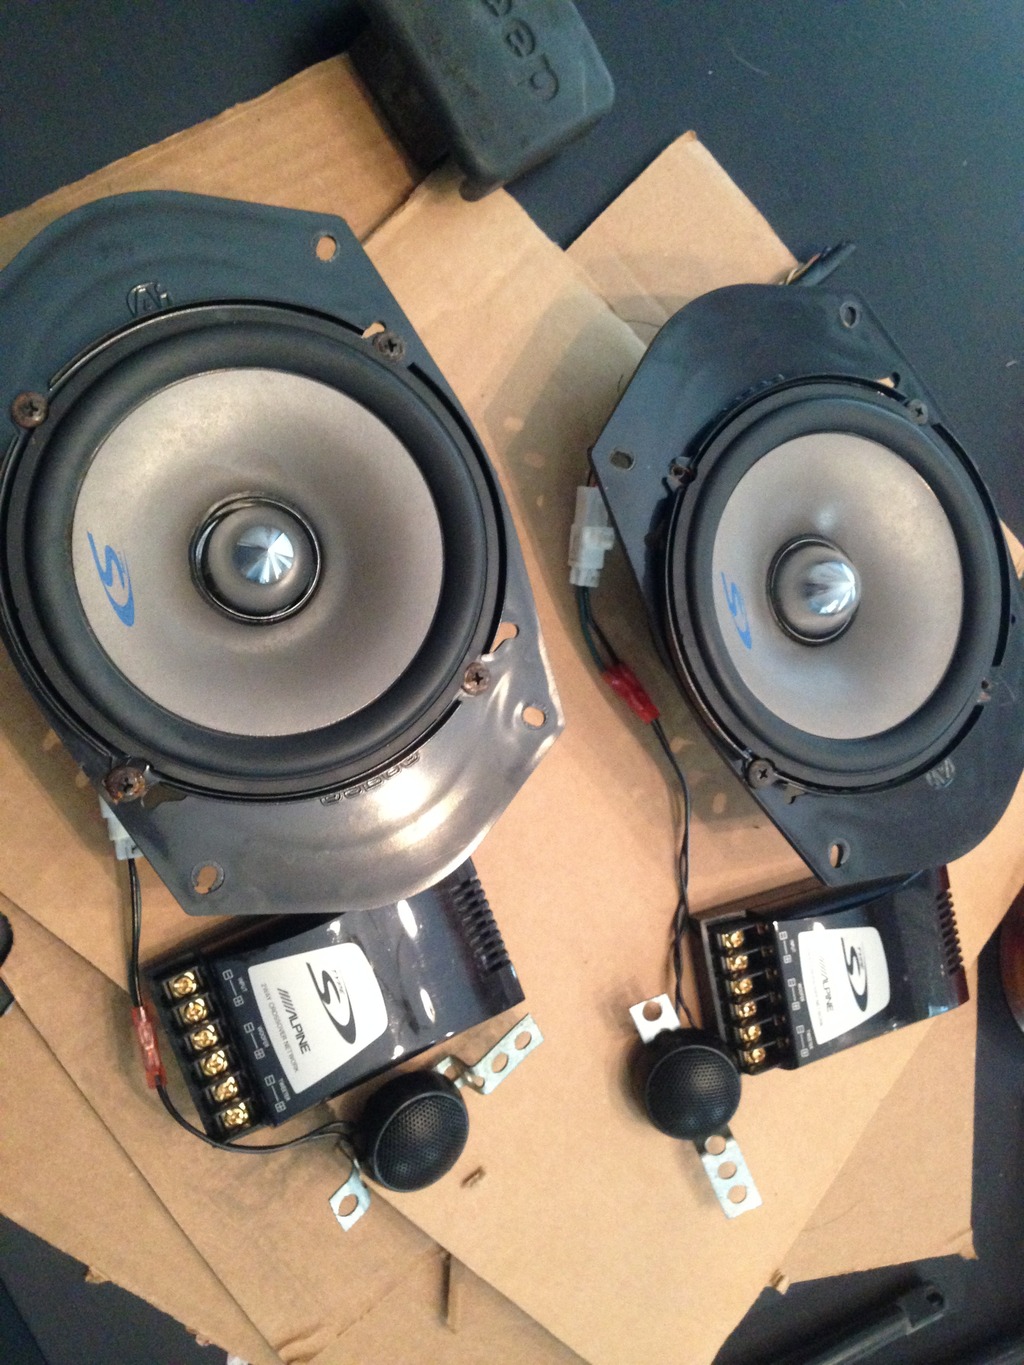
A nice set of component speakers from a WJ that were obviously professionally installed and powered by the factory Infinity amp. These are most likely going into the rear of the XJ as I have some Alpine Type-R components still BNIB to go in the front doors. For $9, I couldn't pass on 'em:
Also found some good glass struts ($3) and a hitch plug ($.75) for my girlfriend's WJ:


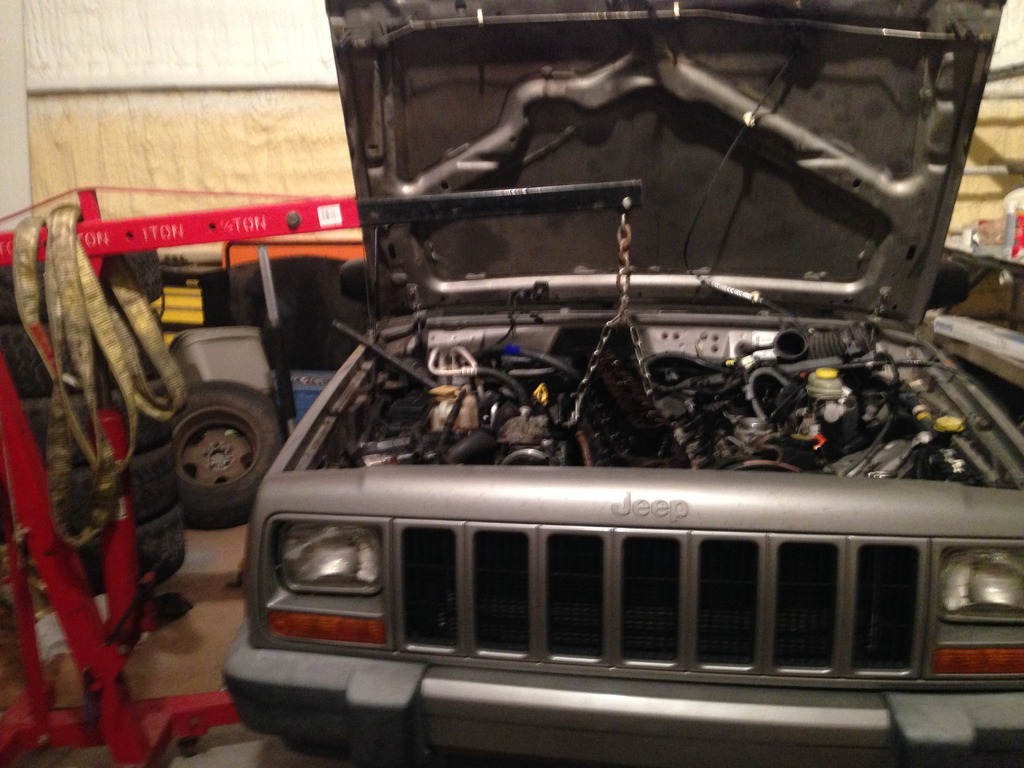
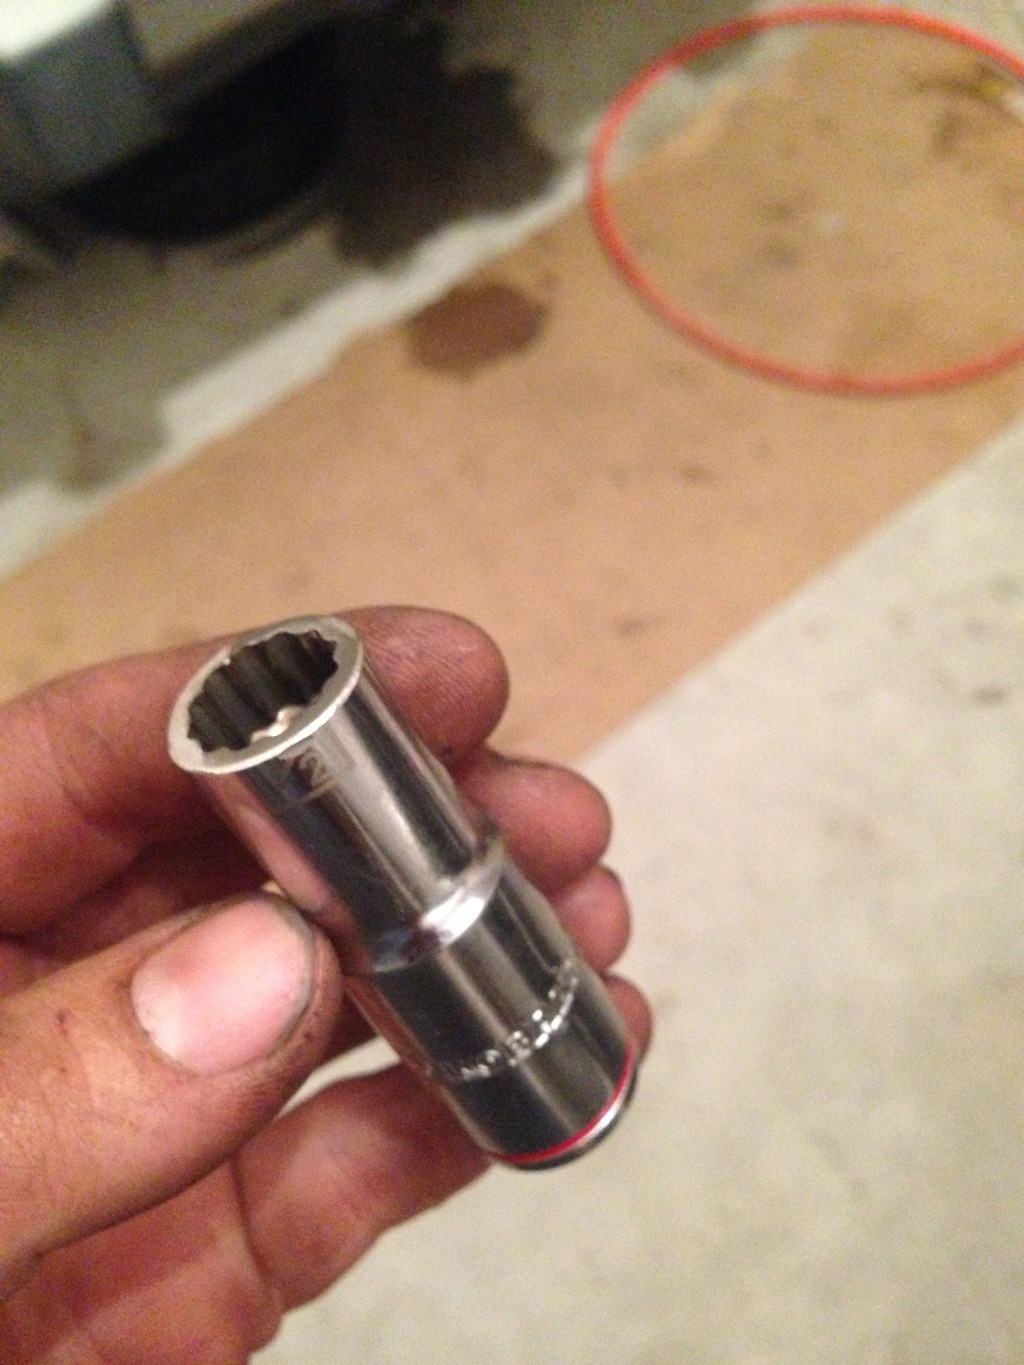
I had to mow my yard before the rain came, so I didn't get back to work on my XJ until much later. But I did manage to get the stock head removed last night (Okay, so it was actually around 12am this morning). I lost some time modifying the new socket I had to buy just for the head bolts. The splines didn't go deep enough, so the socket choked down before the threaded stud part on the head bolt was fully inserted. The threaded portion measured 27/64". I couldn't find a 7/16" bit and my 1/2" was dull. But I found a machinist-grade 29/64". Go figure. Anyway, I drilled out the center of the socket and it worked perfectly. I'll have to cut off about 3/8" from the end to fit it and my torque wrench on that back corner bolt. Yeah, you know which one I'm talking about.
I used my shop crane because the head is an oily, sharp, 80-pound pig:
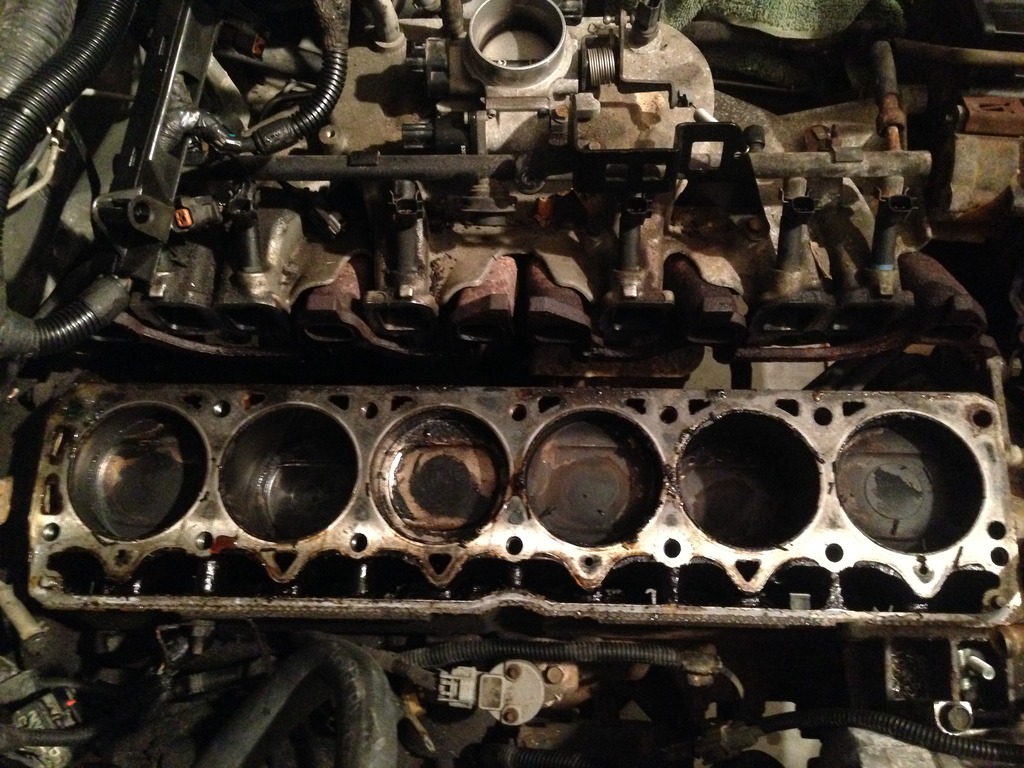
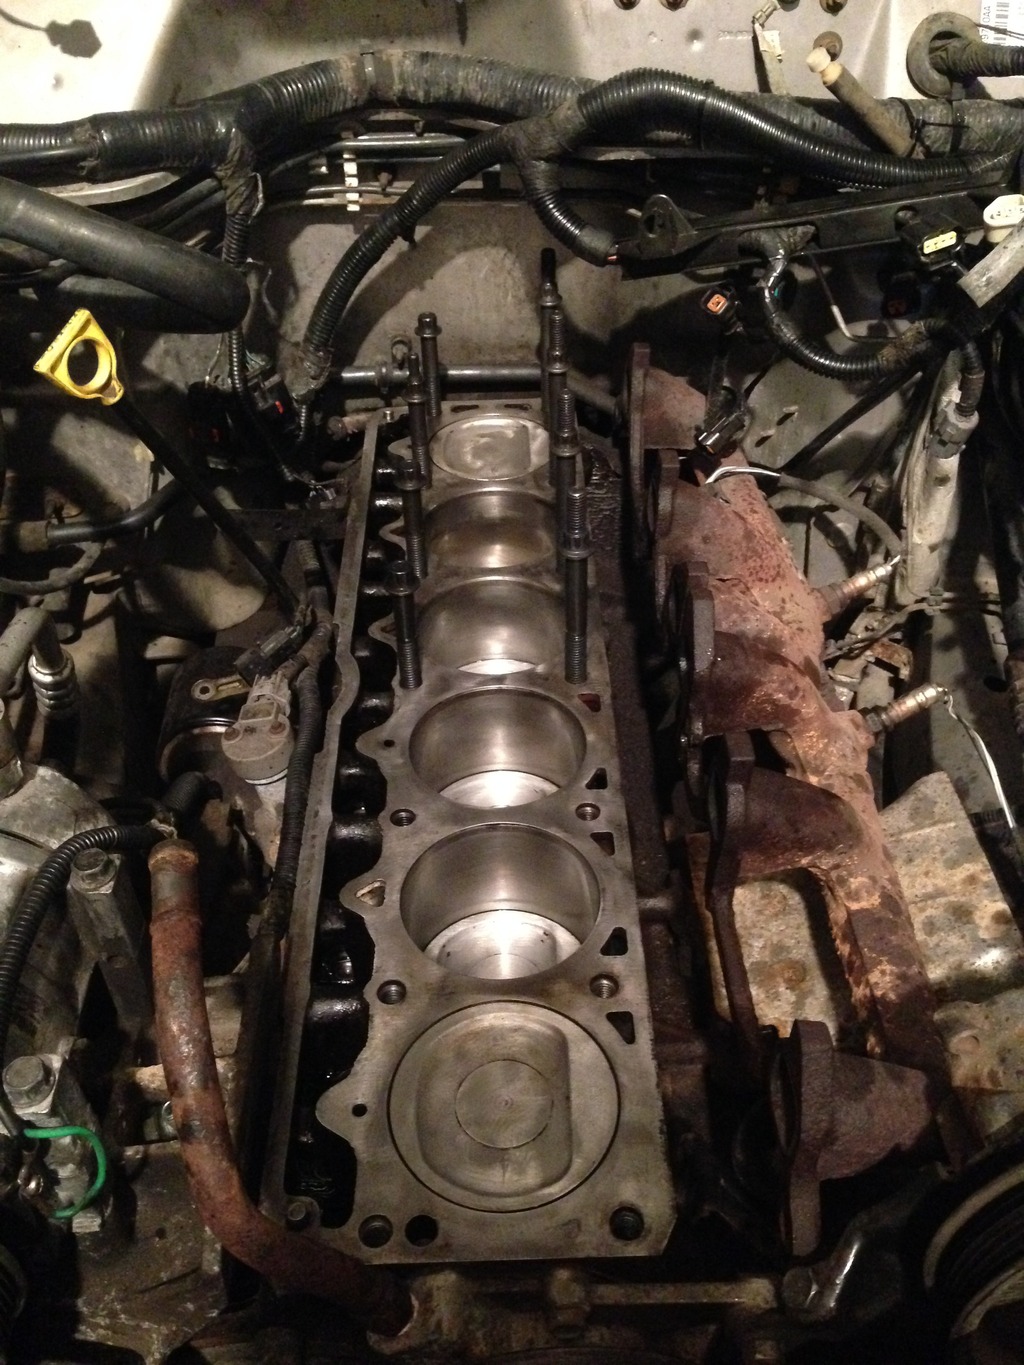
Overhead piston comparison. #4 was getting a steam bath, evident by some of the carbon being cleaned off:
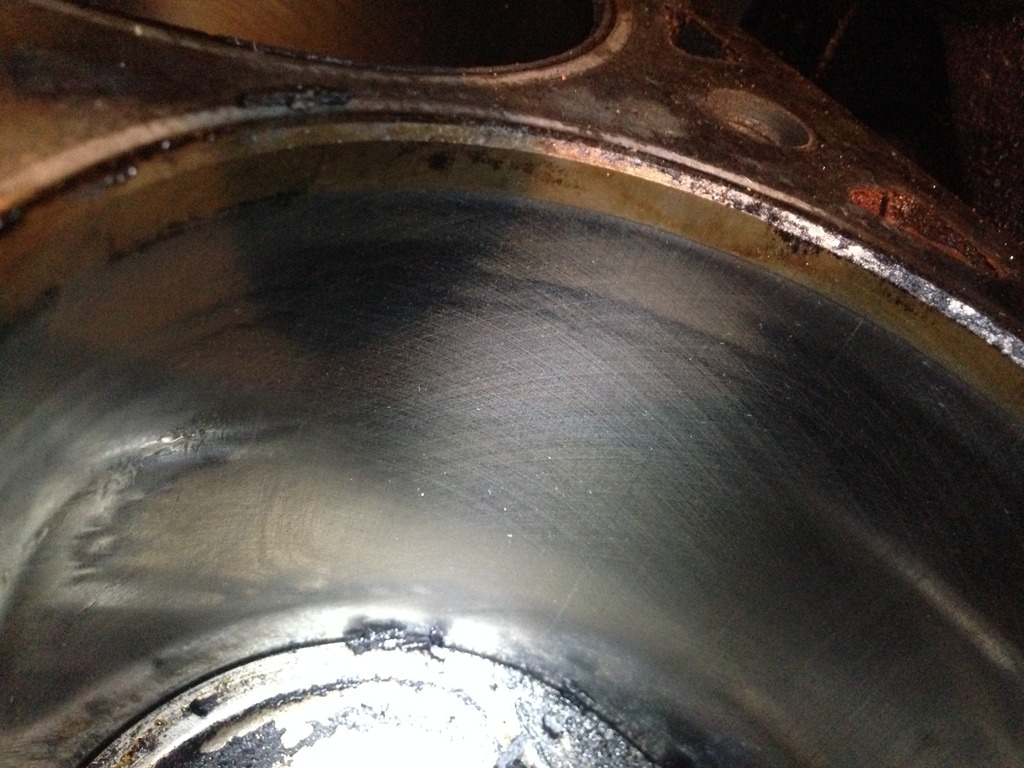
#4 wall. That blob to the left isn't damage. It's the light reflecting off that steam-cleaned piston. All cylinders look alike- no ridge and well-defined crosshatching. Not bad for 160,000 miles:
Went back to the salvage yard today to pull the 8.8 I found yesterday. There were plenty of them, but this was the only one with 4.10s. The brakes and all look great, as in- possibly serviced not long before this Explorer was scrapped. It was a back-breaking 4-hour battle involving sketchy balancing with a junk floor jack I found nearby. But, it was all totally worth it when I swiped my card for the $54.87 total charge! $15 of that is the core charge. Minus the taxes and fees, the base price for the axle complete from disc to disc with calipers, brake lines, parking brake cables, etc. was $32.49!:
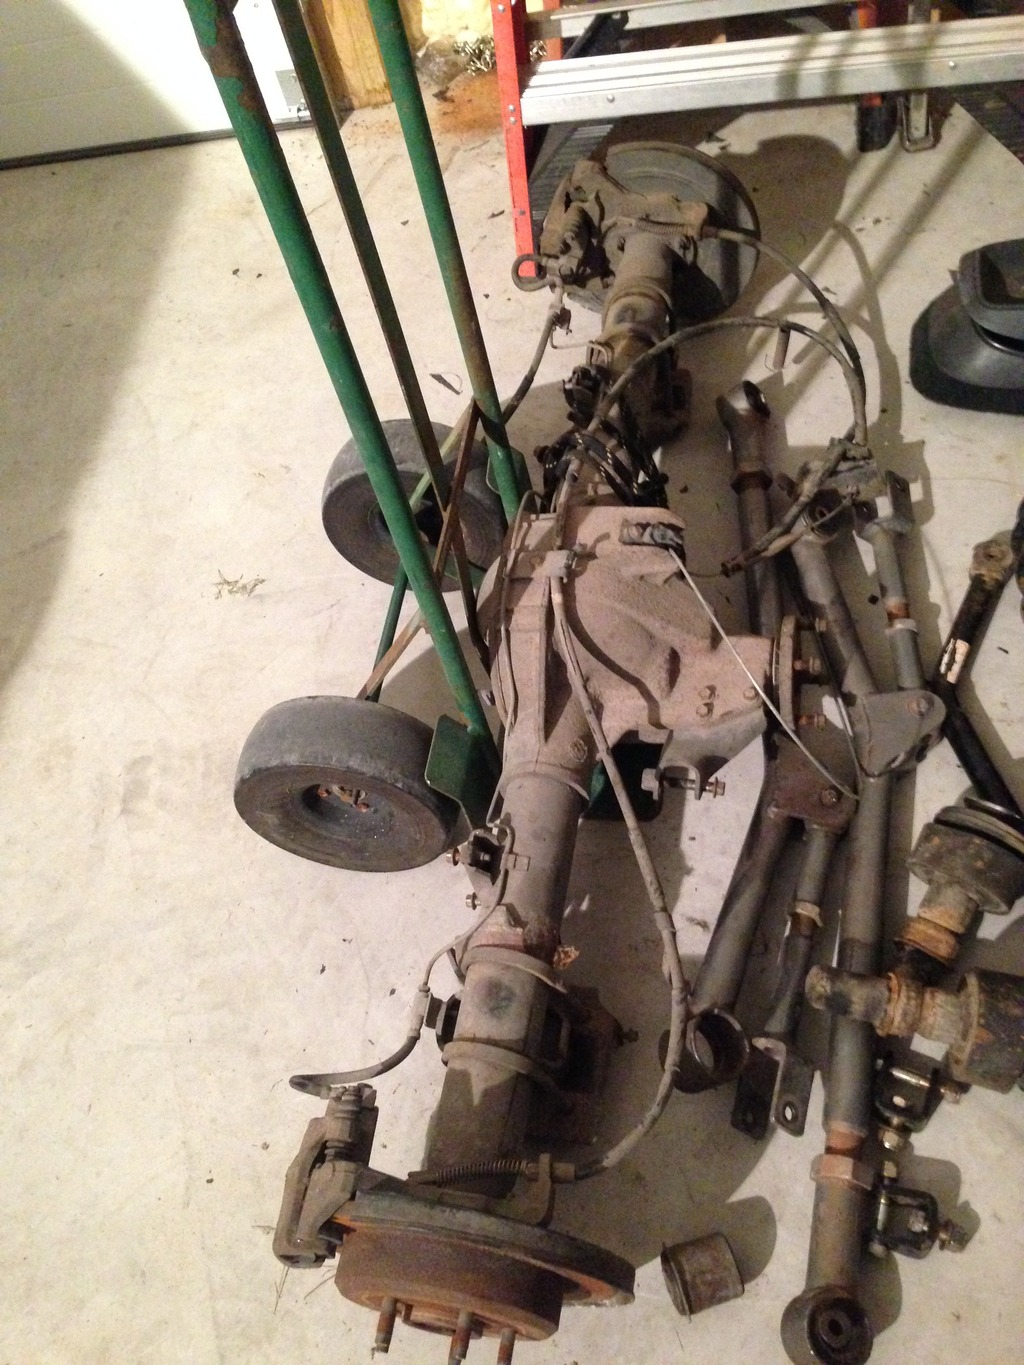
I really didn't wanna invest in new brakes and a gear set for the 8.25. This 8.8 solves both of those issues while being a strength upgrade- all for $55. I'm still looking for a HP D30 with 4.10s for the front, or at least a carrier that will support 4.10s. Anyone have any leads?
I got the blessing from Blackstone to clean up the block and replace the head. I have a full Victor Reinz gasket kit, VR head bolts and Sealed Power lifters. I picked up a Clearwater head Thursday night from a CF member that didn't need it. It looks nice, but I can't tell much difference between it and the original 0331 thickness-wise. Maybe I'm not looking in the right areas?:

Went to the salvage yard yesterday to take advantage of their half-off sale and got a handful of goodies-
A nice set of component speakers from a WJ that were obviously professionally installed and powered by the factory Infinity amp. These are most likely going into the rear of the XJ as I have some Alpine Type-R components still BNIB to go in the front doors. For $9, I couldn't pass on 'em:

Also found some good glass struts ($3) and a hitch plug ($.75) for my girlfriend's WJ:


I had to mow my yard before the rain came, so I didn't get back to work on my XJ until much later. But I did manage to get the stock head removed last night (Okay, so it was actually around 12am this morning). I lost some time modifying the new socket I had to buy just for the head bolts. The splines didn't go deep enough, so the socket choked down before the threaded stud part on the head bolt was fully inserted. The threaded portion measured 27/64". I couldn't find a 7/16" bit and my 1/2" was dull. But I found a machinist-grade 29/64". Go figure. Anyway, I drilled out the center of the socket and it worked perfectly. I'll have to cut off about 3/8" from the end to fit it and my torque wrench on that back corner bolt. Yeah, you know which one I'm talking about.
I used my shop crane because the head is an oily, sharp, 80-pound pig:

Overhead piston comparison. #4 was getting a steam bath, evident by some of the carbon being cleaned off:

#4 wall. That blob to the left isn't damage. It's the light reflecting off that steam-cleaned piston. All cylinders look alike- no ridge and well-defined crosshatching. Not bad for 160,000 miles:

Went back to the salvage yard today to pull the 8.8 I found yesterday. There were plenty of them, but this was the only one with 4.10s. The brakes and all look great, as in- possibly serviced not long before this Explorer was scrapped. It was a back-breaking 4-hour battle involving sketchy balancing with a junk floor jack I found nearby. But, it was all totally worth it when I swiped my card for the $54.87 total charge! $15 of that is the core charge. Minus the taxes and fees, the base price for the axle complete from disc to disc with calipers, brake lines, parking brake cables, etc. was $32.49!:

I really didn't wanna invest in new brakes and a gear set for the 8.25. This 8.8 solves both of those issues while being a strength upgrade- all for $55. I'm still looking for a HP D30 with 4.10s for the front, or at least a carrier that will support 4.10s. Anyone have any leads?
Last edited by s10xtremist; Sep 6, 2015 at 08:08 PM.
Thread Starter
Junior Member
Joined: May 2015
Posts: 46
Likes: 0
From: 70729
Year: 2001
Model: Cherokee
Engine: 4.0 I6
Between working weekends and other obligations, I wasn't able to touch the XJ until this past Saturday afternoon. I got the pistons and block deck cleaned, the new lifters dropped in, and the head torqued down. I cleaned up a few very minor handling burrs on the edge of the head, flushed out the coolant passages and installed the spark plugs before I set it on the block. It went much easier than I was planning and I didn't have to fight that #14 bolt. I positioned the head over the block with the engine hoist and cracked open the valve so that it lowered very slowly. I held the head into position with the #14 bolt in place, but held up an inch or two while the head slowly settled into position.
I didn't clean every last molecule of carbon off the pistons, but I got 99.xxx% of it off. I covered the tops of each piston with 2-stroke oil to keep the debris from getting down between the cylinder walls and piston shoulders. I also kept a shop vac near the cleaning disc as I buffed away the crud.
In this pic, I was cleaning out each head bolt hole from back to front and installing the new headbolts as I cleaned the holes to seal them from being recontaminated as I cleaned out the next hole:
This is the Kobalt socket I modified for the head bolts. I drilled the center out to 29/64" to fit over the threaded studs of the head bolts and I trimmed about 3/8"-1/2" off the depth of the socket to fit under the lip on the firewall with my torque wrench. It worked perfectly:
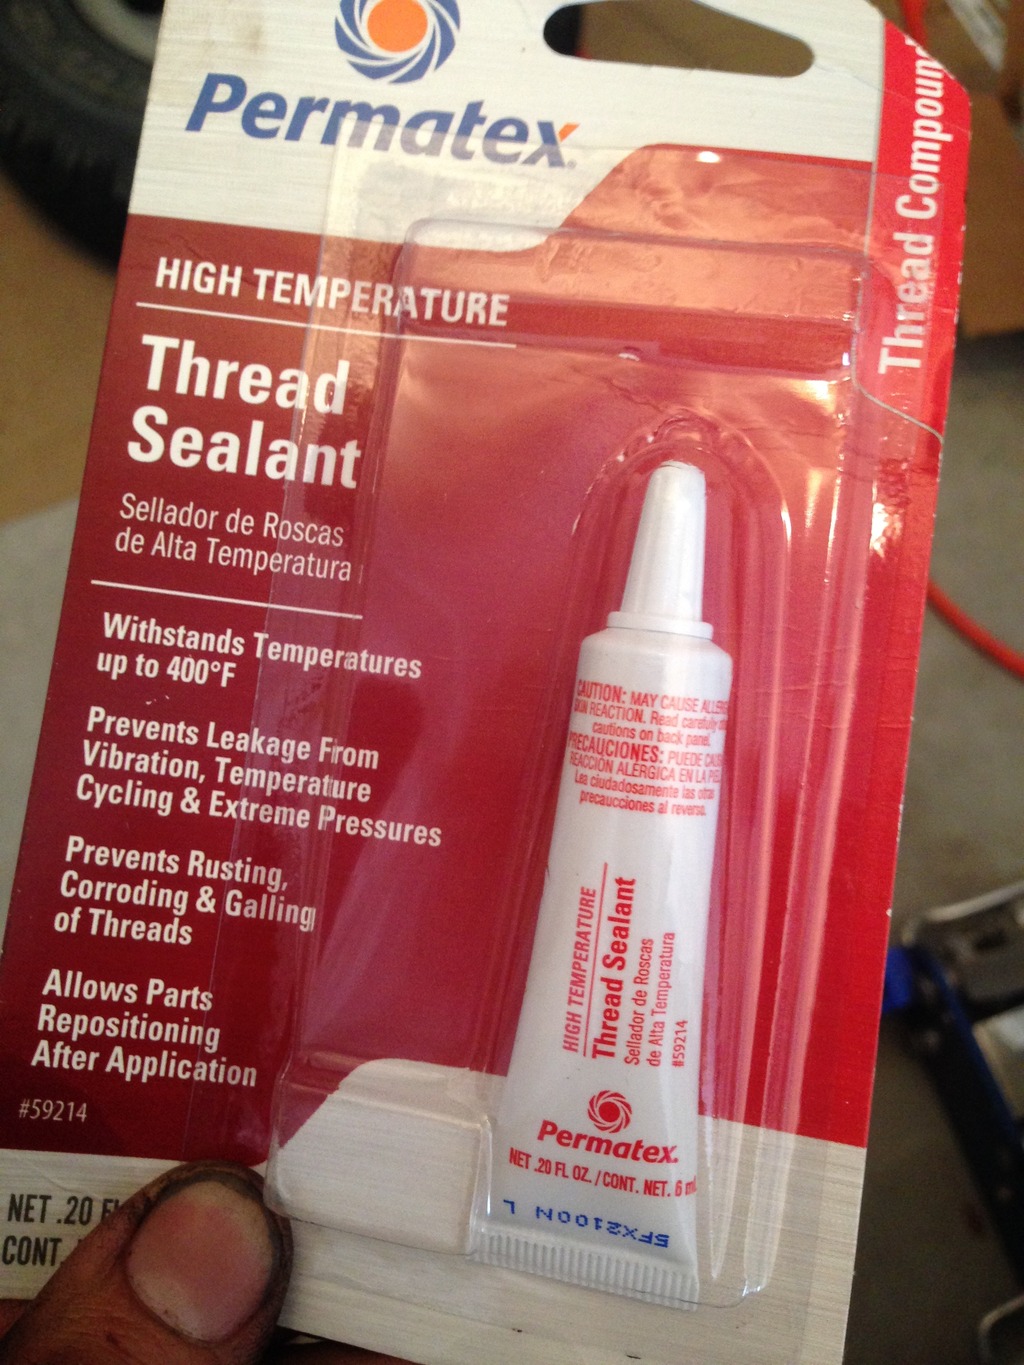
I remembered the thread sealant for the #11 head bolt:
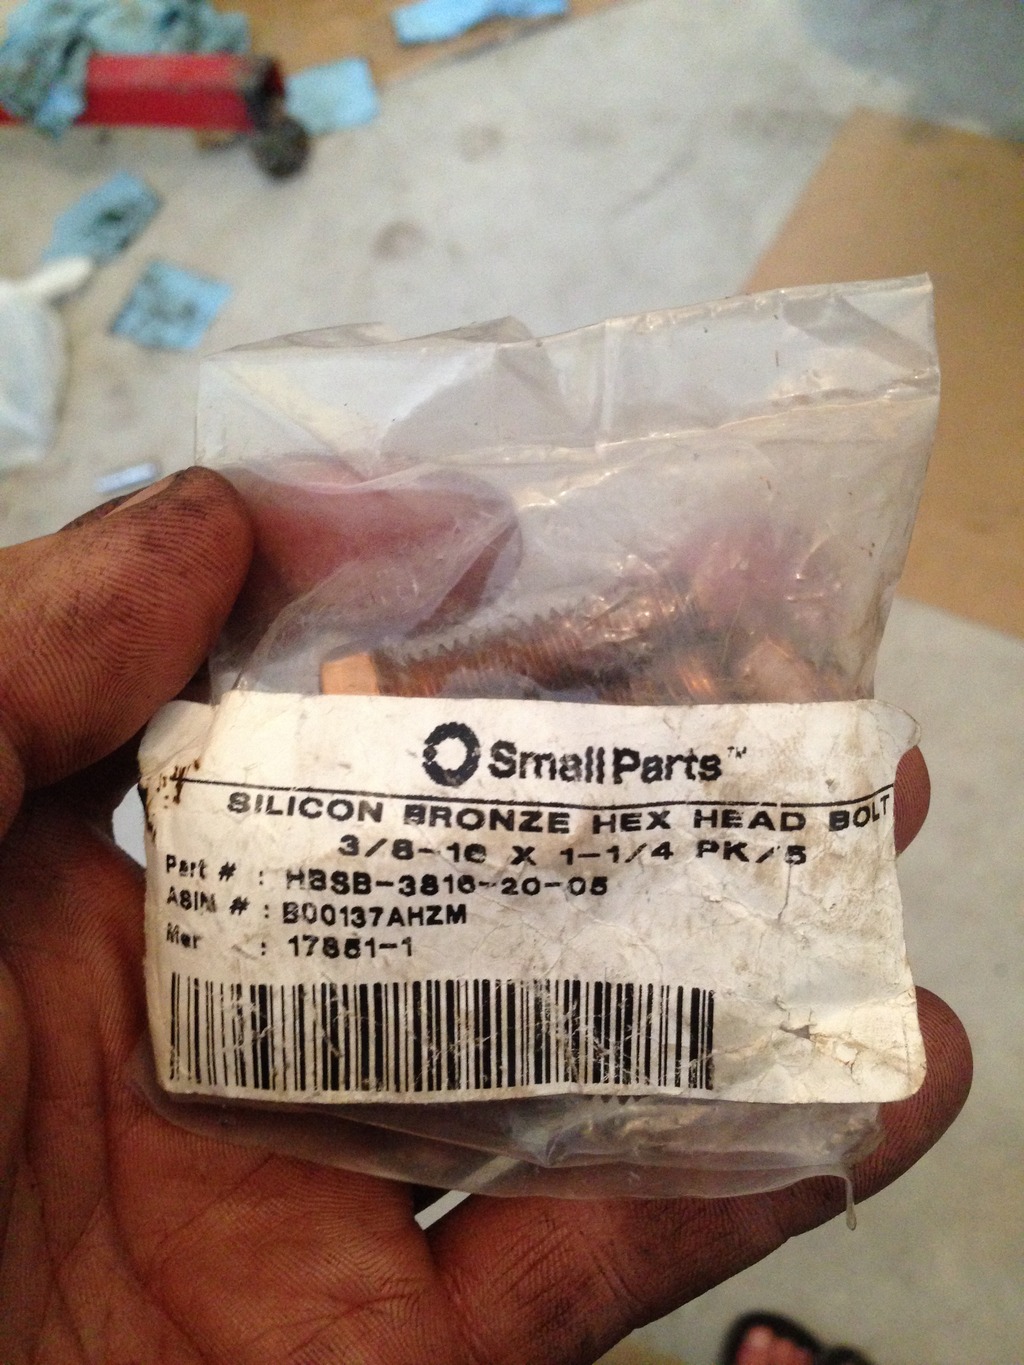
Just because I'm weird like this, I ordered some silicone bronze bolts off Amazon for the manifolds:
I'll clean up the Belleville washers and reuse them. I'm also reusing the two threaded studs. Once I got the two studs installed to locate the gasket and exhaust manifolds (THAT was fun), I called it quits for the night. I'll pick up a bottle brush so I can clean out the inside of the intake manifold. I may have caused a pinhole leak on the fuel line that feeds the rail when I unbolted it from the manifold. That clamp was rusted and may have slightly corroded the fuel line. I'm trying to locate one to keep on standby just in case, but not having any luck with a part number or even a proper name for it to help with the search.
I didn't clean every last molecule of carbon off the pistons, but I got 99.xxx% of it off. I covered the tops of each piston with 2-stroke oil to keep the debris from getting down between the cylinder walls and piston shoulders. I also kept a shop vac near the cleaning disc as I buffed away the crud.
In this pic, I was cleaning out each head bolt hole from back to front and installing the new headbolts as I cleaned the holes to seal them from being recontaminated as I cleaned out the next hole:

This is the Kobalt socket I modified for the head bolts. I drilled the center out to 29/64" to fit over the threaded studs of the head bolts and I trimmed about 3/8"-1/2" off the depth of the socket to fit under the lip on the firewall with my torque wrench. It worked perfectly:

I remembered the thread sealant for the #11 head bolt:

Just because I'm weird like this, I ordered some silicone bronze bolts off Amazon for the manifolds:

I'll clean up the Belleville washers and reuse them. I'm also reusing the two threaded studs. Once I got the two studs installed to locate the gasket and exhaust manifolds (THAT was fun), I called it quits for the night. I'll pick up a bottle brush so I can clean out the inside of the intake manifold. I may have caused a pinhole leak on the fuel line that feeds the rail when I unbolted it from the manifold. That clamp was rusted and may have slightly corroded the fuel line. I'm trying to locate one to keep on standby just in case, but not having any luck with a part number or even a proper name for it to help with the search.
Last edited by s10xtremist; Sep 28, 2015 at 08:23 PM.
Thread Starter
Junior Member
Joined: May 2015
Posts: 46
Likes: 0
From: 70729
Year: 2001
Model: Cherokee
Engine: 4.0 I6
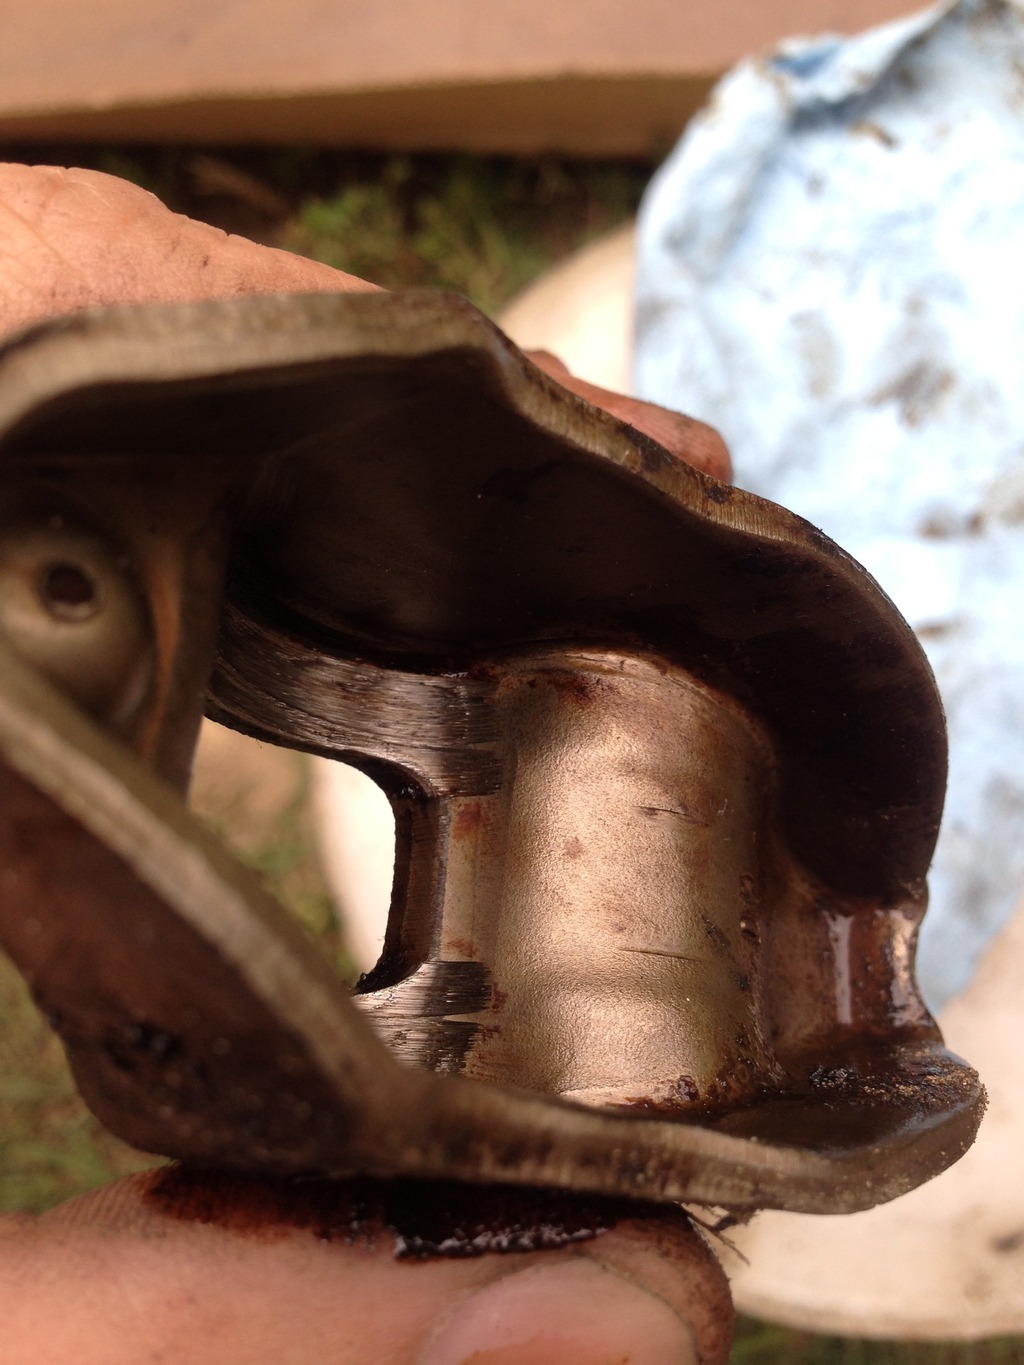
I'm glad I ordered that new fuel line! Apparently, pinhole leaks from that cruddy clamp are a common occurrence. Mine had a solid spray that was clearly audible. I went to clean up the rockers to install them onto the new head to finish up the engine and found this:
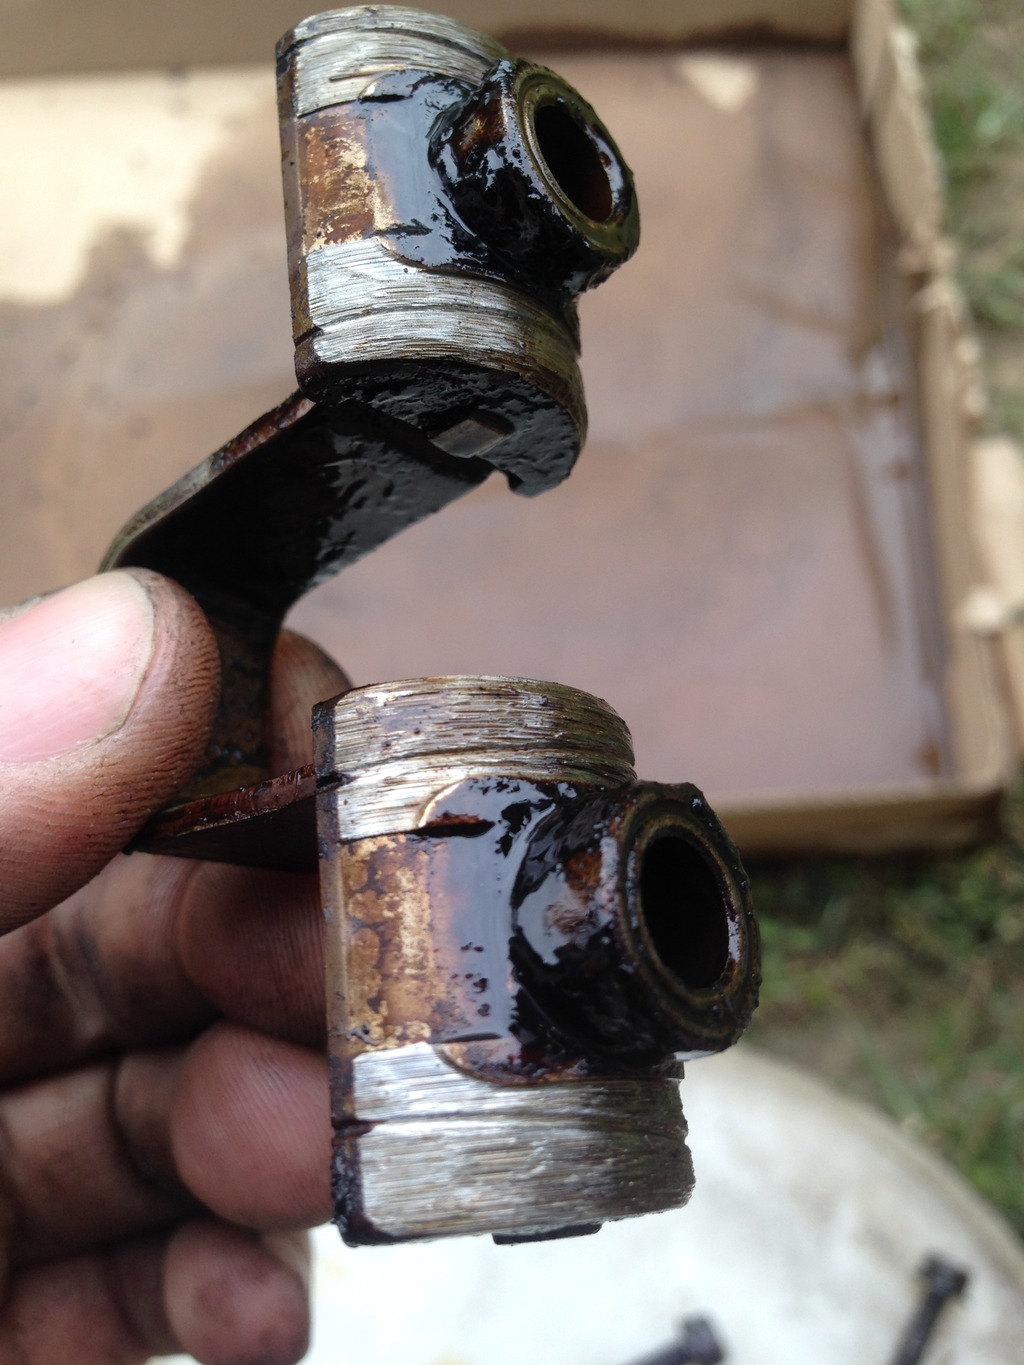
Now that water line on the push rods makes sense. Went back to Amazon and ordered a rocker arm kit that included pivots and bridges. Also ordered AC Delco brake pads and rotors, a wheel cylinder for the right rear and a Wix 51515. From eBay, I got some H4 semi-projector conversion headlight housings (I'm hoping that they're at least just better than the stock sealed beams) and some new aftermarket headlight housings for the WJ.
I installed the new fuel line and did all the brake work last night. I also installed the 1" spacers after I trimmed off about 3/16" from the front studs. I mounted up the stock wheels since the 31x10.50s won't allow turning with no lift. Picked up a used Big Daddy Off-Road HD tie rod off craigslist for $40 yesterday and a set of 6,000-mile OEM JK shocks today for $40.
I rushed home to clean the sludge out of the valve cover and bolt it on so I could finally have the engine 100% complete. I backed it out of the shop to let it get to full temperature to see how the oil pressure acted. At cold idle, the needle is around 40 or just under. When hot, the pressure drops low enough to trigger the "CHECK GAUGES" light if I let it idle long enough. It rises back to factory specs as soon as I rev the engine a hair. I'll try a heavier oil when I drain this 10W-30 to see if I can at least keep the light from coming on.
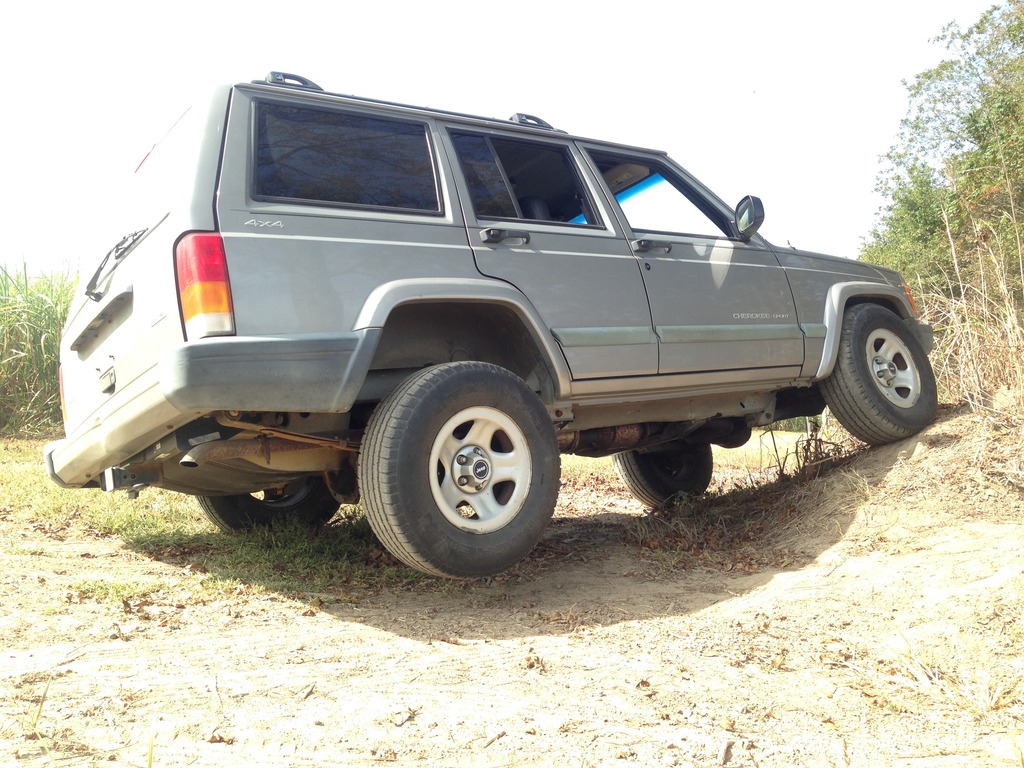
Anyway, I took it to the end of my street and back, then immediately climbed the mound behind my shop that has weeds/small trees growing from it. For the dryrotted all-season tires, it surprised me. Of course, this is my first 4WD, so it's all new and exciting. For my first time out, I believe I did it right:
I attacked this mound from three sides to knock down the weeds and trees. I went until I high-centered. I don't have any pics, but I got higher/steeper on the other side:
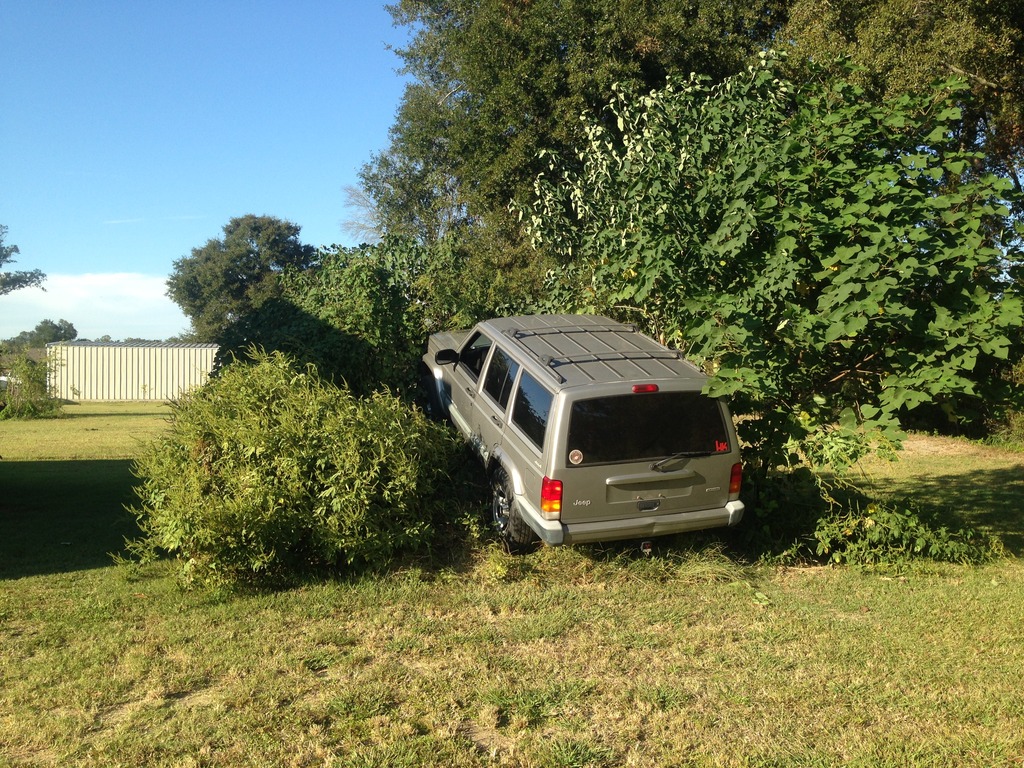
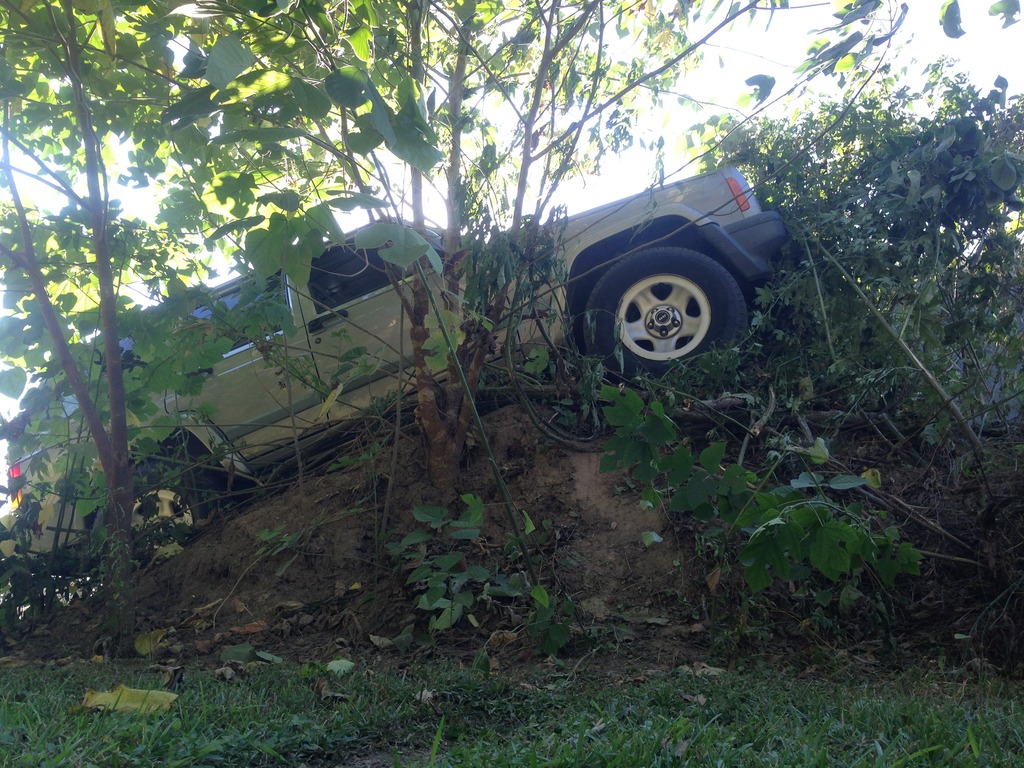
It's just an expensive weed killer at this point:
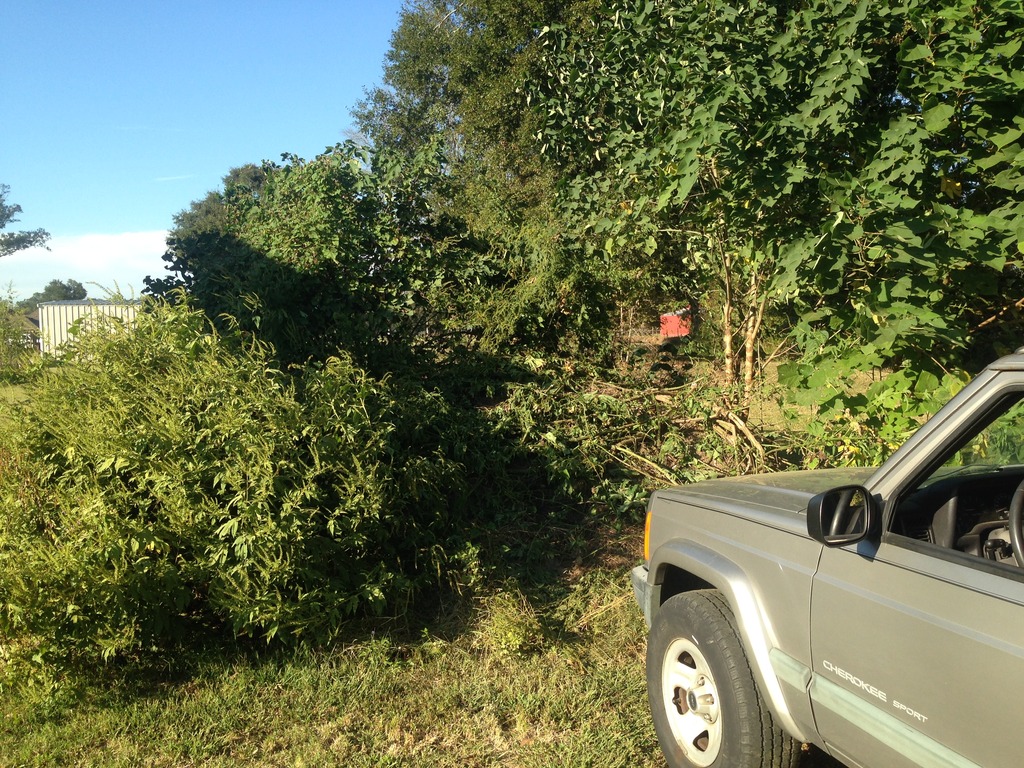
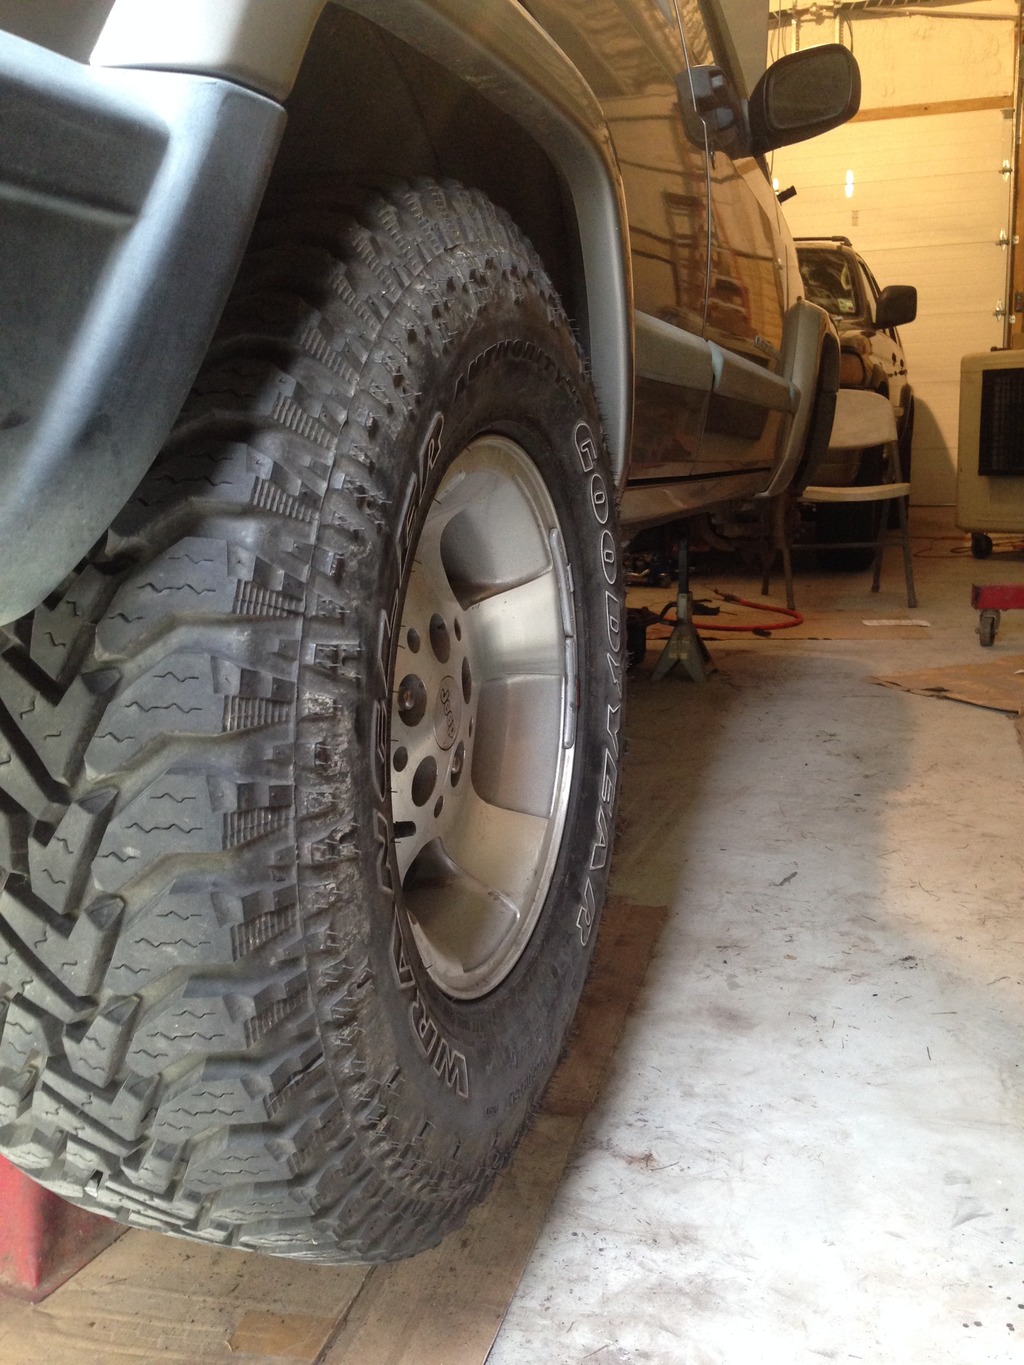
Before I had it running and out of the shop, I threw the 31s on there just to see:
After horsing around in the yard, I took it around the block to bed in the brakes. The rears need more adjustment. It felt sluggish on the trip home and the left caliper was smoking when I got there. I know why, too: I knocked the caliper out of my hand when I was having trouble reinstalling it and it yanked on the hose pretty good. I know I damaged it then and the hose is collapsing now. First thing tomorrow morning I'll pick up new and longer hoses for the front and rear.
I'm gonna skip the 2" spacer lift and order the 3" coils from Rusty's. I'll lift the rear with a hybrid pack from the Durango and/or Dakota leaf sets I have in the attic. I'll try the JK shocks as-is, but I'm prepared to make BPEs if I need that little extra. Between the adjustable track bar and HD tie rod, I believe I'll be good with the steering/alignment stuff for my mild lift.


Now that water line on the push rods makes sense. Went back to Amazon and ordered a rocker arm kit that included pivots and bridges. Also ordered AC Delco brake pads and rotors, a wheel cylinder for the right rear and a Wix 51515. From eBay, I got some H4 semi-projector conversion headlight housings (I'm hoping that they're at least just better than the stock sealed beams) and some new aftermarket headlight housings for the WJ.
I installed the new fuel line and did all the brake work last night. I also installed the 1" spacers after I trimmed off about 3/16" from the front studs. I mounted up the stock wheels since the 31x10.50s won't allow turning with no lift. Picked up a used Big Daddy Off-Road HD tie rod off craigslist for $40 yesterday and a set of 6,000-mile OEM JK shocks today for $40.
I rushed home to clean the sludge out of the valve cover and bolt it on so I could finally have the engine 100% complete. I backed it out of the shop to let it get to full temperature to see how the oil pressure acted. At cold idle, the needle is around 40 or just under. When hot, the pressure drops low enough to trigger the "CHECK GAUGES" light if I let it idle long enough. It rises back to factory specs as soon as I rev the engine a hair. I'll try a heavier oil when I drain this 10W-30 to see if I can at least keep the light from coming on.
Anyway, I took it to the end of my street and back, then immediately climbed the mound behind my shop that has weeds/small trees growing from it. For the dryrotted all-season tires, it surprised me. Of course, this is my first 4WD, so it's all new and exciting. For my first time out, I believe I did it right:

I attacked this mound from three sides to knock down the weeds and trees. I went until I high-centered. I don't have any pics, but I got higher/steeper on the other side:


It's just an expensive weed killer at this point:

Before I had it running and out of the shop, I threw the 31s on there just to see:


After horsing around in the yard, I took it around the block to bed in the brakes. The rears need more adjustment. It felt sluggish on the trip home and the left caliper was smoking when I got there. I know why, too: I knocked the caliper out of my hand when I was having trouble reinstalling it and it yanked on the hose pretty good. I know I damaged it then and the hose is collapsing now. First thing tomorrow morning I'll pick up new and longer hoses for the front and rear.
I'm gonna skip the 2" spacer lift and order the 3" coils from Rusty's. I'll lift the rear with a hybrid pack from the Durango and/or Dakota leaf sets I have in the attic. I'll try the JK shocks as-is, but I'm prepared to make BPEs if I need that little extra. Between the adjustable track bar and HD tie rod, I believe I'll be good with the steering/alignment stuff for my mild lift.
Last edited by s10xtremist; Oct 10, 2015 at 10:29 PM.
Thread Starter
Junior Member
Joined: May 2015
Posts: 46
Likes: 0
From: 70729
Year: 2001
Model: Cherokee
Engine: 4.0 I6
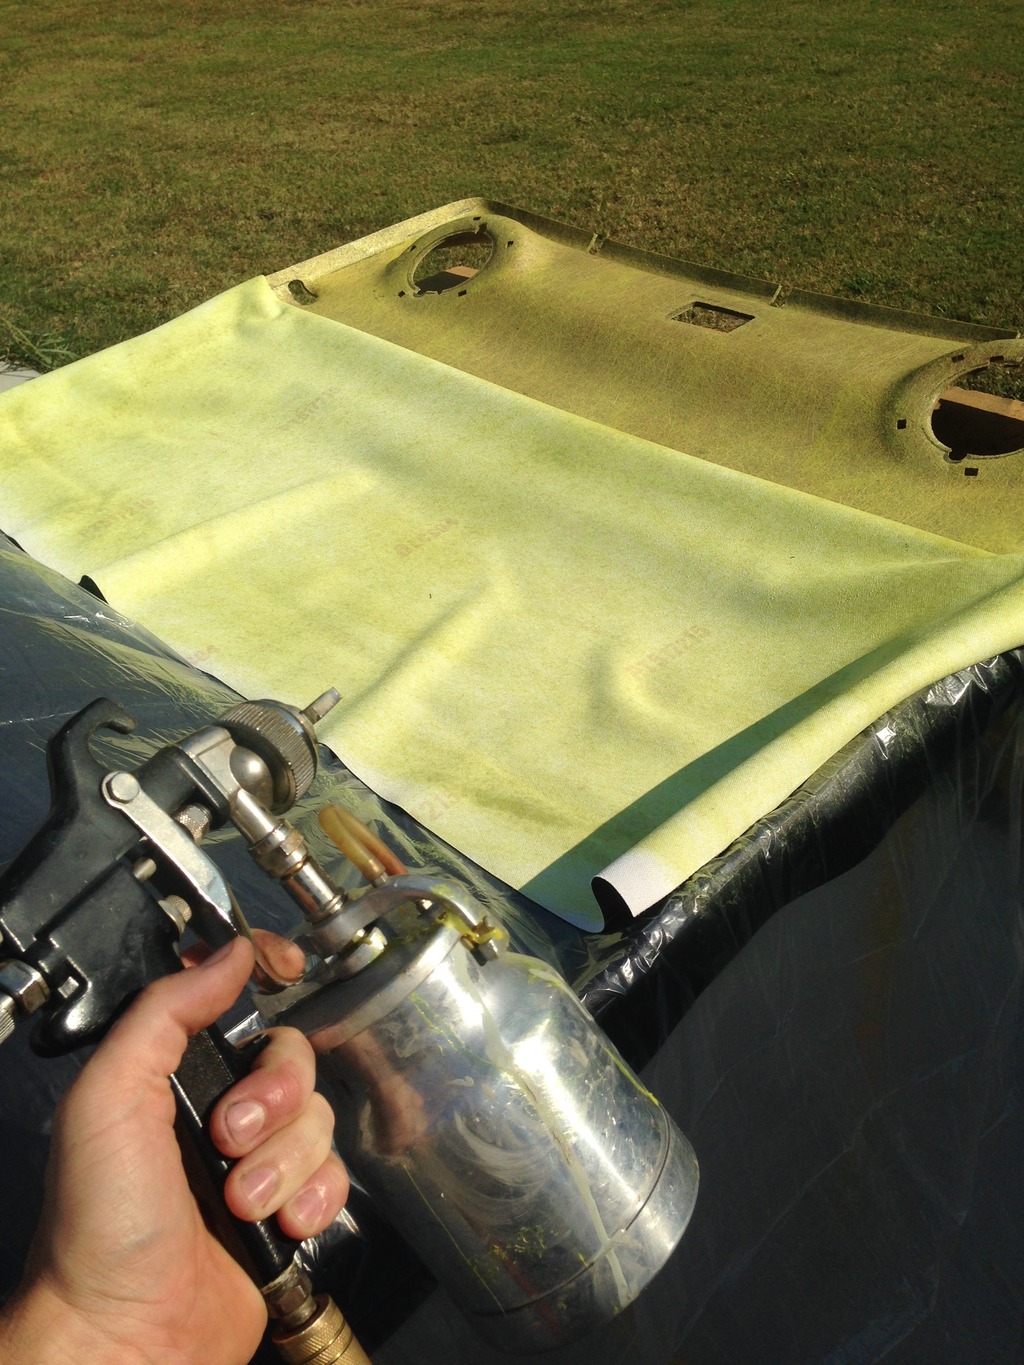
I had to take a break from the dirty stuff and make progress elsewhere. Started off yesterday by swapping the crappy old Alpine CD player for a like-new Pioneer I scored for $60 on Craigslist. After putting it in and out of the dash four or five times to check the wiring for an intermittently dead front left speaker, I eventually discovered that the speaker only works when the door is closed. No worries, I'll have to cut the harness in that area to install quick disconnects for when I make the doors removable. While I was handling wiring, I removed some extra panels and removed the XM tuner's antenna wire. I also removed the CB since it didn't work. While removing the wiring for it, I discovered that the problem was just that the power wire came loose in the fuse panel. Oh well, it needs a new antenna and I didn't care for the installer's wire routing. After that, I moved on to the headliner. I bought a cheap pan and roller kit to spread the adhesive, but the can recommended spraying. This reminded me of a spray gun I was given over a decade ago and I never knew if I'd ever have a good use for it. Well, now I did. Back in '00, I worked in a shop that did leather interior conversions, vinyl tops, headliners, sunroofs, etc. and I recall them spraying the adhesive from a similar gun. This adhesive is most likely the same stuff as it looked, smelled, and sprayed the same. I'm glad I did it this way instead of with the roller! On with the pics-
Spray gun and about to finish the headliner by doing the speaker pod area last. That part was a **** due to all the compound curves:
From the front:
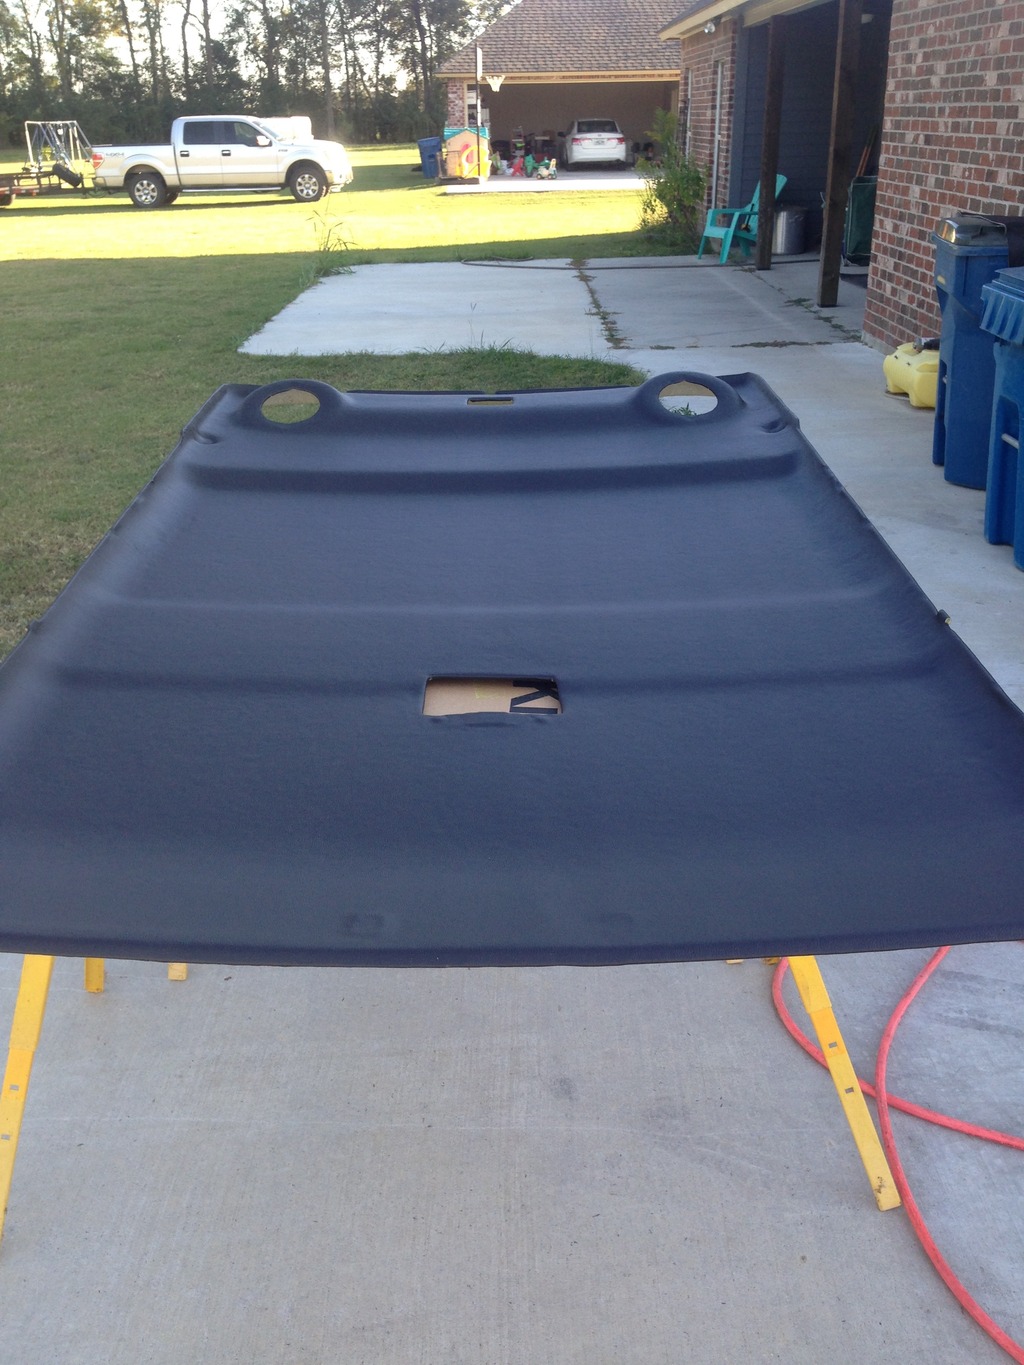
From the back:
Back side:
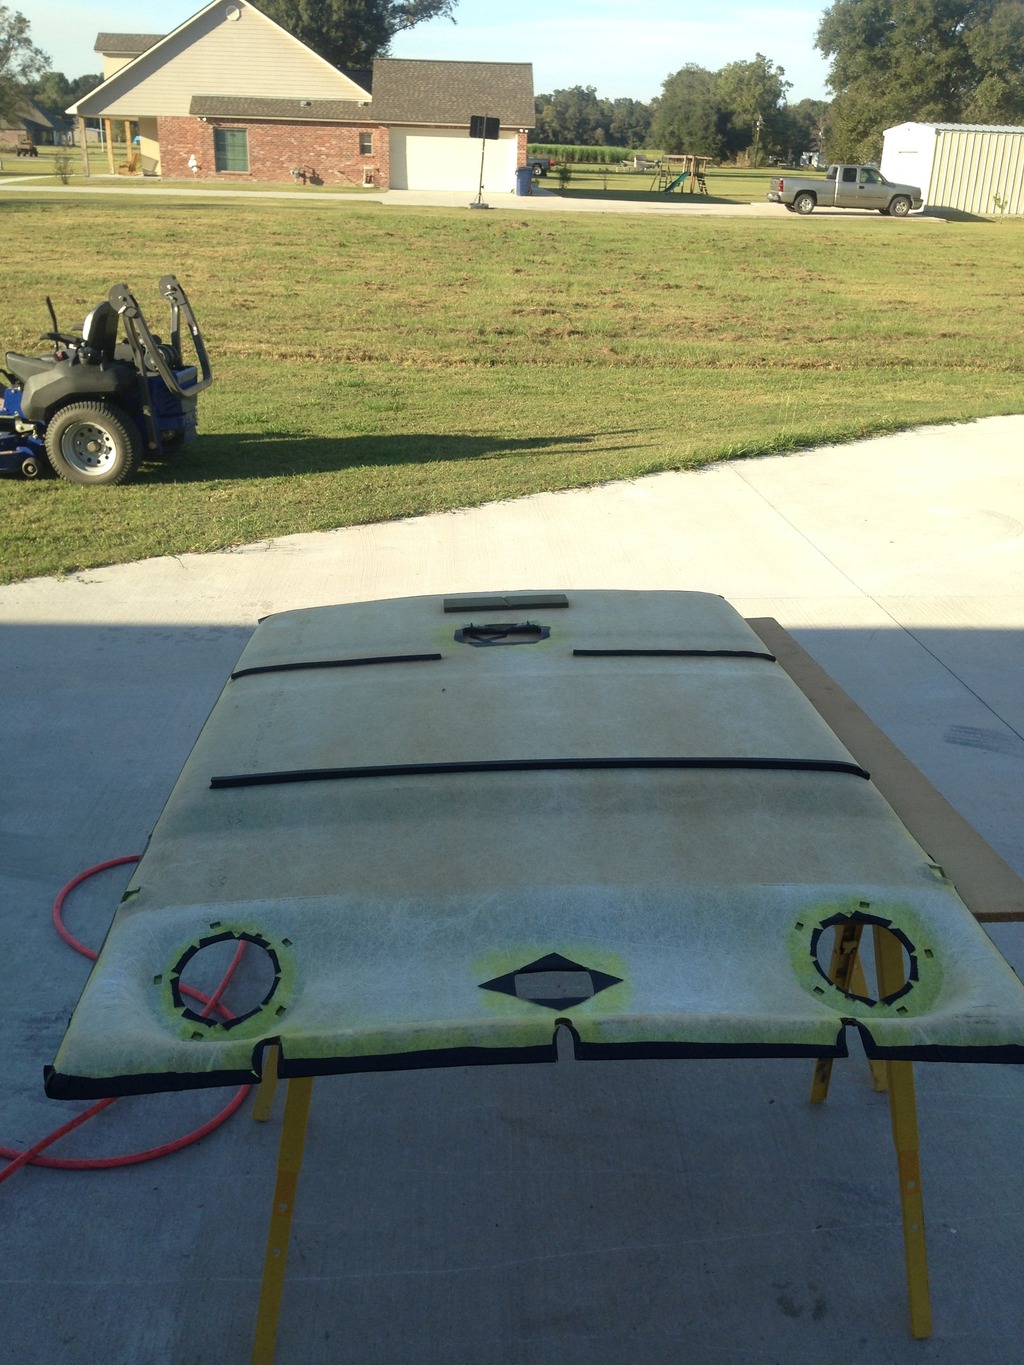
For my first time, I'm very much satisfied. The very back area behind the speaker pods looks like an old man's skin due to me working it so much to lay flat. But, no one will ever notice it. It's way better than the sagging fabric and it'll clean so much easier, which will come in handy when driving with the doors off. I'll cut in the remaining smaller holes with an Xacto knife when I install the small pieces. I think I have enough material left over to recover the visors. Gotta get some SEM dye to color the plastic pieces as well.
Spray gun and about to finish the headliner by doing the speaker pod area last. That part was a **** due to all the compound curves:

From the front:

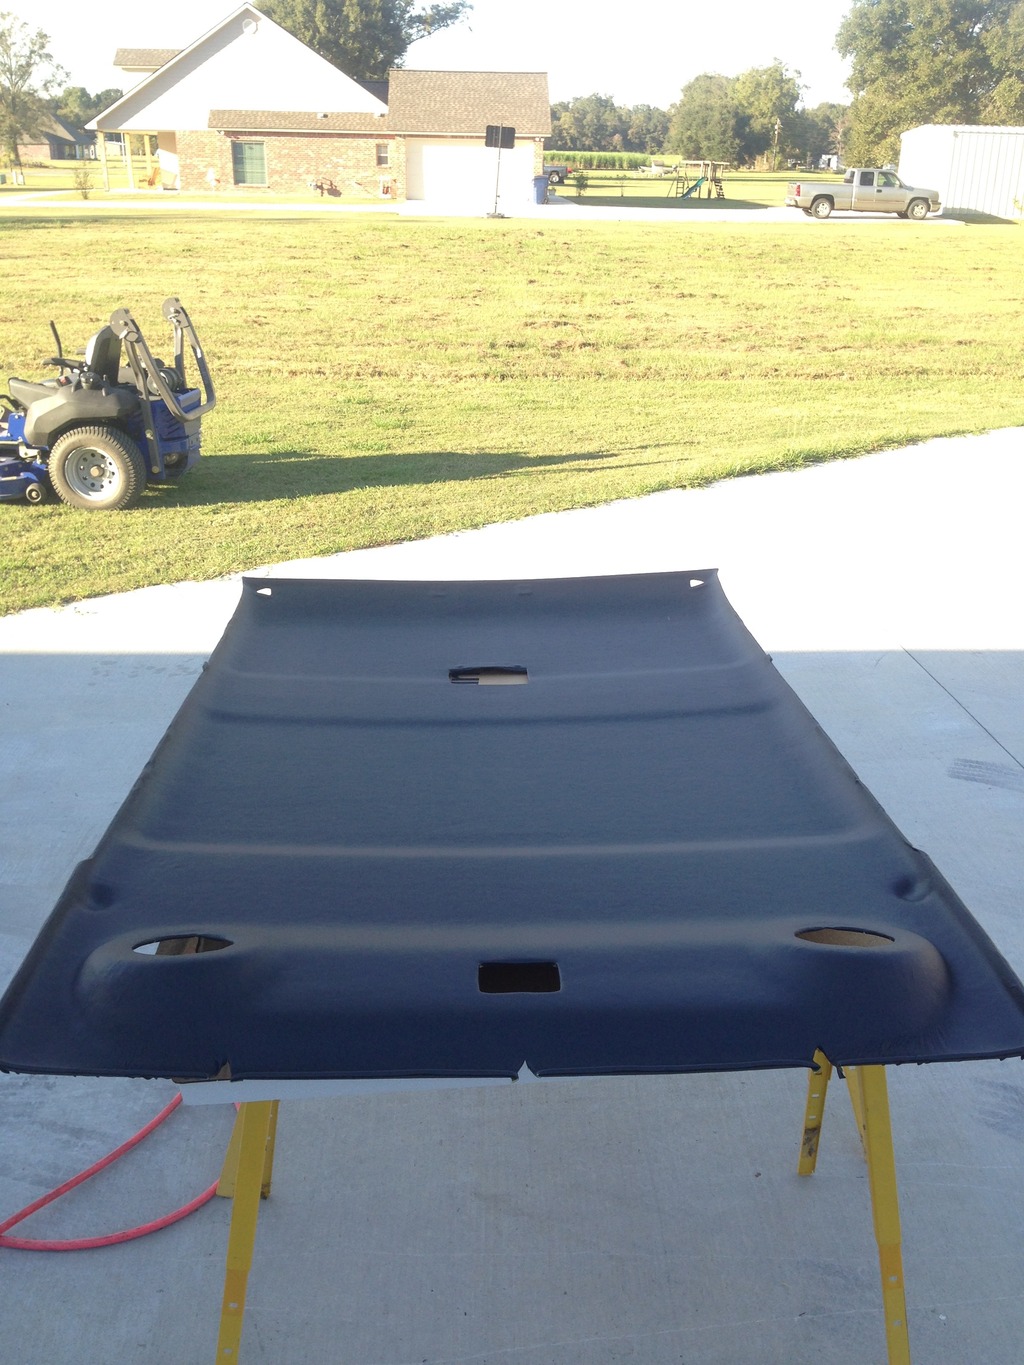
From the back:

Back side:

For my first time, I'm very much satisfied. The very back area behind the speaker pods looks like an old man's skin due to me working it so much to lay flat. But, no one will ever notice it. It's way better than the sagging fabric and it'll clean so much easier, which will come in handy when driving with the doors off. I'll cut in the remaining smaller holes with an Xacto knife when I install the small pieces. I think I have enough material left over to recover the visors. Gotta get some SEM dye to color the plastic pieces as well.
Last edited by s10xtremist; Oct 12, 2015 at 09:18 AM.
Thread Starter
Junior Member
Joined: May 2015
Posts: 46
Likes: 0
From: 70729
Year: 2001
Model: Cherokee
Engine: 4.0 I6
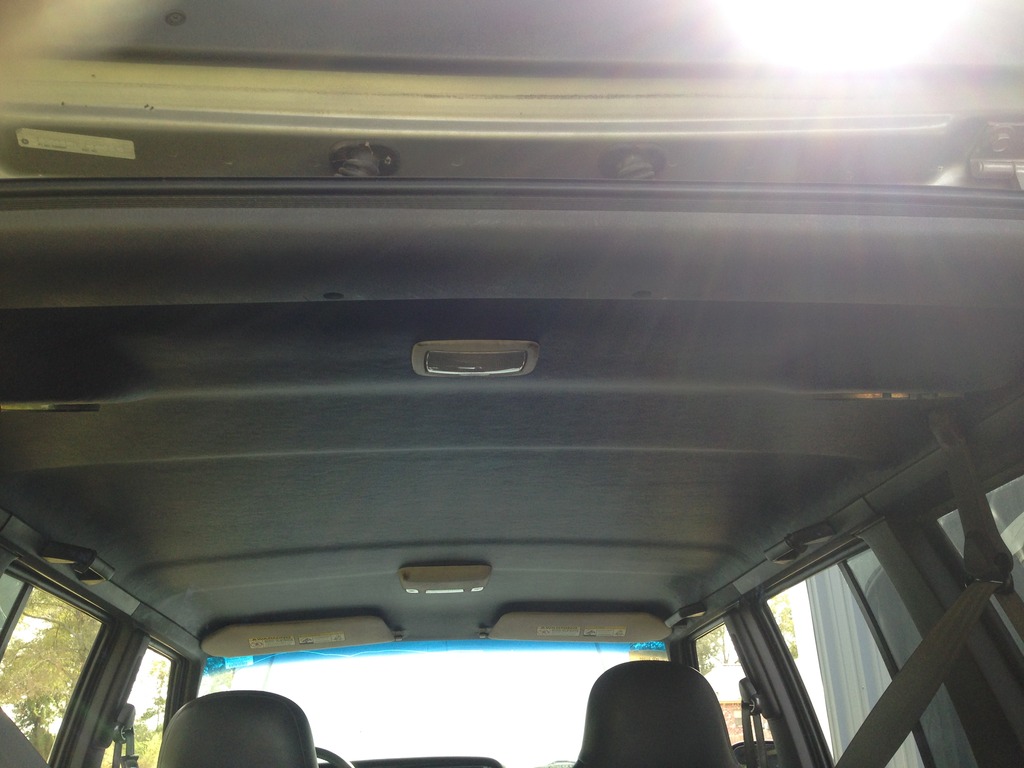
I finished up the headliner earlier this week. I still need to re-wrap the visors in the same vinyl and dye all the plastics. All in good time:
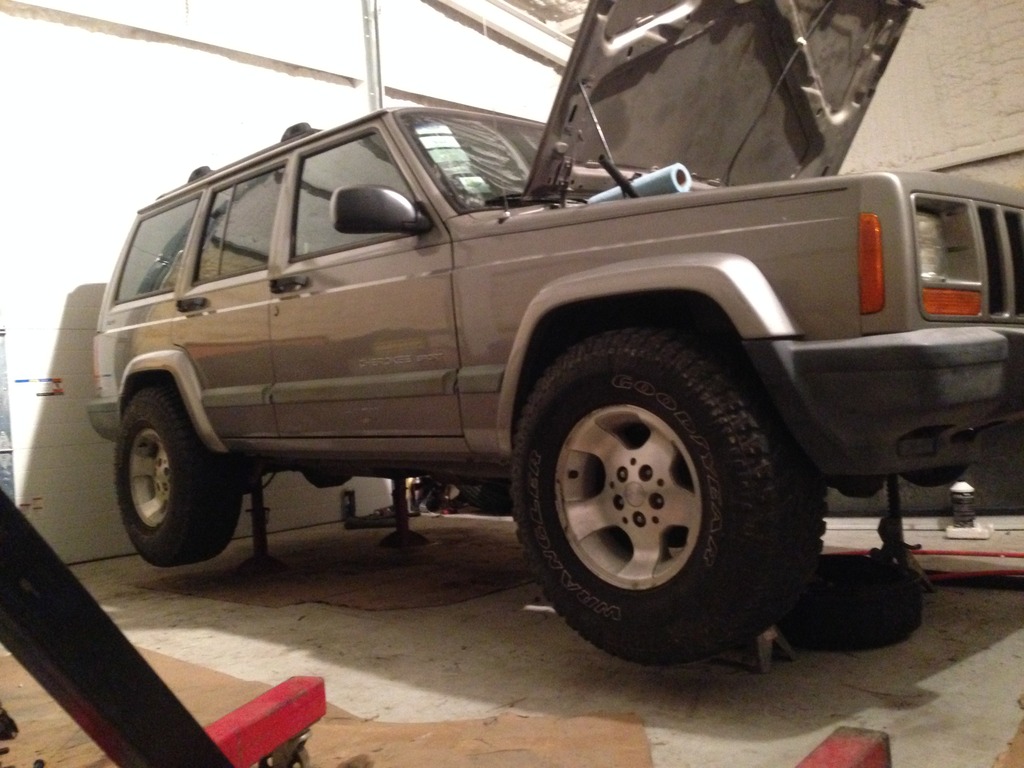
This morning I replaced both front soft brake lines with stock TJ lines. I've been letting it sit for most of the week with the front up on jack stands and the oil plug out to drain as much of the contaminated oil as I could. I reinstalled the plug and a new Wix 51515 filter and filled it with cheap 10W-30 as continuation of the engine flushing process. I installed some Moog Thermoplastic sway bar bushings while I was under there. Then I took it out to the cane fields around my house and played around for a few minutes:

I went back home and drained the vinegar from the cooling system, flushed it with tap water, ran a 1-pound box of baking soda through it, flushed again with tap water and am currently running a box of Cascade in it as a final flushing.

This morning I replaced both front soft brake lines with stock TJ lines. I've been letting it sit for most of the week with the front up on jack stands and the oil plug out to drain as much of the contaminated oil as I could. I reinstalled the plug and a new Wix 51515 filter and filled it with cheap 10W-30 as continuation of the engine flushing process. I installed some Moog Thermoplastic sway bar bushings while I was under there. Then I took it out to the cane fields around my house and played around for a few minutes:


I went back home and drained the vinegar from the cooling system, flushed it with tap water, ran a 1-pound box of baking soda through it, flushed again with tap water and am currently running a box of Cascade in it as a final flushing.
Last edited by s10xtremist; Oct 17, 2015 at 10:49 PM.

Thread
Thread Starter
Forum
Replies
Last Post
Currently Active Users Viewing This Thread: 1 (0 members and 1 guests)