
My last build, 2000 XJ

Thread Starter
Member
Joined: Feb 2009
Posts: 225
Likes: 0
From: Linden, MI
Year: 2000
Model: Cherokee
Engine: 4.0
 )
)
CF Veteran
Joined: May 2008
Posts: 2,202
Likes: 0
From: Brighton, MI
Model: Cherokee


Thread Starter
Member
Joined: Feb 2009
Posts: 225
Likes: 0
From: Linden, MI
Year: 2000
Model: Cherokee
Engine: 4.0
Ordered up some Poly bump stops. Plan to build new front and rear bumps. Not sure how I will like these small-ish poly bumps, but they were cheap enough for me to try them out.

Member
Joined: Nov 2010
Posts: 130
Likes: 0
From: lake tahoe
Year: 1998
Model: Cherokee
Engine: 4.0l 6
i like what you did with the front of the wheel well. im at 3 inch and 33's with 1" bumpstopped in the front and the only place i rub is right there in the front under the battery.. how did you cut it out and did you just bolt the new pieces in or weld?? im curious cuz i would love to do that!
Thread Starter
Member
Joined: Feb 2009
Posts: 225
Likes: 0
From: Linden, MI
Year: 2000
Model: Cherokee
Engine: 4.0
I went to harbor freight and picked up a $5 spot weld cutter. After removing everything that's in the way, center punch all of the spot welds on that front inner fender and drill away. Once the old one was out I made a template with poster board and cut it out in 16 ga. steel. Once it was cut, I bent it over the work bench until it fit. I re drilled a bunch of holes along the perimeter and spot welded it back in.
Also TNT customs makes a kit for this if you don't wanna worry about making your own.
Also TNT customs makes a kit for this if you don't wanna worry about making your own.
Thread Starter
Member
Joined: Feb 2009
Posts: 225
Likes: 0
From: Linden, MI
Year: 2000
Model: Cherokee
Engine: 4.0
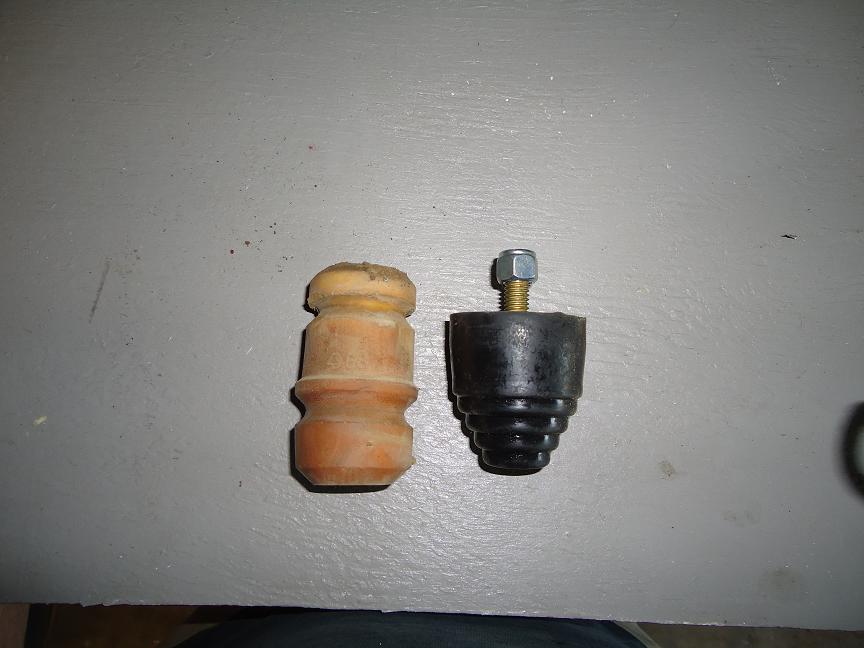
inished up the front bumps.
Comparison between stock fronts and the new ones.

To mount and extend the new bumps, I started with 1.75x.120 Tube and capped off one end.

Once the cap was welded on, I ground it smooth and tapped the center.

Rough comparison between the stock bump in relation to where the new one will sit.

Full bump. May need to trim a bit more.


Here's some quick pics of the 3-link I built some time ago now. Its rusty and muddy now.


Starting the rear bumps tomorrow.
Comparison between stock fronts and the new ones.
To mount and extend the new bumps, I started with 1.75x.120 Tube and capped off one end.
Once the cap was welded on, I ground it smooth and tapped the center.
Rough comparison between the stock bump in relation to where the new one will sit.
Full bump. May need to trim a bit more.
Here's some quick pics of the 3-link I built some time ago now. Its rusty and muddy now.
Starting the rear bumps tomorrow.
Thread Starter
Member
Joined: Feb 2009
Posts: 225
Likes: 0
From: Linden, MI
Year: 2000
Model: Cherokee
Engine: 4.0
Finished up the front bumps.
Comparison between stock fronts and the new ones.
To mount and extend the new bumps, I started with 1.75x.120 Tube and capped off one end.

Once the cap was welded on, I ground it smooth and tapped the center.

Rough comparison between the stock bump in relation to where the new one will sit.

Full bump. May need to trim a bit more.


Here's some quick pics of the 3-link I built some time ago now. Its rusty and muddy now.


Starting the rear bumps tomorrow.
Comparison between stock fronts and the new ones.
To mount and extend the new bumps, I started with 1.75x.120 Tube and capped off one end.
Once the cap was welded on, I ground it smooth and tapped the center.
Rough comparison between the stock bump in relation to where the new one will sit.
Full bump. May need to trim a bit more.
Here's some quick pics of the 3-link I built some time ago now. Its rusty and muddy now.
Starting the rear bumps tomorrow.
Thread Starter
Member
Joined: Feb 2009
Posts: 225
Likes: 0
From: Linden, MI
Year: 2000
Model: Cherokee
Engine: 4.0
Finished up the passenger rear.
New U-bolt spring plate, with integrated bump pad. I had to make some relief cuts in the plate in order to bend up the sides. I welded up the seams afterwards.


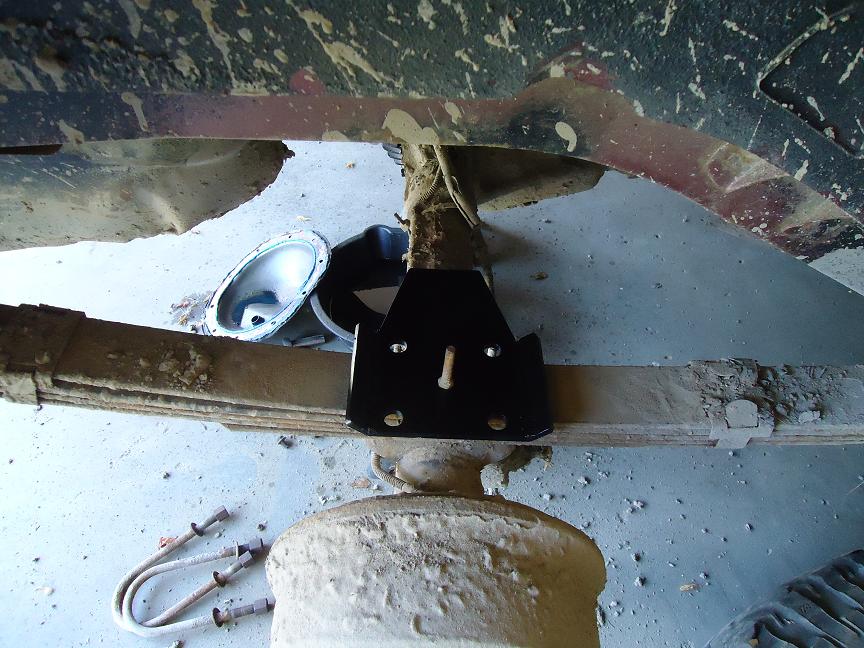
Drilled a 1.75" hole for the tube to slide up into the frame rail.


.25" plate got the same hole to strengthen the unibody rail where the bump stop will be welded on.


Welded the .25" plate to the tube.

Welded to the body.

Finished.


This leaves me around 4" of up travel in the rear and around 3.5" up front, not including the little "squish" I'll get out of the bump stop.
New U-bolt spring plate, with integrated bump pad. I had to make some relief cuts in the plate in order to bend up the sides. I welded up the seams afterwards.
Drilled a 1.75" hole for the tube to slide up into the frame rail.
.25" plate got the same hole to strengthen the unibody rail where the bump stop will be welded on.
Welded the .25" plate to the tube.
Welded to the body.
Finished.
This leaves me around 4" of up travel in the rear and around 3.5" up front, not including the little "squish" I'll get out of the bump stop.

Thread Starter
Member
Joined: Feb 2009
Posts: 225
Likes: 0
From: Linden, MI
Year: 2000
Model: Cherokee
Engine: 4.0
Picked up a 77 Bronco with a dana 44 and 9" axles. Sold the bronco off and kept the axles for the Jeep.
Started trussing the 9". Built out of 3/16 plate. Once i get the rust cleaned off the axle I can tack the truss on and start building the spring perches and shock mounts. The D44 will get a similar truss.


Started trussing the 9". Built out of 3/16 plate. Once i get the rust cleaned off the axle I can tack the truss on and start building the spring perches and shock mounts. The D44 will get a similar truss.

 I could use a set of those rear leaf perch/bump pads