
My 1990 XJ Build

Seasoned Member
Joined: Jan 2010
Posts: 412
Likes: 0
From: Former Tampa Fl. now Southern Indiana
Year: 1990
Model: Cherokee
Engine: 4.0 HO
looking great, digging the green..Not that most people want to detail a jeep but if you take some black satin rattle can and spray in the wheel wells and along the frame edge it makes the rest of your paint job look cleaner..Two thumbs up..

Thread Starter
Junior Member
Joined: Apr 2010
Posts: 75
Likes: 0
From: Denaham Springs
Year: 1990
Model: Cherokee
Engine: 4.0 ltr
I haven't done it yet, I am going to get some cardboard and make a strip a couple of inches wide and tape it up real good on the outside along the cut, pull out the rear trim panels and fill it in with some good flexible automotive seam sealer. I want to use the cardboard to keep it from just leaking out and gooping up, not really worried if i cant get the cardboard out I'm sure it will come off eventually, I'll post some pics when I do it, think I am going to try this weekend. I thought about welding some scraps in there but thats too muck work. I thought about not trimming as much but I would rather everything look uniform as messed up as that is.
Thread Starter
Junior Member
Joined: Apr 2010
Posts: 75
Likes: 0
From: Denaham Springs
Year: 1990
Model: Cherokee
Engine: 4.0 ltr
I plan on cleaning up the fender wells as soon as I hammer down the front pinch welds and seal up my rear ones, is it wrong to be **** about something thats only purpose is to be taken in the woods and beat on?
Seasoned Member
Joined: Jan 2010
Posts: 412
Likes: 0
From: Former Tampa Fl. now Southern Indiana
Year: 1990
Model: Cherokee
Engine: 4.0 HO

Thread Starter
Junior Member
Joined: Apr 2010
Posts: 75
Likes: 0
From: Denaham Springs
Year: 1990
Model: Cherokee
Engine: 4.0 ltr
I know what you mean I have worked in dealerships since 95 I don't trust anyone else, plus when you get into performance mods and things like that prices get ignorant without any kind of warranty to back workmanship. We get techs with UTI Elite training that is brand specific that can't change oil. I can only Imagine what comes out of Wyotech and places like that. All these new guys that have seen all the Fast and Furious movies and all the Spike TV shows that want to build cars for a living keep them away from me.
Thread Starter
Junior Member
Joined: Apr 2010
Posts: 75
Likes: 0
From: Denaham Springs
Year: 1990
Model: Cherokee
Engine: 4.0 ltr
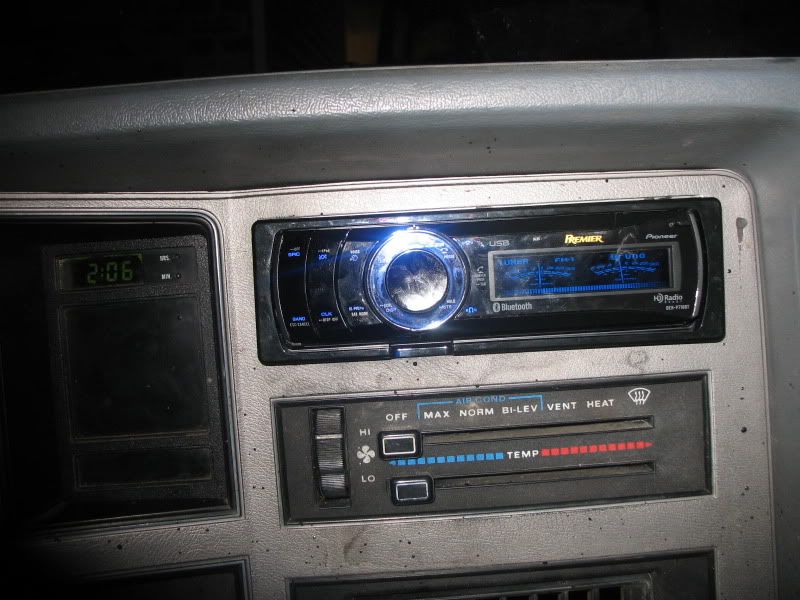
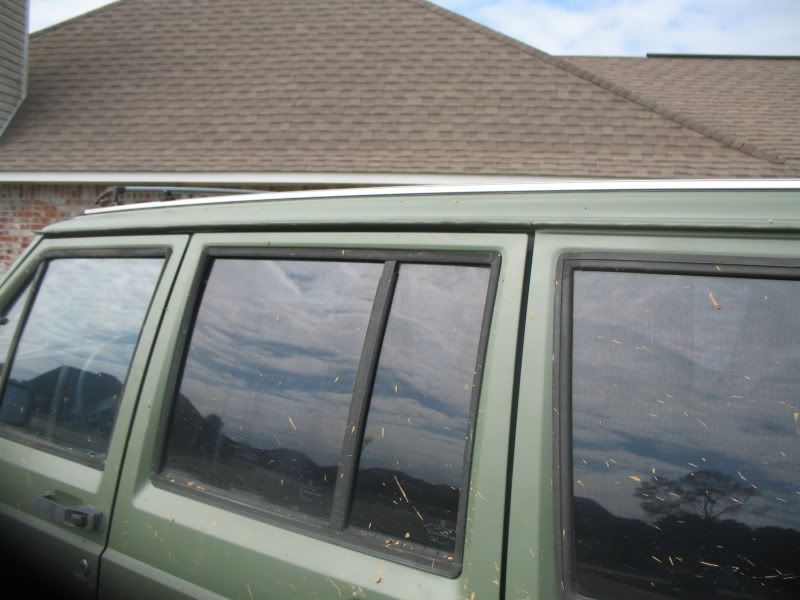
Since my last post I have pulled the drivers door cylinder to have a door key made, installed my Pioneer head unit I took out my TJ before I sold it, ran the wires for my amp, ran the wires for my iPod, installed the handsfree mic for my radio, changed the turn signal switch, changed all the bulbs and a couple of sockets in the rear lamps, replaced the outside handle around the lock cylinder on the rear hatch, my muffler was falling out so now I have a Thrush glass pack in it (cheapest I could find), cleaned all my windows inside and out, an d tonight Its going on its maiden voyage, figure I will take it for a little cruise and fill it up and hope there are not any fluid leaks from it sitting up for 4 years or so. Then Saturday night its off to the trails for the annual Halloween ride.
Thread Starter
Junior Member
Joined: Apr 2010
Posts: 75
Likes: 0
From: Denaham Springs
Year: 1990
Model: Cherokee
Engine: 4.0 ltr
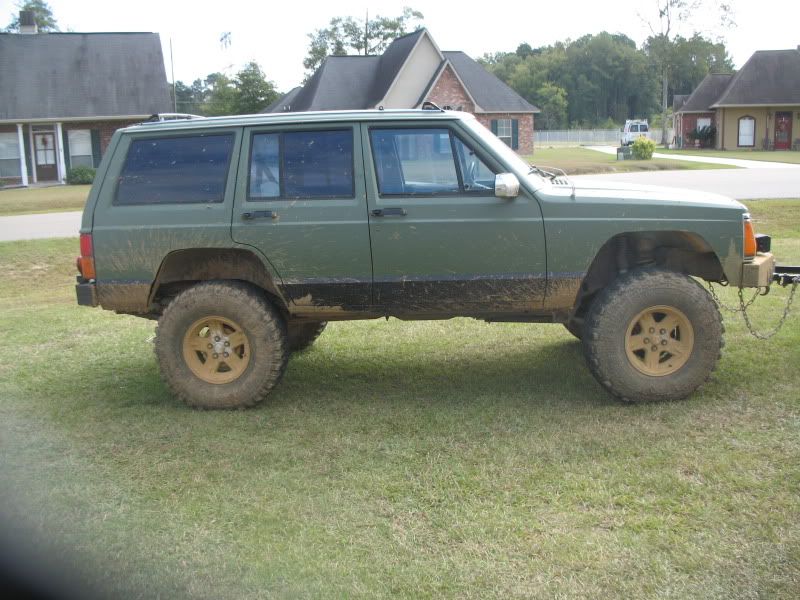
Finally got to take it out on the trails, went last night for the La 4x4 yearly Halloween ride, did not get home till 2 this morning and got about 3 hrs of sleep, I have installed my CB, bolted in my Rustys skid plates,(pic coming) removed my front sway bar, with the frame reinforcements for the bumper could not mount the disconect pins out the way of the front tires, then about an hour before I left took it down the road to th e gas station to fill it up to see how the temp would do, took the trip in 1st and 2nd gear and got home to find a small coolant leak (coolant res) made a mad dash to Vatozone grad a res and some more coolant came home and swapped it and off I went.
It did well for never being on the trails and had no real problems for being sitting for the last 4+ years.
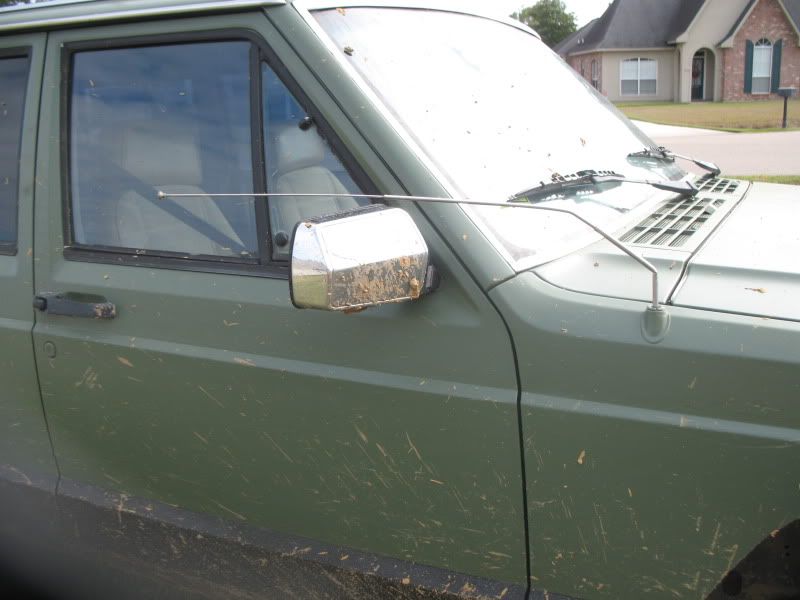
Only damage i got was lost a drip rail molding and bent my antenna.
Radio I kept out my TJ when I sold it
Before I left
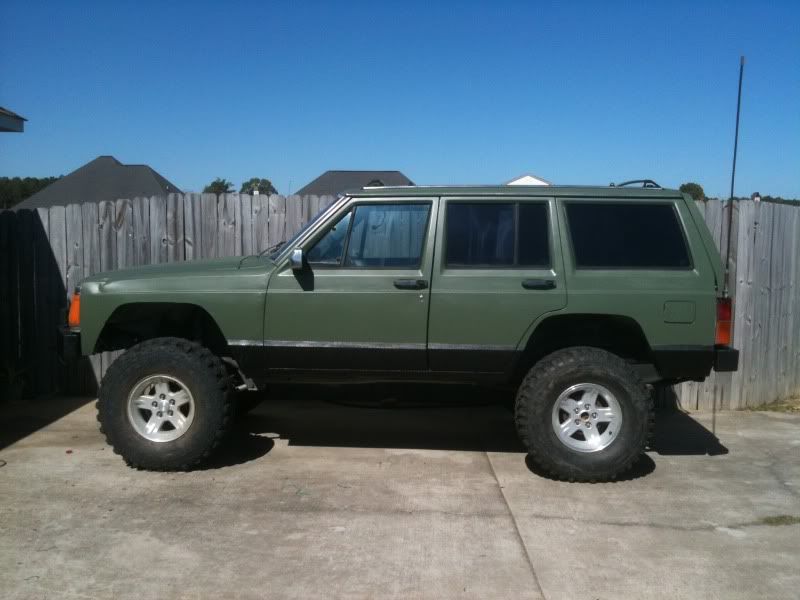
This mornings pics
It did well for never being on the trails and had no real problems for being sitting for the last 4+ years.
Only damage i got was lost a drip rail molding and bent my antenna.
Radio I kept out my TJ when I sold it
Before I left
This mornings pics
Last edited by South_La_XJ; Oct 31, 2010 at 01:42 PM. Reason: adding rest of pics
Thread Starter
Junior Member
Joined: Apr 2010
Posts: 75
Likes: 0
From: Denaham Springs
Year: 1990
Model: Cherokee
Engine: 4.0 ltr
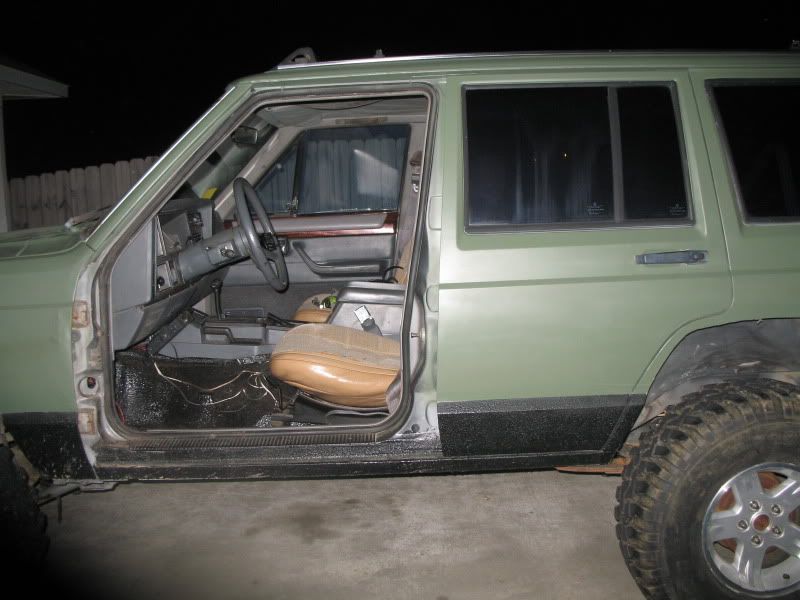
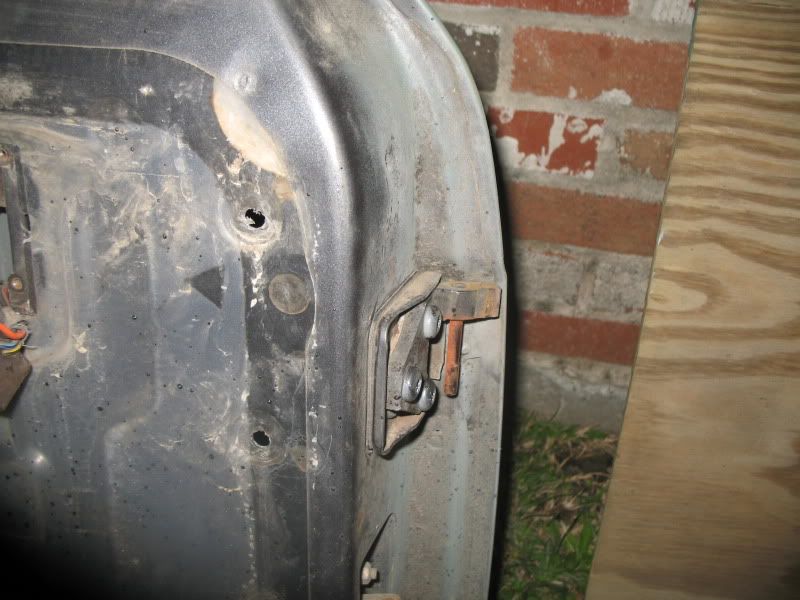
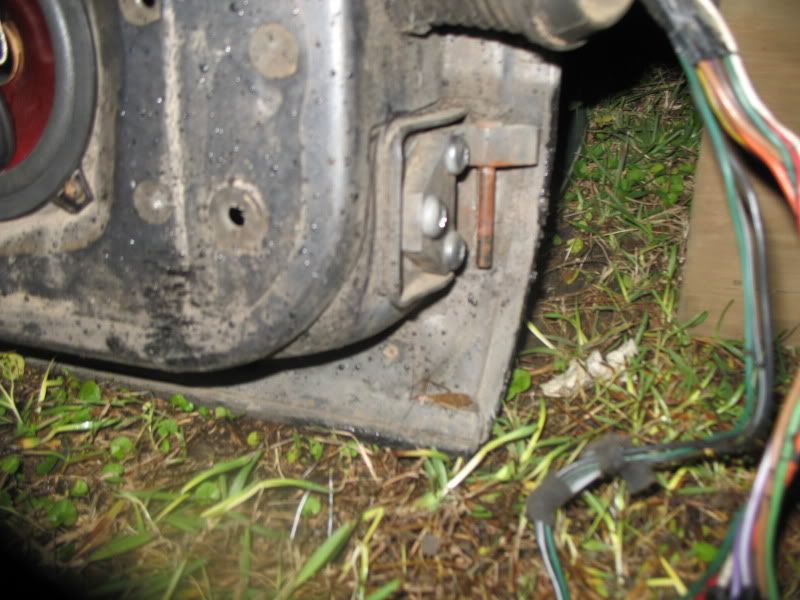
Since my last post, over the past couple of weeks I have replaced my borken antenna with a rubber one and made the front doors removable, and hardwired a switch with relay for my aux fan so I can turn it on and leace it on.
For the door removal I tried both methods, taking the door off and cutting the hinges and using a dremel to cut them with the door on. In my opinion it is easier and quicker to remove the door and cut them. I read every article on this topic I could find and the way I went about it was pretty much exactly like the one with the dremel shows on my driver door, and for the passanger I took my spray paint and painted over the hinge, bolts, spacer peice and shims (did this to make it easier to put it back in place), to remove the door there are 2 holes on the body side of the hinge, this makes it easy to break the 2 inside bolts loose from inside the fender, only found this info on one of the write ups, my hinges did not have bushings as some do fromt what I read nor were the passanger side ones upside down. For the passanger side after I removed the door and cut the hinges I used a open end 3/4" wrench to hammer off the bottom of the hinges which was easier then the punch that I used on the driver side. To lift the driver side off after I cut the hinges and used 2 2x4 peices and a floor jack (one piece along the bottom of the door and one piece end down on the jack and the other end on the piece alone the bottom of the door) slowly jack up the jack with help and it takes the work out of removing the hinge pins out of the hinge.
Driver
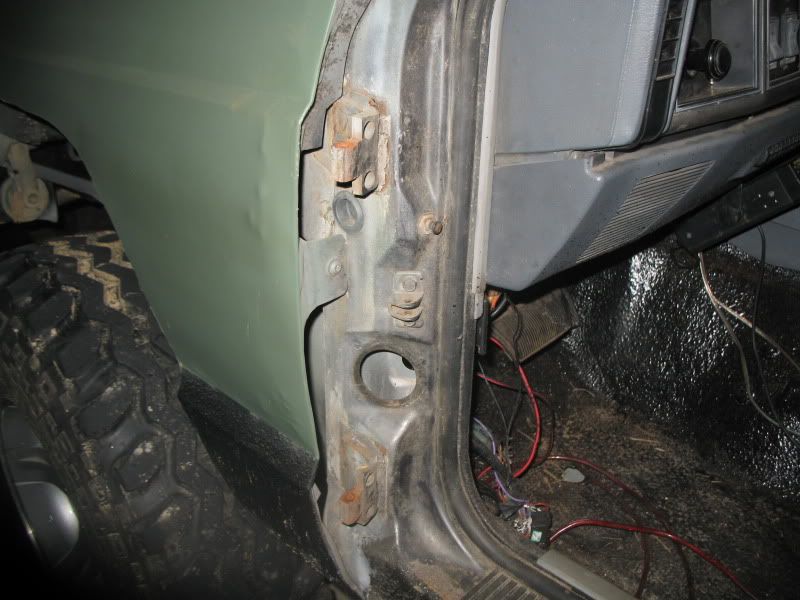
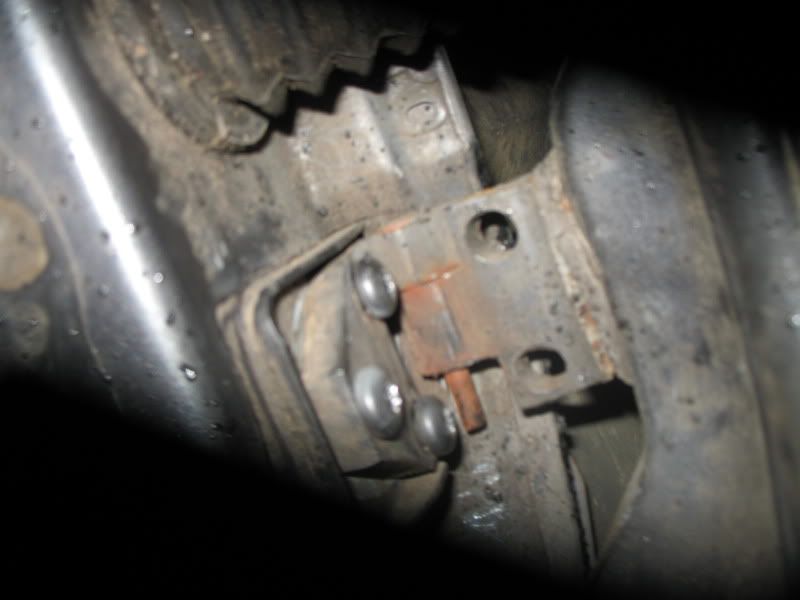
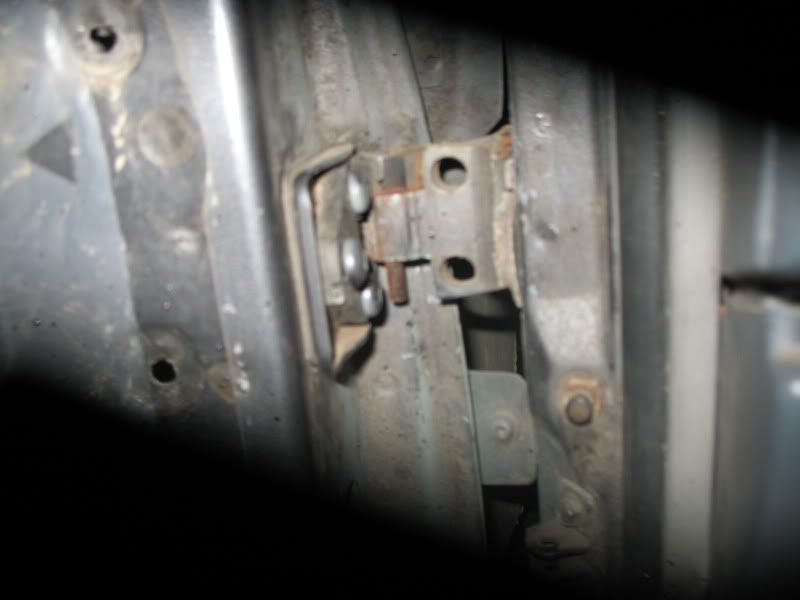
Passanger
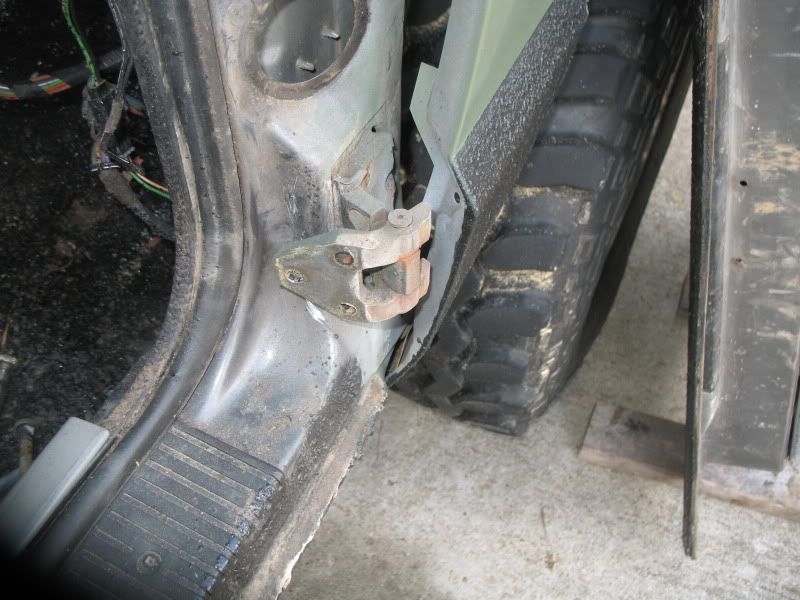

I thought I took more pics I guess not, It helps alot to shorten the hinge pins, I found It made no difference wether to top one is cut flat or at an angle, and there is no reason to remove the door panels to do this. Feel free to ask me any questions I will do my best to help you out.
For the door removal I tried both methods, taking the door off and cutting the hinges and using a dremel to cut them with the door on. In my opinion it is easier and quicker to remove the door and cut them. I read every article on this topic I could find and the way I went about it was pretty much exactly like the one with the dremel shows on my driver door, and for the passanger I took my spray paint and painted over the hinge, bolts, spacer peice and shims (did this to make it easier to put it back in place), to remove the door there are 2 holes on the body side of the hinge, this makes it easy to break the 2 inside bolts loose from inside the fender, only found this info on one of the write ups, my hinges did not have bushings as some do fromt what I read nor were the passanger side ones upside down. For the passanger side after I removed the door and cut the hinges I used a open end 3/4" wrench to hammer off the bottom of the hinges which was easier then the punch that I used on the driver side. To lift the driver side off after I cut the hinges and used 2 2x4 peices and a floor jack (one piece along the bottom of the door and one piece end down on the jack and the other end on the piece alone the bottom of the door) slowly jack up the jack with help and it takes the work out of removing the hinge pins out of the hinge.
Driver
Passanger
I thought I took more pics I guess not, It helps alot to shorten the hinge pins, I found It made no difference wether to top one is cut flat or at an angle, and there is no reason to remove the door panels to do this. Feel free to ask me any questions I will do my best to help you out.
Senior Member
Joined: Jan 2010
Posts: 846
Likes: 0
From: South Louisiana
Year: 1990
Model: Cherokee
Engine: 4.0
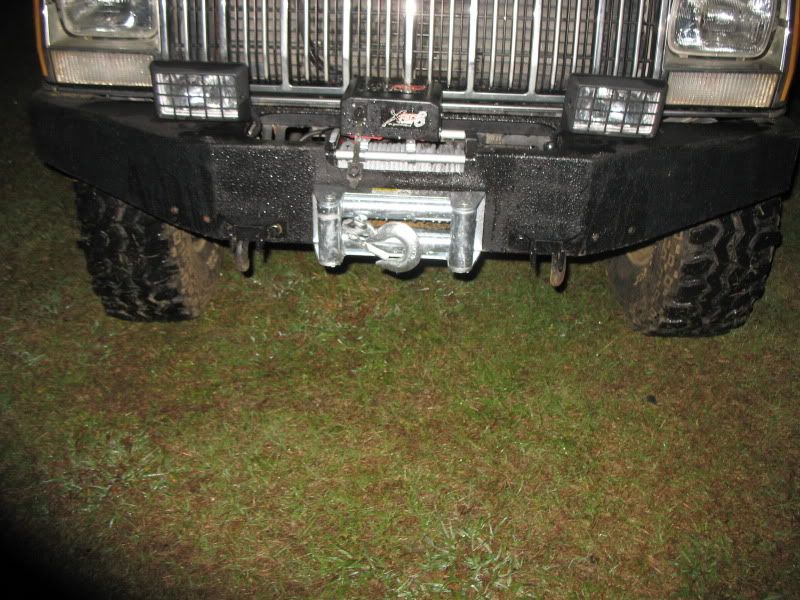
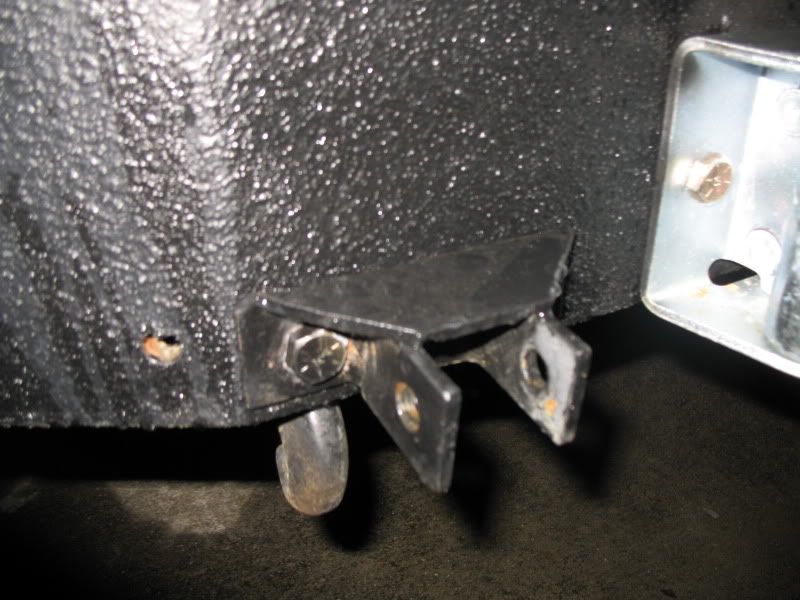
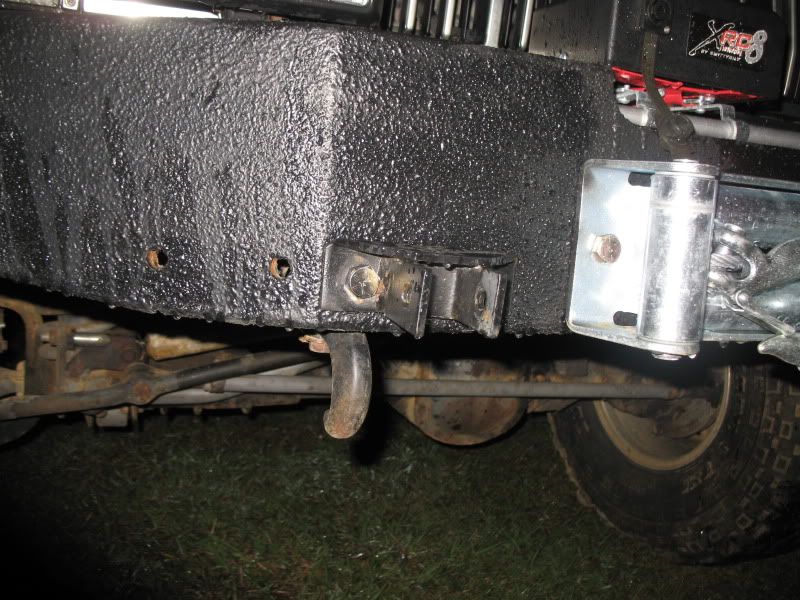
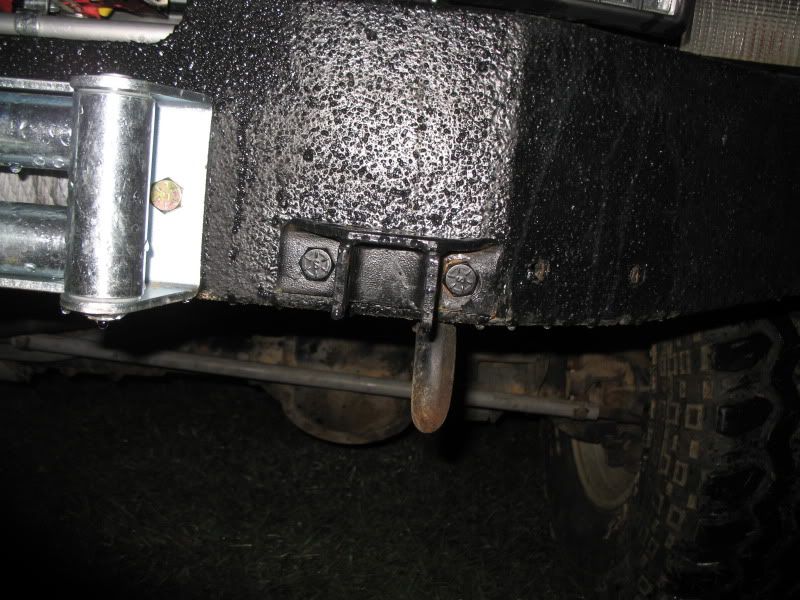
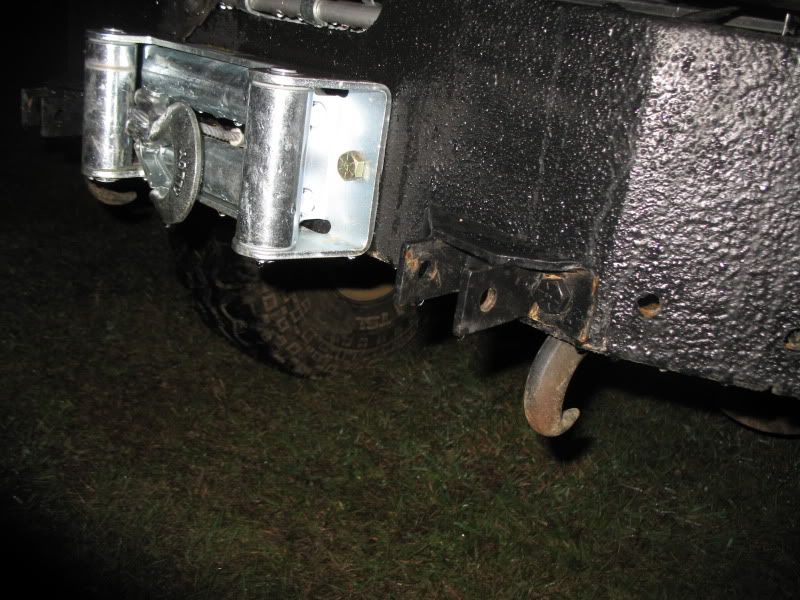
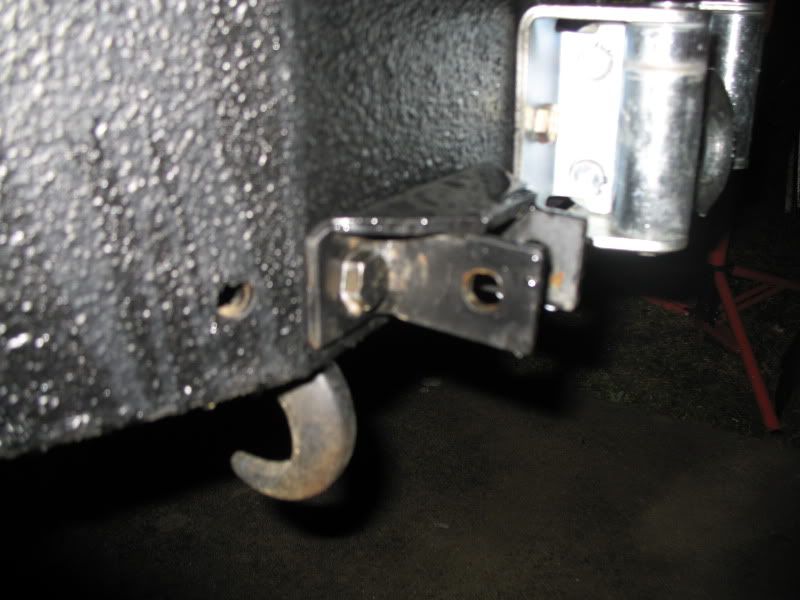
hey man can you take pics of that tow point you got mounted to the front bumper? i'm about to do the same exact thing and i wanna see your set up. specifically how it mounts to the bumper. we'll be taking a trip to gilmer, tx in january and i don't wanna drive my xj so i'm gonna pull it with my hemi. thanks!
Thread Starter
Junior Member
Joined: Apr 2010
Posts: 75
Likes: 0
From: Denaham Springs
Year: 1990
Model: Cherokee
Engine: 4.0 ltr
Here is what I got from Harbor Freight http://www.harborfreight.com/5000-lb...bar-94696.html you can get coupons for I think 20% off, I got some bulk chain 2 hooks and 6 of the screw close type hooks,, cut the chain in 4 pieces, use the regular hooks to hook the safety chains to the inside of my bumper and the other hooks on the rest of it. I have the JCR frame reinforcement brackets on my bumper, I'm not sure if I would trust the factory bumper mounts, isn't much there. I took I think a 4 inch drop hitch and turned it upside down to keep the tow bar level.
Thread Starter
Junior Member
Joined: Apr 2010
Posts: 75
Likes: 0
From: Denaham Springs
Year: 1990
Model: Cherokee
Engine: 4.0 ltr
Here are a few pic links from our last ride
http://s197.photobucket.com/albums/a...island%202011/
http://gallery.me.com/drcre8tive#100285
Put the XJ on its side and broke inner and outer left axle shafts, over all a good first real hardcore wheeling trip!
http://s197.photobucket.com/albums/a...island%202011/
http://gallery.me.com/drcre8tive#100285
Put the XJ on its side and broke inner and outer left axle shafts, over all a good first real hardcore wheeling trip!
Thread Starter
Junior Member
Joined: Apr 2010
Posts: 75
Likes: 0
From: Denaham Springs
Year: 1990
Model: Cherokee
Engine: 4.0 ltr
Haven't been on the forum much lately but hopefully this will help make up for it, I bent my steering and broke both left axle shafts last time I wheeled it, so that means it's time to upgrade. Here is a little write up on what I did
I broke both left axle shafts and bent my steering at the June Jam so I decided to upgrade, a good friend donated some TJ shafts, best factory shafts with biggest U-joints you can get without going aftermarket, I had the 2 piece right side shaft, ordered a kit that has seals and a plate to go there the vaccuum pod went, also added some outer alloy seals, and upgraded the steering to crossover steering from a WJ.
The WJ 99-04 has factory crossover steering, beefier knuckles and bigger brake rotors and 2 piston calipers, the WJ had 2 different versions of calipers the 02-04 were a better caliper and made by teves, all this came from the junkyard for really cheap, you dont need the rotors or the unibearings, they are 5 on 5 bolt pattern.
This is suppose to be a direct bolt on for a XJ, YJ, TJ, and ZJ Yea not so much I was short on time so I had to cut a few corners
List of stuff you will need
Knuckle, calipers, caliper brackets off of a 1999-2004 Grand Cherokee 2wd, 4wd, v8, 4.0 they are all the same
2002 Ford Explorer Sport Trac Postal front rotors (2 of them)
These came from Lowes (They have a great bolt, nut, and misc section if you did not know this)
4 12x1.50x50mm bolts
4 12mm lock washers
4 12mm flat washers (12 extra if you want to be lazy)
1996 chevy c1500 front brake lines (Used them on opposite sides on the Jeep)
Vatozone parts 77761 & 77760 These are 21" long and $16 each
Steering componets if you can't get them with the knuckles and brakes (Mexi cans beat me to them)
Found them at Advanced on Siegan
Drag Link adjusting sleeve DS1453S 24.72 inches long (This goes from pitman arm to knuckle
Drag link ends ES3475 (pitman arm end) ES3474 (right knuckle end
Tie Rod adjusting sleeve DS1452S 41.25 inches long (this goes from knuckle to knuckle)
Tie rod ends ES3472 (right knuckle end) ES3473 (left knuckle end)
The knuckles go on the axle without any issues (WJ lower ball joints are different part numbers than a XJ) but the went on with no issues not sure what the difference is, you need to make 1/4" spacers to go between the knuckle and claiper brackets or the brackets will not fit (made a cardboard templet for later use) was short on time so I used 3 of the 12mm flat washers on each bolt to space it, the factory bolts are not long enough so this is where the 4 12x1.50x50mm bolts come in, you need to put one flat washer and one lock washer at the head of each bolt or they will bind up the rotor. the 2002 Sport trac postal rotors are the same dimensions as the WJ rotors and are 5 on 4.5 bolt pattern (the hat on the rotors are not as deep as the XJ rotors this is why you need spacers).
I put all the ends on the adjusting sleeves and found them to be about 4 inches too long for my XJ I wanted to cut a section out the middle and weld a sleeve over them but I was running short on time so I trimmed about an inch off of each end (snug up the clamps on the adjusting sleeves and use them as a guide, this will help keep the cut somewhat straight)bolted in the tie rod then slapped some 24" levels on a couple of studs on each wheel and measured the difference between the front and back and found it toed out a little more than 1/8" so I let it ride. For the drag link I had to trim an inch off of each end and a little more than an inch off the rod ends, I used the end of the adjusting tube I cut off and taped it to the rod ends to help me make a nice straight cut, bolted it in and this was done.
Bolted on my new wheels and tires thanks to AlanG and Curtis bled the brakes and took it for a spin, had a slight pull at around 40mph but I plan on correcting this when I redo my steering links (not real worried about this, it doesnt see any road time), came home and gave everything a good looking over and found my already extened brake lines to be too short, checked around and spent a little time on google and my best option was the Chevy 1500 brake lines. They come with a bracket about half way down which is affixed with a little glue, I took a flat blade screw driver and some channel locks and gently pryed the bracket open a little and it came loose and I moved it to the upper end of the brake line and found if you use the driver side line on the passanger side of the XJ you can bolt it to the factory spot on the Jeep (had to drill out the hole on the bracket, it was a little to small) and the passanger side worked the same on the driver side of the XJ. Bled the brakes again and went put some gas in for the weekend wheeling.
When I fix it the way I want I will take more pictures.
Here is the link to the few I have
http://s69.photobucket.com/albums/i4...ing%20Upgrade/
I forgot to mention 15 inch wheels will not clear the WJ calipers unless you have a good bit of back spacing.
To fix this I bought some Rubicon wheels from a friend and some 33x13.5x16 Bias Ply TSL Swampers and some 1.5 inch spacers to help with tire clearance my old 33x12.5x15's rubbed a little
If you have any questions feel free to ask
Thread Starter
Junior Member
Joined: Apr 2010
Posts: 75
Likes: 0
From: Denaham Springs
Year: 1990
Model: Cherokee
Engine: 4.0 ltr
Took it out this weekend new tires did awesome, had no problems with the steering, planning on making some brackets and swapping in grand front seats this week, putting in a newer XJ center console and shifter, and updating to a diaphram booster and newer master cylinder to help my new front brakes out, I will be sure to take many pictures since there is no time constrant on this one.