
Back In Black - 99 XJ Build Project Log


Thread Starter
Junior Member
Joined: Jan 2014
Posts: 37
Likes: 0
From: California
Year: 1999
Model: Cherokee (XJ)
Engine: 4.0
I had been getting the jeep itch again, so I went and traded an old truck for an XJ. It was dark and freezing cold when we negotiated the trade, and I missed a bunch of stuff that probably would have made me turn away. But I went ahead with trade… I was too darn excited that I had found a rust-free black '99 5-speed 4x4 with a 3" lift and no wobble. I think the 8.25" rear must have clinched it for me at the time.
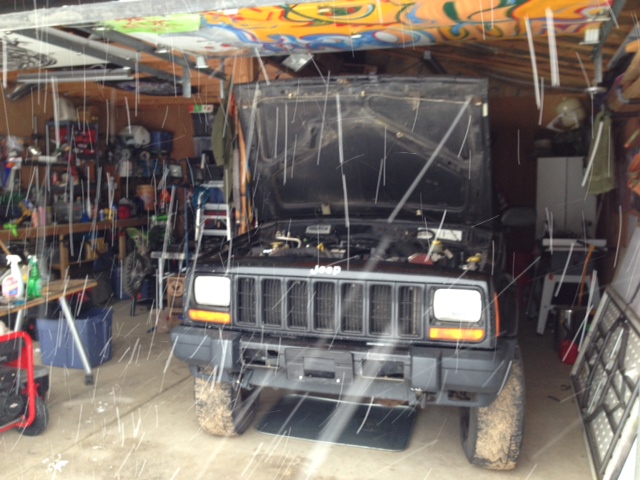
Of course, I should have know better. To start with, it had 230k. The front tires were pretty worn and the rears were worse. The dash and main cabin illumination didn't work, the trunk-ajar and airbag lights were on, the horn didn't work, the bumper had been cut open to fit fog lamps inside it, which were speaker-wired to a loose, floating switch which was semi- jammed into the console trim, and did not work.
Of course, I should have know better. To start with, it had 230k. The front tires were pretty worn and the rears were worse. The dash and main cabin illumination didn't work, the trunk-ajar and airbag lights were on, the horn didn't work, the bumper had been cut open to fit fog lamps inside it, which were speaker-wired to a loose, floating switch which was semi- jammed into the console trim, and did not work.
Last edited by JBV; Mar 15, 2014 at 03:13 PM.
Thread Starter
Junior Member
Joined: Jan 2014
Posts: 37
Likes: 0
From: California
Year: 1999
Model: Cherokee (XJ)
Engine: 4.0
The tie rod was bent, the track bar was worn out, and the old-style skyjacker adjustable LCAs were improperly mounted at the axle end, and not adjusted to the same length. The tires were very unevenly worn. Interestingly, it still drove pretty darn straight.
Left LCA from the front:
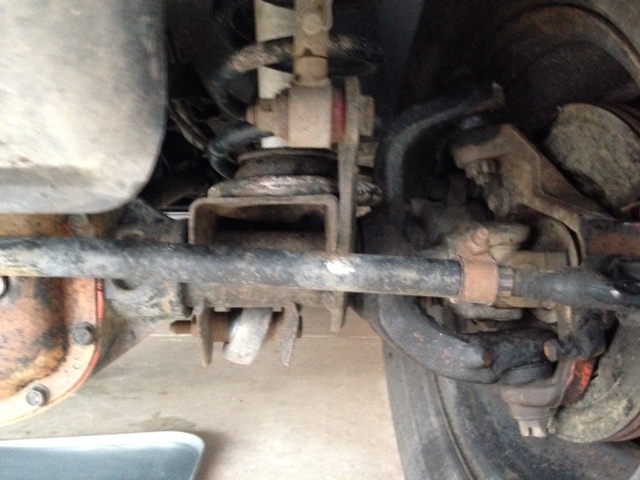
Right LCA from behind:
Left LCA from the front:
Right LCA from behind:
Thread Starter
Junior Member
Joined: Jan 2014
Posts: 37
Likes: 0
From: California
Year: 1999
Model: Cherokee (XJ)
Engine: 4.0
I attacked the electrical system first.
Cleaned battery contacts, found corrosion in the first several inches of positive battery wires, was able to salvage the cable going to the fuse block, but the starter cable will need to be replaced.
Replaced broken body-ground connector.
Removed all traces of the previous fog lamps and stupid switch.
Removed all traces of corroded hack job of a trailer wiring setup, discovered that one rear taillight assembly was held in place with jb-weld which had to be removed before I could get to the wiring. Left taillight assembly added to junkyard list.
The tailgate multi-switch was unplugged and damaged so that it no longer stayed in place� but it still worked, so I plugged it in and the cargo light came on. Then I locked it into the "closed" position with a small clip, and the cargo lights went off, as did the tailgate-ajar indicator on the dash. Problem and solution found, good.
Thread Starter
Junior Member
Joined: Jan 2014
Posts: 37
Likes: 0
From: California
Year: 1999
Model: Cherokee (XJ)
Engine: 4.0
There were three broken door-jamb switches, and one missing, which meant fishing the wiring up out of the body. I used some baling wire down through the switch hole and out through the door wiring hole (after removing the rubber boot from the body side) which I also used to find the switch wiring by poking around blindly with my finger. Once I had both through the lower hole, I wrapped the baling wire securely around the weather shielding on the end of the switch wire, and pulled it carefully back up and through it's proper hole. New switches installed and an overhead bulb up front, and the doors activate interior lighting. Good.
Thread Starter
Junior Member
Joined: Jan 2014
Posts: 37
Likes: 0
From: California
Year: 1999
Model: Cherokee (XJ)
Engine: 4.0
Still no dash illumination. Found stock fuse diagram from an owners manual online, and made mine match it… dimmer fuse that is supposed to be a 5 was a 15, and blown. Replaced with a 5, powered on, blew the 5.
Pulled the aftermarket stereo, found a rat's nest of stupid wiring, complete with twist connectors, exposed wire, and defunct amp and sub connections. Removed all of it. Replaced the dimmer fuse again and powered up. Dash lights work.
Pulled the aftermarket stereo, found a rat's nest of stupid wiring, complete with twist connectors, exposed wire, and defunct amp and sub connections. Removed all of it. Replaced the dimmer fuse again and powered up. Dash lights work.
Thread Starter
Junior Member
Joined: Jan 2014
Posts: 37
Likes: 0
From: California
Year: 1999
Model: Cherokee (XJ)
Engine: 4.0
Quick bit of reading online diagnosed the airbag light and horn issue as being a bad clockspring. I had the dealership do that one, I didn't want to deal with the fasteners stuck in the wheel-surround. The jeep tech couldn't get it either, so he broke off a fastener, comped me the labor charges, and discounted the part price.
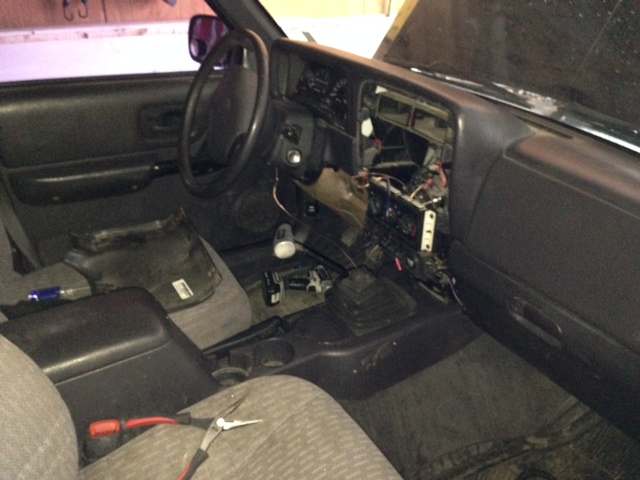
The e brake would not stay engaged, it would appear that to be a ratchet mechanism is worn or miss-aligned. Can't find a diagram anywhere or see into it from above to see if it can be repaired. The center console mounting bracket was broken, and the rear heater vent was weak.
With my worn out e-brake, I was having issues removing the center console. I loosened the e-brake cable all the way, that gave me the slack to pull the brake handle up all the way. The bracket, vent tube, and airbag controller must be removed before you can get the brake handle removed.
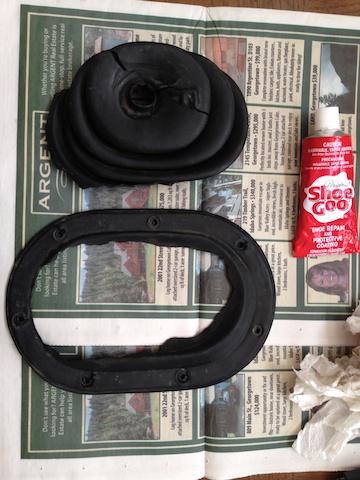
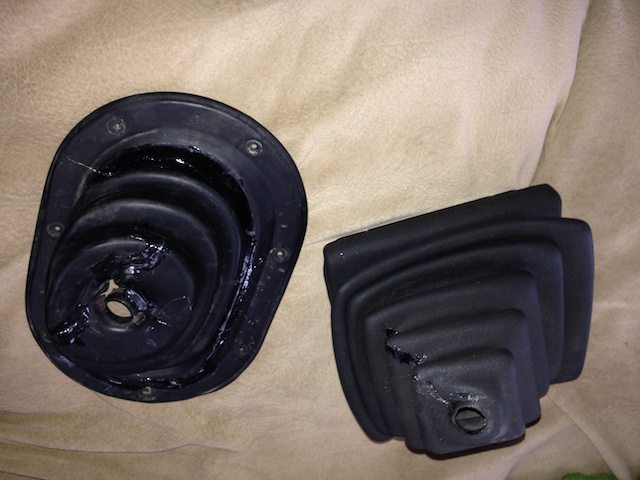
I replaced it with a working handle from the junkyard. The rear air vent was missing the foam collar that attaches it to the dash vent system, so I made a collar out of silver ducting tape (NOT grey duct tape on a roll, the actual silvery ducting tape with the peel-off paper backing). I replaced the console mounting bracket with a junkyard part, and used shoe-goo to repair the torn shifter boots, which I could neither find at the JY nor source from anywhere.

The e brake would not stay engaged, it would appear that to be a ratchet mechanism is worn or miss-aligned. Can't find a diagram anywhere or see into it from above to see if it can be repaired. The center console mounting bracket was broken, and the rear heater vent was weak.
With my worn out e-brake, I was having issues removing the center console. I loosened the e-brake cable all the way, that gave me the slack to pull the brake handle up all the way. The bracket, vent tube, and airbag controller must be removed before you can get the brake handle removed.
I replaced it with a working handle from the junkyard. The rear air vent was missing the foam collar that attaches it to the dash vent system, so I made a collar out of silver ducting tape (NOT grey duct tape on a roll, the actual silvery ducting tape with the peel-off paper backing). I replaced the console mounting bracket with a junkyard part, and used shoe-goo to repair the torn shifter boots, which I could neither find at the JY nor source from anywhere.
Last edited by JBV; Mar 22, 2014 at 06:11 PM. Reason: add photos
Thread Starter
Junior Member
Joined: Jan 2014
Posts: 37
Likes: 0
From: California
Year: 1999
Model: Cherokee (XJ)
Engine: 4.0
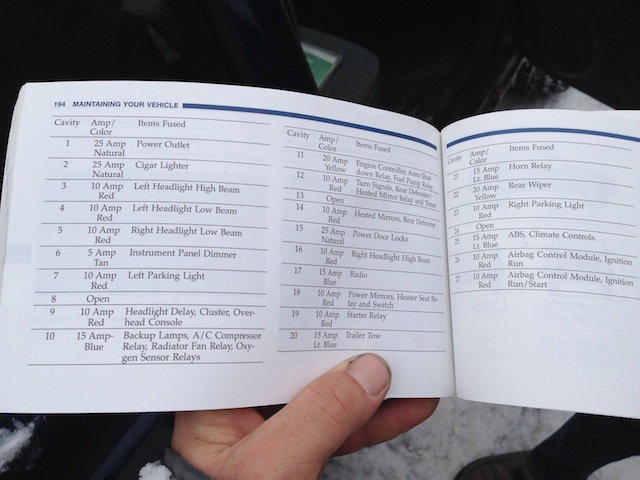
In the course of solving my dash light issue, I had pulled all the fuses from the kick panel fuse block, and replaced them according to an owners manual that I found online, as there was no diagram anywhere on mine.
This was a good thing for the issues I had experienced to this point...
But it also meant that I removed the #10 fuse, which the manual I had looked at says is Open.
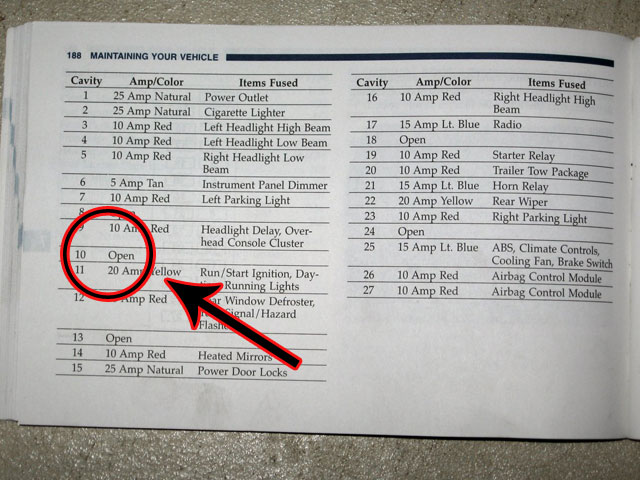
Now, this is apparently an error on the part of Chrysler, as I have discovered: some owner's manuals have a good diagram, some have a bad one, and some have a note saying to check the fuse-box cover� which in turn sometimes says to check the manual.
This was a good thing for the issues I had experienced to this point...
But it also meant that I removed the #10 fuse, which the manual I had looked at says is Open.
Now, this is apparently an error on the part of Chrysler, as I have discovered: some owner's manuals have a good diagram, some have a bad one, and some have a note saying to check the fuse-box cover� which in turn sometimes says to check the manual.
Last edited by JBV; Mar 30, 2014 at 03:07 PM.
Trending Topics
Thread Starter
Junior Member
Joined: Jan 2014
Posts: 37
Likes: 0
From: California
Year: 1999
Model: Cherokee (XJ)
Engine: 4.0
Upon starting the jeep I immediately threw a CEL and two codes, PO443 and P1491. My cheapo Actron pocketscan would read the codes, but not erase them. Same thing with my ELM32WiFi +DashCommand app.
After searching the forums, I discovered the fuse-diagram issue, which showed that my two codes were both related to the same circuit, which now had no fuse, but needed one.
I added a 15a minifuse to slot 10, and the PO443 went away, but the P1491 and the CEL were still there. When I checked for operation of the fans, but they kicked on with the A/C, so I knew the relay was still good.
I almost bought a more expensive scan tool, but thought better of it. I cleaned the contacts on the OBDII port, and tried clearing the codes again, successfully.
Here is an accurate diagram for the junction box:
Last edited by JBV; Mar 22, 2014 at 06:08 PM.
Thread Starter
Junior Member
Joined: Jan 2014
Posts: 37
Likes: 0
From: California
Year: 1999
Model: Cherokee (XJ)
Engine: 4.0
Pulled the brakes front and rear, measured, and brought a rotor and drum in to the parts store with me after reading that my 99 is a transition year for brake sizes.
It was good that I did, because I had measured stud length (1 1/8"), and this particular store only had the overall height in the computer, a choice between 3 1/16" and 3 3/16" tall. I needed the shorter one. I then pulled open the other box he brought me as well, to be sure. It had been mislabeled/mispacked, and was the taller one. I made them bring out their whole stock of both, and picked through them to find a matching correct size.
The difference between drums is more obvious; my c8.25 rear uses the 9" drums. The 10" d35 drum would not possibly fit into the 9" box.
I measured anyway.
They comped me the spring kit, which turned out to be necessary: busted and rusted spring bits came falling out when I pulled the old shoes. It stops good now.
Thread Starter
Junior Member
Joined: Jan 2014
Posts: 37
Likes: 0
From: California
Year: 1999
Model: Cherokee (XJ)
Engine: 4.0
Valve cover gasket was leaking, so I replaced it. I had never done one before, but it was easy enough with the FSM.

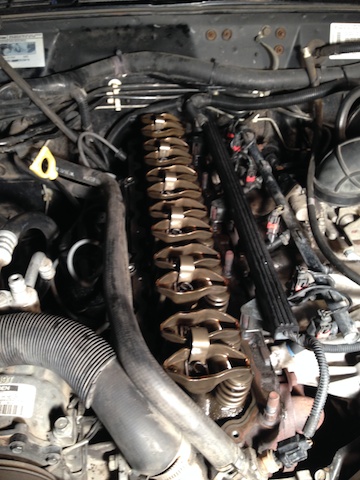
I managed to shatter both ccv fittings in the process: too cold in my garage to put any sort of torsional force onto plastic, or even try to pull on rubber tube… but it turned out to be a good thing, because I realized that I had installed the wrong CCV up front earlier.

NAPA says both ccv fittings are the same, but quadratec's diagram shows a differently shaped vent (back of the valve cover) and breather (front of the valve cover).
They are different. The rear (Grey) elbow has a restrictive fitting, which is the part that was given to me for BOTH by Napa and was the generic 'PCV-Dodge/Jeep' from Help that I found at O'Rielly. It is Chysler part # 5303 0495.
The front (Black) elbow does not have the restrictive fitting. It is Chrysler Part # 5303 0497. Otherwise they are the same.
The elbow itself has a chrysler logo and three part numbers for a grey molding, a blue molding, and a black molding. (This only applies if you get the OEM part cast in Mexico. when I returned with the chrysler part number and got the correct forward (Black) elbow from Napa, I noticed that it was made in china and did not have the part numbers or chrysler symbol.)
If you are having trouble finding the black elbow, a grey one with the restrictive fitting removed (maybe drilled out) would fit, but the black elbow is cheaper by a dollar or two.
Next time, if need be, I will try to avoid breaking the ccvs by following this writeup for removing the old elbows:http://www.jeepforum.com/forum/f310/...ite-up-733669/
I managed to shatter both ccv fittings in the process: too cold in my garage to put any sort of torsional force onto plastic, or even try to pull on rubber tube… but it turned out to be a good thing, because I realized that I had installed the wrong CCV up front earlier.
NAPA says both ccv fittings are the same, but quadratec's diagram shows a differently shaped vent (back of the valve cover) and breather (front of the valve cover).
They are different. The rear (Grey) elbow has a restrictive fitting, which is the part that was given to me for BOTH by Napa and was the generic 'PCV-Dodge/Jeep' from Help that I found at O'Rielly. It is Chysler part # 5303 0495.
The front (Black) elbow does not have the restrictive fitting. It is Chrysler Part # 5303 0497. Otherwise they are the same.
The elbow itself has a chrysler logo and three part numbers for a grey molding, a blue molding, and a black molding. (This only applies if you get the OEM part cast in Mexico. when I returned with the chrysler part number and got the correct forward (Black) elbow from Napa, I noticed that it was made in china and did not have the part numbers or chrysler symbol.)
If you are having trouble finding the black elbow, a grey one with the restrictive fitting removed (maybe drilled out) would fit, but the black elbow is cheaper by a dollar or two.
Next time, if need be, I will try to avoid breaking the ccvs by following this writeup for removing the old elbows:http://www.jeepforum.com/forum/f310/...ite-up-733669/
Last edited by JBV; Mar 22, 2014 at 06:13 PM. Reason: add photos
Thread Starter
Junior Member
Joined: Jan 2014
Posts: 37
Likes: 0
From: California
Year: 1999
Model: Cherokee (XJ)
Engine: 4.0
To replace the leaf/block combo in back, I ordered a set of Rubicon Express 3.5" leafsprings… but 4wheelparts gave me mismatched rubicon express leaf springs and incorrect ubolts, which I exchanged for matched springs and more incorrect ubolts.
I ended up getting ubolts from NAPA, p/n 650-4028 for a 1/2" x 3" x 8" u-bolt to fit a Chrysler 8.25, and I warn anyone against trusting the Pro-Comp u-bolt description for which vehicle it is for, and measure them yourself. The P/N and description in the 4WD catalog and on Amazon were different from those on the ProComp website, and both were wrong, at least for me.
I ended up getting ubolts from NAPA, p/n 650-4028 for a 1/2" x 3" x 8" u-bolt to fit a Chrysler 8.25, and I warn anyone against trusting the Pro-Comp u-bolt description for which vehicle it is for, and measure them yourself. The P/N and description in the 4WD catalog and on Amazon were different from those on the ProComp website, and both were wrong, at least for me.
Thread Starter
Junior Member
Joined: Jan 2014
Posts: 37
Likes: 0
From: California
Year: 1999
Model: Cherokee (XJ)
Engine: 4.0
I knew how bad the stock headlamps were, so I sourced a pair of Delta H4 housings and bulbs, and an ARB M002 harness kit.
This was almost a straightforward install, once you figure our where you are routing and mounting and all, but I had issues due to my factory foglamps.
The ARB instructions fail to mention that with the stock foglight setup there is not enough current to switch the relay back from high beam to low beam. The solution is either to remove the foglight relay from the underhood PDC (thereby disabling the fogs), or to bridge driver's side stock headlight plug, and disable Foglight Cancel on highbeams. This issue also apparently presents itself if you have the DRL option, and the solution is similar.
I choose to bridge the two vertical slots of the stock driver's side headlight plug. I live in a remote area, and the more light the better. I should mention that it is ILLEGAL to drive with fog lights and highbeams on AT THE SAME TIME while on public roads. The stock setup simply does not allow it. My setup means that I will have to consciously turn off the fogs when I switch to my brights, but that is preferable to not having the fogs at all. I have had a pair of yellow KC covers in my parts box for years, and they fit perfectly on the off-brand foglamps in my bumper; the yellow really helps in foggy/snowdust conditions, and they look enough like marker lights now that I don't think anyone would think to hassle me about them if I do forget to turn them off.
When I serviced the foglamp switch, I retained the indicator light, even though it will continue melting the housing: that light is bright enough to remind me to turn it off if it is not needed.
The difference is huge, and the Deltas have a clean cutoff on the low beam to prevent blinding oncoming traffic... i
Last edited by JBV; Mar 15, 2014 at 03:23 PM.
Thread Starter
Junior Member
Joined: Jan 2014
Posts: 37
Likes: 0
From: California
Year: 1999
Model: Cherokee (XJ)
Engine: 4.0
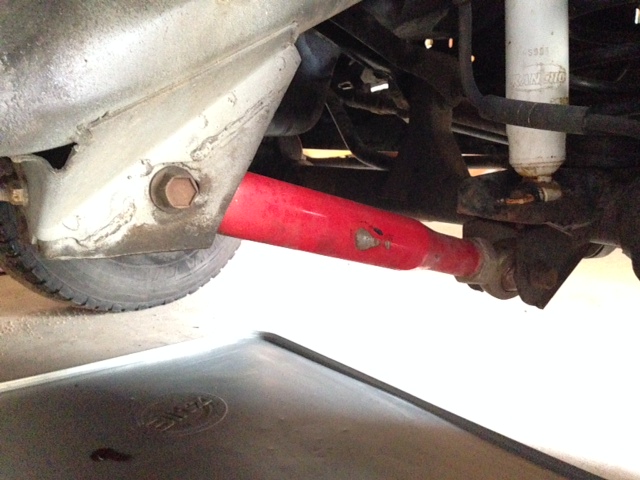
Replaced the trackbar, and put a Rubicon Express Tie Rod up front, along with a pro-comp steering stabilizer, replaced a broken motor mount. Drove 30 miles to town for some fresh rubber and an alignment. 31-1050R15 Goodyear Duratrac tires are my current DD top choice with the ice and snow on the roads here this time of year. Alignment shop failed to adjust my LCAs, which were the main reason I went in, but they did manage to leave me with a sideways steering wheel.
Thread Starter
Junior Member
Joined: Jan 2014
Posts: 37
Likes: 0
From: California
Year: 1999
Model: Cherokee (XJ)
Engine: 4.0
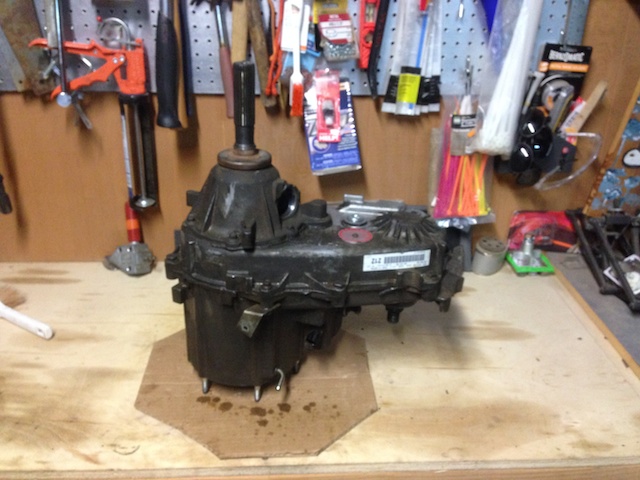
My back was hurting, so Big Jim came by and helped me pull the t-case out.
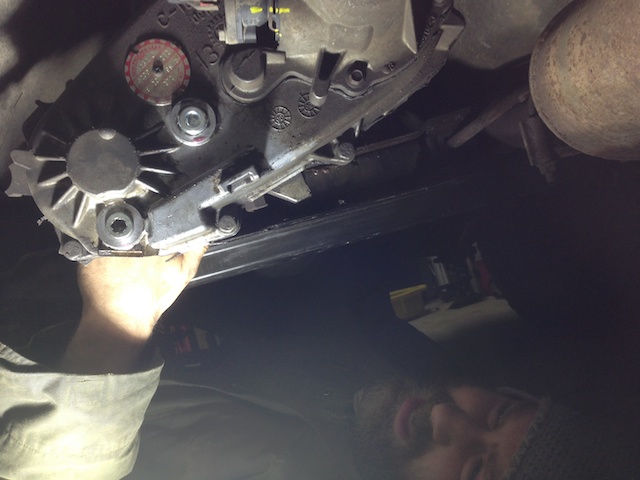
He did it the hard way, by leaving the crossmember in place, and reaching in with his eyes closed to find each hidden nut. Then he went through most of my collection of swivels, extensions and 14mm size tools, eventually gaining access through the shift cover. After it was sitting on the bench, we went in and looked at the book for the recommended procedure... whoops. oh well, it was out.
The Teraflex kit is not the same casting as the AA/Procomp/etc. The main difference that I could see was that the Teraflex housing does not have the vacuum provision, and so does not have the correspoding plug.
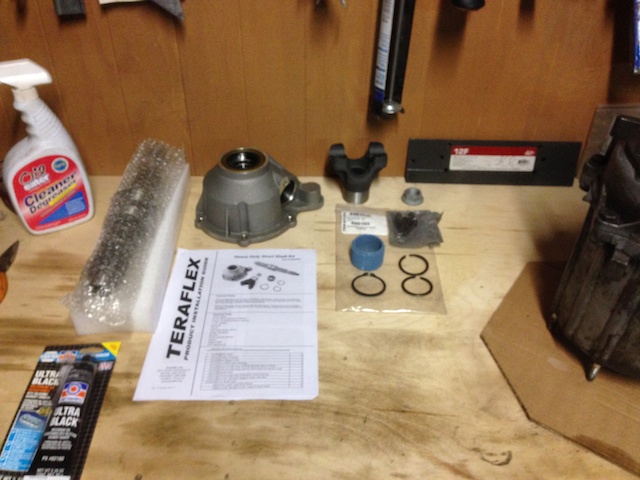
I guess that means it would not work for certain older xjs?. It came with good printed directions (not photocopy), but the black and white photos left something to be desired. Plenty of good photos online, here and on JF. AA has a youtube video of their sye being installed which I watched prior to unboxing mine.
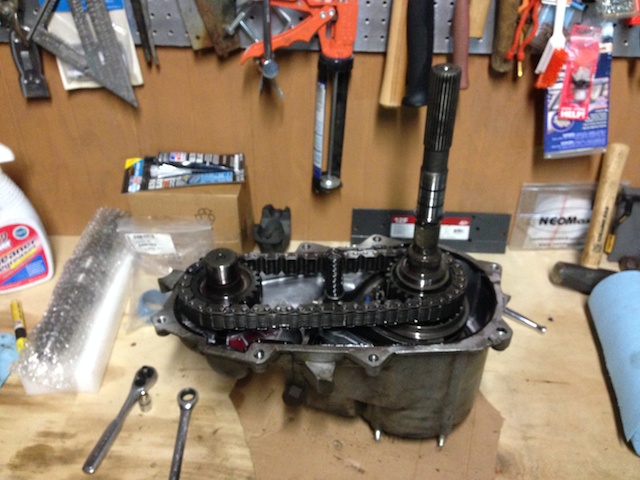
I cleaned the case as well as I could before starting and cleared old rtv out of the pry slots.

It split easily, the install was straightforward, and I hate snap rings.
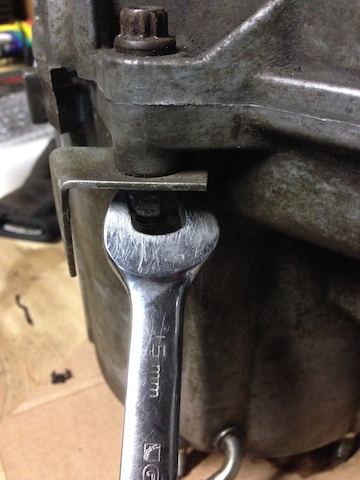
The only missing instruction in all the write-ups and directions relates to this bracket and nut on the back of the 12-pt assembly bolt. It is there, take it off.
Putting it back together, my only issues was remembering to put the oil pump tube in place inside the case before sticking the case halves together. I got it right the second time, and used less RTV after seeing that I had been too liberal the first time

Jim came back the next day, bench-pressed the t-case back into place, and torqued it down to spec. I paid him back by plowing his driveway and removing the snowbank that was containing his camper trailer.
He did it the hard way, by leaving the crossmember in place, and reaching in with his eyes closed to find each hidden nut. Then he went through most of my collection of swivels, extensions and 14mm size tools, eventually gaining access through the shift cover. After it was sitting on the bench, we went in and looked at the book for the recommended procedure... whoops. oh well, it was out.
The Teraflex kit is not the same casting as the AA/Procomp/etc. The main difference that I could see was that the Teraflex housing does not have the vacuum provision, and so does not have the correspoding plug.
I guess that means it would not work for certain older xjs?. It came with good printed directions (not photocopy), but the black and white photos left something to be desired. Plenty of good photos online, here and on JF. AA has a youtube video of their sye being installed which I watched prior to unboxing mine.
I cleaned the case as well as I could before starting and cleared old rtv out of the pry slots.
It split easily, the install was straightforward, and I hate snap rings.
The only missing instruction in all the write-ups and directions relates to this bracket and nut on the back of the 12-pt assembly bolt. It is there, take it off.
Putting it back together, my only issues was remembering to put the oil pump tube in place inside the case before sticking the case halves together. I got it right the second time, and used less RTV after seeing that I had been too liberal the first time
Jim came back the next day, bench-pressed the t-case back into place, and torqued it down to spec. I paid him back by plowing his driveway and removing the snowbank that was containing his camper trailer.
Last edited by JBV; Mar 22, 2014 at 06:03 PM. Reason: add link
Thread Starter
Junior Member
Joined: Jan 2014
Posts: 37
Likes: 0
From: California
Year: 1999
Model: Cherokee (XJ)
Engine: 4.0
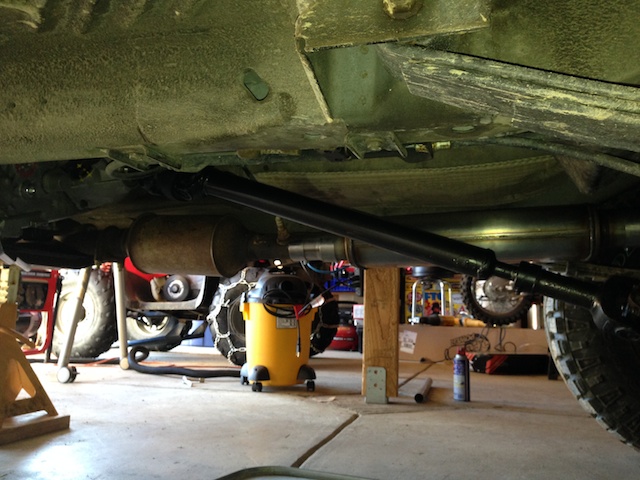
My $20 junkyard xj front driveshaft was too short as expected. It came from a '98 AW4/D30 and I had hoped it would fit my ax15/c8.25/3.5"lift/sye combo, but no such luck, so I had it lengthened 3" and balanced by Ron at Drive Line Service in Boulder. It is now 34.25", which works with my current setup.
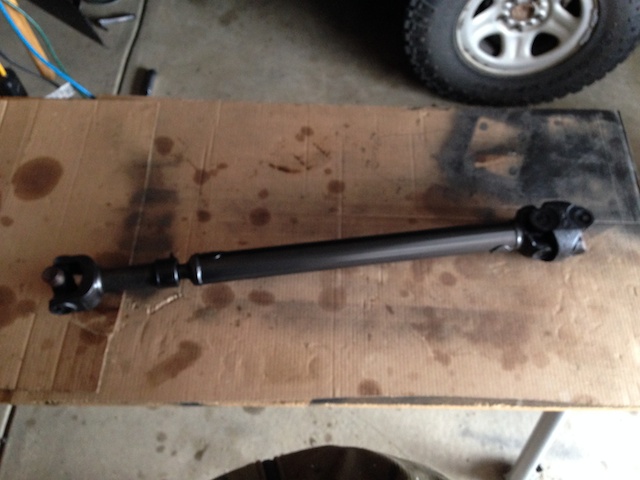
With the driveshaft in place, I was able to take some angle readings, and sent away for a pair of 2.5 degree steel shims from R.E. to match my springs. They got drilled out to match my center pins and then added to the pack. My driveline angle is looking pretty good now. The shims added about 3/8" to the rear height, which is now 36.5" at the fenderwell.
With the driveshaft in place, I was able to take some angle readings, and sent away for a pair of 2.5 degree steel shims from R.E. to match my springs. They got drilled out to match my center pins and then added to the pack. My driveline angle is looking pretty good now. The shims added about 3/8" to the rear height, which is now 36.5" at the fenderwell.
Last edited by JBV; Mar 22, 2014 at 06:05 PM.