
91 XJ Limited - SubZero Resurrection

Herp Derp Jerp

Joined: Nov 2011
Posts: 18,251
Likes: 17
From: Parham, ON
Year: 1999
Model: Cherokee
Engine: 4.0L OBD-II
Thread Starter
Seasoned Member
Joined: Jul 2011
Posts: 291
Likes: 0
From: Interior of Alaska
Year: 1991
Model: Cherokee
Engine: 4.0 HO
Thanks for all the replies. I was really looking for the input on having adjustable LCAs with a 3" lift, because I think that's probably the highest I'll be going. Just wondering if there were any advantages.
If I decide to go higher I may consider them then, otherwise it seems like they are unnecessary.
If I decide to go higher I may consider them then, otherwise it seems like they are unnecessary.
Member
Joined: Mar 2013
Posts: 137
Likes: 0
From: Coweta
Year: 1994
Model: Cherokee
Engine: 4.0
I got a few more pics of my Rigid lights, the SRM's for backup:


Plus I got some Lens covers for my forward facing lights. Blue looks good on the snow. (although I may get amber ones in the future) We are gaining alot of daylight so I probably won't be using the lights much till late August now, but we'll see how the lens change the light quality.


Then I had a new head unit installed. Not a huge stereo guy, but it's got BlueTooth so I can talk handsfree with my phone or play my audiobooks through my car stereo.

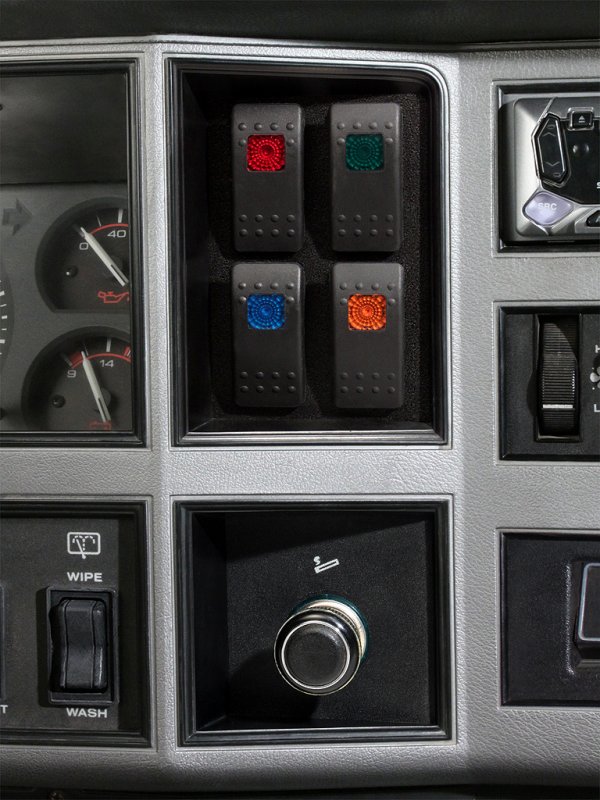
Note: the switch panel is just temporary, was going to put a panel in place of the vent below the heater control, but have changed my mind. Looking for a new location for 5-6 Contura V switches now.
Gonna be PlastiDipping my truck as soon as we get some warm days (probably at least a month). And then building a locking secure cargo box.
Still looking for an answer on my LCA question above.
Plus I got some Lens covers for my forward facing lights. Blue looks good on the snow. (although I may get amber ones in the future) We are gaining alot of daylight so I probably won't be using the lights much till late August now, but we'll see how the lens change the light quality.
Then I had a new head unit installed. Not a huge stereo guy, but it's got BlueTooth so I can talk handsfree with my phone or play my audiobooks through my car stereo.
Note: the switch panel is just temporary, was going to put a panel in place of the vent below the heater control, but have changed my mind. Looking for a new location for 5-6 Contura V switches now.
Gonna be PlastiDipping my truck as soon as we get some warm days (probably at least a month). And then building a locking secure cargo box.
Still looking for an answer on my LCA question above.
Thread Starter
Seasoned Member
Joined: Jul 2011
Posts: 291
Likes: 0
From: Interior of Alaska
Year: 1991
Model: Cherokee
Engine: 4.0 HO
Or I could buy this one :
from Prime 4x4
Or I could put them in the little cubby ahead of the shifter.

Still undecided for now. Waiting on my OTRATTW switches to be finished.
Thread Starter
Seasoned Member
Joined: Jul 2011
Posts: 291
Likes: 0
From: Interior of Alaska
Year: 1991
Model: Cherokee
Engine: 4.0 HO
So it's finally spring.....we had our first warm day in the 70s. I have FINALLY worked out a deal on a lift kit. Looks like it's gonna be a RC 3" with full leafs, but that won't be happening until late June.
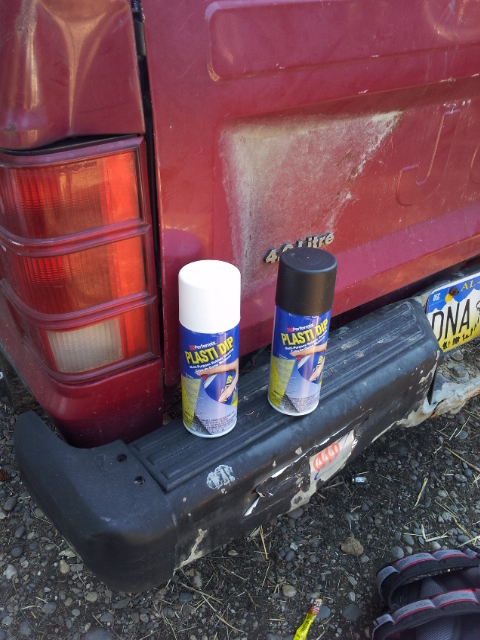
So first things to do....I am SICK of looking at this crappy factory paint. In 90-91 there was some kind of serious problem with both Chrysler and GM with their clear coats and over time it lifts and hazes up. After looking at NewJerseyXJ's rig and his use of PlastiDip as a top coat I decided that was what I am going to paint my XJ with. (See www.dipyourcar.com)
First though.....times for the pinstripes to go!

Enter the Magic Eraser!

This thing rocks...

Wipe with a damp cloth.

One of the things that PlastiDip is supposed to be good for was doing emblems. I decided that since my XJ was going to be all black that I was through with gold badges. I decided to see what white would look like.
PlastiDip doesn't have to be masked off, but I had never seen photos of exactly how it 'self masked' as someone put it.
Start by masking a larger area off around the badge.

Then start laying it down in THIN layers.

After 5 or 6 coats, letting it completely dry in between, you can start by removing the masking....look at how stretchy the PD is.

Pull it tight, and up, away from the emblem.

It breaks away cleanly.

I had to use tweezers to get the pieces down in the close areas, but once you get ahold of it, it peels right up.

Not sure how I like it yet. I may see if I can mask off the 'in between' parts so just the 4 and the X are white.
Then I decided to see how the black PD would cover my paint. I had just pressure washed the whole thing and it was completely dry before I started all this. I decided to start with the hood area.
First I found all the little pits with bare metal and sanded them down and primed them with self etching primer.

Here's a close up of what it looked like 'before' on the passenger side of the cowl.

Then after a few coats of PD.

It looks good, feels pretty funky.
Still have a couple more coats on the hood to go, but ran into supper time.
Since most of the blown clear coat is above the top body line, I think I'm gonna shoot over it tomorrow and see what it looks like. More pics when I get that finished tomorrow.
So first things to do....I am SICK of looking at this crappy factory paint. In 90-91 there was some kind of serious problem with both Chrysler and GM with their clear coats and over time it lifts and hazes up. After looking at NewJerseyXJ's rig and his use of PlastiDip as a top coat I decided that was what I am going to paint my XJ with. (See www.dipyourcar.com)
First though.....times for the pinstripes to go!
Enter the Magic Eraser!
This thing rocks...
Wipe with a damp cloth.
One of the things that PlastiDip is supposed to be good for was doing emblems. I decided that since my XJ was going to be all black that I was through with gold badges. I decided to see what white would look like.
PlastiDip doesn't have to be masked off, but I had never seen photos of exactly how it 'self masked' as someone put it.
Start by masking a larger area off around the badge.
Then start laying it down in THIN layers.
After 5 or 6 coats, letting it completely dry in between, you can start by removing the masking....look at how stretchy the PD is.
Pull it tight, and up, away from the emblem.
It breaks away cleanly.
I had to use tweezers to get the pieces down in the close areas, but once you get ahold of it, it peels right up.
Not sure how I like it yet. I may see if I can mask off the 'in between' parts so just the 4 and the X are white.
Then I decided to see how the black PD would cover my paint. I had just pressure washed the whole thing and it was completely dry before I started all this. I decided to start with the hood area.
First I found all the little pits with bare metal and sanded them down and primed them with self etching primer.
Here's a close up of what it looked like 'before' on the passenger side of the cowl.
Then after a few coats of PD.
It looks good, feels pretty funky.
Still have a couple more coats on the hood to go, but ran into supper time.
Since most of the blown clear coat is above the top body line, I think I'm gonna shoot over it tomorrow and see what it looks like. More pics when I get that finished tomorrow.
Thread Starter
Seasoned Member
Joined: Jul 2011
Posts: 291
Likes: 0
From: Interior of Alaska
Year: 1991
Model: Cherokee
Engine: 4.0 HO
Re-did the badges on one side, was having the hardest time masking off the 'in between' parts so I got inventive and used a black sharpie after coating it. Turned out 'ok', but I'm thinking I may just go all black, not sure yet.
Your thoughts are appreciated.


Overall the PlastiDip did a GREAT job of covering up the bad clear coat. I only used a couple of cans I think because I was shooting over black to begin with. It was super easy to clean up, all I did was wash the windows with newspaper and windex.
Take a look.
Before:

After:

And the from the back.
Before:

After:

If I keep the white badges, I think the only thing to tie it all together would be a white rocker panel stripe.......input please.
Your thoughts are appreciated.
Overall the PlastiDip did a GREAT job of covering up the bad clear coat. I only used a couple of cans I think because I was shooting over black to begin with. It was super easy to clean up, all I did was wash the windows with newspaper and windex.
Take a look.
Before:
After:
And the from the back.
Before:
After:
If I keep the white badges, I think the only thing to tie it all together would be a white rocker panel stripe.......input please.

Thread Starter
Seasoned Member
Joined: Jul 2011
Posts: 291
Likes: 0
From: Interior of Alaska
Year: 1991
Model: Cherokee
Engine: 4.0 HO
Old SJ

On the new XJ

Like this only opposite white/black

Thread Starter
Seasoned Member
Joined: Jul 2011
Posts: 291
Likes: 0
From: Interior of Alaska
Year: 1991
Model: Cherokee
Engine: 4.0 HO
So here's what I did with the hardware. It's my attempt to do my own shovel/ax mount for my roof rack.
So I used a couple of square u-bolts, some extra plates and wing nuts. Here I have everything set up for test fitting.

Then I mounted the shovel up trying to decide to mount the shovel in or out.


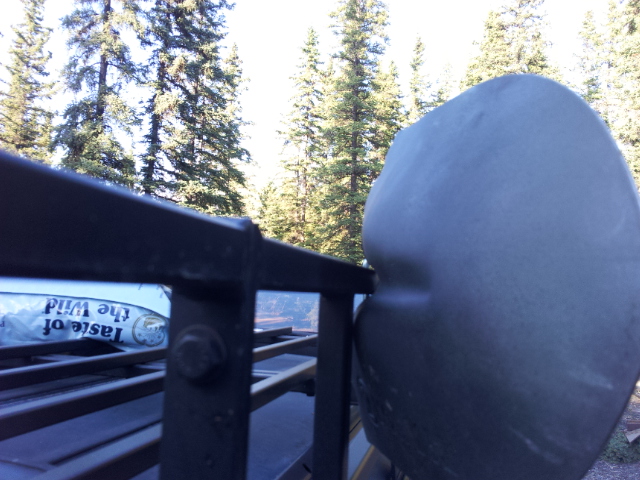
Decided that it needed to ride point in, so as a temp cushion I cut a piece of heater hose to protect the finish on the rack and eliminate any rattles.
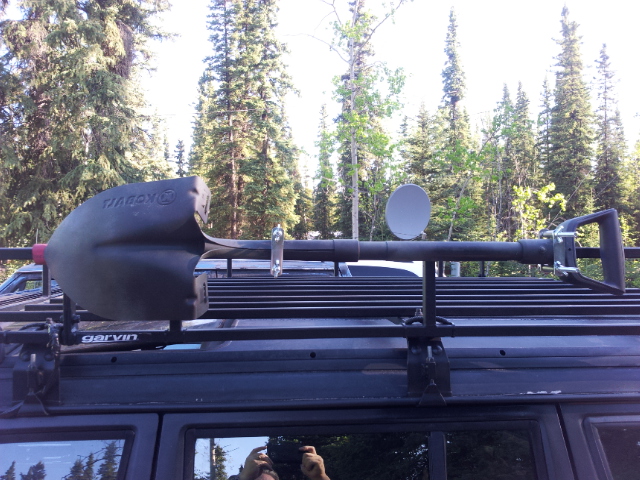
The heater hose didn't go all the way around the rack bar, so I got some 1in stuff in black today. Won't show as much and I can use it under the U-bolts as well. Planning on PlastiDipping all the hardware to protect it. Waiting on my ax to come back, getting a custom kydex sheath made for it.
Anyway, that's the update. Got my Garvin HiLift mount for the other side, will be putting that on this weekend. Want to paint my jack black or gray to continue the color theme, guess I'll try engine enamel and see how it holds up.
So I used a couple of square u-bolts, some extra plates and wing nuts. Here I have everything set up for test fitting.
Then I mounted the shovel up trying to decide to mount the shovel in or out.
Decided that it needed to ride point in, so as a temp cushion I cut a piece of heater hose to protect the finish on the rack and eliminate any rattles.
The heater hose didn't go all the way around the rack bar, so I got some 1in stuff in black today. Won't show as much and I can use it under the U-bolts as well. Planning on PlastiDipping all the hardware to protect it. Waiting on my ax to come back, getting a custom kydex sheath made for it.
Anyway, that's the update. Got my Garvin HiLift mount for the other side, will be putting that on this weekend. Want to paint my jack black or gray to continue the color theme, guess I'll try engine enamel and see how it holds up.
Thread Starter
Seasoned Member
Joined: Jul 2011
Posts: 291
Likes: 0
From: Interior of Alaska
Year: 1991
Model: Cherokee
Engine: 4.0 HO
So I finally pulled out the mounting kit I bought last year for my high lift jack. This thing is BEEFY. I mean tough....it actually weighs in at 12lbs.

and it really mounts rock solid on the rack.

Once it was up I decided to repaint my HiLift black to match the truck. First self etching primer.

Then engine enamel low gloss black.

All done...

Mounted up to the rack....

Alittle rattling when I took it down the driveway to my house. I think it was because I don't have a handle keeper and its rattling against the jack body. I'm picking one up on Monday....But I think it's a keeper.
And a teaser on the next part of the project I'm working on....

and it really mounts rock solid on the rack.
Once it was up I decided to repaint my HiLift black to match the truck. First self etching primer.
Then engine enamel low gloss black.
All done...
Mounted up to the rack....
Alittle rattling when I took it down the driveway to my house. I think it was because I don't have a handle keeper and its rattling against the jack body. I'm picking one up on Monday....But I think it's a keeper.
And a teaser on the next part of the project I'm working on....
Junior Member
Joined: Apr 2012
Posts: 61
Likes: 0
From: NH (White Mountain region)
Year: 1997
Model: Cherokee
Engine: 4.0 I6
Like the build (and the collection) so far. I can understand the addiction...started with a crapped out CJ-7 years ago and 14 Jeeps later its still going strong. Definitely going to watch the progression.
We don't have quite the cold you do but we had a stretch last December where the temp was in the -40's for a week (with the wind chill). People ask me why I live 20 minutes from the windiest place and second cloudiest place in the US and I always say because no one else does!
As for the LCA question, I put a 4.5" RC lift with rear spring pack on when I bought the XJ in late 2010. Put the fixed RC LCA's on at the same time. Since I use it as a daily driver, I dropped the lift to a 3" RC w/spring pack in 2011 and been running it that way since. I kept the RC LCA's on and have had no issues. You can ask 100 different people on the forums the same question and get 200 different answers so the best bet is get different viewpoints and then make your best decision based on how you plan to drive your XJ (or just ask your TARDIS).
Thread Starter
Seasoned Member
Joined: Jul 2011
Posts: 291
Likes: 0
From: Interior of Alaska
Year: 1991
Model: Cherokee
Engine: 4.0 HO
Thanks Semtex. Yeah, I think I've decided to just stick with the 3-3.5in lift with fixed LCA. This is my DD and I want to stay drive able.
This is the time of year where I will cram 12 months worth of work into 13 weeks. We get almost 24 hours of daylight for the next 7 weeks and I plan on making the most of it.
Future items:
*Air horn assembly
*LIFT! Should be on by first of July.
*New Wheels & Tires
*Custom Cargo box
*BW Style Cutout Fender Flares
*Sun Visor (Lund Style)
*New muffler, cat and mandrel bent pipe.
*Build a front bumper based on No Rdplz build (already have JCR Tie in Brackets)
*Upgrade headlights, fix no highbeam problem
This should keep me busy for the rest of the summer, plus a new waterpump on my new MJ. Plus tune up and getting it ready for winter.
