
'86 MJ Commuter/Weekend Warrior Buid


Thread Starter
Junior Member
Joined: Jul 2012
Posts: 61
Likes: 0
From: Stuart, FL
Year: 1993
Model: Cherokee
Engine: 4.0L I6
Yes, this is the same "89" MJ posted in MJ Tech. My friend, Outlaw Star, told me about this MJ that was on CL for $400. This was what I had to go on:


It had no engine or tranny, and was stated as being an '89.
I go over there on New Year's Eve to give it a look. Here's what I found:


From the bottom, the cab floor pans look spotless, no apparent rust spots:

Under the bed didn't look too bad either:

A nice D44 sitting under the bed:

Some engine bay shots:


Now, here's something interesting:

This is an '86 MJ that used to have a 2.8 V6, but:

why is the firewall indented in the center for the 4.0!? And why is there a D44 if the AMC 20 and D35 are supposed to be the only axles offered in '86!?
Oh, well, I decided to buy the truck, this was today at the PO's house, we pulled it out of the carport, and unloaded the two ridiculously heavy generators out of the bed:


Loaded up, and ready to go, thanks again to Outlaw Star for helping me tow this thing home:

On the way to it's new home:

and FINALLY, it's HOME!! That's one of my daughters, helping us get the Jeep in the backyard.

Before I went to get the truck today, I went to the local U-Pull-&-Pay, and scored an AX15 shifter, boot, and floor plate, and a clean pair of 2 door XJ tilt back seats that were tan and had no slop in the beack mech!
My plans are to put in a 4.0, AX15 5-Speed, and 242 t-case, and lift it 3" and put 31x10.50's under it.
Tomorrow: taking the bedliner out of the bed to see the shape of said bed, and give it a complete cleaning!
Jerry
Last edited by JeepsOLot; Jan 2, 2015 at 09:07 PM.
Thread Starter
Junior Member
Joined: Jul 2012
Posts: 61
Likes: 0
From: Stuart, FL
Year: 1993
Model: Cherokee
Engine: 4.0L I6
Well, it was Cleaning Day! This is what the MJ looked like after a bath:


Impressive what a little soap and water will do!! Now, the dreaded task of taking out the bedliner and see the condition of the bed:


Not bad for a 28 year old bed!! I was shocked!! On the the next dreaded task, revealing what's under the vinyl over the driver side and pass side front floor boards:
Drivers side:

Pass Side:

Again, not bad, only one hole in the whole truck!! Won't take much to fix.
Did my first mod to the truck, swap out the blank plate above the tranny tunnel and replace it with a plate with the hole for the shifter, and installed the shifter and boot to check for clearance.

Tomorrow's tasks, pulling the bench and the vinyl floor/insulation to see the condition of the rest of the cab floor.
Jerry
Thread Starter
Junior Member
Joined: Jul 2012
Posts: 61
Likes: 0
From: Stuart, FL
Year: 1993
Model: Cherokee
Engine: 4.0L I6
Thanks!
Got the bench seat, vinyl flooring, and insulation out of the cab to inspect the rest of the cab floor.


Not bad for a 28 year old AMC product!! Yes, I did the screwdriver test on all of the questionable metal, hence how I found the hole on the pass side. Looks like wire brushing, some Osfo (sp?), a patch welded in, some primer and paint, and that's it for the floor!
Here is a shot of the tranny hump floor plate I swapped out and the AX15 shifter in place. Note the bracket by the shifter, it's for the future console that's going to be there.

Speaking of a console, here is one of the 2dr XJ seats that will be going in.


That's it for this weekend, just buttoning everything up for the week.
Jerry
CF Veteran
Joined: Nov 2008
Posts: 1,021
Likes: 3
From: mass
Year: 1992
Model: Cherokee
Engine: 4.0 high output
Looks good! You should pull the diff cover off one of the axles and see what you have for gears. If it really did have the v6 you might have 410s. That would a big plus
Thread Starter
Junior Member
Joined: Jul 2012
Posts: 61
Likes: 0
From: Stuart, FL
Year: 1993
Model: Cherokee
Engine: 4.0L I6
Unfortunately, from what I was told, the gears were swapped out for "racing" gears for a 350 conversion, not sure how far that ever got. It really looks like no ones touched it, so, I might be lucky.
Jerry
Jerry
Thread Starter
Junior Member
Joined: Jul 2012
Posts: 61
Likes: 0
From: Stuart, FL
Year: 1993
Model: Cherokee
Engine: 4.0L I6
Just for grins, after checking all of the wiring, I hooked a battery to the MJ.


It looks more alive when the lights work!!
For those that know, could the reason why the left turn on the dash is on be that I have a bulb out at the front turn signal? Been so long since I dealt with an issue like this. Thanks!
Jerry


It looks more alive when the lights work!!
For those that know, could the reason why the left turn on the dash is on be that I have a bulb out at the front turn signal? Been so long since I dealt with an issue like this. Thanks!
Jerry
Trending Topics
Thread Starter
Junior Member
Joined: Jul 2012
Posts: 61
Likes: 0
From: Stuart, FL
Year: 1993
Model: Cherokee
Engine: 4.0L I6
In prepping for the 4.0, I pulled the XJ beside the MJ to look at both engine bays.


Now, the differences:


The radiator area:


The firewall:


Pass Side:


And the Drivers Side:


Looks like the big problem will be the radiator area:


Might have to think on this a bit!
Jerry


Now, the differences:


The radiator area:


The firewall:


Pass Side:


And the Drivers Side:


Looks like the big problem will be the radiator area:


Might have to think on this a bit!
Jerry
CF Veteran
Joined: Nov 2008
Posts: 1,021
Likes: 3
From: mass
Year: 1992
Model: Cherokee
Engine: 4.0 high output
Shouldn't be a problem, you just might have to swap over the radiator support, header panel and front clip. Also that blinker light won't flash if you have a bulb out.
Thread Starter
Junior Member
Joined: Jul 2012
Posts: 61
Likes: 0
From: Stuart, FL
Year: 1993
Model: Cherokee
Engine: 4.0L I6
xjheep92, the blinker lights on both sides flash.
I'm starting to rethink my engine choice. With the radiator area being a problem and the firewall possibly being another problem, I'm thinking of going with either a 4.3 V6 or a 350. All I need to do with this truck is commuting to and from work, a very little off roading, and some hauling capabilities. Which would you guys think would be a better choice?
Jerry


Thread Starter
Junior Member
Joined: Jul 2012
Posts: 61
Likes: 0
From: Stuart, FL
Year: 1993
Model: Cherokee
Engine: 4.0L I6
Got the seats where I want them, just need to figure out how to mount the '94 XJ seats on the '86 MJ brackets, looks like some bar stock is in order.


Hopefully, I'll have time today to get that figured out.
Jerry


Hopefully, I'll have time today to get that figured out.
Jerry
CF Veteran


Joined: Jun 2009
Posts: 2,611
Likes: 447
From: Michigan
Year: 1987 MJ, 1973 J2000, 1986 XJ, 08 JK
Model: Comanche (MJ)
Engine: 4.0L H.O
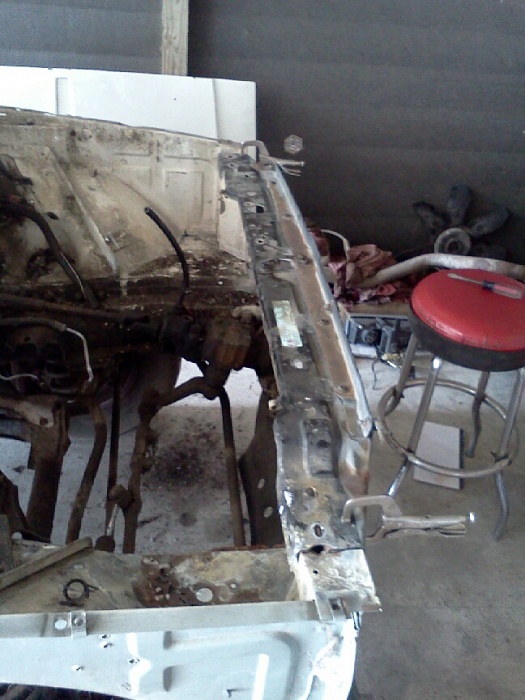
the radiator support is not too complicated to "update"... below is the pics of how i did mine..
Test fit
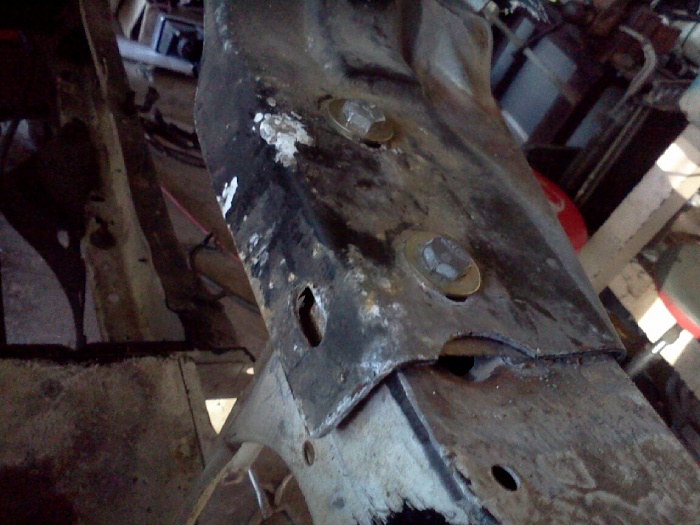
made a mounting plate with 2 nuts welded to the bottom side then welded one of these on each side
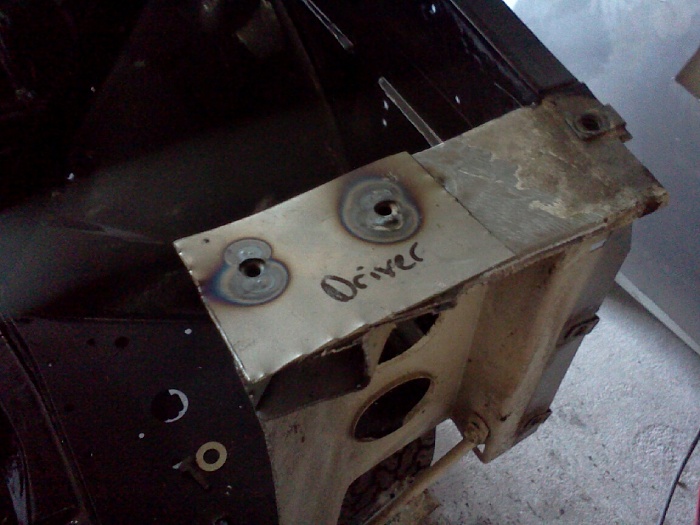
bolted town and good to go. you will also need to make tabs for the bottom side of the radiator to rest on with the rubber gromets... again not too difficult
there is a little more area than this shown that needs to be clearanced.... 4lb sludge hammer does the job... Again not too difficult... only difficult part is probably having to install motor, check for clearance, and further correct the clearance needed... repeat till you can put your hand between the head/valve cover and firewall.

Test fit

made a mounting plate with 2 nuts welded to the bottom side then welded one of these on each side

bolted town and good to go. you will also need to make tabs for the bottom side of the radiator to rest on with the rubber gromets... again not too difficult

there is a little more area than this shown that needs to be clearanced.... 4lb sludge hammer does the job... Again not too difficult... only difficult part is probably having to install motor, check for clearance, and further correct the clearance needed... repeat till you can put your hand between the head/valve cover and firewall.
