1989 cherokee budget build
 12-10-2013, 07:23 PM
#16
Junior Member
Join Date: Aug 2013
Location: Bothell, WA
Posts: 88
Likes: 0
Received 0 Likes
on
0 Posts
Year: 1999
Model: Cherokee
Engine: 4.0 H.O
How is the 99 valve cover an upgrade? I took my old 93 valve cover and swapped it into my 99. My 99 had the stamped aluminum, which is worse than the other style.

 12-10-2013, 08:04 PM
#18
Member
Thread Starter
Join Date: Nov 2013
Posts: 104
Likes: 0
Received 0 Likes
on
0 Posts
Model: Cherokee
The thing i have hooked up now is just a oil catch can with a vent so that it doesn't go into my air box.
Got the valve cover for 30, going to put the oem 90's on them and run 3/8 hose. Hoping this all works out as planned lol.
As of right now, i will not be putting my long arm on tonight. I work for the next 4 nights so maybe next week sometime.
Depends what time i work tomorrow, but i might go and pull the leafs off a junk s10 at my dads and get working on the bastard pack. Going to try and get atleast 4inch's out of it (thats where some guys end up) and then get some adjustable shackles and see where i am at.
Today it has ran really good, oil leaking from the valve cover at the oil cap. Not worrying about it right now.
12-11-2013, 11:39 PM
#19
Senior Member
Join Date: Apr 2012
Location: Los Banos CA
Posts: 735
Likes: 0
Received 0 Likes
on
0 Posts
Year: 2000
Model: Cherokee
Engine: 4.0
Another fix to the common renix oil in air box problem is to cut 1/2 inch off the metal tube for the breather inside of the valve cover, solved my oily air cleaner problem. FYI do not cheap out and use a cork gasket. Between that and the oily air cleaner problem it almost cost me my motor, considering only 2 1/2 quarts of oil came out from a valve cover leak caused by a cork gasket and the oil running out if the air box after every long drive. No more oil leaks.
12-12-2013, 03:30 AM
#20
Member
Thread Starter
Join Date: Nov 2013
Posts: 104
Likes: 0
Received 0 Likes
on
0 Posts
Model: Cherokee
Another fix to the common renix oil in air box problem is to cut 1/2 inch off the metal tube for the breather inside of the valve cover, solved my oily air cleaner problem. FYI do not cheap out and use a cork gasket. Between that and the oily air cleaner problem it almost cost me my motor, considering only 2 1/2 quarts of oil came out from a valve cover leak caused by a cork gasket and the oil running out if the air box after every long drive. No more oil leaks.
12-12-2013, 03:30 AM
#21
Member
Thread Starter
Join Date: Nov 2013
Posts: 104
Likes: 0
Received 0 Likes
on
0 Posts
Model: Cherokee
Another fix to the common renix oil in air box problem is to cut 1/2 inch off the metal tube for the breather inside of the valve cover, solved my oily air cleaner problem. FYI do not cheap out and use a cork gasket. Between that and the oily air cleaner problem it almost cost me my motor, considering only 2 1/2 quarts of oil came out from a valve cover leak caused by a cork gasket and the oil running out if the air box after every long drive. No more oil leaks.
12-12-2013, 07:32 AM
#22
Junior Member
Join Date: Aug 2013
Location: Bothell, WA
Posts: 88
Likes: 0
Received 0 Likes
on
0 Posts
Year: 1999
Model: Cherokee
Engine: 4.0 H.O
I've used cork gaskets for forever. I end up replacing them more, but it gives me time to inspect the heads and lifters. I'll do an oil change at the same time. Usually never have any leaks. First couple times I did, before I got the feel for how tight the bolts need to be.
12-12-2013, 08:10 AM
#23
Seasoned Member

Join Date: May 2012
Location: Ware Shoals, SC
Posts: 436
Likes: 0
Received 0 Likes
on
0 Posts
Year: 1993
Model: Cherokee
Engine: 4.0L
The felpro permaseal gasket is reusable, so saves money down the line and won't leak. One thing that will take care of a lot of your excess oil blowby, is changing your valve stem seals. The stock ones will be hard as rock and not sealing anymore. New ones eliminated all my oil blowby. Takes about 2 hours to do, taking your time.
12-12-2013, 09:40 AM
#24
Member
Thread Starter
Join Date: Nov 2013
Posts: 104
Likes: 0
Received 0 Likes
on
0 Posts
Model: Cherokee
I've used cork gaskets for forever. I end up replacing them more, but it gives me time to inspect the heads and lifters. I'll do an oil change at the same time. Usually never have any leaks. First couple times I did, before I got the feel for how tight the bolts need to be.
And as for doing the valve stem seals, i have never done that on a vehicle. I am going to see where i am with the newer cover. They seem to be a much better design so im excited to try it. Ill prolly have about 50 bucks in just the rubber parts and plastic 90's from the dealer along with 30 for a gasket. But i know it will be worth it so i can complain too much.
12-12-2013, 11:05 AM
#25
Senior Member
Join Date: Apr 2012
Location: Los Banos CA
Posts: 735
Likes: 0
Received 0 Likes
on
0 Posts
Year: 2000
Model: Cherokee
Engine: 4.0
The front elbow off the HO valve cover will fit on the renix valve cover after sanding to make it fit snug. I ended up making all new vacuum lines and breather lines on my comanche. Still passes California emissions.
12-15-2013, 04:24 PM
#26
Member
Thread Starter
Join Date: Nov 2013
Posts: 104
Likes: 0
Received 0 Likes
on
0 Posts
Model: Cherokee
ok, today i had off and decided i wanted to refresh some grounding points.
First i did the "instrument panel" ground and send it to another location with added 10g wire.
Second- Refreshed the top part of the engine ground (the one flat wire) not going to do the part that connects to the engine until i fix the valve cover leaking problem.
Third- i decided i was gong to refresh the c101 or whatever it is. This was a PITA because of all the tar. I sprayed it with brake cleaner, then scrapped, then sprayed and repeat. I didnt get it ALL but i got a damn good amount.
Results!!!!!!!!!!
Well 1st thing i noticed MY TEMP GAUGE WORKS!!!!!!
2nd thing i noticed, MY VOLTS WENT WAY UP!
i have been going through all of cruiser54's renix tips, and i sure am glad that i found it
Tomorrow, or maybe even tonight, i am planning on adding the relays to the power door locks to get them back up and working properly. I am going to do a write up with pictures and submit it, i know there is a write up on other pages, (greg smith) but none that i could find with pictures and step by step instructions. So i figured maybe it would be nice to go ahead and get one up on here.
Last edited by joedarr33; 12-15-2013 at 07:36 PM.
12-19-2013, 10:26 PM
#27
Member
Thread Starter
Join Date: Nov 2013
Posts: 104
Likes: 0
Received 0 Likes
on
0 Posts
Model: Cherokee
ok, just a little bit of an update.
Today, cleaned up the engine bay by covering the exposed wires with that plastic crap. Made it look alot better.
Also, i did this door lock mod.. It didnt really do it for me, AT FIRST. Then i realized i did it to the wrong wires. Re did it, now it works great!!!
Also got a tube from the junk yard that myn was needing. Couldnt tell ya what the hell it was lol but i put it in.
Last edited by joedarr33; 12-19-2013 at 11:38 PM.
12-21-2013, 01:21 AM
#28
Member
Thread Starter
Join Date: Nov 2013
Posts: 104
Likes: 0
Received 0 Likes
on
0 Posts
Model: Cherokee
Ok so I got the front done. I used a spring compressor and it worked great. I still have to put the front shocks and trac bar on but it should be done tomorrow night then an alignment ASAP. Depending how groggy I feel I might go ahead and pull the leafs off of the scrap s10 we have and get some u bolts and finish my rear so I can get everything in order. Also I have to weld the crossmember on. It's on with bolts right now and will be fine for a few miles. (Will be welded tomorrow) anyways it is alot higher then I had thought it was going to be but am very happy with how it's going. Cutting the old control arm mounts were a pain. But that was the hardest part. Will update more on it tomorrow.
Btw I have to drive this back and forth to my shop which is why it's in a parking lot lol
Btw I have to drive this back and forth to my shop which is why it's in a parking lot lol
12-24-2013, 11:35 PM
#30
Member
Thread Starter
Join Date: Nov 2013
Posts: 104
Likes: 0
Received 0 Likes
on
0 Posts
Model: Cherokee
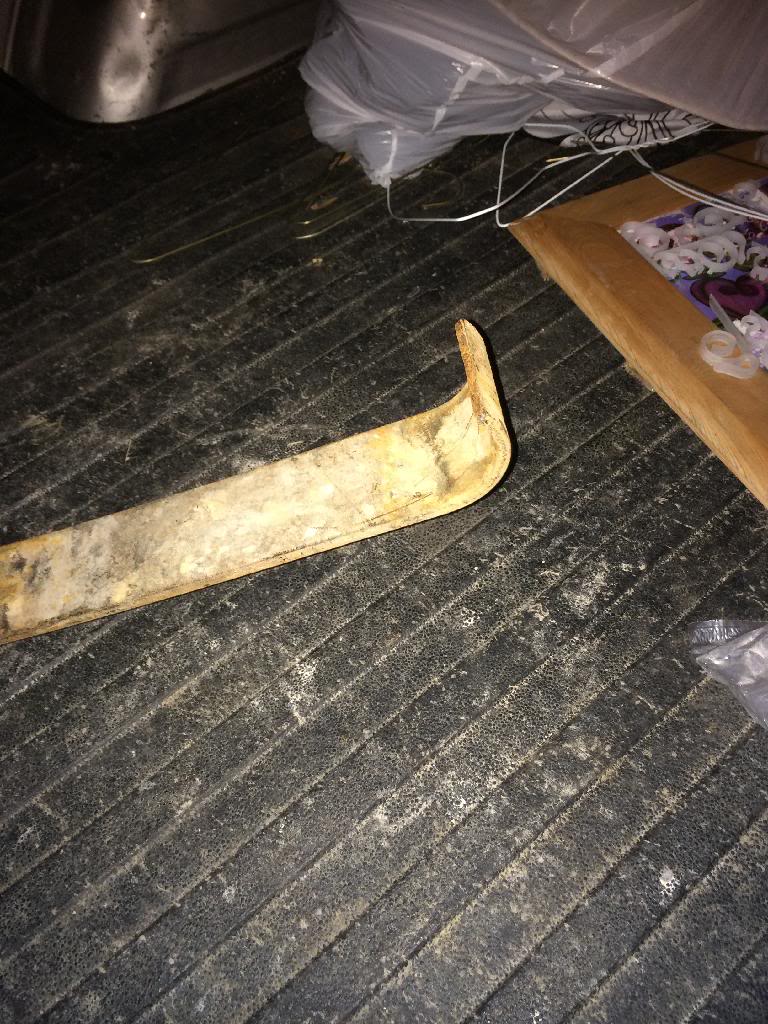
Just wanted to share of what i have been driving around on for awhile now. Didnt even know until i pulled the leaf out, put me back another $50 bucks. Kinda sucks but o well.
Also my newer valve cover came in today, going to get some new inserts for it, clean it up, new valve cover and be ready for install.
After my u bolts come in from serious off road, ill throw them on and get the jeep back on the road to get a full alignment. Pretty pumped. My local place is only charging my $100 for a full caster alignment. Chaos fab i believe is there name.
Also i have to weld my crossmember still which will be done the day i get the u bolts in.
Anyways here is the picture.