
1986 Cherokee - "Jezebel"

Thread Starter
Junior Member
Joined: May 2013
Posts: 87
Likes: 0
From: Iron Range, MN
Year: 1986
Model: Cherokee
Engine: None presently
I'm new to Jeeps, trail rigs, etc. I also haven't gotten to do a lot of wrench turning other than fixing snowmobiles and daily driver cars. So when a friend mentioned a 1986 Cherokee Laredo 2-door that he was going to ditch for scrap I took the opportunity for a fun project. I also live pretty close to an OHV park, so as a bonus I can probably get some decent use out of it. I'm also new to posting on forums, just a heads up.
The Jeep itself is in pretty good shape for a 1986. Overall the body is solid (only a couple of dents from a deer). The floor boards have some rust but not too bad. The engine has some issues, but from what buddies and other forums say it isn't a bad thing to upgrade anyway (I have the 2.8L V6).
For those of you wondering about the title "Jezebel", it comes from the owner before the one I bought it from. The guy I got it from nicknamed it after her and it kind of stuck.
Anyway, onto the build. I've already started buying a bunch of stuff and doing some work, so it's about a month in progress. I work a full time job and am going for my master's degree in electrical engineering, so progress will be hit and miss at times. The goal of the build is to be a capable daily driver yet fun off road as well. Since most of my wrenching experience has been on broken vehicles that I need to get running and not fun builds, I also want to use this as a chance to learn some engine work/etc and more about the different parts of a 4 wheel drive vehicle. I've got a handful of buddies who are giving advice and assistance, but any additional comments/suggestions are always welcome.
Upgrades I'm planning:
Bushwacker cutout flares
Rusty's 4 1/2" lift with adjustable control arms, JKS disconnects, and steering stabilizer
33" BFGoodrich All Terrain tires
JCR Offroad stage 3 rock sliders
Misc armor/protection
Front and rear bumpers
Spare tire holder on rear bumper
Adding recovery points
WinchMoog tie rod ends and U-joints
Chevy 350 engine with 700R4 tranny (probably not right away)
Upgrade to Dana 30/35 (not sure what yet) and lockers
Bedliner inside (Herculiner, no carpet) and out (2 tone, Monstaliner)
Change of interior color from red to blue
Removing headliner (may need to deal with sound from this and carpet coming out)
Pioneer deck, amp, sub, speakers (probably removing them from doors and making sound bar type setup)
Probably others that I'm forgetting but will try to list when I do them.
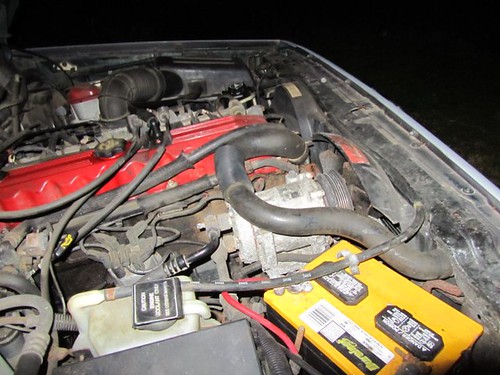
Pics of starting point:


The Jeep itself is in pretty good shape for a 1986. Overall the body is solid (only a couple of dents from a deer). The floor boards have some rust but not too bad. The engine has some issues, but from what buddies and other forums say it isn't a bad thing to upgrade anyway (I have the 2.8L V6).
For those of you wondering about the title "Jezebel", it comes from the owner before the one I bought it from. The guy I got it from nicknamed it after her and it kind of stuck.
Anyway, onto the build. I've already started buying a bunch of stuff and doing some work, so it's about a month in progress. I work a full time job and am going for my master's degree in electrical engineering, so progress will be hit and miss at times. The goal of the build is to be a capable daily driver yet fun off road as well. Since most of my wrenching experience has been on broken vehicles that I need to get running and not fun builds, I also want to use this as a chance to learn some engine work/etc and more about the different parts of a 4 wheel drive vehicle. I've got a handful of buddies who are giving advice and assistance, but any additional comments/suggestions are always welcome.
Upgrades I'm planning:
Bushwacker cutout flares
Rusty's 4 1/2" lift with adjustable control arms, JKS disconnects, and steering stabilizer
33" BFGoodrich All Terrain tires
JCR Offroad stage 3 rock sliders
Misc armor/protection
Front and rear bumpers
Spare tire holder on rear bumper
Adding recovery points
WinchMoog tie rod ends and U-joints
Chevy 350 engine with 700R4 tranny (probably not right away)
Upgrade to Dana 30/35 (not sure what yet) and lockers
Bedliner inside (Herculiner, no carpet) and out (2 tone, Monstaliner)
Change of interior color from red to blue
Removing headliner (may need to deal with sound from this and carpet coming out)
Pioneer deck, amp, sub, speakers (probably removing them from doors and making sound bar type setup)
Probably others that I'm forgetting but will try to list when I do them.
Pics of starting point:


Thread Starter
Junior Member
Joined: May 2013
Posts: 87
Likes: 0
From: Iron Range, MN
Year: 1986
Model: Cherokee
Engine: None presently
The first parts I got in were the Bushwackers and they seemed like they'd be easy enough to get in. I've never cut fenders but it didn't seem like it'd be too bad. Stripped off the factory flares easy enough and cut the front 2 first. Took longer than I figured, but went well. On my driver side it actually got rid of most of the damage from a deer hit, so I couldn't complain about that either. I ran into a couple of hiccups on the rear. I did the trimming on the driver side per the directions and grabbed one of the remaining flares. Looked like I needed more trimming to get it to fit, so I did and managed to hit the weld between the 2 pieces. To add insult to injury, came to find that the 2 flares were both rear passenger side so I was doomed with that set anyway. I'm in the process of an RMA to get it corrected, but that put that work on hold.
Driver side before install:

Passenger side after install:

Driver side before install:
Passenger side after install:
Thread Starter
Junior Member
Joined: May 2013
Posts: 87
Likes: 0
From: Iron Range, MN
Year: 1986
Model: Cherokee
Engine: None presently
With the flares on hold, I thought I'd start on the interior work. I started by ripping out the interior trim and headliner. That went very easy (I wasn't overly sensitive on the trim, I'm thinking of making some new metal trim to make it a little unique). I was pretty happy with how the ceiling looks without the headliner, but a buddy said it may sound too tingy to leave like that. Guess I'll wait and see.

I then proceeded with the carpet and seats. This went pretty easy with the exception of a few screws and bolts. After doing it I was pretty glad I decided to. I found the floor panels quite a bit more rusted than I expected (plus a good supply of mouse crap that was nice to clean out).

And removed the center console.

I then proceeded with the carpet and seats. This went pretty easy with the exception of a few screws and bolts. After doing it I was pretty glad I decided to. I found the floor panels quite a bit more rusted than I expected (plus a good supply of mouse crap that was nice to clean out).
And removed the center console.
Thread Starter
Junior Member
Joined: May 2013
Posts: 87
Likes: 0
From: Iron Range, MN
Year: 1986
Model: Cherokee
Engine: None presently
I'm still in the process of grinding/wirebrushing, acid cleaning, then rust convertor/priming things. Passenger side went easy, rest is slower. I've got a few patches to take care of before I can bedline also. If I keep ambitious and can focus on it, might be soon that I can get the floor done and start getting the inside back together.

When I needed a break during some of this work I decided to try out some of my vinyl/interior paint. Since I had the console out I took it apart and did the arm rest and main piece. The first coat or two didn't look to impressive, after 3+ I'm happy with it. Since I'm not a fan of red this blue works better for me (but means no turning back on converting colors for everything).


When I needed a break during some of this work I decided to try out some of my vinyl/interior paint. Since I had the console out I took it apart and did the arm rest and main piece. The first coat or two didn't look to impressive, after 3+ I'm happy with it. Since I'm not a fan of red this blue works better for me (but means no turning back on converting colors for everything).
Trending Topics
::Regional Moderator::
Joined: Jul 2011
Posts: 2,912
Likes: 6
From: Over here...
Year: 1986
Model: Cherokee
Engine: 2.8
Oh man, your interior reminded me of the way my '86 used to look... and then I scroll down and your interior looks like how my '86 looks now. 
For 33's you'll be fine sticking with the Dana 30 up front and swapping in a 29 spline 8.25 in the rear.
For 33's you'll be fine sticking with the Dana 30 up front and swapping in a 29 spline 8.25 in the rear.
Thread Starter
Junior Member
Joined: May 2013
Posts: 87
Likes: 0
From: Iron Range, MN
Year: 1986
Model: Cherokee
Engine: None presently


Senior Member
Joined: Nov 2010
Posts: 711
Likes: 1
From: Benton, KY
Year: 1991
Model: Cherokee
Engine: 4.0
the 2.8 is not as bad of an engine as people make it out to be. I put the one in my first XJ through hell... even locked it up after turning the ***** off of it in a mudhole for almost 30 minutes... broke it loose by pop starting it and it fired right up and was still running like a top when I had to get rid of it
::Regional Moderator::
Joined: Jul 2011
Posts: 2,912
Likes: 6
From: Over here...
Year: 1986
Model: Cherokee
Engine: 2.8

You'll find, when you get around to your sbc swap, the engine bay is better laid out for it's donor engine vs '87+. From what I've read during my own research, the 2.8L radiator should keep up with cooling duties with an electric puller fan and shroud.
Thread Starter
Junior Member
Joined: May 2013
Posts: 87
Likes: 0
From: Iron Range, MN
Year: 1986
Model: Cherokee
Engine: None presently
the 2.8 is not as bad of an engine as people make it out to be. I put the one in my first XJ through hell... even locked it up after turning the ***** off of it in a mudhole for almost 30 minutes... broke it loose by pop starting it and it fired right up and was still running like a top when I had to get rid of it
Thread Starter
Junior Member
Joined: May 2013
Posts: 87
Likes: 0
From: Iron Range, MN
Year: 1986
Model: Cherokee
Engine: None presently
http://www.novak-adapt.com/knowledge/xj_swap.htm
::Regional Moderator::
Joined: Jul 2011
Posts: 2,912
Likes: 6
From: Over here...
Year: 1986
Model: Cherokee
Engine: 2.8
I've been looking at this site for some of the info on the engine swap. They lean towards needing an upgraded radiator. I guess I haven't done a whole lot more looking yet since that work is a ways out. Once I knock off the list of things I have sitting in my garage I'll probably spend some more time researching.
http://www.novak-adapt.com/knowledge/xj_swap.htm
http://www.novak-adapt.com/knowledge/xj_swap.htm
Here's a 4.0L in a '92 I have laying around.
This is how my '87 MJ is setup with a sbc and Afco radiator. Still need to finish making my brackets to mount my radiator. The Novak radiator fits behind the grille in that empty space. I've cut the top header panel piece (which holds the factory radiator in) to make room for this setup.
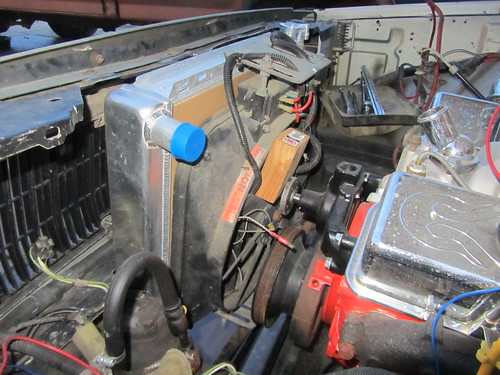
Now compare to my '86 XJ engine bay. Very different cooling setups and in my opinion, the 2.8L is setup better.
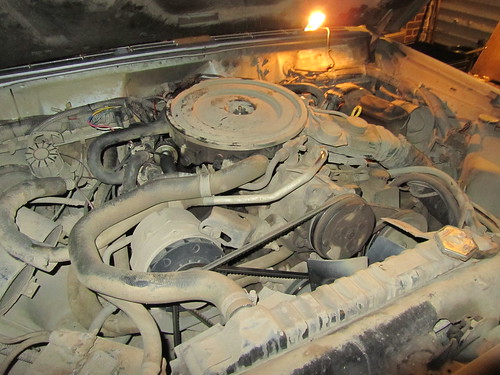
Keep doing your research, but try to focus on 84-86 swaps so you can get an idea of what you'll be dealing with.