

Posted this on JeepForum a while back and finally got around to sharing it here as well...
I finally got tired of the headliner material attached to the rear sound bar in my 1995 XJ Sport flapping in the breeze. I had purchased some 6 1/2" JVC speakers to replace the crappy stock speakers anyways so i figured I would kill 2 birds with one stone.
I didn't want to replace the fabric, so i figured why not give it a nice paint job?
1. I removed the sound bar from the back of the jeep, and pulled the headliner material off.
2. I used a "blue" scotchbrite pad to thoroughly rub down the entire sound bar to remove all the "fuzzies" left over from the headliner and the foam padding. This is what it looked like afterwards:

3. I removed the stock 5 1/2" speakers and test fit new 6 1/2" speakers. I ended up having to trim a little of the opening with a dremel. I marked the locations where the speaker would attach and also where the grilles attach:

4. After checking for fitment of everything, time to get painting! I sanded the sound bar down with progressively finer paper till i got to 600grit and hit it with 3-4 coats of primer. Wet sanded to 800grit. Repeated.
5. I chose a satin gloss gray paint to match my interior as close as possible, but still look nice (Krylon if anyone wonders). - A note on this...ALWAYS match your primer and paint brands. I did 6 sets of the following procedure:
Paint 2 coats w/ 5 min between coats, let dry 24 hours, wet sand w/ 800grit. The last coat obviously i did not wet sand. I was going to do a clear coat on top - and actually did - but it ended up looking terrible and blotchy, so i just left the paint color exposed and it looks fantastic.
Finished painted + sanded product:


6. Installed the speaker using pop rivets:

7. Don't forget the grilles! Installed using long self-tapping screws:

note: i installed these backwards, had to rotate 180 once i got them in the truck to get the letters to face correct way
8. Finished Product, ready to install:

9. And Installed:


The results? Even though the new speakers were cheap (i paid $60 for the set), the sound is so much better. And the speaker bar looks so much better than stock, especially without the flapping headliner material.
I finally got tired of the headliner material attached to the rear sound bar in my 1995 XJ Sport flapping in the breeze. I had purchased some 6 1/2" JVC speakers to replace the crappy stock speakers anyways so i figured I would kill 2 birds with one stone.
I didn't want to replace the fabric, so i figured why not give it a nice paint job?
1. I removed the sound bar from the back of the jeep, and pulled the headliner material off.
2. I used a "blue" scotchbrite pad to thoroughly rub down the entire sound bar to remove all the "fuzzies" left over from the headliner and the foam padding. This is what it looked like afterwards:
3. I removed the stock 5 1/2" speakers and test fit new 6 1/2" speakers. I ended up having to trim a little of the opening with a dremel. I marked the locations where the speaker would attach and also where the grilles attach:
4. After checking for fitment of everything, time to get painting! I sanded the sound bar down with progressively finer paper till i got to 600grit and hit it with 3-4 coats of primer. Wet sanded to 800grit. Repeated.
5. I chose a satin gloss gray paint to match my interior as close as possible, but still look nice (Krylon if anyone wonders). - A note on this...ALWAYS match your primer and paint brands. I did 6 sets of the following procedure:
Paint 2 coats w/ 5 min between coats, let dry 24 hours, wet sand w/ 800grit. The last coat obviously i did not wet sand. I was going to do a clear coat on top - and actually did - but it ended up looking terrible and blotchy, so i just left the paint color exposed and it looks fantastic.
Finished painted + sanded product:
6. Installed the speaker using pop rivets:
7. Don't forget the grilles! Installed using long self-tapping screws:
note: i installed these backwards, had to rotate 180 once i got them in the truck to get the letters to face correct way
8. Finished Product, ready to install:
9. And Installed:
The results? Even though the new speakers were cheap (i paid $60 for the set), the sound is so much better. And the speaker bar looks so much better than stock, especially without the flapping headliner material.

Senior Member
im doing that right now!!!! wht paint did you use? it looks good. thats the only thing im really wondering about.
Quote:
Paint 2 coats w/ 5 min between coats, let dry 24 hours, wet sand w/ 800grit. The last coat obviously i did not wet sand. I was going to do a clear coat on top - and actually did - but it ended up looking terrible and blotchy, so i just left the paint color exposed and it looks fantastic
.Originally Posted by dukie564
5. I chose a satin gloss gray paint to match my interior as close as possible, but still look nice (Krylon if anyone wonders). - A note on this...ALWAYS match your primer and paint brands. I did 6 sets of the following procedure:Paint 2 coats w/ 5 min between coats, let dry 24 hours, wet sand w/ 800grit. The last coat obviously i did not wet sand. I was going to do a clear coat on top - and actually did - but it ended up looking terrible and blotchy, so i just left the paint color exposed and it looks fantastic
Quote:
Rigid how? It's fiberglass - it's pretty damn rigid to begin withOriginally Posted by toogreat
is there any way to make it more rigid?
I suppose if you felt the need you could grab some fiberglass and add more to the inside, maybe with some aluminum strips on each side glassed in.
Member
What holds the sound bar up? Looks like it's just tucked into the trim at the ends and the center lamp assembly screwed in?
Cool project man, I like it!
Cool project man, I like it!
Quote:
You got itOriginally Posted by BadThad
What holds the sound bar up? Looks like it's just tucked into the trim at the ends and the center lamp assembly screwed in?
CF Veteran
o ya, i forgot to tell u that i finally finished mine, i asked u a while back on how u did urs. i ended up sanding it to get rid of the adhesive. took a long time but it turned out great, painted it red
Junior Member
so you put 6.5" in there with little trimming?? now i must re-think my speaker upgrade, lol.
Can 6.5" be put in the doors?
BTW..Looks AWESOME!!
Can 6.5" be put in the doors?
BTW..Looks AWESOME!!

yea 6.5" in the speaker bar, just a little trimming.
As for the doors, yes you can fit a 6.5", but it requires quite a bit of "massaging" to get the speaker to sit in the door panel correctly. Not too terrible though.
This is the one I have completed. I'll take some progress pictures when I do the other one.
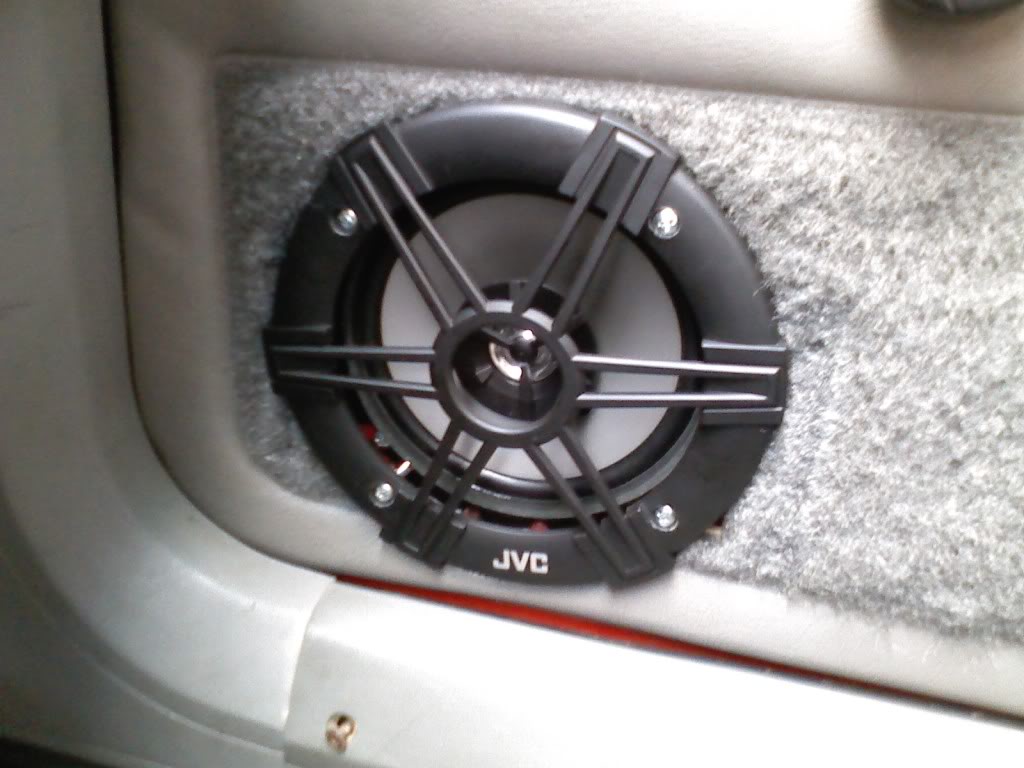
As for the doors, yes you can fit a 6.5", but it requires quite a bit of "massaging" to get the speaker to sit in the door panel correctly. Not too terrible though.
This is the one I have completed. I'll take some progress pictures when I do the other one.
Seasoned Member
Quote:

Don't I know you from somewhere else? Originally Posted by Veeb0rg
So when are we gonna do mine?

Junior Member
Cool, thanks man. Not sure what i wanna do now, lol. I really like what u did with the rear though.
Seasoned Member
NICE JOB! You could also add a coat of that textured paint just before the final color coat, dull down the final coat (after it is dry) with #000 steel wool.