
More cylinder head questions


Thread Starter
Newbie
Joined: Oct 2013
Posts: 26
Likes: 0
From: Taunton Massachusetts
Year: 1999
Model: Cherokee
Engine: 4.0
I bought a 98 dodge neon off my friend for $50 YUP!!!
Had a blown head gasket. That's ten years ago and it took me close to 20 hours with coaching from a master mechanic. I chose the absolute cheapest route which was to buy the gasket ONLY. Cleaned it up real good put it back together and crossed my fingers.
Now I'm replacing my 99 Xj cylinder head that's presently cracked for sure.
Saturday I will be visiting my first 96 Xj at the local salvage where I retired it to in great running condition to yank the head out of it.
I'm far from experienced with internals but I'm armed to the teeth with tools and a Haynes manual.
What are some or all of the things I want to look out for so that I know my 99 bottom end isn't in need of some attention as well?
Should I start by inspecting the 99 as I break it down? And what the hell am I looking for? Cuz for all I know the lifters and push rods and rockets etc etc could be damaged also.
Just looking for a coach
Thread Starter
Newbie
Joined: Oct 2013
Posts: 26
Likes: 0
From: Taunton Massachusetts
Year: 1999
Model: Cherokee
Engine: 4.0
The 99 runs decent as of now. I tried some KW block and head gasket sealer. It did not fix it but it got better.
Found traces of coolant in the oil. So I changed it.
There is a misfire that hasn't gone away. Even after tune up. Haven't found anymore water in my oil. And I'm burning far less water.
Found traces of coolant in the oil. So I changed it.
There is a misfire that hasn't gone away. Even after tune up. Haven't found anymore water in my oil. And I'm burning far less water.
CF Veteran
Joined: Aug 2010
Posts: 8,357
Likes: 103
From: Canton, MI
Year: 1999
Model: Cherokee
Engine: 4.0
The 0630 head from the '96 should work okay on the '99 except the '99 block had locator dowls on the deck to match holes in the head to align the head to the block, and I think the '96 didn't.
You'll have to check the '96 head to see if they have these holes. If they don't you'll have to remove the locator dowls from the block.
The '96 head gasket may not have holes in it for these dowls either but it won't matter if they are removed, just use a '99 gasket.
Victor Reinz makes a good head gasket and they also have good head bolts (I used both). Both available from Rockauto.com. The Victor Reinz exhaust/intake manifold gasket is wrong however - the exhaust ports are not on register with the exhaust ports in the head. Use a Dorman gasket or an OEM gasket here (I used OEM because it has a graphite coating on it and Dorman doesn't). The Felpro gasket is off register as well.
Edit:
You'll need a foot/pound torque wrench with 100 ft/lbs. close to mid scale.
You'll need a tube of Loctite PST 592 Thread Sealant (or equivalent) to apply to the threads of #11 head bolt (Amazon.com).
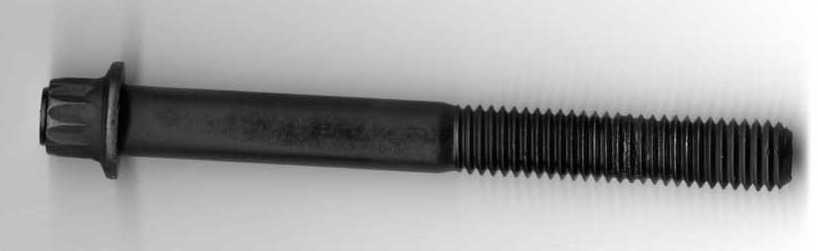
Make damn sure the Haynes manual shows the proper torque sequence. The FSM has you torquing the bolts to 110 ft/lbs (except #11 bolt) but the torque chart in the back of section 9 of the FSM says 100 ft/lbs for all of them. I went with 100 ft/lbs accross the board and have no problems.
For torquing purposes, I cut the threaded portion of bolt #14 off so I could get a standard 1/2"-12 point socket on it. See pic.
You'll have to check the '96 head to see if they have these holes. If they don't you'll have to remove the locator dowls from the block.
The '96 head gasket may not have holes in it for these dowls either but it won't matter if they are removed, just use a '99 gasket.
Victor Reinz makes a good head gasket and they also have good head bolts (I used both). Both available from Rockauto.com. The Victor Reinz exhaust/intake manifold gasket is wrong however - the exhaust ports are not on register with the exhaust ports in the head. Use a Dorman gasket or an OEM gasket here (I used OEM because it has a graphite coating on it and Dorman doesn't). The Felpro gasket is off register as well.
Edit:
You'll need a foot/pound torque wrench with 100 ft/lbs. close to mid scale.
You'll need a tube of Loctite PST 592 Thread Sealant (or equivalent) to apply to the threads of #11 head bolt (Amazon.com).
Make damn sure the Haynes manual shows the proper torque sequence. The FSM has you torquing the bolts to 110 ft/lbs (except #11 bolt) but the torque chart in the back of section 9 of the FSM says 100 ft/lbs for all of them. I went with 100 ft/lbs accross the board and have no problems.
For torquing purposes, I cut the threaded portion of bolt #14 off so I could get a standard 1/2"-12 point socket on it. See pic.
Last edited by CCKen; Oct 16, 2013 at 01:06 PM.

CF Veteran
Joined: Apr 2012
Posts: 5,302
Likes: 23
From: Wisconsin
Model: Cherokee
Thread Starter
Newbie
Joined: Oct 2013
Posts: 26
Likes: 0
From: Taunton Massachusetts
Year: 1999
Model: Cherokee
Engine: 4.0
Some good pointers. I will be sure to look out for those pins.
Still leaves me wondering how to inspect the lifters and pushrods etc. what if my 99 cam shaft components are damaged or warn? How can I tell?
Still leaves me wondering how to inspect the lifters and pushrods etc. what if my 99 cam shaft components are damaged or warn? How can I tell?
Trending Topics
CF Veteran
Joined: Aug 2010
Posts: 8,357
Likes: 103
From: Canton, MI
Year: 1999
Model: Cherokee
Engine: 4.0
Another Q: Are you going to have the replacement head rebuilt before installing it?
Concerning lifters and push rods:
When removing the push rods and lifters make sure you store them in the position from which they were removed so they can go back in the same position.
A small cardboard box with 12 holes punched in it with a screw driver for each push rod (with postion marked) is good for storing the push rods.
An egg carton can be used for storing the lifters. Again, with each position maked on each egg cup.
Inspection of the lifters and push rods:
HYDRAULIC TAPPETS
CLEANING
Clean each tappet assembly in cleaning solvent to remove all varnish, gum and sludge deposits.
INSPECTION
Inspect for indications of scuffing on the side and base of each tappet body. Inspect each tappet base for concave wear with a straightedge positioned across the base. If the base is concave, the corresponding lobe on the camshaft is also worn. Replace the camshaft and defective tappets.
PUSH RODS
CLEANING
Clean all the components with cleaning solvent. Use compressed air to blow out the oil passages in the push rods.
INSPECTION
Inspect each push rod end for excessive wear and replace as required. If any push rod is excessively worn because of lack of oil, replace it and inspect the corresponding hydraulic tappet for excessive wear.
Inspect the push rods for straightness by rolling them on a flat surface or by shining a light between the push rod and the flat surface. A wear pattern along the length of the push rod is not normal. Inspect the engine cylinder head for obstruction if this condition exists.
Inspect the length of the push rods using a carpenter's square. Lay the square on a flat surface then lay all the push rods on the flat surface, one next to the other, with one end of the push rods tucked up against the verticle of the square. Eyeball the opposite ends of the push rods to see if any rod is shorter or longer than the others. Or place another square on the horizontal of the carpenter's square, butted up against the push rods, and check the push rods. All must be the same length.
Thread Starter
Newbie
Joined: Oct 2013
Posts: 26
Likes: 0
From: Taunton Massachusetts
Year: 1999
Model: Cherokee
Engine: 4.0
Forgot to ask; What makes you think for sure the cylinder head is cracked?
Another Q: Are you going to have the replacement head rebuilt before installing it?
Concerning lifters and push rods:
When removing the push rods and lifters make sure you store them in the position from which they were removed so they can go back in the same position.
A small cardboard box with 12 holes punched in it with a screw driver for each push rod (with postion marked) is good for storing the push rods.
An egg carton can be used for storing the lifters. Again, with each position maked on each egg cup.
Inspection of the lifters and push rods:
HYDRAULIC TAPPETS
CLEANING
Clean each tappet assembly in cleaning solvent to remove all varnish, gum and sludge deposits.
INSPECTION
Inspect for indications of scuffing on the side and base of each tappet body. Inspect each tappet base for concave wear with a straightedge positioned across the base. If the base is concave, the corresponding lobe on the camshaft is also worn. Replace the camshaft and defective tappets.
PUSH RODS
CLEANING
Clean all the components with cleaning solvent. Use compressed air to blow out the oil passages in the push rods.
INSPECTION
Inspect each push rod end for excessive wear and replace as required. If any push rod is excessively worn because of lack of oil, replace it and inspect the corresponding hydraulic tappet for excessive wear.
Inspect the push rods for straightness by rolling them on a flat surface or by shining a light between the push rod and the flat surface. A wear pattern along the length of the push rod is not normal. Inspect the engine cylinder head for obstruction if this condition exists.
Inspect the length of the push rods using a carpenter's square. Lay the square on a flat surface then lay all the push rods on the flat surface, one next to the other, with one end of the push rods tucked up against the verticle of the square. Eyeball the opposite ends of the push rods to see if any rod is shorter or longer than the others. Or place another square on the horizontal of the carpenter's square, butted up against the push rods, and check the push rods. All must be the same length.
Now I suppose I still can't say for sure the head is cracked but it's a pretty safe bet from what I've read. And we are turning over 160k soon. I am positive though that I've blown the gasket.
Knowing what I know about the two heads I'd feel more comfortable replacing the head with my 96xj head despite the higher mileage.
Opinion?
Junior Member
Joined: Sep 2013
Posts: 54
Likes: 0
From: NW Iowa
Year: 2001
Model: Cherokee
Engine: 4.0L I6
If you are going to swap a used head in, I'd go with the '96 head. Otherwise, there are some great aftermarket heads available on the internet that have been beefed up in the weak areas for around $400. I recently got one from J&C enterprises ready to install, and I'm pleased with it so far.
Thread Starter
Newbie
Joined: Oct 2013
Posts: 26
Likes: 0
From: Taunton Massachusetts
Year: 1999
Model: Cherokee
Engine: 4.0
Ok great I'm glad I had all you guys to help me come to a decision. I'm going to go with the 96 head.
If anyone cares to move the thread in a slightly different direction I'd like to know what the response might be to a shave as close to threshold as possible which will boost my compression. Also I used to hold an interest in tuning small Honda engines and had a set of adjustable cam gears and actually had my valve train replaced. Head and intake manifold ported polished and gasket matched. Never dyno tested it but damn what a difference it made for a tiny 1.8 Naturally aspirated engine.
Besides the popular stroker kits I had nothing really turn up when I looked into pulling anymore power out of this engine.
No need to mention things such as intakes or exhaust. Think most anyone responding to this thread is presumably novice to say the least. I wanna hear about tried and true or trial and error attempts at squeezing some ponys out of the 4.0.
CF Veteran
Joined: Mar 2010
Posts: 47,923
Likes: 38
From: Broward County Fl.
Year: 1989 xj sport 2dr
Model: Cherokee
Engine: 12 hole bosch Injectors
All blocks should have locator dowels if there not there get 2 and use them .There there for a reason keeps bores between head and block ligned up. Assembling with out them is asking for trouble.
CF Veteran
Joined: Mar 2010
Posts: 47,923
Likes: 38
From: Broward County Fl.
Year: 1989 xj sport 2dr
Model: Cherokee
Engine: 12 hole bosch Injectors
Thread Starter
Newbie
Joined: Oct 2013
Posts: 26
Likes: 0
From: Taunton Massachusetts
Year: 1999
Model: Cherokee
Engine: 4.0

Thread
Thread Starter
Forum
Replies
Last Post
NM-XJ
Stock XJ Cherokee Tech. All XJ Non-modified/stock questions go here
18
Oct 23, 2018 04:21 PM
Travis88XJ
Stock XJ Cherokee Tech. All XJ Non-modified/stock questions go here
19
Mar 12, 2016 07:26 AM
Currently Active Users Viewing This Thread: 1 (0 members and 1 guests)