
Installing pre 97 overhead console in base model.


Thread Starter
Junior Member
Joined: Jan 2010
Posts: 95
Likes: 0
From: Tucson, AZ
Year: 1987
Model: Cherokee
Engine: 4.0
I was hitting the junkyard last week for axle breather caps and stumbled upon a 94 classic or limited xj. Looked up and saw the overhead console with temp and compass readings. I had heard of the OHC before on pre 97 xj's but had never personally seen one. It looked like crap but i snatched it figuring i would never see one again.
I thought this was going to be a straight plug in with the wiring i took, but nope. I have an 87 pioneer with roll up windows and manual locks. So i decided to take some pictures and share with everyone how i figured it out.
First. Parts needed: Console, Brackets (x2), Passenger pillar wiring, Temp sending unit, and shorter visors depending on what size yours are.
Console

Brackets

Wiring

Temp Sending Unit (mine was taken from a ZJ)

Old visors

New ones

First thing i did was found a dirty place with no room to work in the garage. I removed all the electronics and lights. They push out through the bottom just be careful with the plastic tabs that hold everything in place.

Next i stripped off all the old fabric and foam. I used a razor knife, some kind of scraper blade i had and some sand paper to remove all the old foam. I had to remove everything because i will be recovering this one with new fabric.
Before

After


Then i did the fun part wiring. This console had a keyless entry thinger which i wasnt going to use so i stripped it from the harness. Dont re-wrap the wiring yet because you are going to be doing some splicing.

Next remove your sunvisors and sunvisor clip in thingys. Then remove your dome light and the passenger side pillar cover. Remove the wiring which is already in place under the passenger side pillar cover. Note the 4-pin connector where the original harness plugged into. Now match up 1 of the 2 plugs on your new harness and plug it in.

This connector controls the door activated lighting and lights on the OHC activated by buttons.
Now clip the 6-pin connector.

I used this site http://www.jonsteiger.com/www/barrac...ERHEADCONSOLE/ for wiring descriptions.
White w/black stripe switched +12v This provides power to the digital display, and should provide +12v when the ignition is on
Black w/green stripe ground This wire provides a ground to the compass
Orange w/black stripe parking light/headlight sense This wire should provide +12v whenever your headlights or parking lights are on
Blue w/violet stripe dimmer switch This wire should produce 0-12v, depending on the position of your dimmer ****. The higher the voltge, the dimmer the display will get.
Violet w/green stripe Temperature sensor This wire provides +12v to the temperature sensor. Connect it to the corresponding wire on the sensor.
Black w/blue stripe Temperature sensor This wire receives a signal back from the temperature sensor. Connect it to the corresponding wire on the sensor.
I ran the switched 12v wire from my acc port in my fusebox underneath the drivers dash.
For the ground i spliced into the black wire in the harness i got from the JY.
I wired the dimmer switch to a ground and the headlight switch to the switched 12v. This way the display is always at full brightness, but you could go through some more hassle if you wanted to. Next i ran the two wires to the temp sending unit.
I placed it behind my front bumper in the stock location.

Sensor Installed

Now test the unit to make sure it powers up with the key on. I used a hairdryer to see if the temp sender was working.
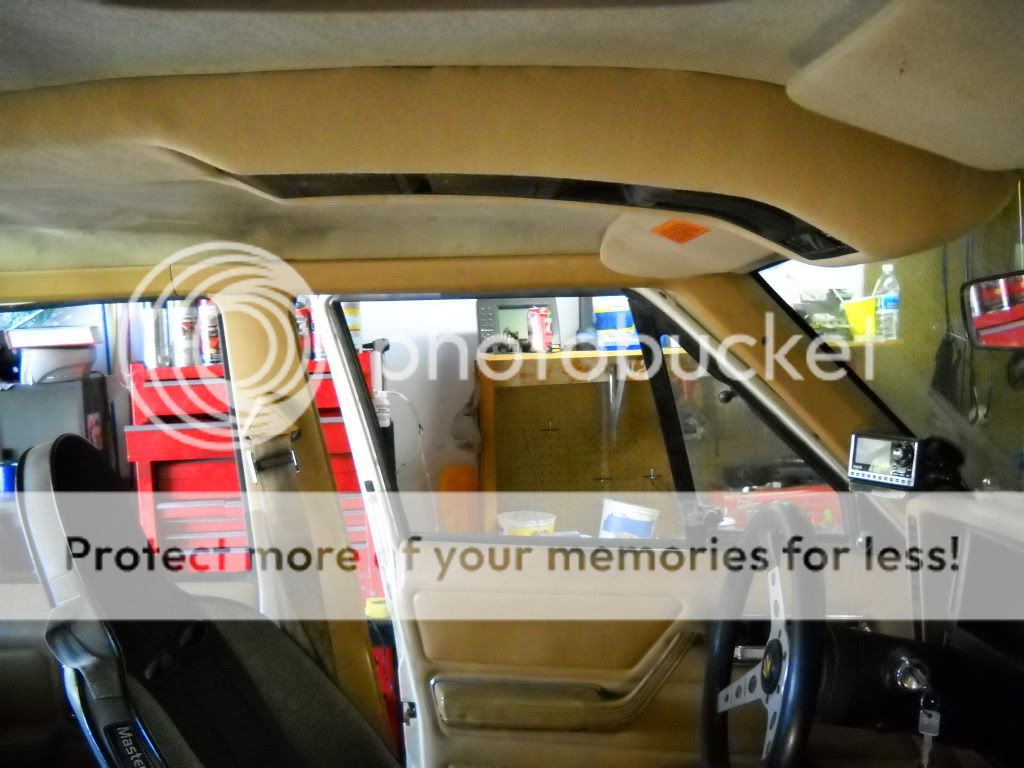
After everything is working run the wires and reinstall the visors. I had to drill new holes in the roof to screw the visor clips in place. You will not go through the top of the roof, there are two layers of metal. Be careful here. Then i reassembled the bare OHC to mount up the brackets. I had to cut pieces of the headliner and drill new holes for the front mounting bracket. Mock up the OHC and make sure it fits. Then i tore the console apart again to recover it. I used automotive headliner material from the fabric store beside michaels. They also sell a spray foam adhesive which worked great. After the recover i assembled the console again and installed.
All done!


I thought this was going to be a straight plug in with the wiring i took, but nope. I have an 87 pioneer with roll up windows and manual locks. So i decided to take some pictures and share with everyone how i figured it out.
First. Parts needed: Console, Brackets (x2), Passenger pillar wiring, Temp sending unit, and shorter visors depending on what size yours are.
Console
Brackets
Wiring
Temp Sending Unit (mine was taken from a ZJ)
Old visors
New ones
First thing i did was found a dirty place with no room to work in the garage. I removed all the electronics and lights. They push out through the bottom just be careful with the plastic tabs that hold everything in place.
Next i stripped off all the old fabric and foam. I used a razor knife, some kind of scraper blade i had and some sand paper to remove all the old foam. I had to remove everything because i will be recovering this one with new fabric.
Before
After
Then i did the fun part wiring. This console had a keyless entry thinger which i wasnt going to use so i stripped it from the harness. Dont re-wrap the wiring yet because you are going to be doing some splicing.
Next remove your sunvisors and sunvisor clip in thingys. Then remove your dome light and the passenger side pillar cover. Remove the wiring which is already in place under the passenger side pillar cover. Note the 4-pin connector where the original harness plugged into. Now match up 1 of the 2 plugs on your new harness and plug it in.
This connector controls the door activated lighting and lights on the OHC activated by buttons.
Now clip the 6-pin connector.
I used this site http://www.jonsteiger.com/www/barrac...ERHEADCONSOLE/ for wiring descriptions.
White w/black stripe switched +12v This provides power to the digital display, and should provide +12v when the ignition is on
Black w/green stripe ground This wire provides a ground to the compass
Orange w/black stripe parking light/headlight sense This wire should provide +12v whenever your headlights or parking lights are on
Blue w/violet stripe dimmer switch This wire should produce 0-12v, depending on the position of your dimmer ****. The higher the voltge, the dimmer the display will get.
Violet w/green stripe Temperature sensor This wire provides +12v to the temperature sensor. Connect it to the corresponding wire on the sensor.
Black w/blue stripe Temperature sensor This wire receives a signal back from the temperature sensor. Connect it to the corresponding wire on the sensor.
I ran the switched 12v wire from my acc port in my fusebox underneath the drivers dash.
For the ground i spliced into the black wire in the harness i got from the JY.
I wired the dimmer switch to a ground and the headlight switch to the switched 12v. This way the display is always at full brightness, but you could go through some more hassle if you wanted to. Next i ran the two wires to the temp sending unit.
I placed it behind my front bumper in the stock location.
Sensor Installed
Now test the unit to make sure it powers up with the key on. I used a hairdryer to see if the temp sender was working.
After everything is working run the wires and reinstall the visors. I had to drill new holes in the roof to screw the visor clips in place. You will not go through the top of the roof, there are two layers of metal. Be careful here. Then i reassembled the bare OHC to mount up the brackets. I had to cut pieces of the headliner and drill new holes for the front mounting bracket. Mock up the OHC and make sure it fits. Then i tore the console apart again to recover it. I used automotive headliner material from the fabric store beside michaels. They also sell a spray foam adhesive which worked great. After the recover i assembled the console again and installed.
All done!


Thread
Thread Starter
Forum
Replies
Last Post
xjwolfman
Stock XJ Cherokee Tech. All XJ Non-modified/stock questions go here
8
Aug 26, 2020 12:59 PM
NM-XJ
Stock XJ Cherokee Tech. All XJ Non-modified/stock questions go here
18
Oct 23, 2018 04:21 PM
98JGC826
Stock Grand Cherokee Tech. All ZJ/WJ/WK Non-modified/stock questions go here!
2
Sep 3, 2016 08:10 PM
Currently Active Users Viewing This Thread: 1 (0 members and 1 guests)