
heater core replacement

Thread Starter
Junior Member
Joined: Nov 2010
Posts: 91
Likes: 0
From: Casper Wyoming
Year: 1989
Model: Cherokee
Engine: 4.0
i am in the process of changing the heater core in my 99. im not sure how to get everything out from under the dash. how much of the dash do i have to remove or can it be done without it? i have the nuts off the 5 studs on the firewall, heater hoses diconnected, and tomorrow will have the a/c disconnected.
i would appreciate any help and advice on how to get this done. im frustrated beyond beleif right now
thanks
i would appreciate any help and advice on how to get this done. im frustrated beyond beleif right now
thanks
Senior Member
Joined: Jun 2009
Posts: 553
Likes: 1
From: West Texas
Year: 1991
Model: Cherokee
Engine: 4.0 L

Hey.....remove as much as possible.
makes it easier to pull out, foam shielding (for vibration purposes and sealing) as well.
just take photos wher you removed stuff so you have reference when you put it back together.
(i know, I am same way, just keep pulling screws out to get to the problem)
but trust me, take pics, then you know what goes where!!!
my 2 cents sir
cpnwrench

Member
Joined: Feb 2011
Posts: 133
Likes: 1
Model: Cherokee
Heres what it looks like. Use the search function and you,ll find detailed instructions....https://www.cherokeeforum.com/f5/rep...r-core-109582/
Senior Member
Joined: Nov 2009
Posts: 904
Likes: 3
From: Maine
Year: 1999 Sport
Model: Cherokee
Engine: I6
Youll need to remove everything basically. Get some baggies, a sharpie marker, a pen and pad of paper. Start by taking trim pieces off and writing on the paper the steps in order so you can put it back together easily, like this: #1 - Radio trim. Then bag the screws and label them the same. You CAN NOT get screwed up if you do it this way. Youll need to take just about all the trim off, the tilt spring if you have tilt, the two bolts that hold the column in place and the entire center console. Then there are main dash bolts across the top of the dash and one on each side down near the kick panels. Remove those and the dash is free.
The drivers side will only pull out up against the back of the wheel, but the passengers side will sit right in the passengers seat. Get a heavy bungee cord so you can use it to strap the dash in place so you can get behind it to disconnect everything and pull the heater box.
Thing is, when youre doing this for the first time, its REALLY intimidating. There is a LOT going on, a lot is removed and its going to be really difficult if youre alone and a big person. (Im 5'10" and 205lbs XL shirt 34 waist) and I had a hard time getting into some areas. Plan on a LOT of extra time. I spent an entire day pulling things apart and then the next day putting it all together. Probably an honest 10-12 hours, but counting lunch, it was July and HOT, etc., it was a 2 day project. Now, if I had to do it again and it wasnt sunny and only about 65 out, I could probably do the whole thing in 4 hours start to finish.
Here are some of my photos from my '99 that I just did it in. Oh, and PLEASE do the AC Condenser while youre in there. A $60 dollar part and you KNOW everything in there is new. Youll also NEED to get the foam firewall gaskets. If you dont replace those, youll be REALLY cold come winter, and water will be leaking in. Those are a dealer only part, Im pretty sure. Something like $60 bucks? I cant remember though. GET THOSE!!!!!!!
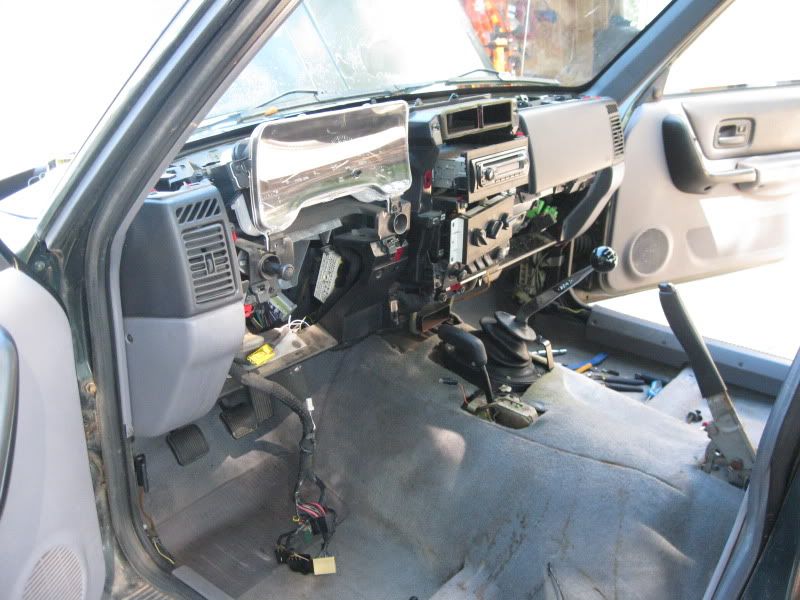
This is what it will look like when youre ALMOST ready to pull it. I also took out the glove box completely. Make sure to do that too.

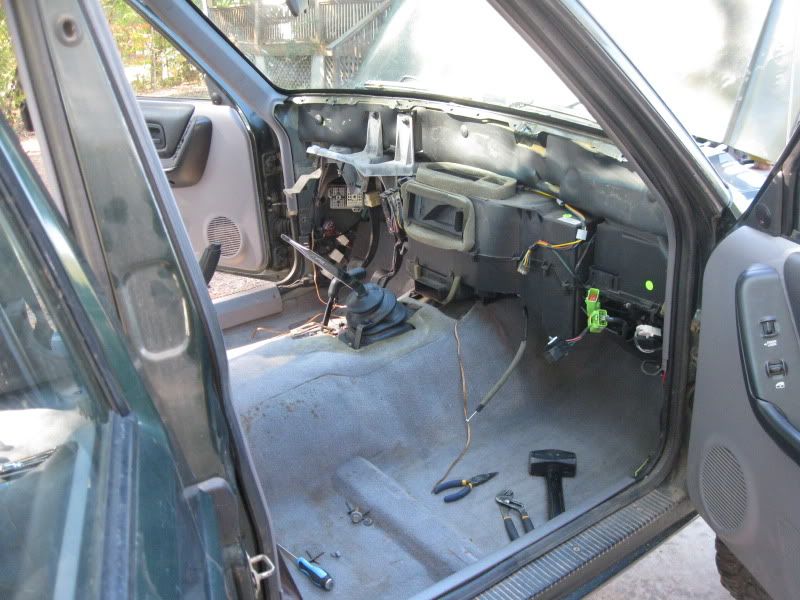
Here is everything out and the dash pulled forward and hanging by my bungee cord. It goes up to the grab handle. Can you see it connected to this side of the dash?

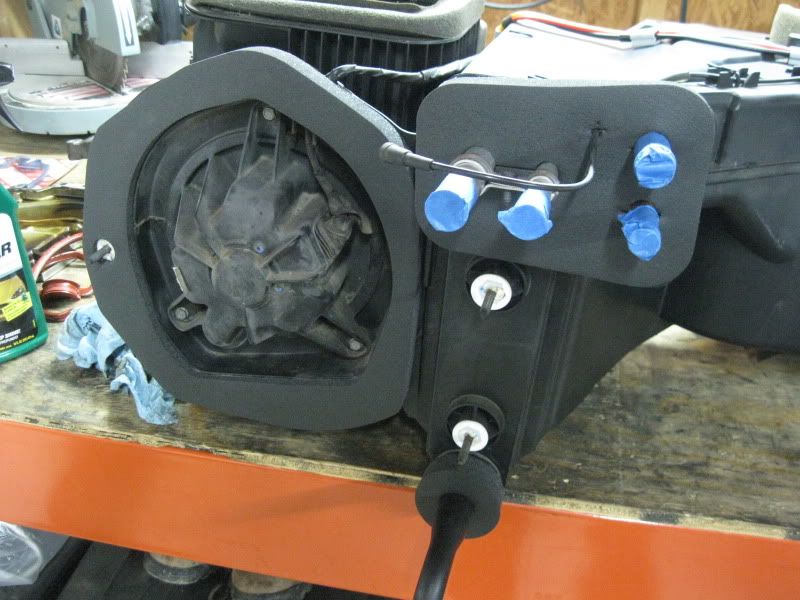
And this is what the heater box looks like when its out. This is EXACTLY how it sits behind the dash. See how that foam gasket is discolored and wet? Thats where mine was misting coolant out the top of the dash when I had the defrost on. You can also see the top of the foam gaskets on the backside that go against the firewall that I was talking about.

The drivers side will only pull out up against the back of the wheel, but the passengers side will sit right in the passengers seat. Get a heavy bungee cord so you can use it to strap the dash in place so you can get behind it to disconnect everything and pull the heater box.
Thing is, when youre doing this for the first time, its REALLY intimidating. There is a LOT going on, a lot is removed and its going to be really difficult if youre alone and a big person. (Im 5'10" and 205lbs XL shirt 34 waist) and I had a hard time getting into some areas. Plan on a LOT of extra time. I spent an entire day pulling things apart and then the next day putting it all together. Probably an honest 10-12 hours, but counting lunch, it was July and HOT, etc., it was a 2 day project. Now, if I had to do it again and it wasnt sunny and only about 65 out, I could probably do the whole thing in 4 hours start to finish.
Here are some of my photos from my '99 that I just did it in. Oh, and PLEASE do the AC Condenser while youre in there. A $60 dollar part and you KNOW everything in there is new. Youll also NEED to get the foam firewall gaskets. If you dont replace those, youll be REALLY cold come winter, and water will be leaking in. Those are a dealer only part, Im pretty sure. Something like $60 bucks? I cant remember though. GET THOSE!!!!!!!
This is what it will look like when youre ALMOST ready to pull it. I also took out the glove box completely. Make sure to do that too.
Here is everything out and the dash pulled forward and hanging by my bungee cord. It goes up to the grab handle. Can you see it connected to this side of the dash?
And this is what the heater box looks like when its out. This is EXACTLY how it sits behind the dash. See how that foam gasket is discolored and wet? Thats where mine was misting coolant out the top of the dash when I had the defrost on. You can also see the top of the foam gaskets on the backside that go against the firewall that I was talking about.
Last edited by bigvig; Oct 28, 2011 at 05:49 PM.
CF Veteran
Joined: Dec 2009
Posts: 1,396
Likes: 2
Model: Cherokee
I just got done replacing mine and its really not that hard. You guys should try playing operation on a Nissan; it's much harder. Jeep was brilliant and made the entire dash come out easily as a sub-assembly. Leaving it in the Jeep is only b/c you cut corners; it's just easier in the end to remove it.
As he ^ stated above you MUST buy those foam gaskets for the HVAC box to seal against the firewall; they're $60 bucks as he said and only Chrysler carries them. It's one of the main reasons we see water in the passenger side floor board of our trucks.
As everyone has said, keeping track of the hardware is pretty important but you don't have to go the bag route. When you pull a piece off, just re-install the hardware from where it came from. You'll end up with only the hardware that actually holds the dash on the firewall.
The most work is on the driver's side. Remove all the trim around your steering wheel and disconnect all of the connectors at the back of the wheel; then drop the wheel. there are three large connectors, affixed with a 10mm head cap screw; they must be compleltely unscrewed before the connectors comes off. They also draw the connector in when you tighten them back down; don't use a wrench. Once you have it out, you can easily take the dash out. Look for that thread over on JeepForum; it's easily found with Google. It'll really detail out all of the connectors you need to get at. There is another one for the clutch medal (man-ual trucks) and the antenna cable and another connector over on the passenger side.
here are a couple pictures to help. btw, you must remove the 2 larger bolts at the bottom of the dash (near the kick panels) so the dash can rotate up and then be pulled off. It's not nearly as bad as it sounds.
take it all out


Here is what the seals block out... Water loves to collect and dribble in from that lower corner of the blower opening.

Beat seals & new seals. notice how compressed the beat ones are; that's why the water can get in.


As he ^ stated above you MUST buy those foam gaskets for the HVAC box to seal against the firewall; they're $60 bucks as he said and only Chrysler carries them. It's one of the main reasons we see water in the passenger side floor board of our trucks.
As everyone has said, keeping track of the hardware is pretty important but you don't have to go the bag route. When you pull a piece off, just re-install the hardware from where it came from. You'll end up with only the hardware that actually holds the dash on the firewall.
The most work is on the driver's side. Remove all the trim around your steering wheel and disconnect all of the connectors at the back of the wheel; then drop the wheel. there are three large connectors, affixed with a 10mm head cap screw; they must be compleltely unscrewed before the connectors comes off. They also draw the connector in when you tighten them back down; don't use a wrench. Once you have it out, you can easily take the dash out. Look for that thread over on JeepForum; it's easily found with Google. It'll really detail out all of the connectors you need to get at. There is another one for the clutch medal (man-ual trucks) and the antenna cable and another connector over on the passenger side.
here are a couple pictures to help. btw, you must remove the 2 larger bolts at the bottom of the dash (near the kick panels) so the dash can rotate up and then be pulled off. It's not nearly as bad as it sounds.
take it all out
Here is what the seals block out... Water loves to collect and dribble in from that lower corner of the blower opening.
Beat seals & new seals. notice how compressed the beat ones are; that's why the water can get in.
Last edited by s14unimog; Oct 28, 2011 at 12:06 PM.
Thread Starter
Junior Member
Joined: Nov 2010
Posts: 91
Likes: 0
From: Casper Wyoming
Year: 1989
Model: Cherokee
Engine: 4.0
thanks for all the info and pics. im now putting it all back together now, atleast it goes back together better then it comes apart....lol.
bigvig...i know what you mean, im 6'1 234lbs, its kinda interesting getting to everything. i think after this i should be able to join the circus....lol
thanks again to everyone who posted, really helped
bigvig...i know what you mean, im 6'1 234lbs, its kinda interesting getting to everything. i think after this i should be able to join the circus....lol
thanks again to everyone who posted, really helped

Newbie
Joined: Jan 2011
Posts: 16
Likes: 0
From: Raleigh
Year: 1999
Model: Cherokee
Engine: 4.0
For anyone who is attempting and has read this post, there is a couple of things that I did when I replaced mine that you might want to do also. Have your AC discharged at a shop, pay for the service, and most will recharge it all for the money paid for an ac charge. That way your not unnecessarily buying freon. Also, when you have the heater box out, have your evaporator pressure tested buy a radiator shop. I was terrified that I would have to go through this again and it was 5 Bucks well spent. (seriously, 5 bucks and 5 mins). If your really gung ho, replace it. But, I didn't have an extra hundred to spend. If your a pretty handy person, I agree with the earlier posts. Its less daunting then it seems. Its pretty straight forward, keep track of what you remove. If you don't have a well rounded socket and tool set this might be more frustration then its worth. I found myself using lots of shorts, longs, bends, extensions, etc. I didn't remove the seats or the dash fully, your going to have to drop the steering wheel regardless of what you do, but at that point you can move the dash far enough back to remove the heater box. If your going for the least frustration and time is not an issue, remove it all. Be careful when reassembling the heater box. I tried two different cores from two different auto part stores and both didn't fit well. It takes a little "manual encouragement" to get it into place. First time I had it in the box I ran a screw through the return line piecing it back together, be careful! Can't stress enough that you don't want to get it all back together to find out you have to take it back apart. Like others said, I did it over 2 days. 5 or 6 hours first day, 4 or 5 second day. Its a relative, simple replacement type repair that's just time consuming and can save you many of hundreds of dollars.

Thread
Thread Starter
Forum
Replies
Last Post
seansr
Stock XJ Cherokee Tech. All XJ Non-modified/stock questions go here
13
Oct 20, 2025 02:48 PM
Zeke P. Lucas
Stock XJ Cherokee Tech. All XJ Non-modified/stock questions go here
8
Aug 30, 2015 05:42 PM
Brynjaminjones
Stock XJ Cherokee Tech. All XJ Non-modified/stock questions go here
2
Aug 22, 2015 05:01 AM
Currently Active Users Viewing This Thread: 1 (0 members and 1 guests)