
Headlight/Harness Upgrade: Step-by-Step Illustrated DIY write-up for total beginners
Subscribe
Quote:
just a relay and heavier gauge from radio shack.. Then again someone (like myself) could/would easily start replacing wire everywhere once that far thru the loom.. just because you're already there, turning the project into complete overhaul mode
Look for Diesel Daze's XJ on CL in a few months "used to run fine but won't start" Originally Posted by DieselDaze
to reiterate a little more clearly from my earlier post, albeit an upgrade no doubt its just adding a relay and extending the run.. same and or better would be to add a relay in a shorter run to switch eliminating (most) of the old wire with a heavier gauge and longer run to headlights..just a relay and heavier gauge from radio shack.. Then again someone (like myself) could/would easily start replacing wire everywhere once that far thru the loom.. just because you're already there, turning the project into complete overhaul mode

CF Veteran
Quote:
Salad is right, the wiring was substandard for the load placed on it by the lighting system but it's downright overkill to trigger the relay.Originally Posted by DieselDaze
understood but you're still using the same old wiring that has been heated and was substandard in the first place... just sayin
Quote:
just a relay and heavier gauge from radio shack.. Then again someone (like myself) could/would easily start replacing wire everywhere once that far thru the loom.. just because you're already there, turning the project into complete overhaul mode
Wait... This is clearer than your earlier post? I must go back and find your earlier post because that would have to be astonishingly unclear to top this.Originally Posted by DieselDaze
to reiterate a little more clearly from my earlier post, albeit an upgrade no doubt its just adding a relay and extending the run.. same and or better would be to add a relay in a shorter run to switch eliminating (most) of the old wire with a heavier gauge and longer run to headlights.. just a relay and heavier gauge from radio shack.. Then again someone (like myself) could/would easily start replacing wire everywhere once that far thru the loom.. just because you're already there, turning the project into complete overhaul mode
Senior Member
Quote:
how'd you know I was having starting issues, I haven't made a thread yet Originally Posted by salad
Look for Diesel Daze's XJ on CL in a few months "used to run fine but won't start"
Quote:
probably is, slept very little last night and here I am again at 3:55am with 2 hrs sleep and feel inclined to answer.. but rather then talk in circles I'll digress until well, whenever.....Originally Posted by F1Addict
Wait... This is clearer than your earlier post? I must go back and find your earlier post because that would have to be astonishingly unclear to top this.
Hopefully the net will tire me out to get some sleep, so I can get back on here later and spill some more nonsense...

Senior Member
Hello, its me again... yes I'm still awake and a light bulb just went off, or I'm completely losing it from sleep deprivation...
Tell me if I've finally wrapped my mind around this, for some reason I was thinking there was still a load at the switch even with a relay, thus the reason I wanted to shorten the run closer to the switch.. But now that I'm delirious and realize this is the exact job the relay does... acts as a 'bridge' to power the headlights significantly and in turn now the headlight switch only acts to power the relay on instead of pushing more juice through the shoddy OEM wire...
Not sure where I was before but I think I have a grasp on it, or maybe not...

Quote:
Here is my understanding.Originally Posted by F1Addict
The switch is no longer connected to the headlights, it's connected to the relay. The relay supplies the electricity to your headlights when you tell it to by pulling the headlight switch.
Circuit#1
The headlight switch is connected to the old headlight socket.
The new harness plugs into the old headlight socket
This new harness is connected to the relay.
Circuit #2
A separate circuit #2 connects the battery and the 2 new headlight sockets.
Relay
Circuit #1 and #2 do not touch each other.
Both circuits pass through the relay, but do not actually touch.
The relay switch for circuit #2 is magnetically closed (headlights go on) when current flows through circuit #1 (headlight switch is closed)
My only confusion is that somewhere in circuit #1, isn't it connected to the battery, since the old circuit used to power the headlights? We have not removed that connection. So doesn't the same amount of current go through the headlight switch still? Or is current determined by what is drawing power from the circuit. Headlights themselves are no longer on circuit #1, so it that why there is less current flowing through circuit #1?
(ie: Is current supplied at a fixed rate, or does it depend on what is drawing the current (headlights)

Senior Member
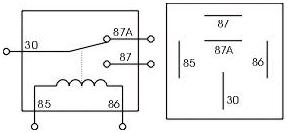
As you can see the White and Yellow wires are connected to the battery,two circuits (two loads).
The green wire from the switch goes to the relay coil (86) the other side of the coil goes to ground (85).
When you flip the switch on voltage goes from the battery to the coil (White wire)or OEM the coil energizes and closes the normally open contact on the relay.When the contacts is close the lights turn on because now voltage is applied to the lights (Yellow wire)and the red wire to the lights.
As you can see the white wire is protected with a 3 amp fuse (smaller current draw)and the yellow wire is protected with a 25 amp fuse (bigger load).
This illustration is a similarity of your headlight switch not an exact duplication,but same concept.By the way the switch is lighted that's why is grounded.
As you can see two different circuits one for the relay and the other for the lights.


Quote:
That is exactly where I put mine as well.Originally Posted by s346k
here's where I put my relays
Senior Member
Quote:
LOL... sorry to stir the pot....... Originally Posted by F1Addict
The switch is no longer connected to the headlights, it's connected to the relay. The relay supplies the electricity to your headlights when you tell it to by pulling the headlight switch.
I obviously missed this post or would have never responded reading this....
some are probably thinking I've stirred bimmers thread on purpose, I assure you I didn't.....
seriously

Seasoned Member
Quote:
It depends on what is drawing the current. The relays draw very little current compared to the actual headlights. Its like when you plug too many items in at home and pop the circuit breaker. When you just have a lamp plugged in, its fine and only draws a little current (like a relay does). Then if you plug in a hair dryer, electric heater, mini fridge, etc you draw too much current and pop the breaker. (like the actual headlights might). You are correct in that installing this harness creates 2 circuits that never touch each other, eliminating the heavy load from the long under rated headlight switch circuit and transferring it to the short, heavy gauge one that the harness supplies. You have 2 relays. one for the low beams and one for the high beams. It seems like youve figured it out and just needed the clarification.Originally Posted by BimmerJeeper
(ie: Is current supplied at a fixed rate, or does it depend on what is drawing the current (headlights)

CF Veteran
Quote:
Originally Posted by playbass
That is exactly where I put mine as well.
Quote:
x3. Seemed the ideal location. Bimmer, I'm impressed. you're learning something. My screws were rusted to hell too, I did the back-and-forth method with PB and they all came out. Originally Posted by s346k
here's where I put my relays
But, you forgot two things...
1. Adjusting the headlights. Torx T20 on the newer Jeeps, IIRC. I had to adjust mine afterwards because they were so much brighter. People hated me.
2. If your 97+ XJ has factory fogs, you'll run into an issue with lows staying on with highs. The best fix I've found is to simply pull the factory fog relay and make your own harness for the fogs.