
Harmonic Balancer Replacement Questions


Thread Starter
Senior Member
Joined: Mar 2014
Posts: 952
Likes: 55
From: Eastern Long Island, NY
Year: 1996
Model: Cherokee
Engine: I6 Cyl / 4L
So I am going to try to replace my Harmonic Balancer this Saturday (rented the puller and installer). For all I know, it is the original, and I am afraid the thing is ready to break apart.
Anyway, I couple of basic questions that I haven't found clear answers to:
1) To keep the crankshaft from turning while wrenching the HB bolt, do I leave the Jeep in Drive (chuck the wheels of course and set the parking brake)?
2) From what I gather, the little wedge sticking out of the crankshaft is called the Key and is removable. What do I have to watch out for so it doesn't move or fall out during the whole process?
3) Finally, when I am installing the HB, as I crank it into place, do I go all the way in until it bottoms? I don't have to worry about going to far in?
Thank you.

Senior Member

Joined: Jul 2012
Posts: 794
Likes: 105
From: Aldie, VA
Year: 1999
Model: Cherokee
Engine: 4.0
I just had to do this on my '98 last weekend so hopefully I can help out here. Luckily I caught mine by the metal on metal I was getting when I hit the gas. The rubber piece on the balancer was deteriorating and was coming out towards the mechanical fan.
I followed advice from the interwebs and put it in D and then did sharp ht on the crank shaft nut. For me, the nut came right off. From there, take a look at how close the harmonic balancer is to the front of the motor on the bottom. Should be about 1/8 inch. Remember that for when you install the new one. Also, remove the washer. It will break if you crank on it with the remover.
To remove it, use the puller and put the 3 bolts int he holes and use a wrench to turn the the middle rod. There wasn't enough room for me to use a socket and ratchet so I used a wrench. Keep turning until it comes off. The key didn't move at all on my removal (it was towards the top). I put the new balancer in place and wiggled it a bit to make sure it was on the key. Then hook up the installer and crank away. I had to use two wrenches since a socket wouldn't fit in the space below the radiator.
Keep wrenching until it is at the same distance it was earlier. Reinstall washer and nut and you're done. You can check it fro underneath after you reinstall the belt. The balancer should line up with the other pulleys.
Thread Starter
Senior Member
Joined: Mar 2014
Posts: 952
Likes: 55
From: Eastern Long Island, NY
Year: 1996
Model: Cherokee
Engine: I6 Cyl / 4L
I just had to do this on my '98 last weekend so hopefully I can help out here. Luckily I caught mine by the metal on metal I was getting when I hit the gas. The rubber piece on the balancer was deteriorating and was coming out towards the mechanical fan.
I followed advice from the interwebs and put it in D and then did sharp ht on the crank shaft nut. For me, the nut came right off. From there, take a look at how close the harmonic balancer is to the front of the motor on the bottom. Should be about 1/8 inch. Remember that for when you install the new one. Also, remove the washer. It will break if you crank on it with the remover.
To remove it, use the puller and put the 3 bolts int he holes and use a wrench to turn the the middle rod. There wasn't enough room for me to use a socket and ratchet so I used a wrench. Keep turning until it comes off. The key didn't move at all on my removal (it was towards the top). I put the new balancer in place and wiggled it a bit to make sure it was on the key. Then hook up the installer and crank away. I had to use two wrenches since a socket wouldn't fit in the space below the radiator.
Keep wrenching until it is at the same distance it was earlier. Reinstall washer and nut and you're done. You can check it fro underneath after you reinstall the belt. The balancer should line up with the other pulleys.
I followed advice from the interwebs and put it in D and then did sharp ht on the crank shaft nut. For me, the nut came right off. From there, take a look at how close the harmonic balancer is to the front of the motor on the bottom. Should be about 1/8 inch. Remember that for when you install the new one. Also, remove the washer. It will break if you crank on it with the remover.
To remove it, use the puller and put the 3 bolts int he holes and use a wrench to turn the the middle rod. There wasn't enough room for me to use a socket and ratchet so I used a wrench. Keep turning until it comes off. The key didn't move at all on my removal (it was towards the top). I put the new balancer in place and wiggled it a bit to make sure it was on the key. Then hook up the installer and crank away. I had to use two wrenches since a socket wouldn't fit in the space below the radiator.
Keep wrenching until it is at the same distance it was earlier. Reinstall washer and nut and you're done. You can check it fro underneath after you reinstall the belt. The balancer should line up with the other pulleys.
Old fart with a wrench
Joined: Nov 2010
Posts: 14,398
Likes: 741
From: Manlius, east of Syracuse, NY
Year: 2000 XJ Sport & WJ Laredo
Model: Grand Cherokee (WJ)
Engine: 4.0L
That HB needs to go all the way on until it stops. It holds the crankshaft timing gear in place as well. The key, I think, is a Woodruff key shaped like a half moon and shouldn't come out easily enough to fall out.
I've never had a 4.0 apart yet, but I've worked on many 383s, 413s, and 426s and one 392 Hemi.
I've never had a 4.0 apart yet, but I've worked on many 383s, 413s, and 426s and one 392 Hemi.
Thread Starter
Senior Member
Joined: Mar 2014
Posts: 952
Likes: 55
From: Eastern Long Island, NY
Year: 1996
Model: Cherokee
Engine: I6 Cyl / 4L
That HB needs to go all the way on until it stops. It holds the crankshaft timing gear in place as well. The key, I think, is a Woodruff key shaped like a half moon and shouldn't come out easily enough to fall out.
I've never had a 4.0 apart yet, but I've worked on many 383s, 413s, and 426s and one 392 Hemi.
I've never had a 4.0 apart yet, but I've worked on many 383s, 413s, and 426s and one 392 Hemi.
Senior Member
Joined: Jul 2012
Posts: 794
Likes: 105
From: Aldie, VA
Year: 1999
Model: Cherokee
Engine: 4.0
Changing that front seal may be tricky with the timing cover in place. I have changed that seal on my '99 but that was with the timing cover out. With everything n place, there is not a lot of room in there to drive the seal. With the timing cover off and on the ground, I use a large socket to drive the seal in. You may be able to use a thin piece of wood and tap it in with a small hammer around the edge. I thought about it when I was doing the harmonic balancer and then decided to not try it with the timing cover on.
Once you get the harmonic balancer off, you could check the seal for pliability to see if it's still flexible or hardened. If it's still flexible, I wouldn't touch it.
I replaced it on my '99 because I was doing the timing chain at 215k miles. The seal seemed in good condition, I replaced because I was there and had the timing cover out. I'd be curios to see if you can change it without removing the timing cover.

CF Veteran


Joined: Nov 2015
Posts: 2,863
Likes: 201
From: syracuse ny
Year: 1997 230,000 miles
Model: Grand Cherokee (ZJ)
Engine: 4.0, new lifters valve job with new springs and exhaust valves, preload set with shims
What makes you want to change out the HB in the first place?
Trending Topics
Thread Starter
Senior Member
Joined: Mar 2014
Posts: 952
Likes: 55
From: Eastern Long Island, NY
Year: 1996
Model: Cherokee
Engine: I6 Cyl / 4L
Changing that front seal may be tricky with the timing cover in place. I have changed that seal on my '99 but that was with the timing cover out. With everything n place, there is not a lot of room in there to drive the seal. With the timing cover off and on the ground, I use a large socket to drive the seal in. You may be able to use a thin piece of wood and tap it in with a small hammer around the edge. I thought about it when I was doing the harmonic balancer and then decided to not try it with the timing cover on.
Once you get the harmonic balancer off, you could check the seal for pliability to see if it's still flexible or hardened. If it's still flexible, I wouldn't touch it.
I replaced it on my '99 because I was doing the timing chain at 215k miles. The seal seemed in good condition, I replaced because I was there and had the timing cover out. I'd be curios to see if you can change it without removing the timing cover.
Once you get the harmonic balancer off, you could check the seal for pliability to see if it's still flexible or hardened. If it's still flexible, I wouldn't touch it.
I replaced it on my '99 because I was doing the timing chain at 215k miles. The seal seemed in good condition, I replaced because I was there and had the timing cover out. I'd be curios to see if you can change it without removing the timing cover.
Thread Starter
Senior Member
Joined: Mar 2014
Posts: 952
Likes: 55
From: Eastern Long Island, NY
Year: 1996
Model: Cherokee
Engine: I6 Cyl / 4L
Well, I think it is a maintenance item that is long over due for a replacement. It is on my to-do list for the spring to get ready for my summer trip to the Jersey shore. I would hate to have it go while I am away from my tools and it would ruin my vacation. Plus if it goes while driving on the highway, bad things could happen, least of them being the motor overheats and dies. Why take the chance over a $30 part that can be changed in a couple of hours. I have spent so much time and money keeping this Jeep alive, that I would hate to have it die because I was too lazy to change a $30 part.
CF Veteran

Joined: Feb 2012
Posts: 2,282
Likes: 18
From: central IN
Year: 1997
Engine: 4.0
when i installed mine i tapped it on mostly with a hammer and wood then used the bolt to seat it. i think the torque spec was somewhere around 85 lb. child’s play compared to those lsx bolts haha
Thread Starter
Senior Member
Joined: Mar 2014
Posts: 952
Likes: 55
From: Eastern Long Island, NY
Year: 1996
Model: Cherokee
Engine: I6 Cyl / 4L
Now you got me googling lsx bolts. ha ha.
Anyway, I did the job yesterday.... Like everything else in this 22 year old XJ, stuff was rusty and dirty. PITA
Even with the transmission in Drive the crankshaft still turned. So onto plan 2.
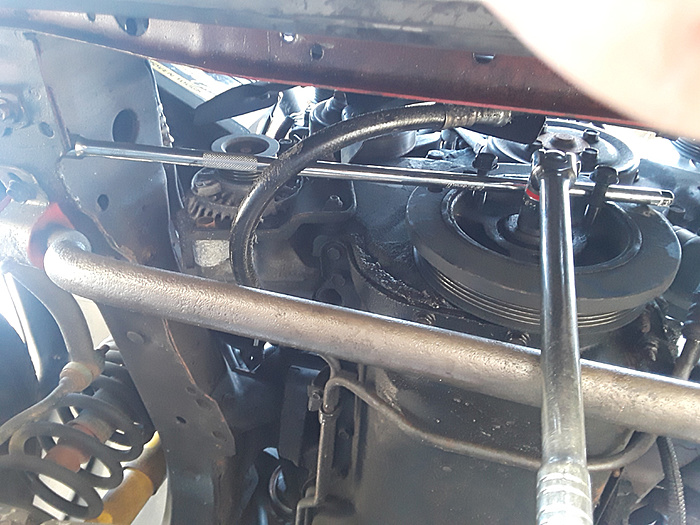
This worked better than I thought. I used the holes above the threaded holes in the balancer to hold 2 bolts that I used to jam that extension in place. It held in place nicely until the center bolt released.
Then trying to get the puller web bolts on the threaded holes of the balancer was a challenge because all the bolts supplied in the rental kit didn't fit. I guess it wasn't a Jeep kit. So I went and got this old puller kit I had bought years ago to pull the yoke on the Dana 30. Luckily the bolts here fit better but still tight. Then I realized the threads were rusty. So I just forced them in there - doesn't matter because it is the old balancer.
Also lucky for me, the old puller kit I had the flat head option instead of the pointed head, which I had read somewhere else can damage the threads in the crankshaft.
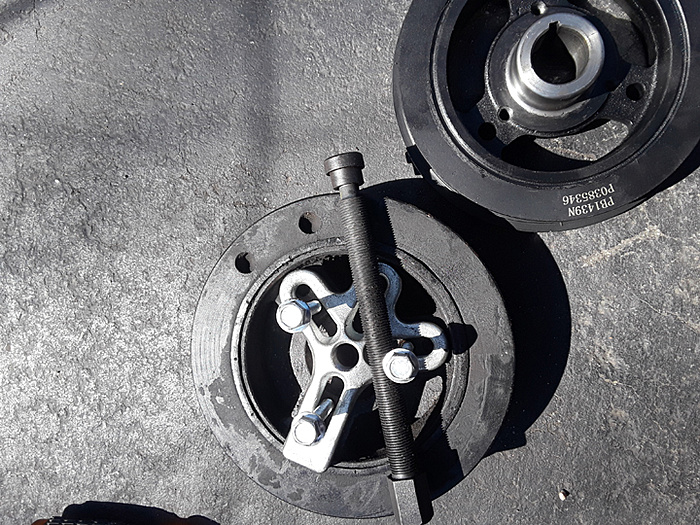
After it was off, I checked the seal. It was pretty dry, and there was good evidence it was leaking. It had even cut a fine groove into the old balancer.
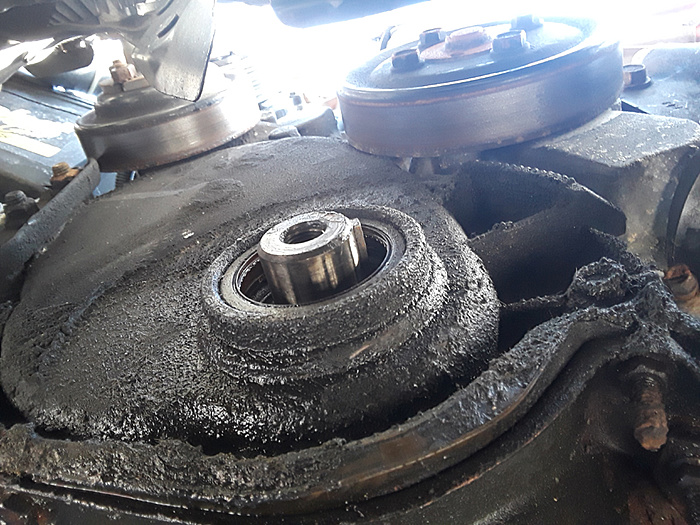
So I decided to change it. I tried a screw driver, needle nose pliers and several other things to try and pry it out but nothing worked. After an hour of this, I broke down and went to AZ for a seal remover. Of course it was too long and I had to cut it down to about 7 inches so it would fit the tight space between the radiator and motor. Once in place, it only took a few taps with the hammer to make it come out.
I used a $10 38 mm socket to tap in the new seal.
Getting the new balancer on was harder than I expected it to be. Halfway in, I could barely turn the nut on the installer. I took a break and thought that applying a little heat to the balancer collar might expand it just enough to make it easier to install. So I used my painters heat gun on the collar for a few minutes. It did the trick and made it much easier to drive it in the last few turns.
Like most of my driveway projects, the sun was setting by the time I was done.
PS If you like working while on your back, this is the job for you
Anyway, I did the job yesterday.... Like everything else in this 22 year old XJ, stuff was rusty and dirty. PITA
Even with the transmission in Drive the crankshaft still turned. So onto plan 2.

This worked better than I thought. I used the holes above the threaded holes in the balancer to hold 2 bolts that I used to jam that extension in place. It held in place nicely until the center bolt released.
Then trying to get the puller web bolts on the threaded holes of the balancer was a challenge because all the bolts supplied in the rental kit didn't fit. I guess it wasn't a Jeep kit. So I went and got this old puller kit I had bought years ago to pull the yoke on the Dana 30. Luckily the bolts here fit better but still tight. Then I realized the threads were rusty. So I just forced them in there - doesn't matter because it is the old balancer.
Also lucky for me, the old puller kit I had the flat head option instead of the pointed head, which I had read somewhere else can damage the threads in the crankshaft.

After it was off, I checked the seal. It was pretty dry, and there was good evidence it was leaking. It had even cut a fine groove into the old balancer.

So I decided to change it. I tried a screw driver, needle nose pliers and several other things to try and pry it out but nothing worked. After an hour of this, I broke down and went to AZ for a seal remover. Of course it was too long and I had to cut it down to about 7 inches so it would fit the tight space between the radiator and motor. Once in place, it only took a few taps with the hammer to make it come out.

I used a $10 38 mm socket to tap in the new seal.
Getting the new balancer on was harder than I expected it to be. Halfway in, I could barely turn the nut on the installer. I took a break and thought that applying a little heat to the balancer collar might expand it just enough to make it easier to install. So I used my painters heat gun on the collar for a few minutes. It did the trick and made it much easier to drive it in the last few turns.
Like most of my driveway projects, the sun was setting by the time I was done.
PS If you like working while on your back, this is the job for you
Last edited by OldTires; Apr 22, 2018 at 05:10 PM.
CF Veteran
Joined: Oct 2013
Posts: 2,097
Likes: 12
From: Tarpon Springs, FL / Denver, CO
Year: '98
Engine: 4.0 I6
Nice work! There are always a million hurdles to get through for even a simple task. And you always need a few tools you will only ever use once, but its nice to have them for the futuer I guess
I am going to be doing the rear main seal, oil pan gasket, timing set, gasket/seal, and the harmonic balancer at some point this summer, definitely bookmarking this for later use
I am going to be doing the rear main seal, oil pan gasket, timing set, gasket/seal, and the harmonic balancer at some point this summer, definitely bookmarking this for later use
CF Veteran
Joined: Sep 2012
Posts: 1,623
Likes: 13
From: In a large sandbox
Year: 1998
Engine: 4.0
Yes, nice work and it looks like both the balancer and seal were much needed.
I had done all of this, including the timing chain, last summer and I'm sure they were the original parts with 214k on them and dry-rotted. Never failed but I became concerned they would and I was already replacing the radiator, water pump, etc. so I had no reason not to do it all and be done with it.
I had done all of this, including the timing chain, last summer and I'm sure they were the original parts with 214k on them and dry-rotted. Never failed but I became concerned they would and I was already replacing the radiator, water pump, etc. so I had no reason not to do it all and be done with it.
Thread Starter
Senior Member
Joined: Mar 2014
Posts: 952
Likes: 55
From: Eastern Long Island, NY
Year: 1996
Model: Cherokee
Engine: I6 Cyl / 4L
Thanks for the replies guys. I hope this thread helps someone in the future.
And let me say that having to drive my dad's 2017 RAV4 to AZ makes me realize every time how much I love driving my XJ. The lines of sights in the RAV4 suck. The turning radius sucks so much it feels like it take forever to make a turn. Same thing with the acceleration, you have to floor it to get the quick acceleration to blend into traffic, and it feels like the engine is really working hard. People often ask me why I drive such an old "car" and I can't really explain it to them because they haven't experienced driving an XJ.
And let me say that having to drive my dad's 2017 RAV4 to AZ makes me realize every time how much I love driving my XJ. The lines of sights in the RAV4 suck. The turning radius sucks so much it feels like it take forever to make a turn. Same thing with the acceleration, you have to floor it to get the quick acceleration to blend into traffic, and it feels like the engine is really working hard. People often ask me why I drive such an old "car" and I can't really explain it to them because they haven't experienced driving an XJ.
Last edited by OldTires; Apr 22, 2018 at 10:44 PM.