
Fubar'd my firewall ground bolt - plz halp

Thread Starter
CF Veteran
Joined: Oct 2013
Posts: 2,097
Likes: 12
From: Tarpon Springs, FL / Denver, CO
Year: '98
Engine: 4.0 I6
Ok, I have a new one for you guys 
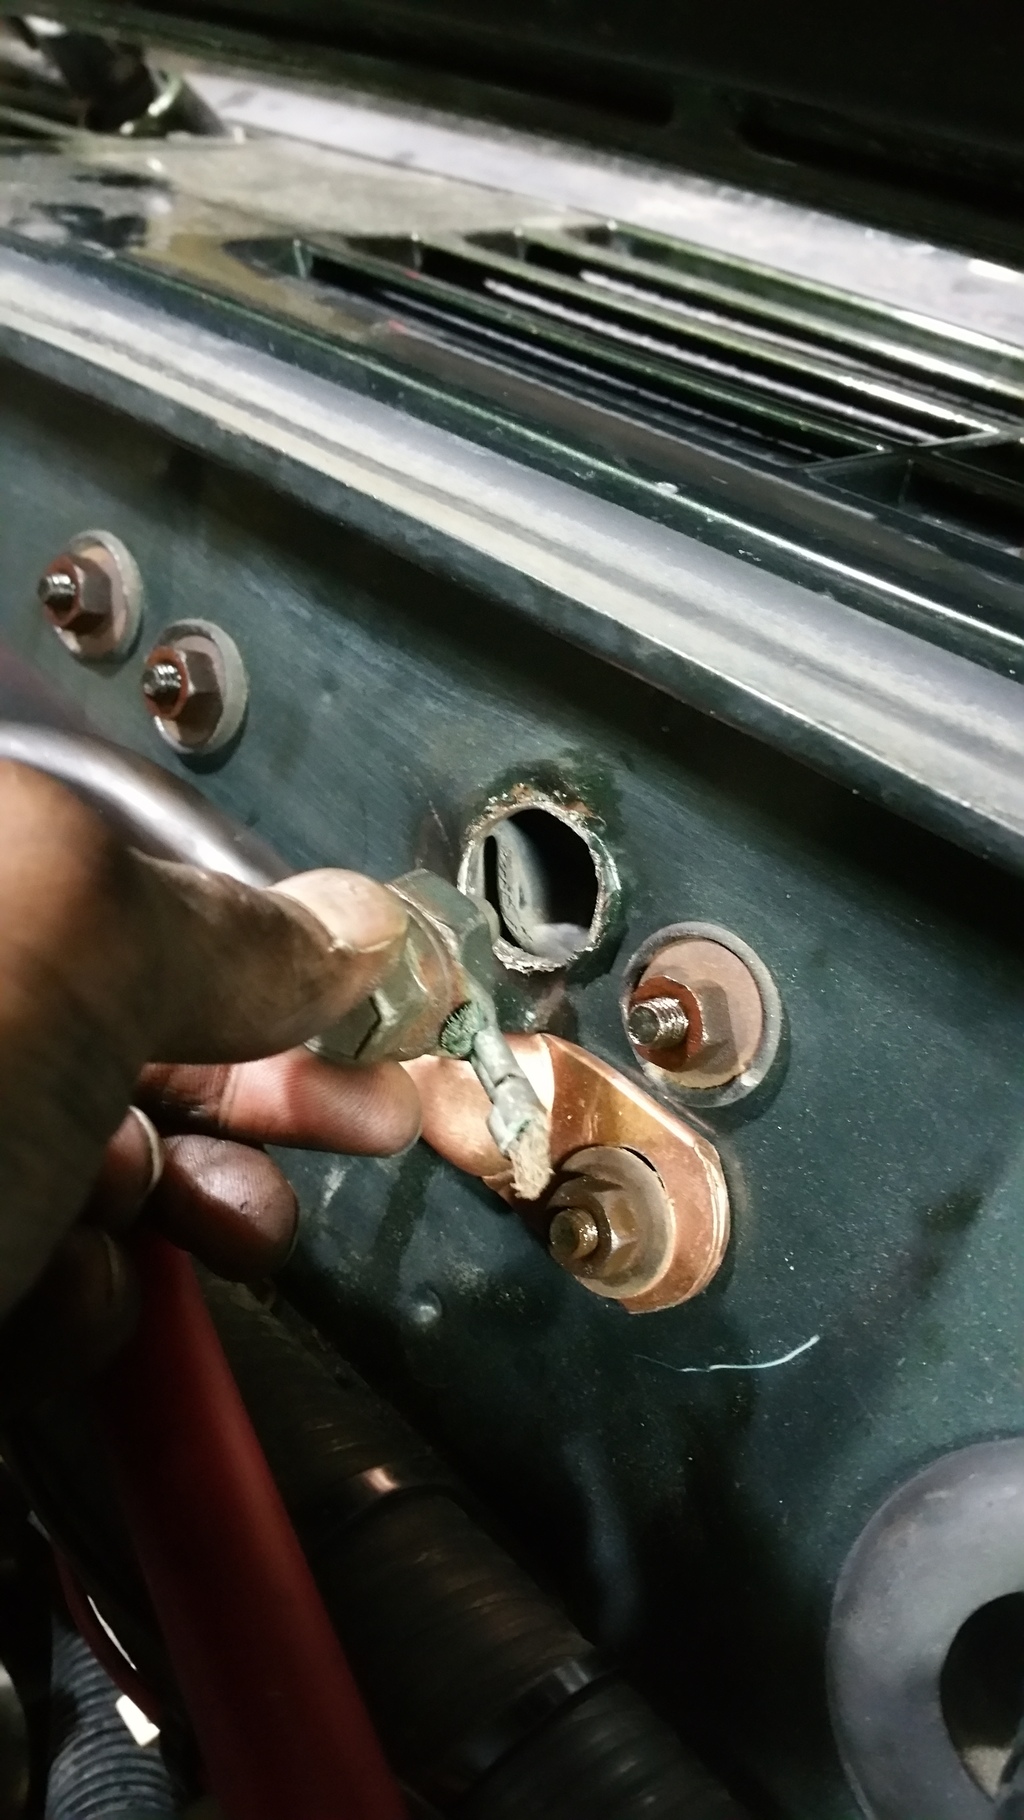
Was going to change out my engine ground strap because the OEM one literally crumbled into dust, and I somehow managed to completely twist a hole in the firewall.
I thought I was backing the bolt out - but the two bolts were fused together! I was only using my ~6" long Snap-On ratchet and I'm not even that strong so I have no clue how this really happened. I did use PB Blaster but it did not help a damn.
Anyways, I affixed the engine ground strap to another bolt on the firewall (I think the windshield wiper motor), which should hopefully suffice for now, and I smushed the fused bolts back in the firewall to keep water from pouring in.
Any ideas on how to fix this? Was thinking of having a nut welded in, and use a new stainless bolt (should be conductive enough to flow electricity through), but I am not really experienced in this crap
I did search and came up with no good suggestions really.
CF Veteran
Joined: Jul 2011
Posts: 4,521
Likes: 1
From: JOCO
Year: 1999
Engine: 4.0 Inline 6
me personally, I would weld a nut back in there. It would be easy for me. either way, clean the paint off under the ground terminal where it will contact the body in order to make proper contact. Like it is now, it's not going to make a good connection (looks like there's paint under the terminal).

Seasoned Member
Joined: Nov 2014
Posts: 360
Likes: 5
Model: Cherokee
Just a tip, and it has nothing to do with fixing your issue, rather with how you present yourself in a forum. Don't use made up and childish words like fubar'd, plz, halp and smushed. You come off as unintelligent and immature. People are less likely to take you seriously.
::CF Moderator::
Joined: Aug 2011
Posts: 43,971
Likes: 1,579
From: Prescott, Az
Year: 1990
Model: Cherokee (XJ)
Engine: 4.0
Fill the hole. Find another place on the body to attach a ground cable.
If you read through my Tip #1 in my signature below, you'll find you can run a cable from the passenger side engine block to a stud on the passenger inner fender. Real easy.
If you read through my Tip #1 in my signature below, you'll find you can run a cable from the passenger side engine block to a stud on the passenger inner fender. Real easy.
CF Veteran
Joined: Aug 2010
Posts: 8,357
Likes: 103
From: Canton, MI
Year: 1999
Model: Cherokee
Engine: 4.0
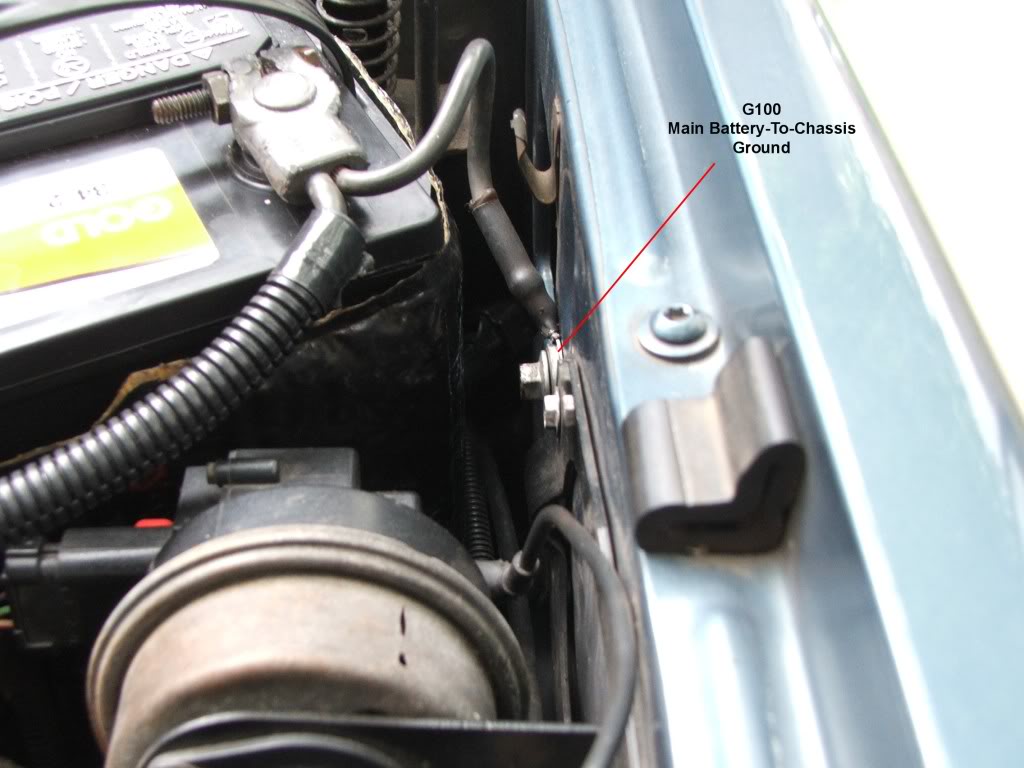
I'm still trying to understand why people are using such a huge cable for that bonding connection. The original intent for that bonding strap was to suppress radio noise from the engine ignition system, and possibly from the alternator.
The main ground connection from the battery to the chassis is at the right inner fender (G100), and it's only an 8 gauge cable (see pic).
Below is a pic of the bonding strap I installed because when I installed my cylinder head I cut off the threaded top of #14 cylinder head bolt so I could torque it using a shallow socket. Therefore I had to find a new home for the engine end of the strap.
In the pic you can see that I attached the bonding strap to a fuel rail hold down bolt. This installation works fine - no radio noise.
G100:
New bonding strap:
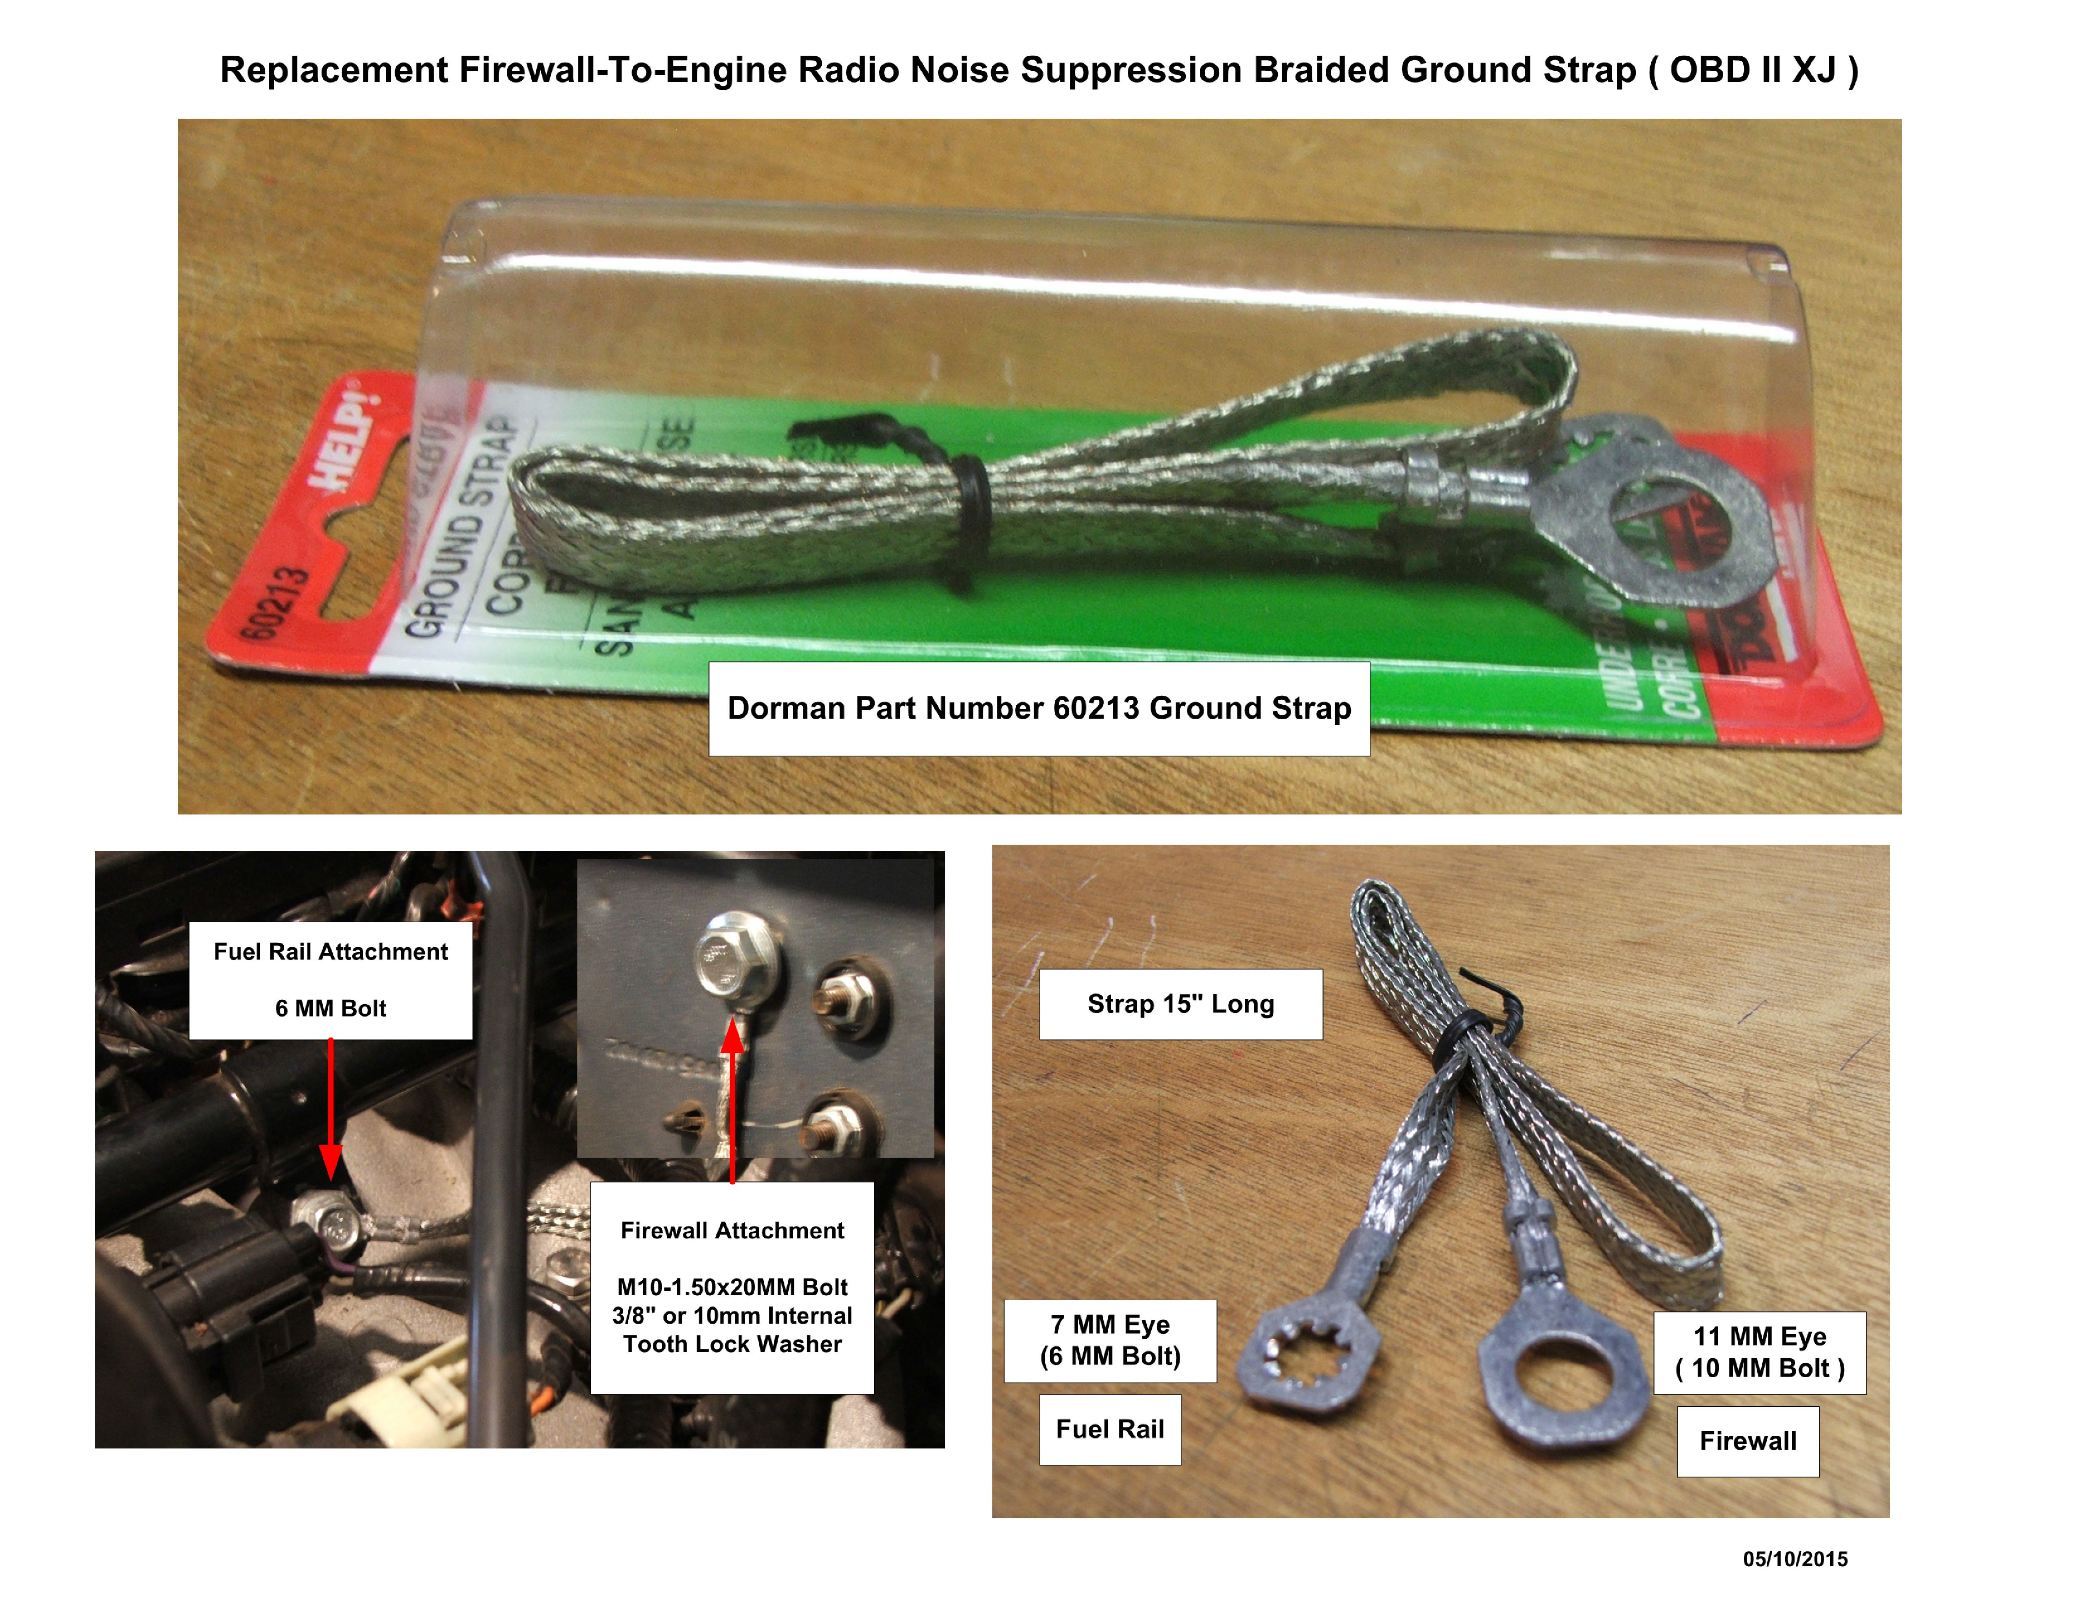
As for the firewall attachment for the bonding strap, I would remove the wipers and grill to access the wiper motor area, then find a spot to drill through the firewall that would clear any wiper components, then drill a 13/32" hole. Remove the paint from the engine bay side of the hole, insert a 10mm bolt through the hole from the inside, securing it from the outside using a 10mm self locking nut and plain washer. Attach the bonding strap to the bolt using a plain nut, flat washer, and a split lock washer.
As for the hole from the old attachment, grind the upset metal off around the hole and get a plastic/rubber plug from the hardware store and use it to plug the hole.
The main ground connection from the battery to the chassis is at the right inner fender (G100), and it's only an 8 gauge cable (see pic).
Below is a pic of the bonding strap I installed because when I installed my cylinder head I cut off the threaded top of #14 cylinder head bolt so I could torque it using a shallow socket. Therefore I had to find a new home for the engine end of the strap.
In the pic you can see that I attached the bonding strap to a fuel rail hold down bolt. This installation works fine - no radio noise.
G100:
New bonding strap:
As for the firewall attachment for the bonding strap, I would remove the wipers and grill to access the wiper motor area, then find a spot to drill through the firewall that would clear any wiper components, then drill a 13/32" hole. Remove the paint from the engine bay side of the hole, insert a 10mm bolt through the hole from the inside, securing it from the outside using a 10mm self locking nut and plain washer. Attach the bonding strap to the bolt using a plain nut, flat washer, and a split lock washer.
As for the hole from the old attachment, grind the upset metal off around the hole and get a plastic/rubber plug from the hardware store and use it to plug the hole.
Thread Starter
CF Veteran
Joined: Oct 2013
Posts: 2,097
Likes: 12
From: Tarpon Springs, FL / Denver, CO
Year: '98
Engine: 4.0 I6

Plus I am a network engineer and in general we are pretty immature, but point taken.
I used 0/1 gauge wire because I already had it, and it was easier to just make a cable vs buying a new ground strap or something.
I think the best option is for me to clean up the hole, and get a nut welded in that opening. That should be conductive enough, and provable better than what was there from the factory.
I did just bolt the cable to the firewall without sanding to bare metal, mostly because my XJ is pretty clean and I wanted to avoid ruining any of the painted areas. That was a temporary measure till I could figure out how to properly fix it.
Now the question I have is: should I use a stainless nut + bolt , zinc coated, or just regular steel? I will probably have an exhaust shop weld it in place for me, since I don't have any of that equipment at my disposal.
Trending Topics
Seasoned Member
Joined: Nov 2014
Posts: 360
Likes: 5
Model: Cherokee
Don't start welding stuff to your mangled bolt hole. If you were worried about scratching off a little paint for that contact area, wait till you see what a few shots with a welding tip do for that paint.
This is a simple problem with a simple solution. Don't over think it or over engineer a fix for it. You can find a variety of round plastic plugs to fit that hole in any decent hardware store. Look in the fastener section. They usually have trays of handy bits and pieces for this type of chore.
Thread Starter
CF Veteran
Joined: Oct 2013
Posts: 2,097
Likes: 12
From: Tarpon Springs, FL / Denver, CO
Year: '98
Engine: 4.0 I6
^^^ this is all you need to know. Another tip.... You'll have to look at the replies in the website rather than an app in order to access the tip#1 link.
Don't start welding stuff to your mangled bolt hole. If you were worried about scratching off a little paint for that contact area, wait till you see what a few shots with a welding tip do for that paint.
This is a simple problem with a simple solution. Don't over think it or over engineer a fix for it. You can find a variety of round plastic plugs to fit that hole in any decent hardware store. Look in the fastener section. They usually have trays of handy bits and pieces for this type of chore.
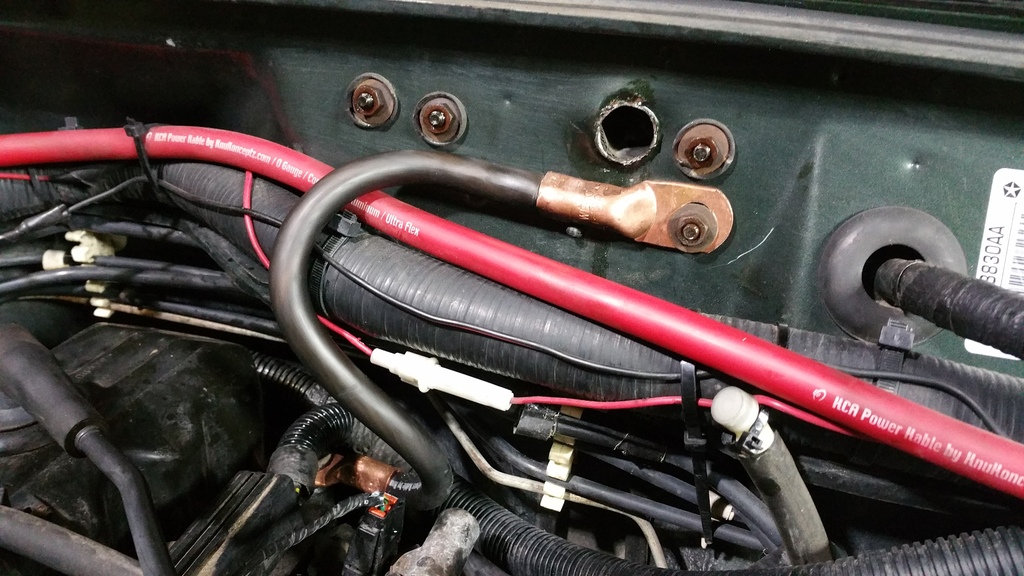
- I have an 0/1 gauge wire connecting the battery negative to the fender (replaced factory chassis ground)
- I have another run of 0/1 gauge wire connected from the engine block to the battery negative directly (piggy backed on the factory grounding stud, where the original ground strap to the firewall was secured).
- I then have another cable connecting the ground stud to the firewall, and by virtue connected directly to the battery negative since it uses the same stud as the engine-block ground.
I could probably get away with not having a ground strap on the firewall, but I do take my audio seriously and figure it might help mitigate some engine noise by connecting directly to the battery as well (probably not). It does look cool though

I will snap some pics, it will make much more sense I'm sure. Regardless of size, that bolt snapped coming out so even if I was replacing it with another grounding strap, I would be in a similar situation.
I was planning on mitigating the slag and any damage from welding by taping up the surrounding areas, and painting a matte black square around the surrounding areas to make it look a little better (and combat corrosion).
Seasoned Member
Joined: Nov 2014
Posts: 360
Likes: 5
Model: Cherokee
Your plan sounds exactly like over engineering. And until you do a little welding around a painted surface, you just can't understand how ugly that intense heat will make your nice paint job look.
But, you seem to have a grand plan when a simple one will do. Good luck!
But, you seem to have a grand plan when a simple one will do. Good luck!

Junior Member
Joined: Nov 2014
Posts: 79
Likes: 0
From: North Georgia
Year: 1988
Model: Comanche
Engine: 4.0L w/Renix
[QUOTE=investinwaffles;3172068]
I used 0/1 gauge wire because I already had it........
What exactly is 0/1 wire?
Do you mean 1/0 AWG? size #1 AWG? or size 0 AWG?
If you mean 1/0, that's a pretty big ground strap.
I used 0/1 gauge wire because I already had it........
What exactly is 0/1 wire?
Do you mean 1/0 AWG? size #1 AWG? or size 0 AWG?
If you mean 1/0, that's a pretty big ground strap.
Seasoned Member
Joined: Jul 2013
Posts: 426
Likes: 10
From: Groveland, CA
Year: 1996 Two Door Wagoneer
Model: Cherokee
Engine: 4.0L
Another thing to note about the original solution of using the wiper motor nut as a grounding point: The wiper motor is secured via rubber bushings and that nut may be a very poor ground path since the load must flow through the wiper motor ground path. Probably another undersized black wire in the harness. Just a thought.
Senior Member
Joined: Sep 2014
Posts: 560
Likes: 18
From: U.P. MI
Year: 1989
Model: Cherokee
Engine: 4.0L
Another thing to note about the original solution of using the wiper motor nut as a grounding point: The wiper motor is secured via rubber bushings and that nut may be a very poor ground path since the load must flow through the wiper motor ground path. Probably another undersized black wire in the harness. Just a thought.