When you click on links to various merchants on this site and make a purchase, this can result in this site earning a commission. Affiliate programs and affiliations include, but are not limited to, the eBay Partner Network.
Stock XJ Cherokee Tech. All XJ Non-modified/stock questions go hereXJ (84-01)
All OEM related XJ specific tech. Examples, no start, general maintenance or anything that's stock.
I know you are on a budget with this project but you might consider replacing the CPS with a new one. When they fail it is a no start situation, or the engine will just quit while you are driving and maybe or maybe not restart. They tend to misbehave with age and as mentioned there is the chance the wiring on the one on the salvage engine has been damaged. They are no fun to change so you want to do it only once and it might be easier before all the assembly is complete and engine completely bolted in.
Aftermarket CPS are hit and miss. The best seems to be the Chrysler part but they are not inexpensive, around $100. They do come with new bolts. When mine died I got one from the Chrysler dealer. Ask how much discount they will give you and you might get one. If you have unique bolts you need and cannot find at a hardware store try a Chrysler dealer. They can get some but again not inexpensive.
The engine does not need to rotated to any particular position when you install the CPS in its location at the near top of the bell housing and close to the firewall. Tip is to put the lower bolt in first, top bolt last. It is easy for the top bolt to fall into the bell housing as you are getting things into place if you try the top bolt first. Bottom bolt first helps get it positioned and if you drop that bolt it should not go into the bell housing.
Like that photo of you with the engine out. Looking forward to updates. Pulling for you that all goes well.
Last edited by third coast; Mar 9, 2019 at 04:39 PM.
I might be easier before all the assembly is complete and engine completely bolted in.
Just be sure the engine and bell housing are bolted up before you install the CPS. There is too little clearance to risk trashing it with the torque plate.
So the new engine is in... But I made some mistakes on the way in like overestimating how far my drive shafts can travel before they come apart. see picture.
Bolting this trans back up is a pain. I've finally gotten it back into position but I don't have the biggest fasteners on the bell housing to hold it in place. Bolting the torque converter is a huge pain as well because the converter is just a little too far back for those little bolts to reach.
I still haven't cranked the engine yet because I can't figure out how to wire the starter correctly. It looks like there are only 2 wires but they are coming directly from the battery terminals. This doesn't seem right.
im also hesitant because it seems like I'm missing a pulley as well. There is waaayyy too much slack on the belt.
also the oil filter seems like it is fused on. I'm going to have to take it off at the block and see if I can get it off another way. I don't even know where most of these vacuum lines go anymore lol. Crushed the life out of the filter trying to get it off. Some cut wires but I figured out what they were for. Do you even lift bro? What is that cut wire for???? These seem like the only connectors that will work on the starter but I don't think they're the right ones Look past the oil filter for the starter wire hook ups My seat belt lifting straps slid a broke this guy. Before I did push ups with the transmission My parking space workshop Trashed motor mount How am I supposed to get this back in now... Smh
* The missing pulley is that for the air conditioning compressor. It goes where the 4 long bolts are sticking up. Someone will know details of the bypass for that.
* For the stuck oil filter try poking a large screw driver all the way through the can. That gives you some leverage.
* I know I have come across a good vacuum tube routing diagram somewhere. There originally was a diagram for the emissions related vacuum hoses/tubes on the firewall by the driver side hood hinge. I can get some photos of how my ’91 is set up if someone doesn’t come up with something first. The vacuum tube in your hand may be the one that goes to the top fitting of the fuel vapor recovery canister located near the firewall passanger side. The tube with 90 degree fitting shown in the photo of the oil filter looks like the one that goes to the heater control valve that the heater hoses connect to near the firewall.
* The missing pulley is that for the air conditioning compressor. It goes where the 4 long bolts are sticking up. Someone will know details of the bypass for that.
* For the stuck oil filter try poking a large screw driver all the way through the can. That gives you some leverage.
* I know I have come across a good vacuum tube routing diagram somewhere. There originally was a diagram for the emissions related vacuum hoses/tubes on the firewall by the driver side hood hinge. I can get some photos of how my �91 is set up if someone doesn�t come up with something first. The vacuum tube in your hand may be the one that goes to the top fitting of the fuel vapor recovery canister located near the firewall passenger side. The tube with 90 degree fitting shown in the photo of the oil filter looks like the one that goes to the heater control valve that the heater hoses connect to near the firewall.
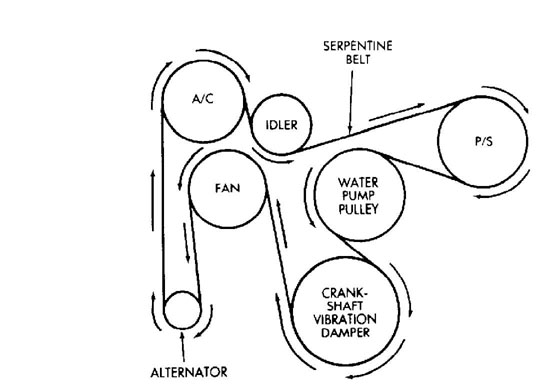
Thanks for the reply. I put the AC back in but i still think I'm missing something. I think I'm missing an idler based on this diagram. I'm not even sure how its mounted lol.
Going to ride my bike to the hardware store to try and find some bolts to hold that transmission together.
* When you get the oil filter off you might cut the can off at the base and see what is on the filter material. If you see metal imbedded in the filter pleats, other than what might be there from cutting the can off, that would not be a good sign for the health of the engine. Oil flows through the filter material from the outside to the center.
* This link on Cherokee Forum has very useful info on sources and methods to search for how to and parts. https://www.cherokeeforum.com/f2/research-249236/
* This link has a ’84 to ’93 service manual that is very helpful. There is also a ’84 to ’96 parts catalog that I have found useful for reference on what parts go where. You might take a break, download the service manual and go through the sections that apply to what you are doing. I found the emissions tube routing and related in section 6. The file is rather large, about 20 megabyte. https://xjjeeps.com/
I think I'm missing an idler based on this diagram. I'm not even sure how its mounted lol.
That belt routing diagram doesn't look right for your configuration. There is an idler pulley next to the air conditioner compressor. The belt runs under it and over to the power steering pump. There is no idler pulley on the PS pump side. This is what mine looks like.
Here is what the belt routing is on my 1991 and it is likely the same on yours. I found another image that shows an idler in place of the AC.
That's how my 95 is routed. I'm pretty sure it's the same across many years.
DrkHrt - you can totally remove the driveshafts until the engine and tranny are in place and put them back on after. As far as the front shaft - I have no idea if it's fixable being separated as it is, but the good news is that you can remove the front shaft and still drive it in 2wd without it being an issue. (On the older XJ's, the same is not true for the inverse - if you don't have a rear shaft, the transfer case will leak ATF around the output shaft.)
I don't have any experience mating an auto tranny to the block, but I did 2 clutches on manual trannys using both a jack mounted transmission jack and a fully dedicated floor jack style transmission jack. I had hoped the fully dedicated style would make mating the tranny to the engine easier --- it did not. It was still way more of a PITA than it sounds on paper.
I think the torque converter should slide forward easily. The smaller solenoid wire to the starter may well be green. (also it should get juice when you turn the key to start). X2 on the screwdriver through the filter. It just may help to slowly pour a pot of boiling water over it first? IDK
I was just going to suggest heating the oil filter first. Or try prying it away from the adapter where the seal is. That’s where it sticks. Then try turning it. Also that first diagram of the belt routing is for 97-01.
Starter related wiring: one large diameter red cable goes directly from the battery to the starter. Another large diameter red wire goes from the battery to the fuse block on the fender.
One large diameter black cable goes from the battery to the engine block ground point below and between spark plugs 5 & 6 at the rear of the engine. In your photo it looks like that wire is attached to the block. Another smaller black wire should go from the battery to the fender near the corner of the battery. A small diameter wire goes from the starter solenoid into the wire harness near the oil filter.
At the driver side rear of the engine there should be a braided ground strap that goes from a head bolt (I believe it is #14) to a stud on the firewall. The ring terminal goes over the head bolt and a nut (I believe a 15mm socket fits it) goes on to secure it. It is important for a properly running engine and other electrical components that all the grounds are in place and making good contact. Lightly clean the mating surfaces with sandpaper or a wire brush. The AutoZone web site repair guide section has a nice collection of electrical schematics. Figure 33 should apply to your 1992 Jeep. https://www.autozone.com/repairinfo/...0c152800a9de9#
Great info there ^^. Also I think there are some number of wires that ground on or near the dipstick mount. These include both computers, the sensors and the injector grounds.
This might help some just look up your year. I have a oem for a 2000 XJ I can send you if needed. I will try and find that link, I know it is in one of my previous posts and you can choose your year.