Jeep Grand Cherokee 1993-1998: 4WD Diagnostic Guide
4WD is an important feature in the Grand Cherokee, but sometimes the 4WD system will fail because of misuse, no use at all, or general wear and tear. Most of these problems are easy to check, but it'll take some time to figure out what's really going wrong.
This article applies to the Jeep Grand Cherokee ZJ (1993-1998).
The 4WD system in the Jeep Grand Cherokee allows you to switch between 2WD, 4WD full-time, 4WD part-time, and 4WD low. 2WD and 4WD are both designed for driving on paved roads, part-time or 4WD high is intended for uneven terrain, and 4WD low is for generating lots of torque.
Now that you know the basics of 4WD, let's look at how to fix it. If you're having problems shifting into 4WD or your shifter just doesn't move at all, it's probably an issue with the linkage and you should check out Step 1 first. If you hear noises while shifting or in 4WD start with Step 2. If you have a display that says "service 4WD drive switch" check out Step 5.
Step 1 – Check the transfer case linkage
Anytime you have trouble shifting in and out of 4WD, it is most commonly caused by a rusty or misaligned linkage. You'll see it under the Jeep on the driver's side. It's a metal rod that connects to the transfer case. If it's never been used, it can build up rust over time, making it difficult to shift in and out of 4WD. Spraying it with penetrating oil and cleaning off the rust should help. However, if the linkage is in bad condition, you should replace it.
If the linkage works but it still won't shift, you can try adjusting the linkage. Underneath the Jeep there is a bracket pivot that moves as the shifter moves. There should be a bolt attached to the bracket. Put the transmission into neutral, and loosen the bolt. Shift the 4WD into 4-Low, and then tighten the bolt.

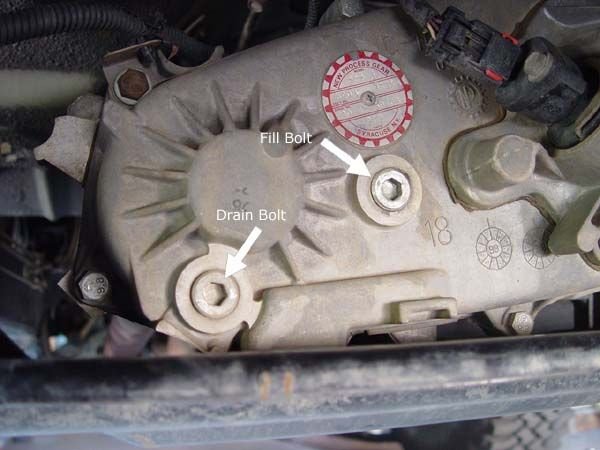
Step 2 – Check the transfer case and change the fluid
Most of the work in your 4WD system happens in the transfer case. It's a box filled with gears, a turning belt, and fluid to keep everything lubricated. If the fluid hasn't been changed, it's possible for the gears to start grinding against each other.
Changing the transfer case fluid isn't much different from changing your transmission fluid. You'll need to run the Jeep for a few minutes to warm up the fluid. If you look at your transfer case, you'll see there are two Hex bolts. The lower bolt is for bleeding out the fluid, while the higher bolt is for inserting the new fluid. Take a pan and crack open that lower bolt to let the old fluid pour out. Check the condition of the fluid. If there's an excessive amount of metal shavings in the fluid, it could mean one of your gears has broken and you'll need a new transfer case. To refill the transfer case, tighten the bottom bolt, loosen the top bolt, and pour in new fluid from the top.
If you're really concerned about the transfer case, you should try opening the transfer case and inspecting the gears before you pour in new fluid. Start by loosening the bolts around the main shaft that sticks out. Slide out the oil pump and viscous coupler, then remove the seven bolts around the case itself. It's not necessary to drop the case from the Jeep if you're being careful. Inspect the gears for any serious cracks or deterioration, and make sure the chain links are all aligned, unbroken, and they aren't sitting slack inside the case.
If you've found nothing wrong, don't put that transfer case back together just yet and continue to Step 3.
Step 3 – Replace the viscous coupler
If you have the 249 or 247 transfer case, then you have a viscous coupler. It's a sealed unit filled with its own special fluid used for generating torque. Many times this component can be the cause of all kinds of noises you hear from the 4WD. Fiddle around with it and see if it sounds like anything is broken. If so, you should replace it.

If this didn't help, try Step 4.
Step 4 – Replace the axle U-joints
When the axle U-joints wear down, they tend to groan and crack whenever you make a sharp turn. Take a look at the U-joints and look for any cracks and abrasions.
To replace, one you'll need to lift the Jeep and set it on jack stands. Remove the wheels, calipers, rotors, and hub assembly. Slide out the axle shaft, and remove the retaining clips on the fours ends of the joint. To separate the U-joint from the axle, you'll need to either lock down the axle shaft on a bench vice and hammer it out or use a hydraulic press to press it out. Use the same method to install a new U-joint, then install the axle shaft back into the Jeep along with the hub assembly, rotors, calipers, and wheels.

Step 5 – Fixing the "service 4WD switch" error
It's not uncommon for this error to show up on the VIC display below your HVAC, and unless you've noticed serious problems with the 4WD, you could probably just ignore it. The 4WD switch is actually a sensor located on top of the transfer case. To replace it, just disconnect the sensor and install a new one. However, if that did not fix the error, then you probably have a faulty VIC display.

Related Discussions
- 4WD Problem '97 Jeep - CherokeeForum.com
- 96 Grand Cherokee 4 Wheel Drive Binding - CherokeeForum.com
- Grinding Noise Only with 4WD On - CherokeeForum.com


