Jeep Cherokee and Jeep Grand Cherokee 1984-2004: How to Reset ECU
Your Cherokee is a lot of things, but it isn't very smart—at least as far as knowing when you've installed a new part or accessory. To help your Jeep better recognize the added component, you must reset its Electronic Control Unit (ECU), which is pretty much your Jeep's "brain."
This article applies to the Jeep Cherokee and Jeep Grand Cherokee (1984-2004).
The Electronic Control Unit (ECU) stores in its memory the information specific to your Jeep, and even your driving habits. To prevent memory loss, so to speak, several capacitors power the ECU even when your vehicle is turned off; interfere with this power source and you essentially wipe your Jeep's memory, as well as restore this ECU to its factory settings. Resetting the ECU is a very easy project that anyone, no matter his or her DIY experience, can do. You don't need parts, you don't need to buy anything, and you can do it in no time flat. Once you've reset your ECU, it starts re-learning your vehicle and driving habits immediately.

Materials Needed
- Ratchet and socket set
- Owner's manual (optional)
Step 1 – Prepare to reset the ECU
- Let the vehicle sit for at least an hour before resetting your ECU. You don't want to accidentally burn yourself from a hot engine.
- Insert your key into the ignition, but do not turn the key to the "ON" position.
- Open the hood and lock it in place with the hood prop.
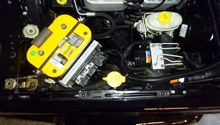
- Locate the battery. You can find it to the left of the engine, toward the front of the engine bay.

Step 2 – Disconnect the battery
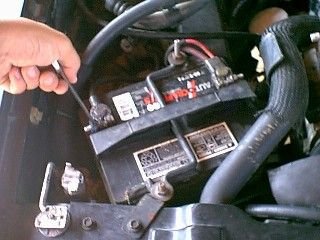
- Remove the positive (red) battery cable from the positive battery terminal. The cable is usually identified as having a plus sign (+), while the negative battery cable is usually identified as having a minus sign (-).
- If you cannot tell which cable is positive and which cable is negative, look in your owner's manual before starting.

Step 3 – Ground positive cable to the negative cable
- Connect the positive battery cable (the cable you removed in Step 2) to the negative cable, which should still be connected to the battery.
- Leave the cables connected for at least 30 seconds. This will release any electric charge that has built up in the capacitors.
Step 4 – Reconnect the battery
- Remove the positive battery cable from the negative battery cable.
- Reconnect the positive cable to the battery.
- After reconnecting the positive cable to the battery, close the hood.
Step 5 – Turn the headlights on and then off
- Put your key in the ignition and turn it to the "ON" position. Do not start the engine.
- Turn on the headlights, and leave them on for 10 to 20 seconds.
- Then turn off the headlights.

Step 6 – Turn key to the "OFF" position
- Turn your key to the "OFF" position. You have successfully reset your ECU and restored it to its factory settings.
- Over the next 50 or so times you turn on your car or drive, your ECU will re-learn your engine and driving habits.
Note
You would follow these same steps to reset your ECU after every new part you install.
Featured Video: How to Troubleshoot a Bad ECU/ECM
Related Discussion
- Jeep ECU Reset Procedure - CherokeeForum.com