
TOTM unibody reinforcing

CF Veteran


Joined: Apr 2009
Posts: 18,786
Likes: 14
From: CT.
Year: 88
Model: Comanche (MJ)
Engine: 4.0 HO
Thread Starter
CF Veteran
Joined: May 2009
Posts: 6,328
Likes: 1
From: SLC, UT
Year: 1989 2 door
Model: Cherokee
Engine: 4.0
ya lets see them? don't make me go pull pics from the multiple builds that i know of that have stiffened their unibody up one way or another!!!
help make our totms a valuable resource for the next guy!
Thanks
help make our totms a valuable resource for the next guy!
Thanks
CF Veteran
Joined: Sep 2010
Posts: 4,968
Likes: 0
From: Salt Lake City, UT
Year: 2000
Model: Cherokee
Engine: 4.0L
ok, here is mine... (just noticed the TOTM at the top, doesnt really stick out)
T&T rails, found localy new for 80$. going to buy the T&T front plate. then make my own up to the bumper plates and back to the shackle relatcation boxes. For removing the paint/undercoating I got some air craft stripper from home-depot. 5$? sprayed them, wiped off. then sprayed again. it all just wiped off again. thick spots took a little puddy knife but scrapped off with no problems. no need to buff/grind it off. took 20-25 mins to clean the rails.
the T&T kit was nice. I needed to drill holes for my long arm kit which wasn't hard. and the slots for the factory bolts where dead on.


painted them, you can see i added plug welds to the sides and bottom of the rails, as i didn't want to just stitch weld them on. I felt the plugs where added strength. but not in the instructions of the t&t kit


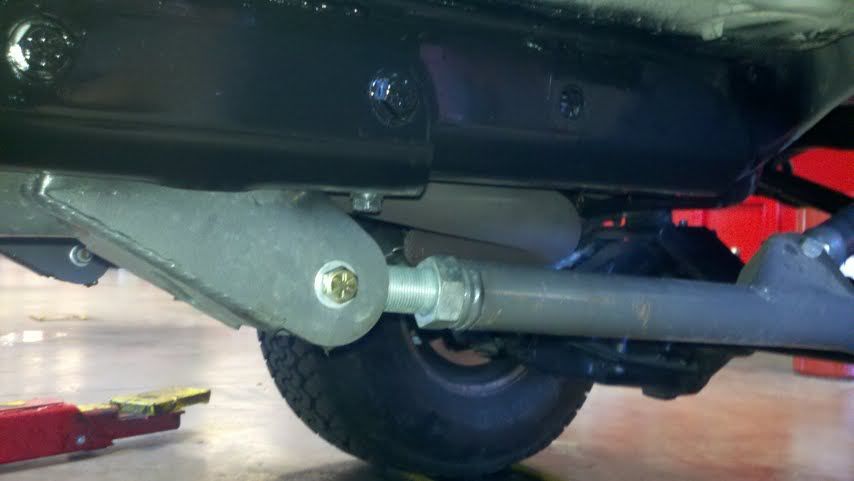
then i used them as the ancor point for my sliders. welded them to the stiffeners and bolted them to the pinch, conecting the two and making it pretty solid to the body/rails...

I plug welded the bolt holes shut, and stitched both sides of the brackets. they have held up great. the body no longer creaks when going threw gutters/dips. not a single creak offroad. feels solid now. would recomend any of the stiffeners to anyone. the pre molded kit was great. I am sure any of them would work well.
T&T rails, found localy new for 80$. going to buy the T&T front plate. then make my own up to the bumper plates and back to the shackle relatcation boxes. For removing the paint/undercoating I got some air craft stripper from home-depot. 5$? sprayed them, wiped off. then sprayed again. it all just wiped off again. thick spots took a little puddy knife but scrapped off with no problems. no need to buff/grind it off. took 20-25 mins to clean the rails.
the T&T kit was nice. I needed to drill holes for my long arm kit which wasn't hard. and the slots for the factory bolts where dead on.
painted them, you can see i added plug welds to the sides and bottom of the rails, as i didn't want to just stitch weld them on. I felt the plugs where added strength. but not in the instructions of the t&t kit
then i used them as the ancor point for my sliders. welded them to the stiffeners and bolted them to the pinch, conecting the two and making it pretty solid to the body/rails...
I plug welded the bolt holes shut, and stitched both sides of the brackets. they have held up great. the body no longer creaks when going threw gutters/dips. not a single creak offroad. feels solid now. would recomend any of the stiffeners to anyone. the pre molded kit was great. I am sure any of them would work well.
Last edited by Gorillaxj; Sep 20, 2011 at 11:35 PM.

Member
Joined: Oct 2010
Posts: 144
Likes: 0
From: Lookout Valley
Year: 1996
Model: Cherokee
Engine: 4.0
I was just about to make a post about the T&T frame stiffeners, just happend to notice this TOTM haha... Gorrilaxj, yours look great, how was the install as far as difficulty?...i know you have to weld, but is there and drilling through the frame or ??
CF Veteran
Joined: Sep 2010
Posts: 4,968
Likes: 0
From: Salt Lake City, UT
Year: 2000
Model: Cherokee
Engine: 4.0L
I just dropped one side of the cross member at a time, slide thee sliders on. used C-clamps to suck it close to the rails. bolted up the cross member, then welded around the front section. used a floor jack and a block of wood to push the stiffeners tight to the rails. moved the C-clamps back as I welded them on. just keep them as tight as possible. then dropped the crossmember out and painted, the reinstalled. pretty easy. welding and paint time took about 2 hours with time for food  pretty easy, the welding is the hardest part IMO.
As far as drilling, no. on the T&T you only have to drill for things you have added like I did for my long arms, or slider bolts ect... but the factory holes are already there. I am sure most if not all are this way, but I've only put these on.
Great stiffeners I was looking into (didn't see any links in the thread yet)
HD engineering (makes front, mid, rear)
http://www.hdoffroadengineering.com
T&T Customs (also make plates to cover factory lower control arm brackets when removed for LA)
http://www.tntcustoms.com/uni-bodystiffeners.aspx
Ruff stuff
http://www.ruffstuffspecialties.com/catalog/XJRAIL.html
Roc Dog fab (small plates go full legnth)
http://rocdogfab.com/index.php?option=com_content&view=article&id=53:xj-unibody-stiffeners&catid=1:latest-news
I am sure I am missing some...
most of these places also have promo codes that can save shipping or 5-10% off. google will give the newest codes for most of these.
pretty easy, the welding is the hardest part IMO.As far as drilling, no. on the T&T you only have to drill for things you have added like I did for my long arms, or slider bolts ect... but the factory holes are already there. I am sure most if not all are this way, but I've only put these on.
Great stiffeners I was looking into (didn't see any links in the thread yet)
HD engineering (makes front, mid, rear)
http://www.hdoffroadengineering.com
T&T Customs (also make plates to cover factory lower control arm brackets when removed for LA)
http://www.tntcustoms.com/uni-bodystiffeners.aspx
Ruff stuff
http://www.ruffstuffspecialties.com/catalog/XJRAIL.html
Roc Dog fab (small plates go full legnth)
http://rocdogfab.com/index.php?option=com_content&view=article&id=53:xj-unibody-stiffeners&catid=1:latest-news
I am sure I am missing some...
most of these places also have promo codes that can save shipping or 5-10% off. google will give the newest codes for most of these.
Last edited by Gorillaxj; Sep 21, 2011 at 12:15 AM.
Member
Joined: Oct 2010
Posts: 144
Likes: 0
From: Lookout Valley
Year: 1996
Model: Cherokee
Engine: 4.0
I just dropped one side of the cross member at a time, slide thee sliders on. used C-clamps to suck it close to the rails. bolted up the cross member, then welded around the front section. used a floor jack and a block of wood to push the stiffeners tight to the rails. moved the C-clamps back as I welded them on. just keep them as tight as possible. then dropped the crossmember out and painted, the reinstalled. pretty easy. welding and paint time took about 2 hours with time for food pretty easy, the welding is the hardest part IMO.
As far as drilling, no. on the T&T you only have to drill for things you have added like I did for my long arms, or slider bolts ect... but the factory holes are already there. I am sure most if not all are this way, but I've only put these on.
Great stiffeners I was looking into (didn't see any links in the thread yet)
HD engineering (makes front, mid, rear)
http://www.hdoffroadengineering.com
T&T Customs (also make plates to cover factory lower control arm brackets when removed for LA)
http://www.tntcustoms.com/uni-bodystiffeners.aspx
Ruff stuff
http://www.ruffstuffspecialties.com/catalog/XJRAIL.html
Roc Dog fab (small plates go full legnth)
http://rocdogfab.com/index.php?option=com_content&view=article&id=53:xj-unibody-stiffeners&catid=1:latest-news
I am sure I am missing some...
most of these places also have promo codes that can save shipping or 5-10% off. google will give the newest codes for most of these.
pretty easy, the welding is the hardest part IMO.As far as drilling, no. on the T&T you only have to drill for things you have added like I did for my long arms, or slider bolts ect... but the factory holes are already there. I am sure most if not all are this way, but I've only put these on.
Great stiffeners I was looking into (didn't see any links in the thread yet)
HD engineering (makes front, mid, rear)
http://www.hdoffroadengineering.com
T&T Customs (also make plates to cover factory lower control arm brackets when removed for LA)
http://www.tntcustoms.com/uni-bodystiffeners.aspx
Ruff stuff
http://www.ruffstuffspecialties.com/catalog/XJRAIL.html
Roc Dog fab (small plates go full legnth)
http://rocdogfab.com/index.php?option=com_content&view=article&id=53:xj-unibody-stiffeners&catid=1:latest-news
I am sure I am missing some...
most of these places also have promo codes that can save shipping or 5-10% off. google will give the newest codes for most of these.
Thanks man, i really appreciate the help haha
 ...i'll have to come back after work and read into those sites...i probably won't be buying frame stiffeners until i get my 6.5" LA, because i'm not planning on keeping this 4.5/mid-arm with 35"s for long haha

Member
Joined: Dec 2010
Posts: 243
Likes: 0
From: Central Indiana
Year: 1987,1990,1992
Model: Cherokee
Engine: 4.0
I had to replace most of the floor in my 87 so since most of the inner frame was visible anyway I cut the rest out then stuck 3" channel inside it and welded it. Now to finish the floor and the front rear spring bolts. Gotta get them out and replace those. One is bent and the other just turns. So if there is anyone in Central Indiana who wants to get them out and has a mig welder I could use help on that project! I have wire, and I'll pay for the gas....food too
CF Veteran
Joined: Sep 2010
Posts: 1,649
Likes: 1
From: Springville, UT
Year: 1993
Model: Grand Cherokee
Engine: 5.2 V8, Dual cold air, dual batts, E-fan, Sanden OBA
Well i got mine started, im startin with the rear since i will be swapping in that axle first. These will go from rear crossmember to front, i figure the hardest part is done now.
Anyways....
before


Used 4"x 3"x.25" angle

Made templates from cardboard then cut out the pieces, used inside diameter of a roll of electrical tape to mark for holes. Holes are for more weld area.


Both sides cutout

They will all be welded together of course.
Used 4" channel iron for my rear crossmember


Well i hope this helps somebody brainstorm....
It is all tacked together for now, i will fully weld it all and put 1/4" plate in all the gaps. It will also be tied into my rock sliders and cage when i make one. Its beef now, never realized how weak the unibody actually was until i started tearing into it. GOOD LUCK EVERYONE
Anyways....
before
Used 4"x 3"x.25" angle
Made templates from cardboard then cut out the pieces, used inside diameter of a roll of electrical tape to mark for holes. Holes are for more weld area.
Both sides cutout
They will all be welded together of course.
Used 4" channel iron for my rear crossmember
Well i hope this helps somebody brainstorm....
It is all tacked together for now, i will fully weld it all and put 1/4" plate in all the gaps. It will also be tied into my rock sliders and cage when i make one. Its beef now, never realized how weak the unibody actually was until i started tearing into it. GOOD LUCK EVERYONE