
Draft: JK (Wrangler) bumper mod for XJ. How-to

Thread Starter
Senior Member
Joined: Nov 2011
Posts: 758
Likes: 1
From: Tampa, FL & DC/MD infrequently
Year: 2000
Model: Cherokee
Engine: 4.0L I6
This is a draft/work in progress and conversation version to the final JK bumper how-to mod I'll place in the Tech section (which doesn't allow questions, as they are locked threads).
The JK bumper mod came to me really as an accident. I bought the XJ with a slight dent in the front bumper and had removed the bumper to dry and remove the dent. Not as easy as I thought (the sheet metal is fairly thick). On a local Jeep group (Element Off-Road) a FB post went out for a free JK bumper. I grabbed it right away. Never really knew if it would fit or not, but if it didn't, only loss was a little gas money to go pick it up.
Like most people, I originally thought the JK plastic bumpers were just for show, not much meat to them. Almost any JK that was modded had an aftermarket bumper. However, once I picked it up, and got it home, I noticed first that it was rather heavy (for an OEM bumper) and it did have a steel core piece inside. In the end, I believe the JK bumper is just as robust in terms of structural rigidity as the OEM XJ bumper, but there are pluses and minus for swapping one onto a JK.
For me, the JK bumper works great. It gives the XJ a tiny bit of extra length at the front. Should I hit something (deer, car/truck/bus, zombie) I hope to save the grill and fiberglass surround by just a little bit more chances. Also, the extra length and width allows me to have a step. I often climb onto the roof of my Jeep to film landscapes, storms, etc. The existing OEM bumper didn't allow for me to use it as a step. I do not rock crawl or "wheel" my Jeep hard. The major objective to to get me into areas for my filming that I may not otherwise be able to. That means I see deep snow, hurricane storm surge, hail, debris from severe winds (hurricanes, tornadoes, derecho, etc.). I do also venture off-road, but it is mostly on established trails.
What I wish I could do with the JK bumper! Well, the one thing I thought would be easy is to add a "hidden" winch below/inside the bumper like many JK owners have. I liked that. However, it seems too difficult (for me) to do because it appears the more I research, that one would have to but the unibody framing at the front to fit it all in. One may look at further pushing the JK bumper forward with a wider mount (greater than the 5x5 I used). I also wanted to eventually put on JK fender flares to match. However, that too, at least at the moment, looks to involved for me to do. I want WIDE flares. Again, since I don't wheel much, not concerned about the impact, but I am concerned about wheel splash during my long drives in the rain, snow, etc. I also film from inside the Jeep (dash cams, etc.) and the least amount of splash the better.
The mod is fairly simple, but does require some welding (light). It also does require some serious metal drilling (if you use my recommended 5x5 steel). In fact, I went through four drill bits and a couple of steeped drill bits to get the holes drilled in the steel. There is also small amounts of cutting. A good 4.5 or great grinder with a few cutting wheels should do.

The next two posts will be the write up drafts and other information.
The JK bumper mod came to me really as an accident. I bought the XJ with a slight dent in the front bumper and had removed the bumper to dry and remove the dent. Not as easy as I thought (the sheet metal is fairly thick). On a local Jeep group (Element Off-Road) a FB post went out for a free JK bumper. I grabbed it right away. Never really knew if it would fit or not, but if it didn't, only loss was a little gas money to go pick it up.
Like most people, I originally thought the JK plastic bumpers were just for show, not much meat to them. Almost any JK that was modded had an aftermarket bumper. However, once I picked it up, and got it home, I noticed first that it was rather heavy (for an OEM bumper) and it did have a steel core piece inside. In the end, I believe the JK bumper is just as robust in terms of structural rigidity as the OEM XJ bumper, but there are pluses and minus for swapping one onto a JK.
For me, the JK bumper works great. It gives the XJ a tiny bit of extra length at the front. Should I hit something (deer, car/truck/bus, zombie) I hope to save the grill and fiberglass surround by just a little bit more chances. Also, the extra length and width allows me to have a step. I often climb onto the roof of my Jeep to film landscapes, storms, etc. The existing OEM bumper didn't allow for me to use it as a step. I do not rock crawl or "wheel" my Jeep hard. The major objective to to get me into areas for my filming that I may not otherwise be able to. That means I see deep snow, hurricane storm surge, hail, debris from severe winds (hurricanes, tornadoes, derecho, etc.). I do also venture off-road, but it is mostly on established trails.
What I wish I could do with the JK bumper! Well, the one thing I thought would be easy is to add a "hidden" winch below/inside the bumper like many JK owners have. I liked that. However, it seems too difficult (for me) to do because it appears the more I research, that one would have to but the unibody framing at the front to fit it all in. One may look at further pushing the JK bumper forward with a wider mount (greater than the 5x5 I used). I also wanted to eventually put on JK fender flares to match. However, that too, at least at the moment, looks to involved for me to do. I want WIDE flares. Again, since I don't wheel much, not concerned about the impact, but I am concerned about wheel splash during my long drives in the rain, snow, etc. I also film from inside the Jeep (dash cams, etc.) and the least amount of splash the better.
The mod is fairly simple, but does require some welding (light). It also does require some serious metal drilling (if you use my recommended 5x5 steel). In fact, I went through four drill bits and a couple of steeped drill bits to get the holes drilled in the steel. There is also small amounts of cutting. A good 4.5 or great grinder with a few cutting wheels should do.
The next two posts will be the write up drafts and other information.
Last edited by stormitecture; Jan 10, 2013 at 04:40 PM.
Thread Starter
Senior Member
Joined: Nov 2011
Posts: 758
Likes: 1
From: Tampa, FL & DC/MD infrequently
Year: 2000
Model: Cherokee
Engine: 4.0L I6
****DRAFT*****
Jeep Parts:
--JK bumper
--
Additional components:
-- 8" long 5" sq. steel tube.
-- 16ga. 12"x18" Steel sheet
-- 1/2"dia. 1.5"L bolts, washers & nuts
-- XXmm nuts (if OEM bolts don't work)
Tool:
-- metal cutting tool (grinder or plasma cutter)
-- heavy duty metal drill
-- xx" drill bit
-- round metal file
-- welder (small on is fine...mine is a 90amp from Harbor Freight)
-- socket set (standard and metric)
-- impact wrench (for removing old bumper)
-- sand paper
-- rust preventative black paint
Last edited by stormitecture; Jan 10, 2013 at 04:03 AM.
Thread Starter
Senior Member
Joined: Nov 2011
Posts: 758
Likes: 1
From: Tampa, FL & DC/MD infrequently
Year: 2000
Model: Cherokee
Engine: 4.0L I6
****DRAFT****
Step One:
REMOVE EXISTING FRONT BUMPER
1. Remove the bumper caps at each end of the bumper (plastic parts). Save the bumper ends.
2. Detach any emissions and accessories (fog lights).
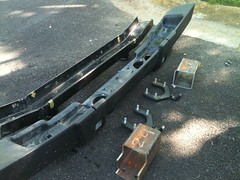
3. Now remove the main steel bumper. It is fairly easy to remove. Don't bother with the bolts on the bumper, just use a socket wrench or impact wrench and remove the mounts that attach at the unibody's attached frame rails.
4. Clean the area. Use the chance to get all dirt, grim, etc. cleaned off.
IMG_2035 by WeatherWarrior.Net, on Flickr
MOCK UP/ALIGNMENT
1. Get a couple of Jack Stands out (or other item that can support the bumper) and start placing it up against the front of the Jeep.
What you are going for here is where you need to do two small slits to accommodate the metal flanges that stick out from the front of the XJ.
IMG_2030 by WeatherWarrior.Net, on Flickr
2. Using a piece of blue tape (or sim.) place a piece toward the center of the grill at the bottom edge. Then place a piece at the center of the JK bumper. Measure and mark the EXACT center of each with a sharpy.
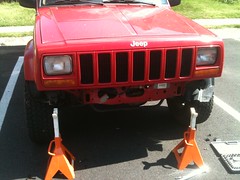
3. Place the JK bumper on the stands/blocking and shim so that the top of the bumper is flush or nearly flush with the bottom of the grill area.
IMG_2038 by WeatherWarrior.Net, on Flickr
4. Check all clearances, fitments, etc. and verify it is centered.
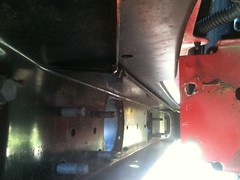
5. Mark the bumper (tape and sharpie) where the taps stick out. This is where you'll trim about 1 to 1.5 inches.
IMG_2041 by WeatherWarrior.Net, on Flickr
(note: the blue tape is a recommendation I did not use. I actually just marked directly on the Jeep and bumper).
TRIM BUMPER
1. On a work bench or other flat area, place the bumper such that you can see the two marks for trimming. Using a grinder or other cutting tool, trim away the rear lip of the JK bumper SLOWLY. About 1/4" thick spacing is all that is needed, but you want to "measure twice, cut once". Don't be afraid to cut away a little bit and keep test fitting to the front of the Jeep until you have it right.
BUILDING THE BRACKETS
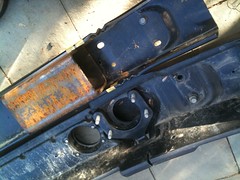
1. Disassemble the JK bumper components. BE CAREFULLY pulling the inner metal portion out. Be sure to unbolt as much of the bolts as you can. However, if like me, you may find that they keep spinning, and spinning, just carefully pull the metal portion off the plastic portion. You will see there are metal inserts which are threaded to keep them in place. As long as you don't detach and reattach the bumper portions a lot...you won't have to worry about messing them up.
IMG_2235 by WeatherWarrior.Net, on Flickr
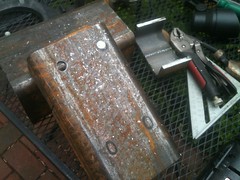
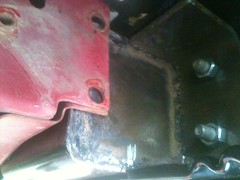
2.Now, take the steel 5x5x9 square tubing and and place them
IMG_2195 by WeatherWarrior.Net, on Flickr
IMG_2198 by WeatherWarrior.Net, on Flickr

IMG_2246 by WeatherWarrior.Net, on Flickr
IMG_2255 by WeatherWarrior.Net, on Flickr
IMG_2293 by WeatherWarrior.Net, on Flickr
IMG_2294 by WeatherWarrior.Net, on Flickr
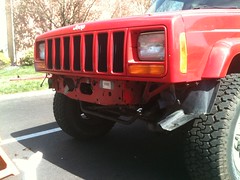
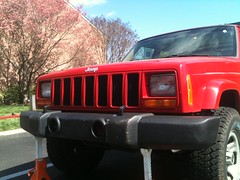
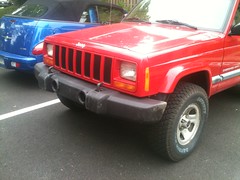
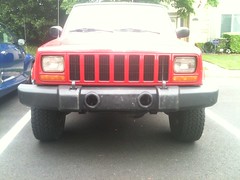
The completed bumper here is shown. The head on picture is showing a little over emphasis on the sillyness, thanks to the wide angle perspective of the lens. It isn't great either...without extend flares or doing the "stubby bumper" mod., but it will a lot less offending in person.
The "stubby bumper" mod that many JK owners do to reduce with the overall width can be found here:
http://www.jkfreaks.com/forums/showt...s-and-Bedliner
(xj_maniac_newb provided the link...thanks)
Step One:
REMOVE EXISTING FRONT BUMPER
1. Remove the bumper caps at each end of the bumper (plastic parts). Save the bumper ends.
2. Detach any emissions and accessories (fog lights).
3. Now remove the main steel bumper. It is fairly easy to remove. Don't bother with the bolts on the bumper, just use a socket wrench or impact wrench and remove the mounts that attach at the unibody's attached frame rails.
4. Clean the area. Use the chance to get all dirt, grim, etc. cleaned off.
IMG_2035 by WeatherWarrior.Net, on Flickr
MOCK UP/ALIGNMENT
1. Get a couple of Jack Stands out (or other item that can support the bumper) and start placing it up against the front of the Jeep.
What you are going for here is where you need to do two small slits to accommodate the metal flanges that stick out from the front of the XJ.
IMG_2030 by WeatherWarrior.Net, on Flickr
2. Using a piece of blue tape (or sim.) place a piece toward the center of the grill at the bottom edge. Then place a piece at the center of the JK bumper. Measure and mark the EXACT center of each with a sharpy.
3. Place the JK bumper on the stands/blocking and shim so that the top of the bumper is flush or nearly flush with the bottom of the grill area.
IMG_2038 by WeatherWarrior.Net, on Flickr
4. Check all clearances, fitments, etc. and verify it is centered.
5. Mark the bumper (tape and sharpie) where the taps stick out. This is where you'll trim about 1 to 1.5 inches.
IMG_2041 by WeatherWarrior.Net, on Flickr
(note: the blue tape is a recommendation I did not use. I actually just marked directly on the Jeep and bumper).
TRIM BUMPER
1. On a work bench or other flat area, place the bumper such that you can see the two marks for trimming. Using a grinder or other cutting tool, trim away the rear lip of the JK bumper SLOWLY. About 1/4" thick spacing is all that is needed, but you want to "measure twice, cut once". Don't be afraid to cut away a little bit and keep test fitting to the front of the Jeep until you have it right.
BUILDING THE BRACKETS
1. Disassemble the JK bumper components. BE CAREFULLY pulling the inner metal portion out. Be sure to unbolt as much of the bolts as you can. However, if like me, you may find that they keep spinning, and spinning, just carefully pull the metal portion off the plastic portion. You will see there are metal inserts which are threaded to keep them in place. As long as you don't detach and reattach the bumper portions a lot...you won't have to worry about messing them up.
IMG_2235 by WeatherWarrior.Net, on Flickr
2.Now, take the steel 5x5x9 square tubing and and place them
IMG_2195 by WeatherWarrior.Net, on Flickr
IMG_2198 by WeatherWarrior.Net, on Flickr
IMG_2246 by WeatherWarrior.Net, on Flickr
IMG_2255 by WeatherWarrior.Net, on Flickr
IMG_2293 by WeatherWarrior.Net, on Flickr
IMG_2294 by WeatherWarrior.Net, on Flickr
The completed bumper here is shown. The head on picture is showing a little over emphasis on the sillyness, thanks to the wide angle perspective of the lens. It isn't great either...without extend flares or doing the "stubby bumper" mod., but it will a lot less offending in person.
The "stubby bumper" mod that many JK owners do to reduce with the overall width can be found here:
http://www.jkfreaks.com/forums/showt...s-and-Bedliner
(xj_maniac_newb provided the link...thanks)
Last edited by stormitecture; Jan 12, 2013 at 09:59 PM.
Thread Starter
Senior Member
Joined: Nov 2011
Posts: 758
Likes: 1
From: Tampa, FL & DC/MD infrequently
Year: 2000
Model: Cherokee
Engine: 4.0L I6
Trending Topics
Thread Starter
Senior Member
Joined: Nov 2011
Posts: 758
Likes: 1
From: Tampa, FL & DC/MD infrequently
Year: 2000
Model: Cherokee
Engine: 4.0L I6
I suspect most could easily do the Bushwacker types or even flat fenders and it look decent. I also know that many JK owners "shorten" the bumper. I haven't figured out how they do it.

CF Veteran
Joined: Sep 2009
Posts: 6,322
Likes: 6
From: Summerville, Ga
Year: 1995
Model: Cherokee
Engine: 2.5 4 cyl.
http://www.jkfreaks.com/forums/showt...s-and-Bedliner
Thread Starter
Senior Member
Joined: Nov 2011
Posts: 758
Likes: 1
From: Tampa, FL & DC/MD infrequently
Year: 2000
Model: Cherokee
Engine: 4.0L I6
Here ya go. Theres a few ways they do it, one includes plastic welding
http://www.jkfreaks.com/forums/showt...s-and-Bedliner
http://www.jkfreaks.com/forums/showt...s-and-Bedliner
Last edited by stormitecture; Jan 12, 2013 at 09:25 PM.
CF Veteran
Joined: Mar 2012
Posts: 1,369
Likes: 0
From: Richmond, VA
Model: Cherokee
Didn't say anything about hardcore wheeling. The JK bumper by design is meant to crush to absorb impact so the driver takes less and the vehicle takes more. Even with the little amount of steel behind it you still have far less protection than the stock stamped steel bumper offers in an accident. The box steel behind it isn't going to stop your front end from absorbing the impact in a crash.