
Homemade Roof Rack - Pirate XJ

Thread Starter
Member
Joined: Mar 2011
Posts: 185
Likes: 0
From: Southern Indiana
Year: 1988
Model: Cherokee
Engine: I6 4.0L
Okay here's my roof rack fabrication thread. I've seen ALOT of roof racks so far and I decided that it was my turn to make my own. Like most of us here on CF I wasn't even going to consider paying $500 for an already made rack. Last semester of college I drew up quite a few of different designs and styles for a rack. This was my favorite because it was easy to make, cheap, and practical.
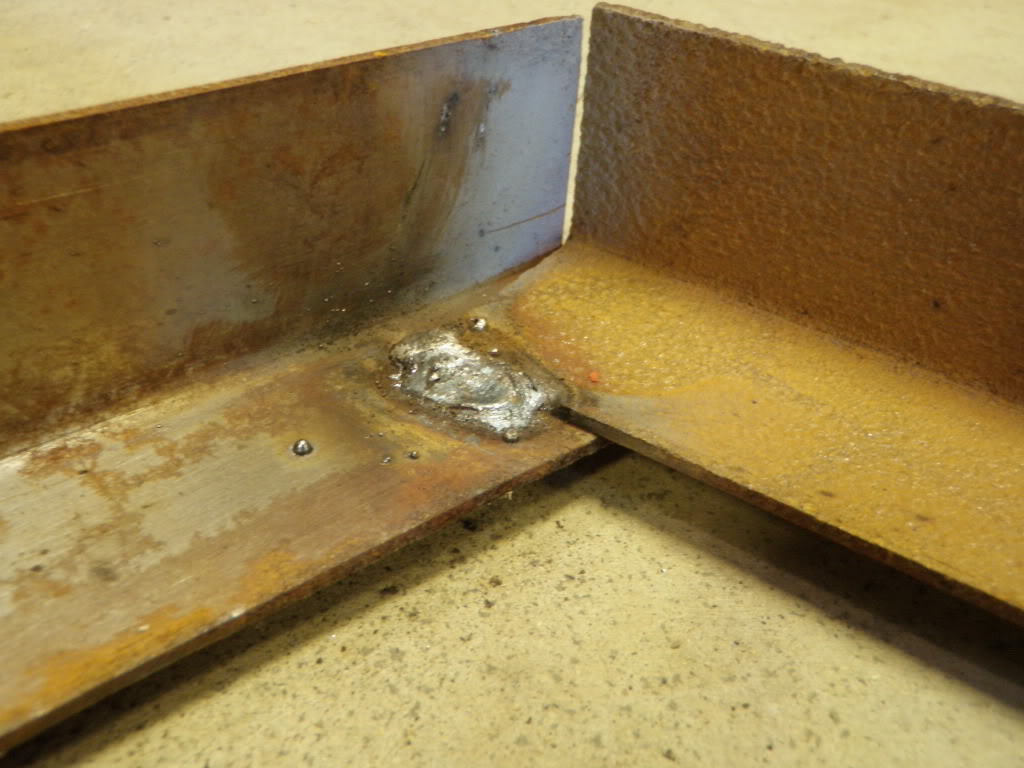
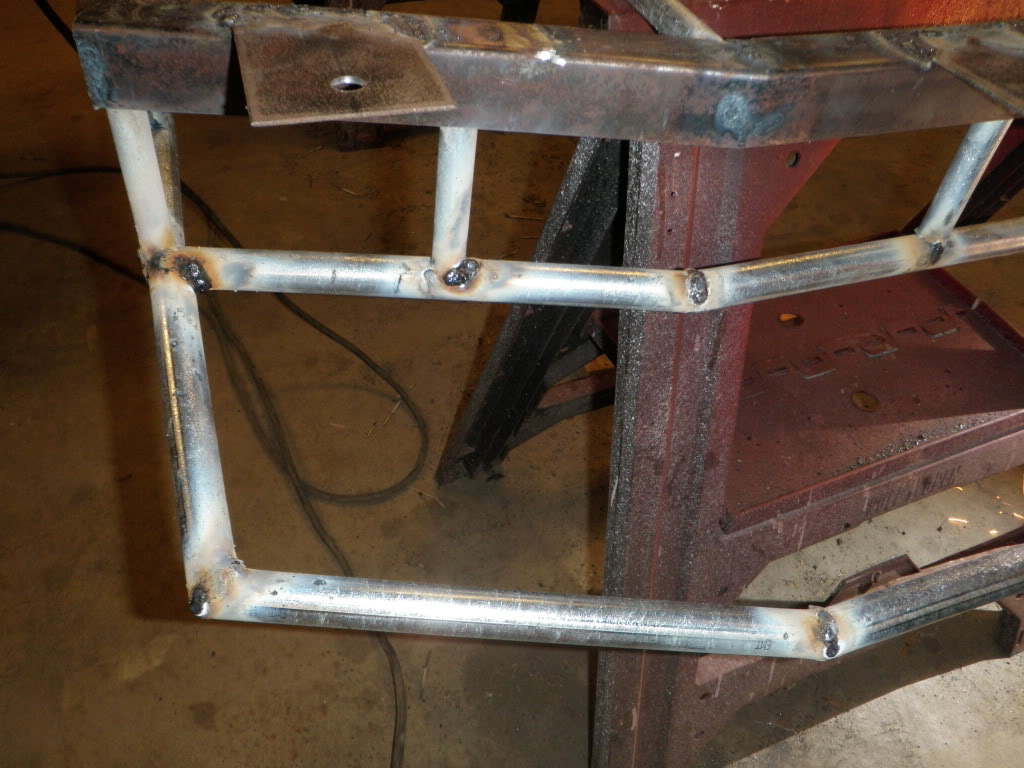
This is where I started. I used some angle for the base. Its the same stuff I used on my subwoofer/cargo workbench. Yes I know the welding sucks. This was really my first experience with stick welding. I got the hang of it down the road but it took a while
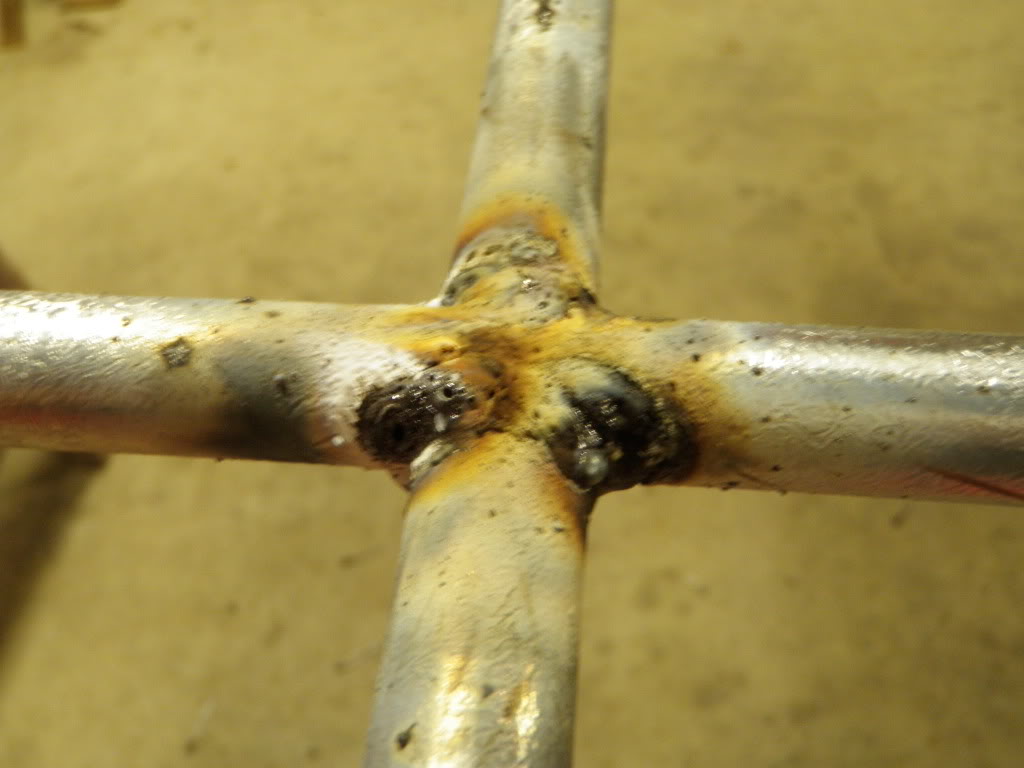
an example of one of my first welds... Its terrible I know
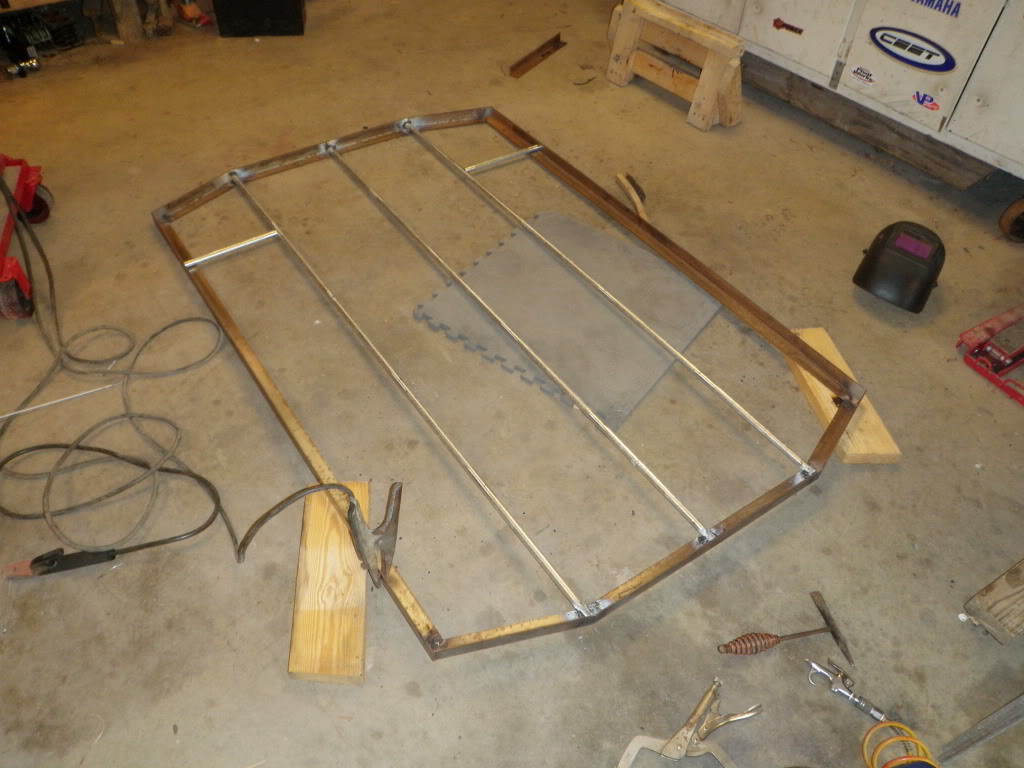
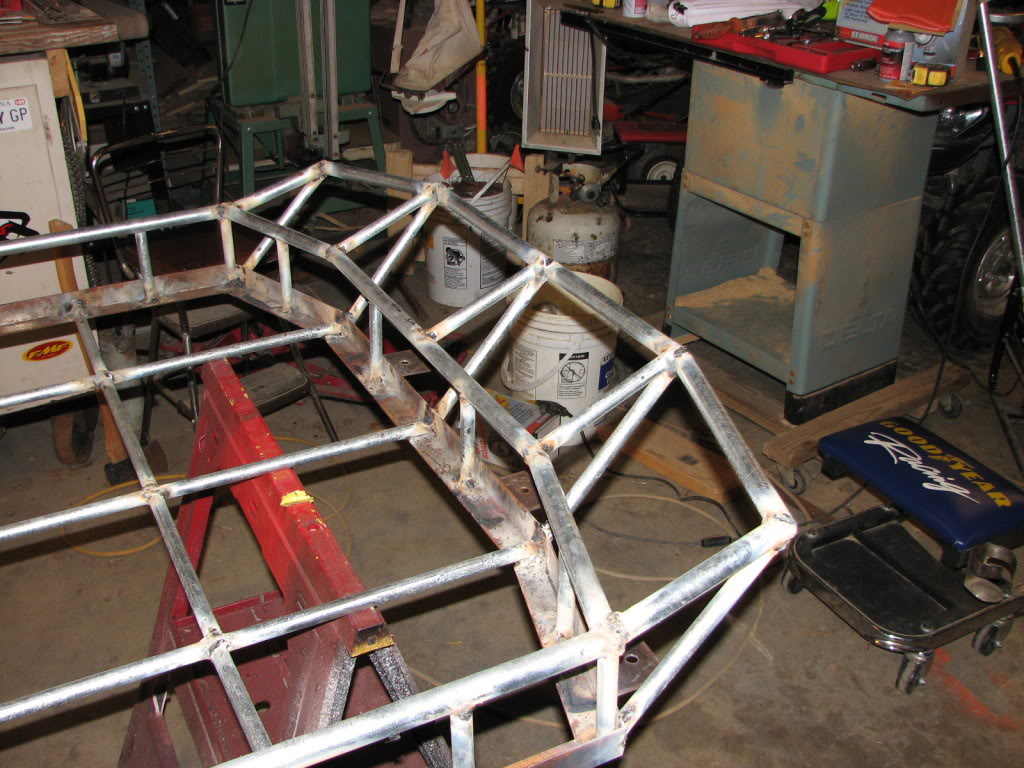
I went to Rural King and bought some cheap 1/2" conduit for $2.50 for a 10 ft span and started cuttin. I fit each piece of conduit as the basket as shown below. I also used a grinder to bevel the sides to fit nicer.
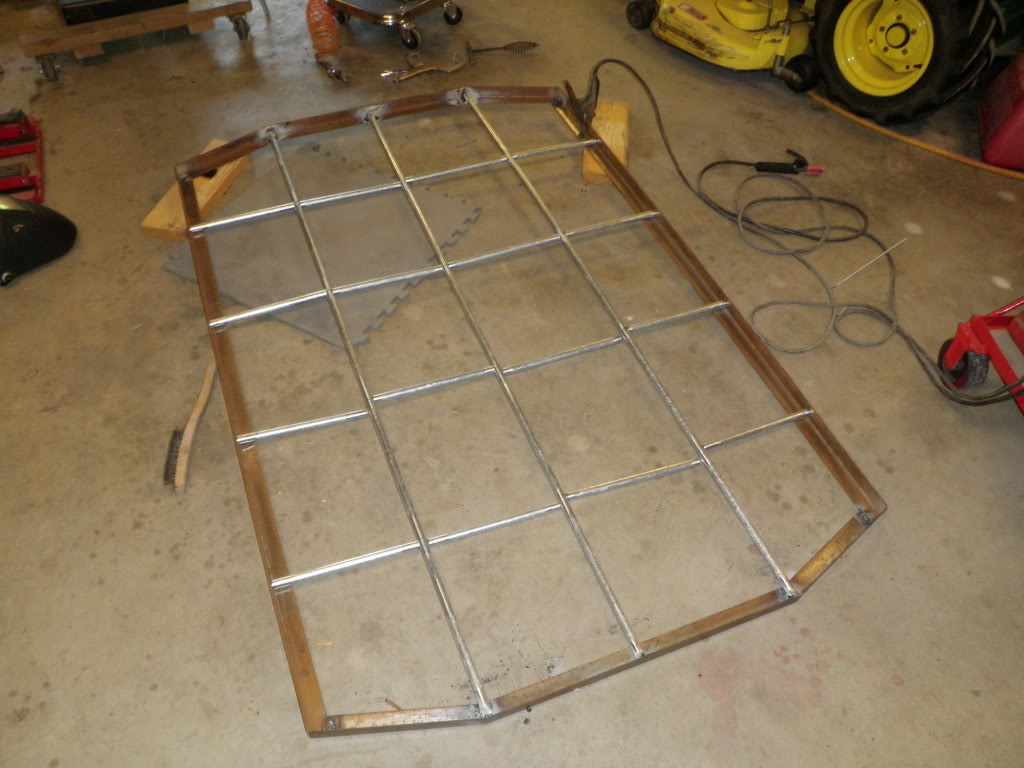
After some welding...
Better example of bad welding, but hey it holds it just aint pretty.
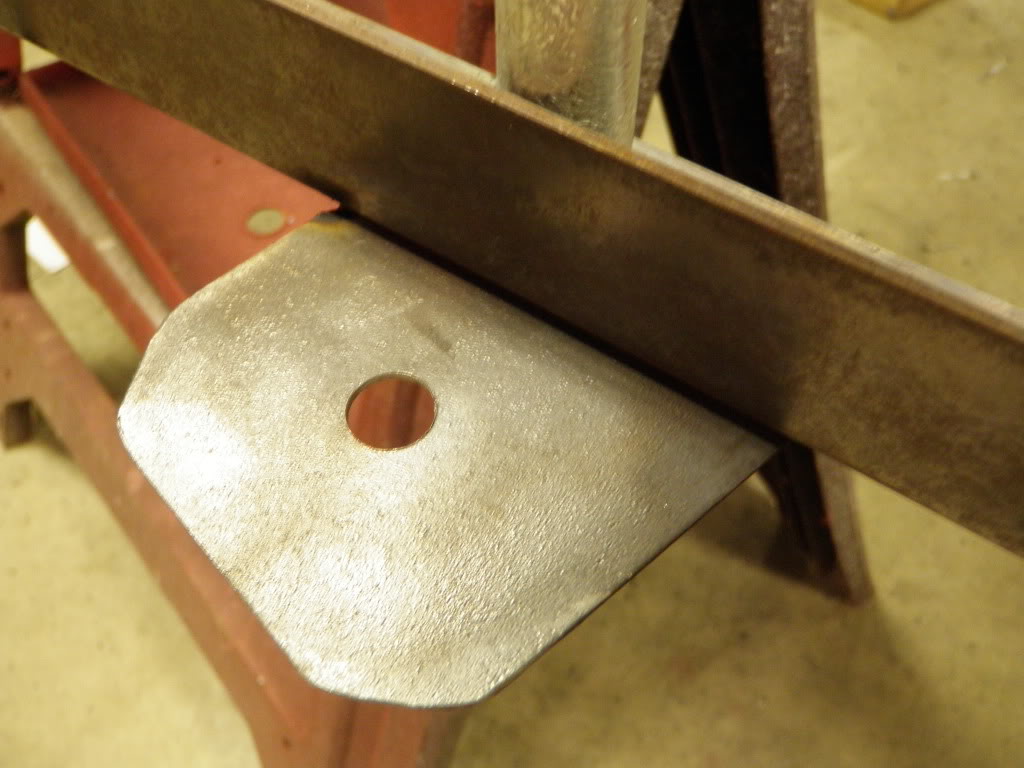
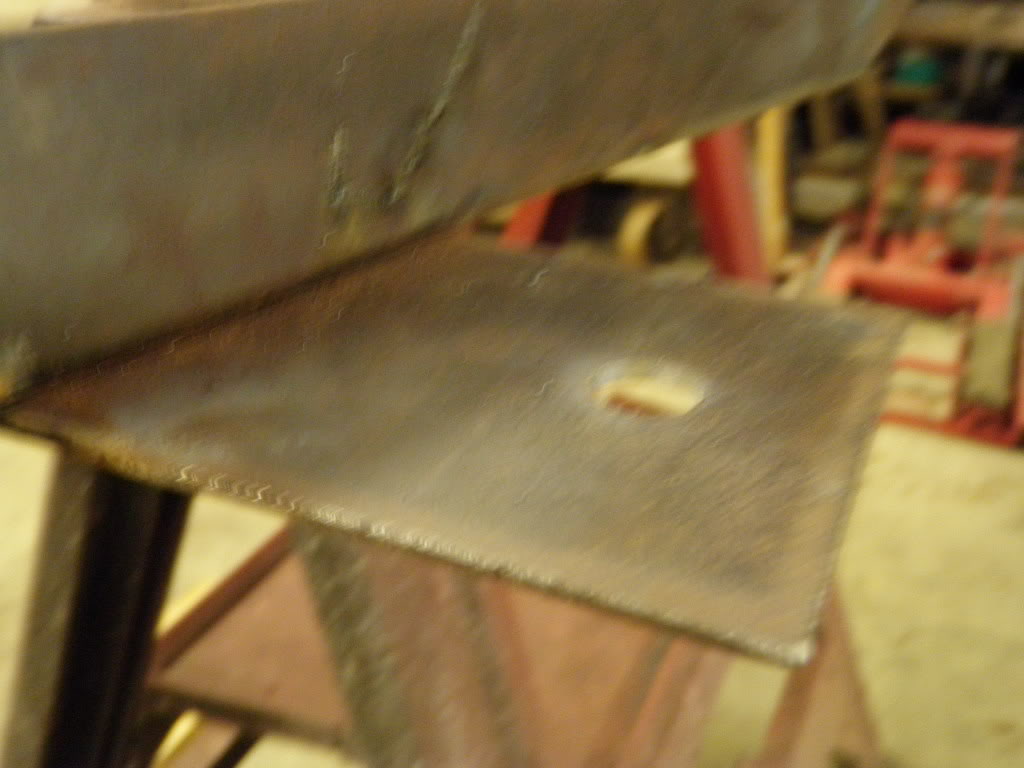
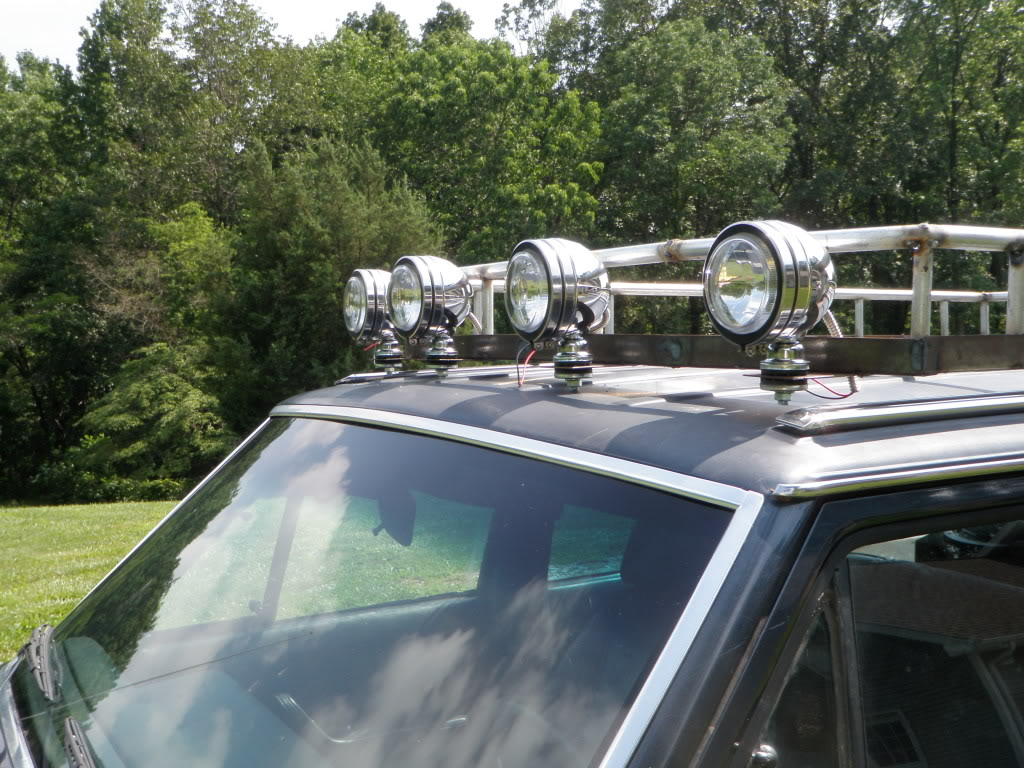
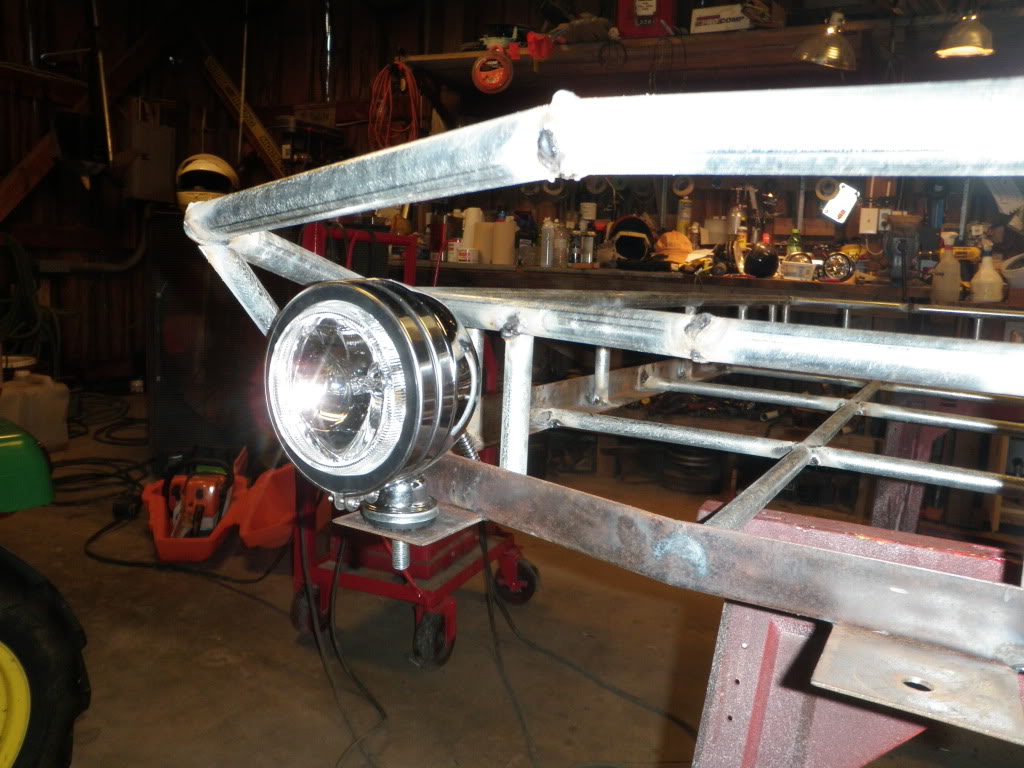
Some spot light mounts. I need to redesign the brackets because they wobble a tad. I'll use thicker metal nxt time.
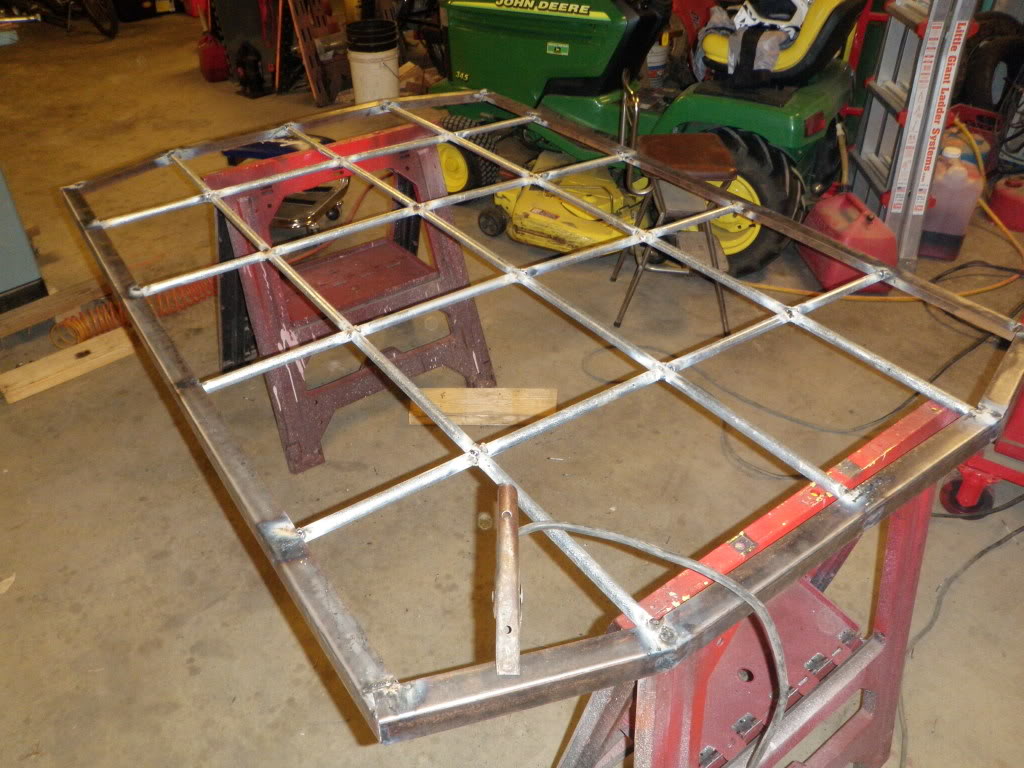
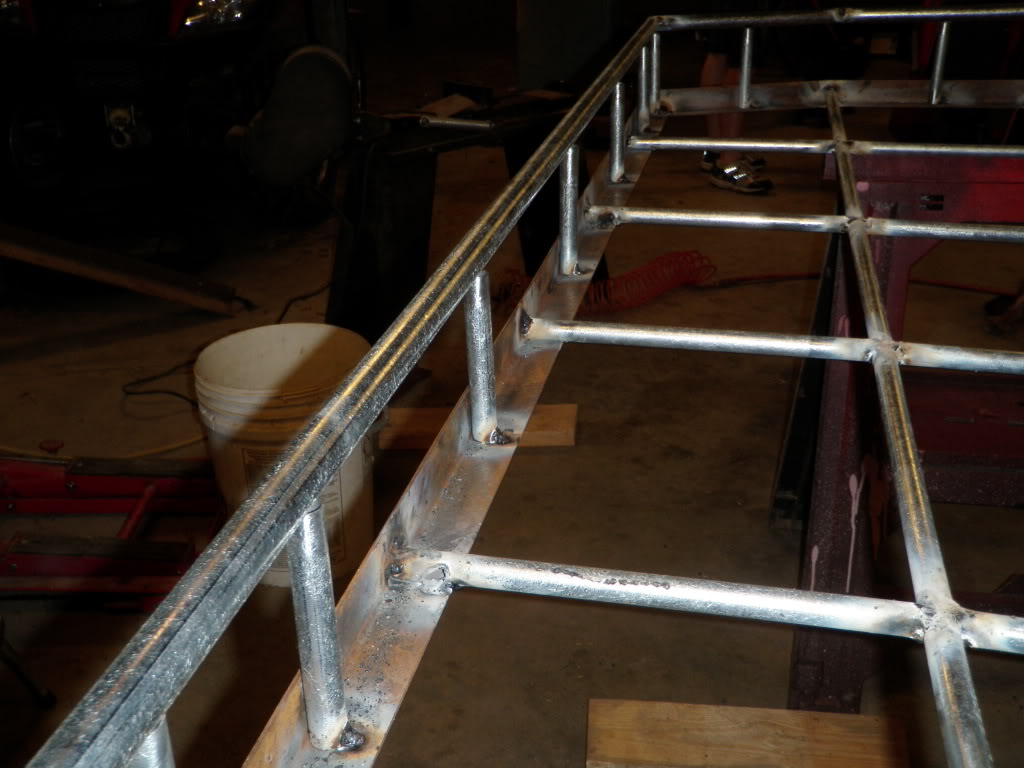
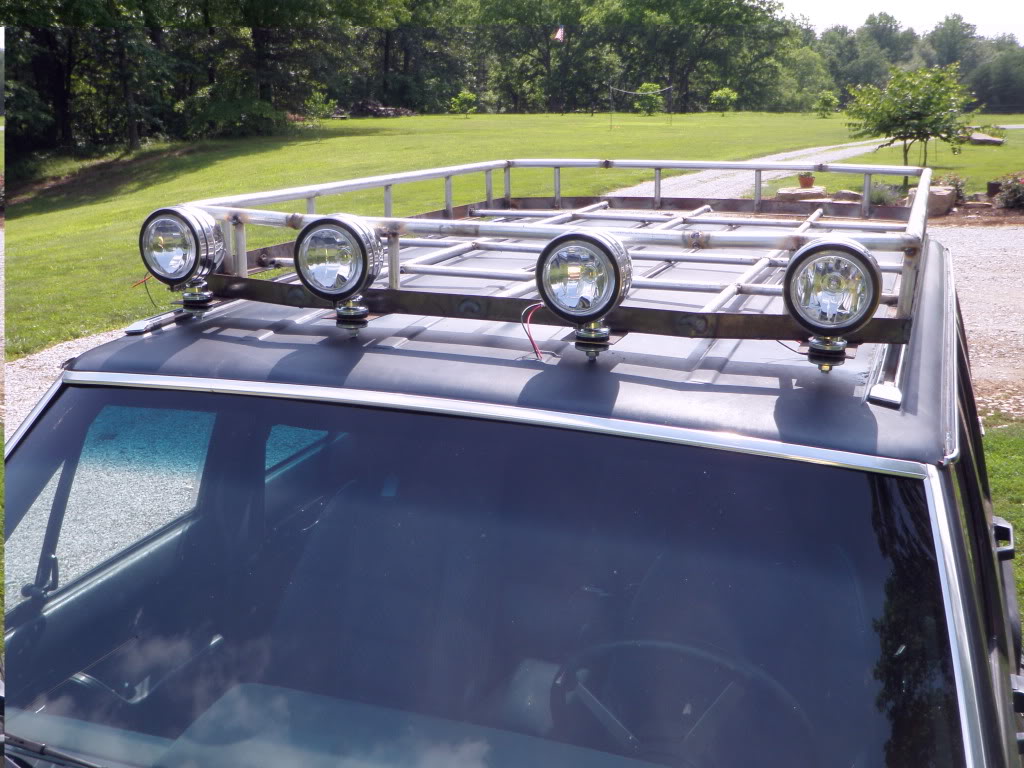
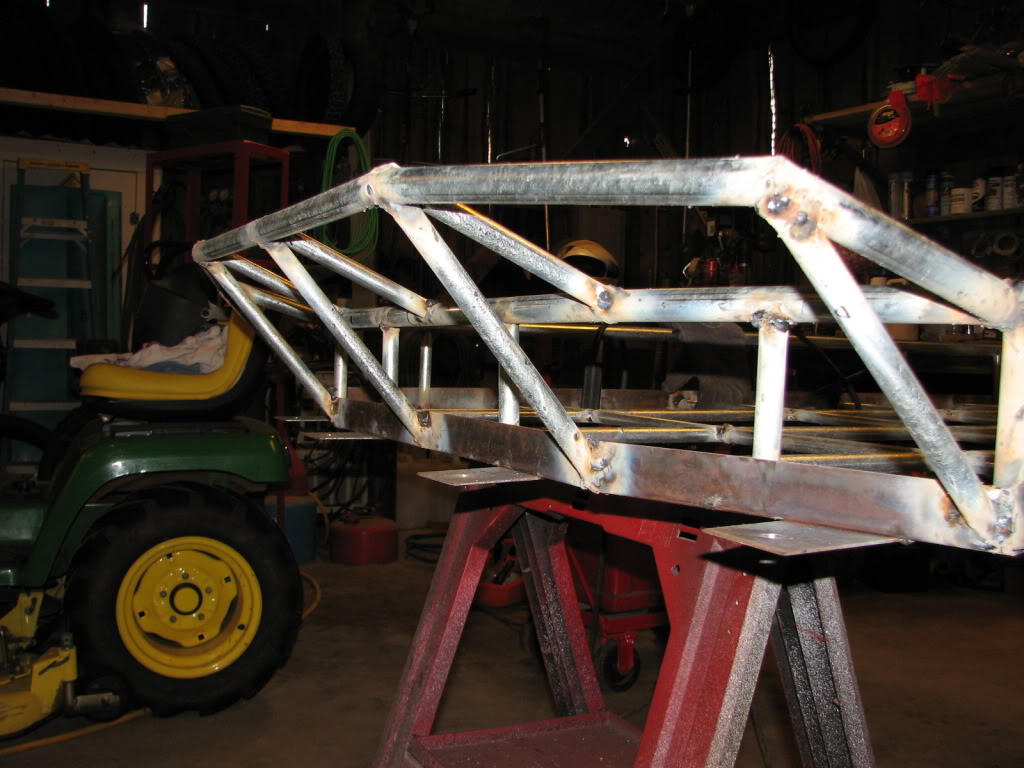
Then I got the 5" vertical pieces on (I used that 1/2" conduit for these again) and started building the top bar using 3/4" conduit.
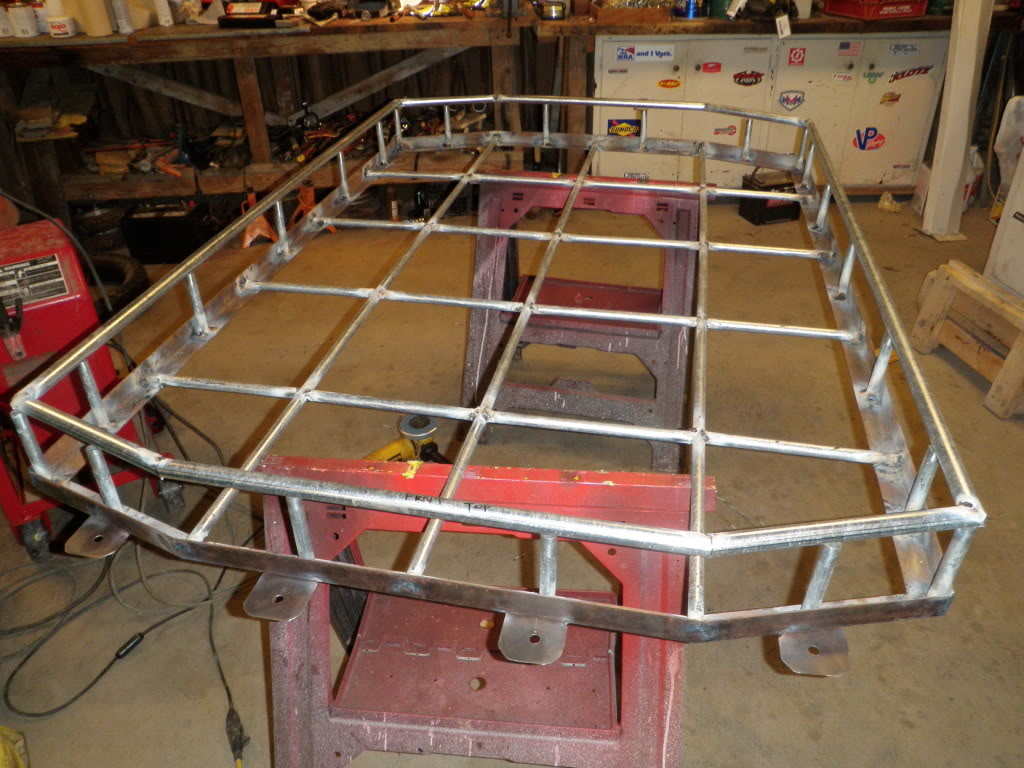
And this is how it sits as of today. Hope to get some more done tonight after work.
I will update this when I get her on there. I'm still not positive how I'm gonna mount it on the Jeep. Thanks for looking at my roof rack and any suggestions will always be considered.
This is where I started. I used some angle for the base. Its the same stuff I used on my subwoofer/cargo workbench. Yes I know the welding sucks. This was really my first experience with stick welding. I got the hang of it down the road but it took a while
an example of one of my first welds... Its terrible I know
I went to Rural King and bought some cheap 1/2" conduit for $2.50 for a 10 ft span and started cuttin. I fit each piece of conduit as the basket as shown below. I also used a grinder to bevel the sides to fit nicer.
After some welding...
Better example of bad welding, but hey it holds it just aint pretty.
Some spot light mounts. I need to redesign the brackets because they wobble a tad. I'll use thicker metal nxt time.
Then I got the 5" vertical pieces on (I used that 1/2" conduit for these again) and started building the top bar using 3/4" conduit.
And this is how it sits as of today. Hope to get some more done tonight after work.
I will update this when I get her on there. I'm still not positive how I'm gonna mount it on the Jeep. Thanks for looking at my roof rack and any suggestions will always be considered.
Thread Starter
Member
Joined: Mar 2011
Posts: 185
Likes: 0
From: Southern Indiana
Year: 1988
Model: Cherokee
Engine: I6 4.0L
Yeah, I've pretty much decided to mount it on the gutters. I just need to fabricate some bracket to work. I'd rather not buy one but I might just to save time. So far I only have $30 into supplies and I'd like to have a budget build rack. If anyone has suggestions on how to build the brackets or suggestions how not to do it help is always appreciated. Thanks again for looking!
CF Veteran


Joined: Jun 2009
Posts: 2,611
Likes: 447
From: Michigan
Year: 1987 MJ, 1973 J2000, 1986 XJ, 08 JK
Model: Comanche (MJ)
Engine: 4.0L H.O
not knowing what kind of welder your using....you could have too strong of a welder... i saw a few burn hole's in your conduit but all in all not a bad start bud...
i have a few ideas rolling around in my head right now for a conduit lightbar.. baja style for the roof of my 99..... kinda pondering how well the conduit will hold up thow...
but back to facts... i've ordered a couple gutter mounts from JCR offroad today, they're only $46 for 4 of them and they look pretty nice..... check em out maybe they'll be what your looking for
CF Veteran
Joined: Dec 2009
Posts: 1,396
Likes: 2
Model: Cherokee
Arc welding is always difficult to do on light gage material so I wouldn't beat yourself up about it. Beat the slag off next time before you take a picture. Oh and make sure you're wearing a respirator, correct me if I'm wrong but that stuff looks galvanized or aluminzed. Either the case, not something you want to be inhaling. Like the progress, keep us posted!
Thread Starter
Member
Joined: Mar 2011
Posts: 185
Likes: 0
From: Southern Indiana
Year: 1988
Model: Cherokee
Engine: I6 4.0L
Okay the arc welder I've been using is a Lincoln Electric AC-225. I'm honestly not to familiar with welders, it's just what my dad has. We also have a gunslinger tig welder but I'm not sure how to work it. haha I'm sorry for not being more helpful. I was running at 40 Amps using some 6011 rods. It prob wasn't the correct setup but it's what I had. It is galvanized conduit thats VERY thin walled. I didn't wear a respirator or anything when I welded but I tried not to breathe any of it in. I would highly recommend using conduit for any light bar or anything. It's very easy to work with and bend and cut. But you need to be a better welder than me to make it look nice. I'm just proud that it holds 
I've also decided to do a light guard across the top of the lights with the 3/4" conduit. I'm gonna go weld the rest and should post more after some progress!
I've also decided to do a light guard across the top of the lights with the 3/4" conduit. I'm gonna go weld the rest and should post more after some progress!
Trending Topics
Thread Starter
Member
Joined: Mar 2011
Posts: 185
Likes: 0
From: Southern Indiana
Year: 1988
Model: Cherokee
Engine: I6 4.0L
Well today I got quite a bit done with the roof rack. If anyone follows my Build thread, I just got some Bushwacker fender flares to consume my time. I'm still waiting on my JCROffroad gutter mounts. Here's the progress of today...
I welded on beefy-er light tabs. Honestly, I was dissapointed because I should have used even thicker steel plate but we'll see if it holds good for now. I do have a few different ideas on how to support it so that the lights don't wobble just in case. Sorry for the poor picture it looked much better on the small 1.5" camera screen
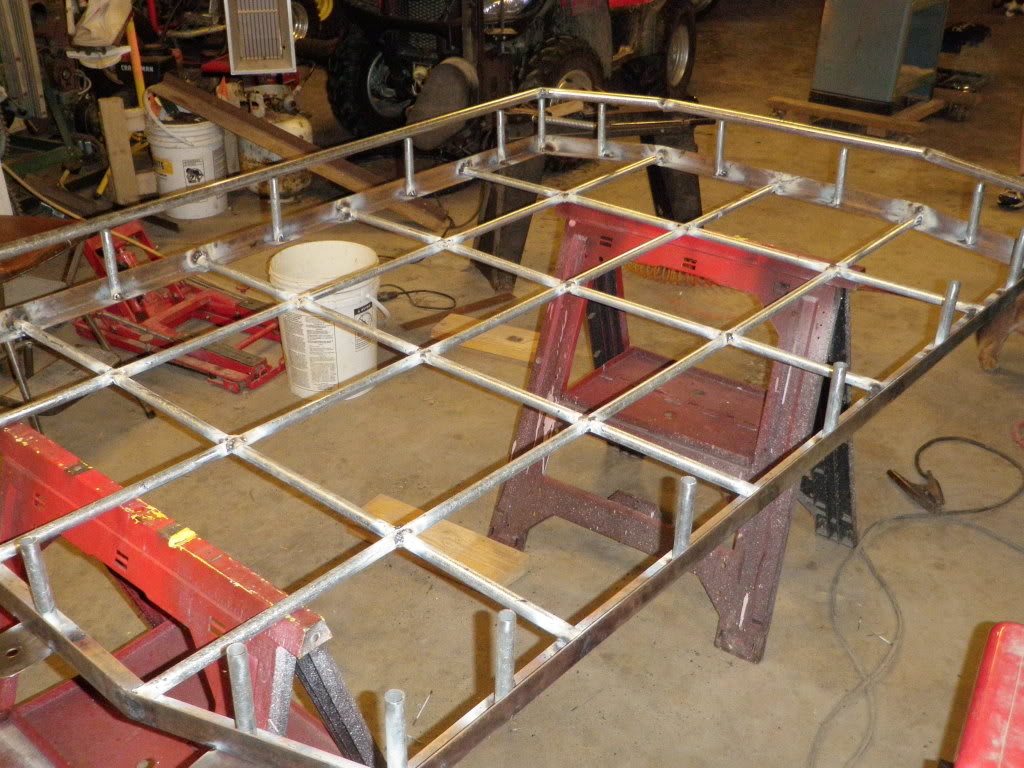
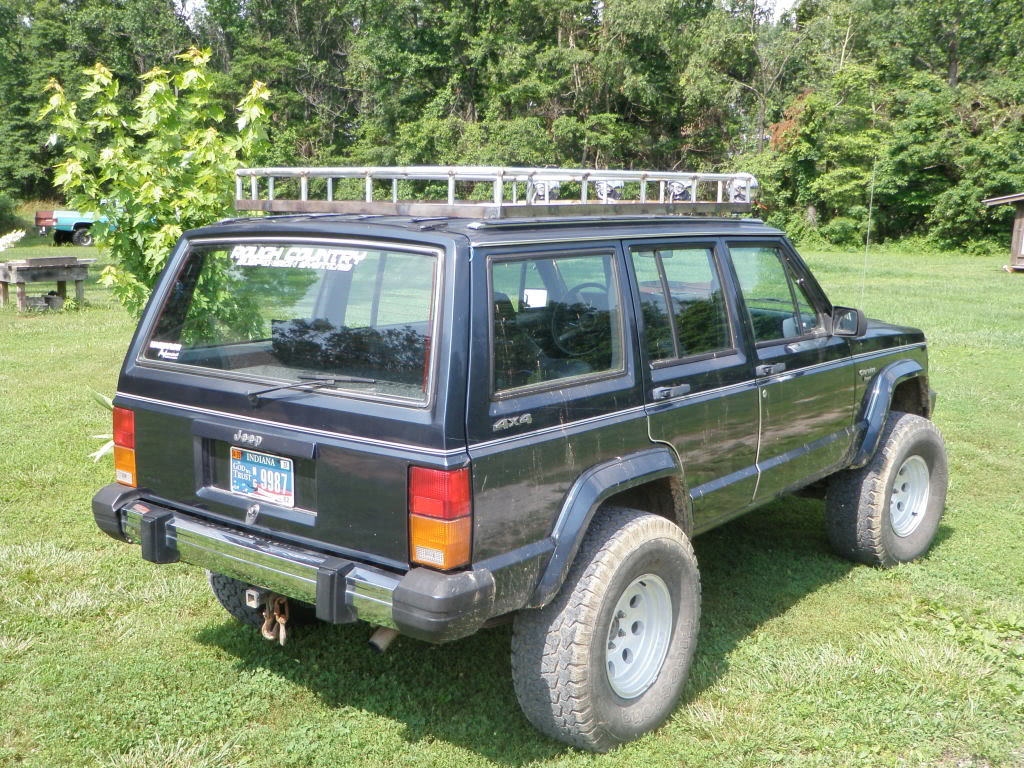
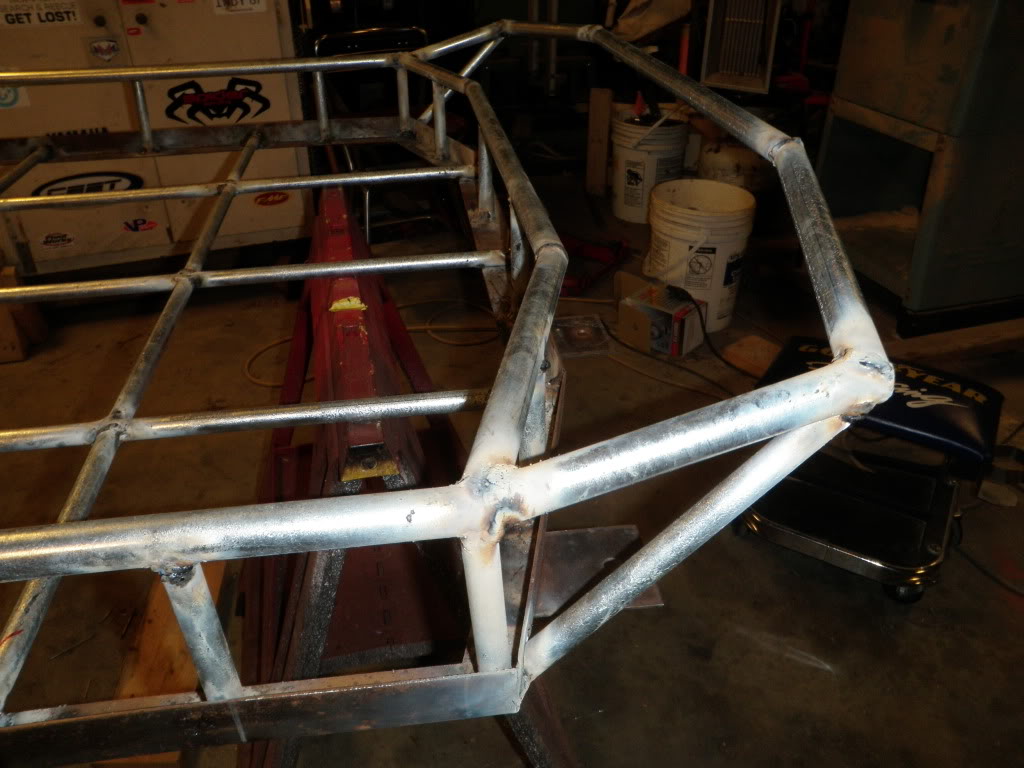
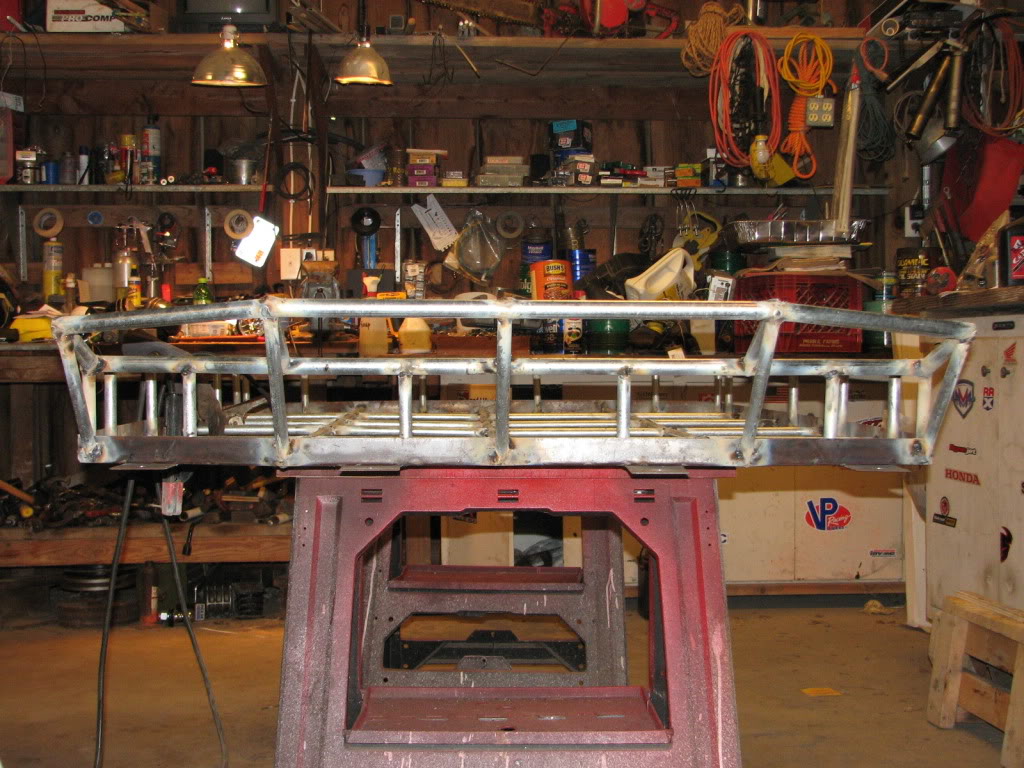
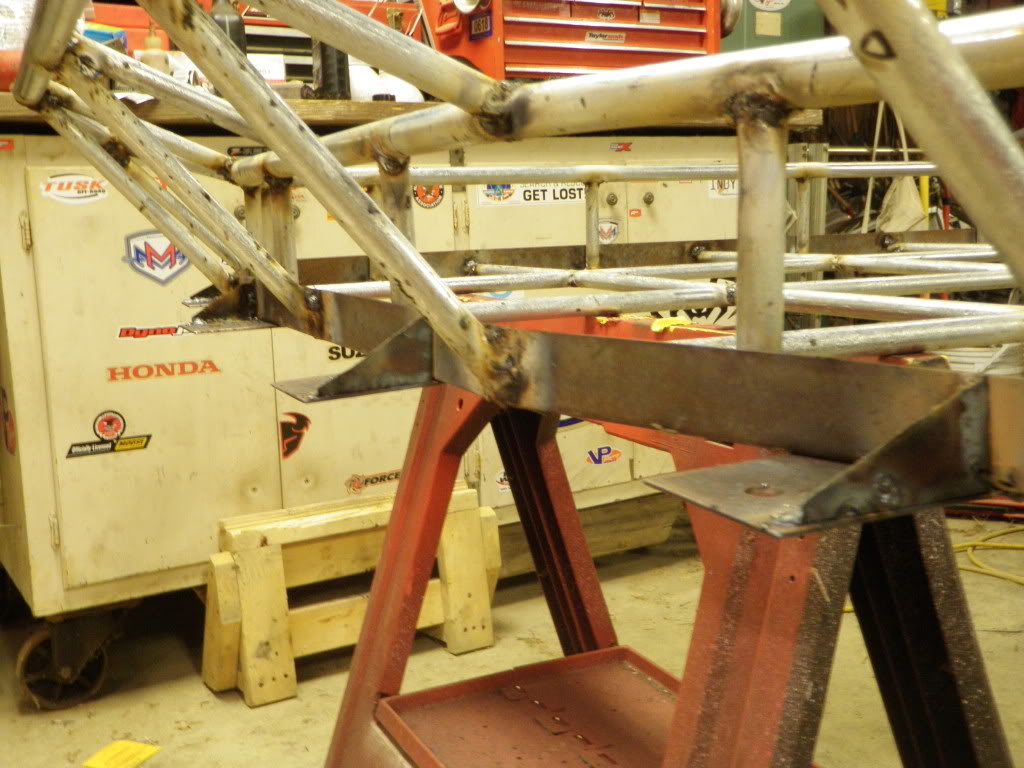
I tacked the top hoop onto all the verticals once I had beveled all the verticals to fit the hoop perfectly. I then decided it was time to see how to looked up on the Jeep. After getting it up there we have this... Believe me this is the part I start getting butterflies in my stomach and I begin excessive smiling. Thus making all this worth it.
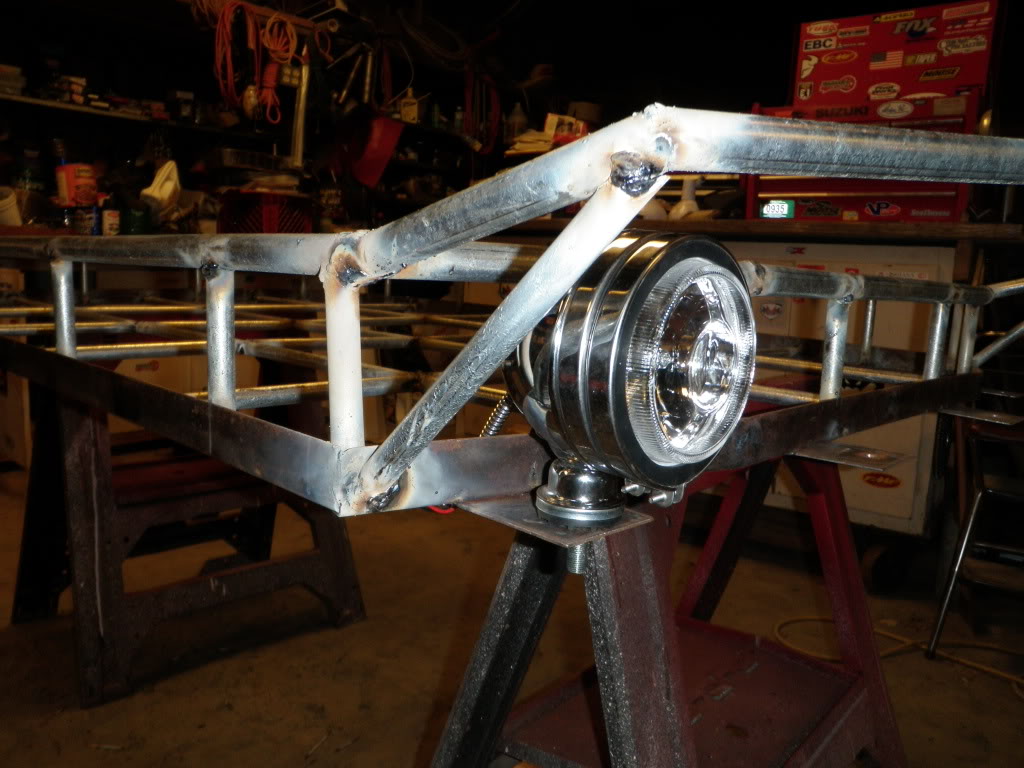
So then I took it down and began with the light guard. I had an idea in my head and it just started taking off. I used the same angles as the top hoop and using more of the 3/4" conduit I fabbed this up (pic shows rack upside down)
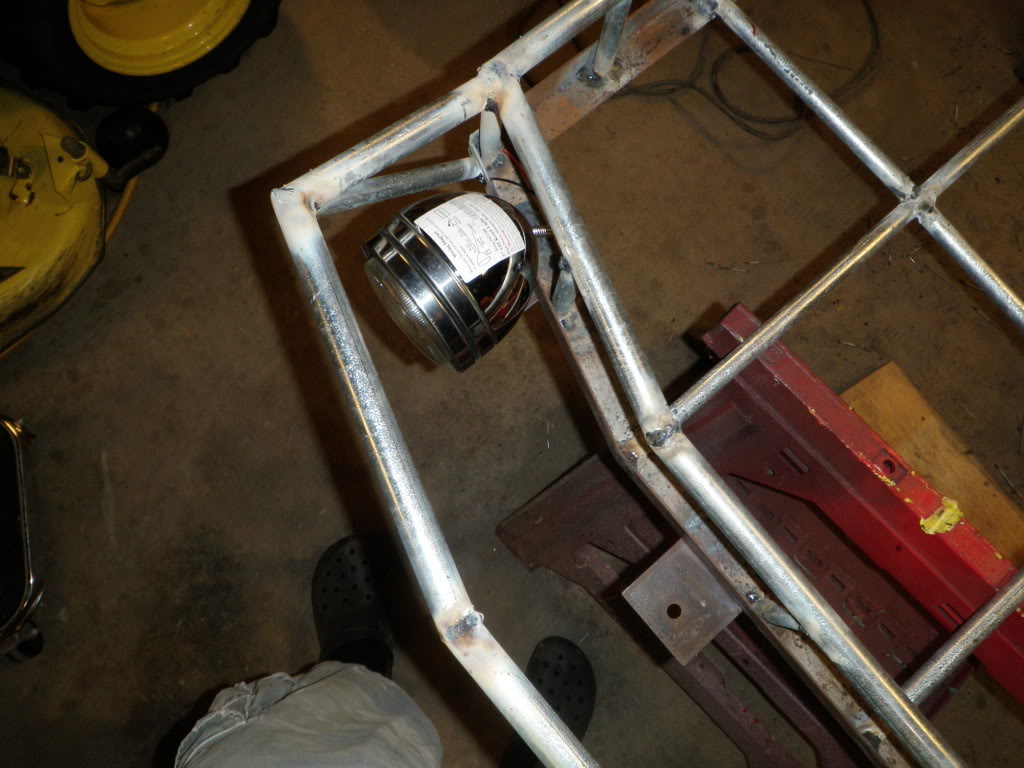
Then I tacked some supports on the edges (4 more coming to stiffen the center more)

Now is was time to see how it looked with one of my 5" el cheapo lights...
That's where I left off tonight. My gf wanted to watch a movie and get slushies. So the Jeep is gonna get some attention early in the morning before work. More supports for the light guard coming up and then I will also be welding some brackets to hold a Hi-Lift Jack, axe, shovel, and whatever I might need for the zombie apocalypse lol. I appreciate everyone for following this and once the rack is done I will keep working on my XJ on whatever else comes up. Thanks for your comments and I hope everyone likes the design. I hope I can help someone out there if they have any questions on building their own rack. This is my first true time welding on my own and its going great. I recommended just jumping into it and giving it your best shot. haha the worst thing that can happen is that you wouldn't like it and you could make another one. Thanks for looking and as always more pics are on their way
I welded on beefy-er light tabs. Honestly, I was dissapointed because I should have used even thicker steel plate but we'll see if it holds good for now. I do have a few different ideas on how to support it so that the lights don't wobble just in case. Sorry for the poor picture it looked much better on the small 1.5" camera screen
I tacked the top hoop onto all the verticals once I had beveled all the verticals to fit the hoop perfectly. I then decided it was time to see how to looked up on the Jeep. After getting it up there we have this... Believe me this is the part I start getting butterflies in my stomach and I begin excessive smiling. Thus making all this worth it.
So then I took it down and began with the light guard. I had an idea in my head and it just started taking off. I used the same angles as the top hoop and using more of the 3/4" conduit I fabbed this up (pic shows rack upside down)
Then I tacked some supports on the edges (4 more coming to stiffen the center more)
Now is was time to see how it looked with one of my 5" el cheapo lights...
That's where I left off tonight. My gf wanted to watch a movie and get slushies. So the Jeep is gonna get some attention early in the morning before work. More supports for the light guard coming up and then I will also be welding some brackets to hold a Hi-Lift Jack, axe, shovel, and whatever I might need for the zombie apocalypse lol. I appreciate everyone for following this and once the rack is done I will keep working on my XJ on whatever else comes up. Thanks for your comments and I hope everyone likes the design. I hope I can help someone out there if they have any questions on building their own rack. This is my first true time welding on my own and its going great. I recommended just jumping into it and giving it your best shot. haha the worst thing that can happen is that you wouldn't like it and you could make another one. Thanks for looking and as always more pics are on their way
Thread Starter
Member
Joined: Mar 2011
Posts: 185
Likes: 0
From: Southern Indiana
Year: 1988
Model: Cherokee
Engine: I6 4.0L
More progress this morning!!!
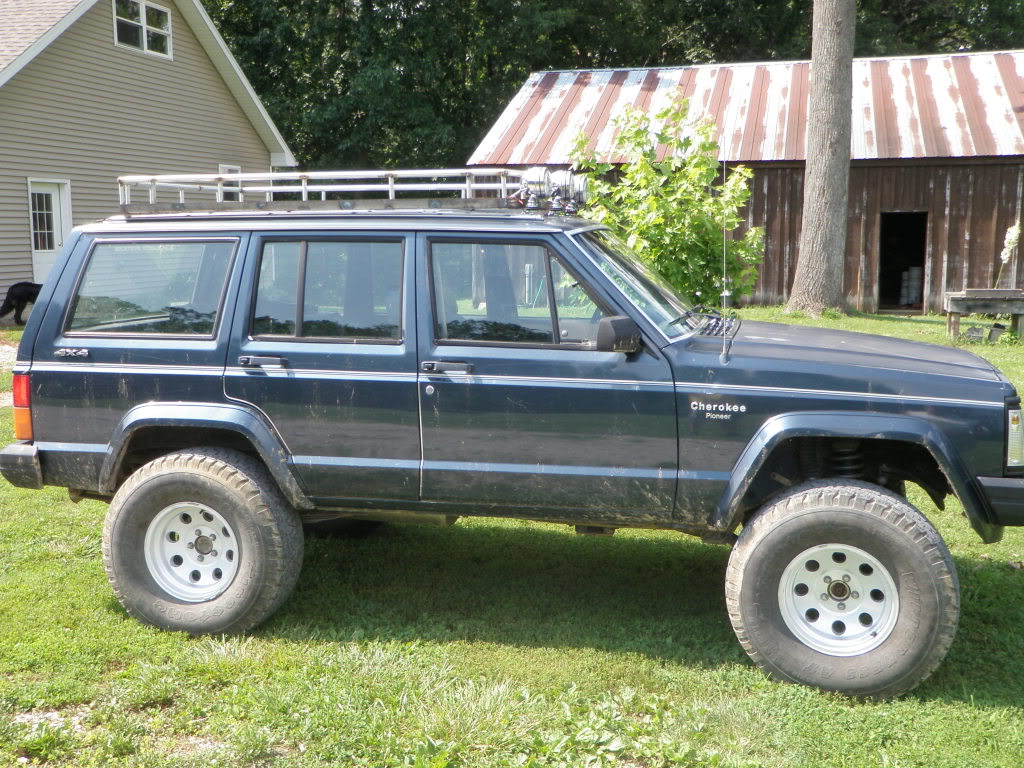
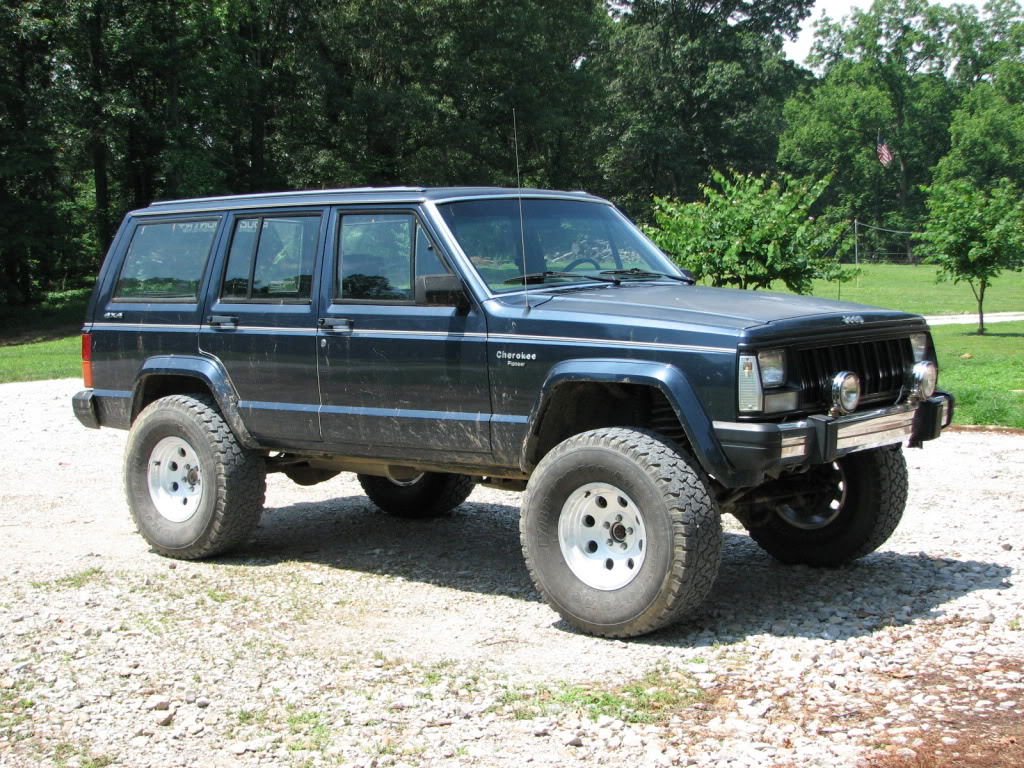
Oh course on the way to the barn I had to take a picture of my XJ sitting in the driveway. This is how the Jeep sits now. Soon to have the rack up there. I really can't wait much longer.
I fabbed up some supports for the front light guard. This is how it looks now. I am so happy with how it turned out! I still have my tool brackets to weld and then once I get the JCROffroad mounts in I will finish welding and it will be all ready for a couple coats of paint and my lights on and wired. I'm just one step closer to getting this rack done. Sorry for the slow progress but it should be worth it when I'm done.
This will look BA when it's finally on. I am also planning on building removable kayak brackets for 2 kayaks. Not exactly sure how to go about doing that but then again I haven't put much effort into thinking it through. I'm anxiously waiting for those JCR brackets
Yes I know we have a very dirty shop but believe it or not I know where pretty much everything is at haha
Last edited by HawK_Racing; Jun 13, 2011 at 11:52 AM.
CF Veteran
Joined: Jun 2009
Posts: 2,611
Likes: 447
From: Michigan
Year: 1987 MJ, 1973 J2000, 1986 XJ, 08 JK
Model: Comanche (MJ)
Engine: 4.0L H.O
Excellent progress bud, love your design for how the rack is setup in the front.... with an offset center and outside... gotta get ya some monster lights for the light cage  hahaha keep it up. BTW whats your mounting plans for the highlift n such????
hahaha keep it up. BTW whats your mounting plans for the highlift n such????
Thread Starter
Member
Joined: Mar 2011
Posts: 185
Likes: 0
From: Southern Indiana
Year: 1988
Model: Cherokee
Engine: I6 4.0L
Okay I'm just going to go ahead and apologize for the lack of detail on these next 2 pics. This is how I'm going to mount whatever I need to the roof rack...
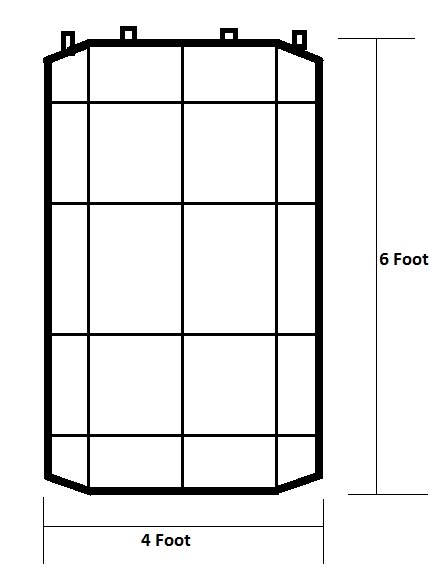
***Note: Dimensions not to scale***
Side view:
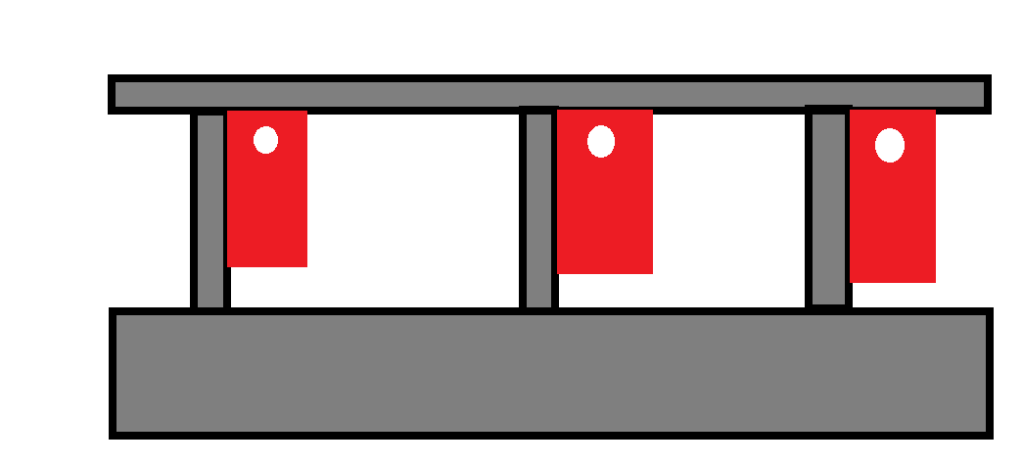
I will weld brackets (red) onto the verticals and the top hoop. There is a hole in bracket for a bolt.
This is the front / back view:

Brackets (red)
Clamp (blue)
Bolt (green)
Axe, Shovel, Hi-lift, pretty much anything (brown star)
I will pretty much just fab some clamps so that I can use whatever mounting locations I need. Hopefully the pics make enough sense to get the basic idea. These were just quick drawings. Hopefully, I will have these brackets welded on tonight. I've went back and cleaned up some welds and fixed others. Right now I'm just trying to get everything ready for when the JCROffroad brackets come in.
I can't wait to start painting this thing
Thread Starter
Member
Joined: Mar 2011
Posts: 185
Likes: 0
From: Southern Indiana
Year: 1988
Model: Cherokee
Engine: I6 4.0L
This morning I decided to beef up the light mounts. I never was truly happy with them and I used up most of the 3/8" plate So I ended up cutting these little dude and practicing a little more of my welding on thinner steel.
Here's the progress:
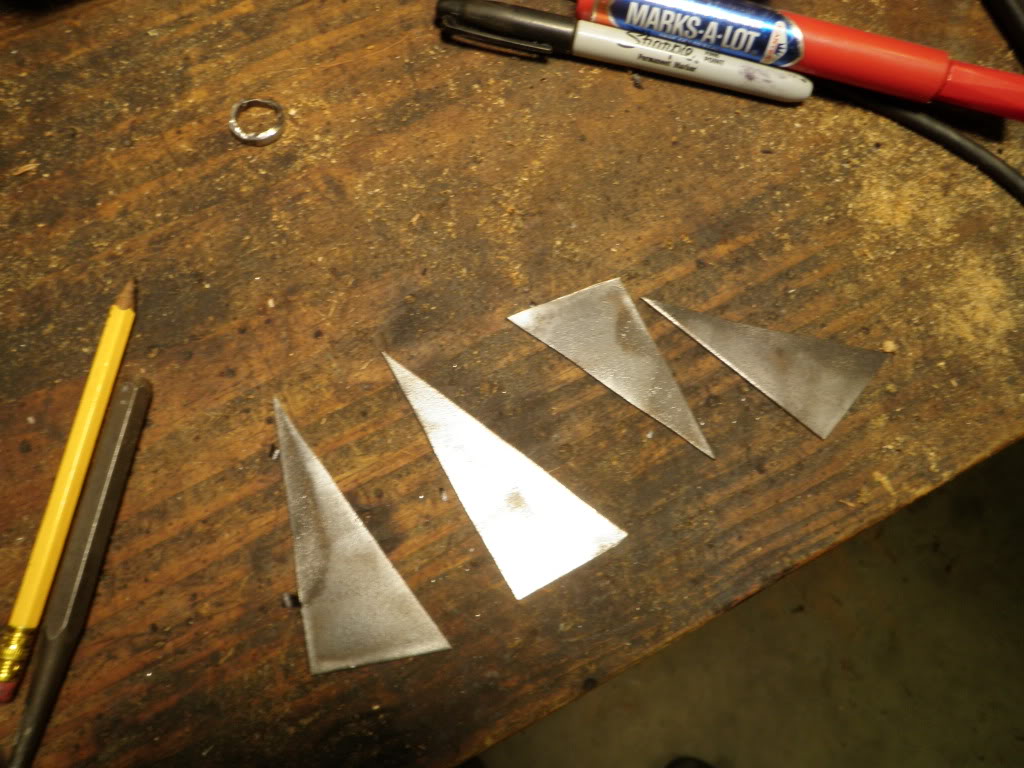
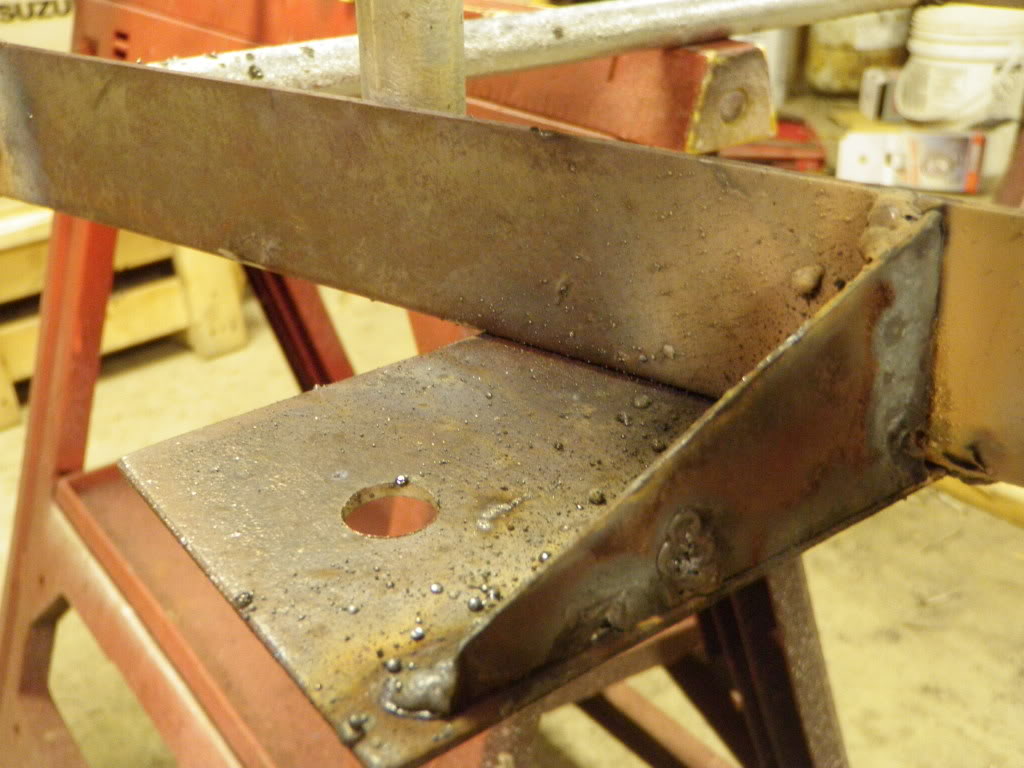
I think it looks good and I knocked most of the slag steel off and wire brushed it and it doesn't look near as nasty as what the pic showed. They are MUCH stronger now and I feel alot better about throwing this up on top of my jeep now
So I ended up cutting these little dude and practicing a little more of my welding on thinner steel.Here's the progress:
I think it looks good and I knocked most of the slag steel off and wire brushed it and it doesn't look near as nasty as what the pic showed. They are MUCH stronger now and I feel alot better about throwing this up on top of my jeep now
Thread Starter
Member
Joined: Mar 2011
Posts: 185
Likes: 0
From: Southern Indiana
Year: 1988
Model: Cherokee
Engine: I6 4.0L
I also learned the importance of wearing more than just Crocs while welding. Oh and gloves help too. From now on I'll wear my at least a glove on my left hand to support my right hand since I am using a stick welder. I can defiantly tell that I'm getting better at welding. Hopefully if I keep building things like I am now I will be pretty good at welding
Junior Member
Joined: Mar 2010
Posts: 92
Likes: 0
From: Dawsonville, GA
Year: 1998
Model: Cherokee
Engine: 4.0
I would like to see you paint it and mount it to your roof. haha.
Are you going to use the rain rail mounts, or what?
good looking rack btw. good luck.
Are you going to use the rain rail mounts, or what?
good looking rack btw. good luck.