
Custom Sway Bar Disconnects.

Thread Starter
Seasoned Member
Joined: Jul 2012
Posts: 484
Likes: 3
From: New Milford, CT
Year: 1999
Model: Cherokee
Engine: 4.0
Probably is. My swaybar slides back and forth in the bushings. Not sure if that's normal or not. Literally like two inches of play in the thing.
Thread Starter
Seasoned Member
Joined: Jul 2012
Posts: 484
Likes: 3
From: New Milford, CT
Year: 1999
Model: Cherokee
Engine: 4.0
Soon enough. Soon enough. Haha.
Does anyone want my old rough country disconnects? They still work but they're pretty beat. Not sure how much "life" is left in them.
You get everything they came with.
$15 shipped anywhere in the USA.
Does anyone want my old rough country disconnects? They still work but they're pretty beat. Not sure how much "life" is left in them.
You get everything they came with.
$15 shipped anywhere in the USA.
CF Veteran


Joined: Jun 2011
Posts: 2,720
Likes: 44
From: Gainesville GA
Year: 1999
Model: Cherokee (XJ)
Engine: 4.0
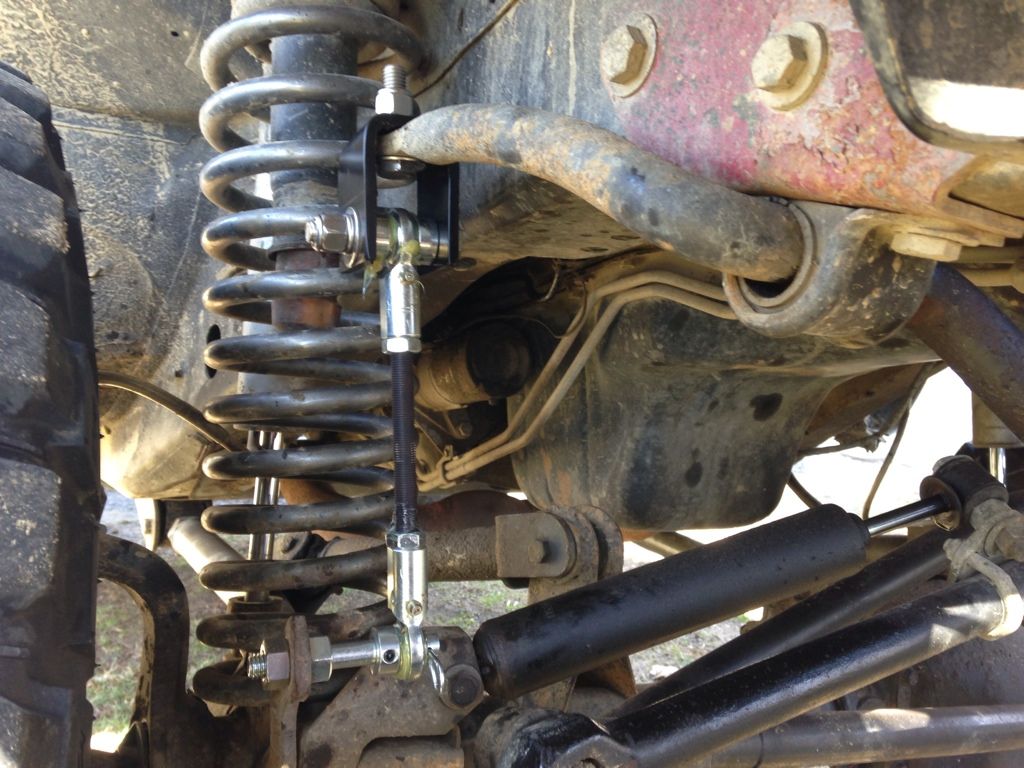
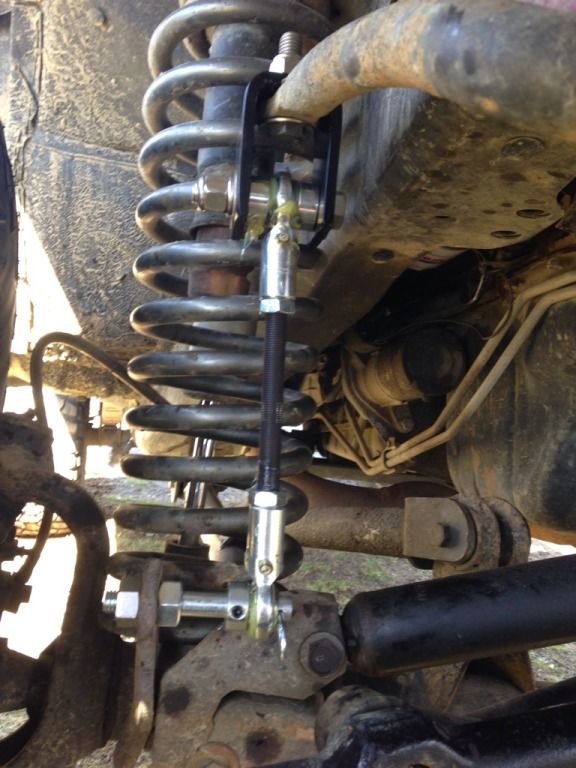
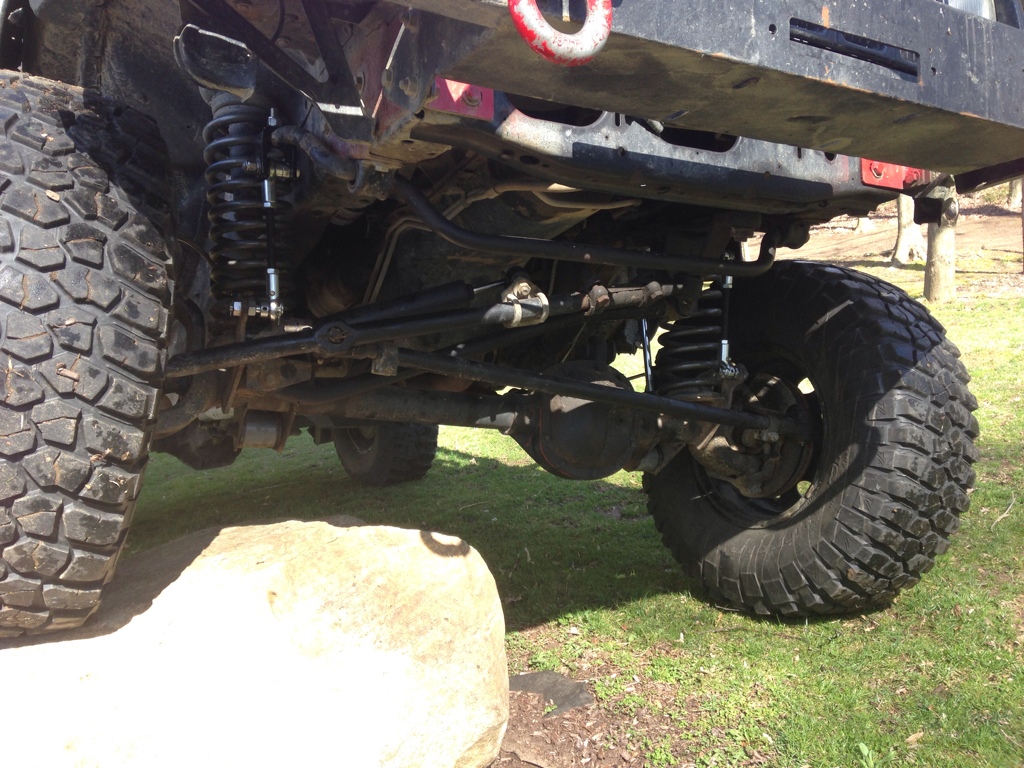
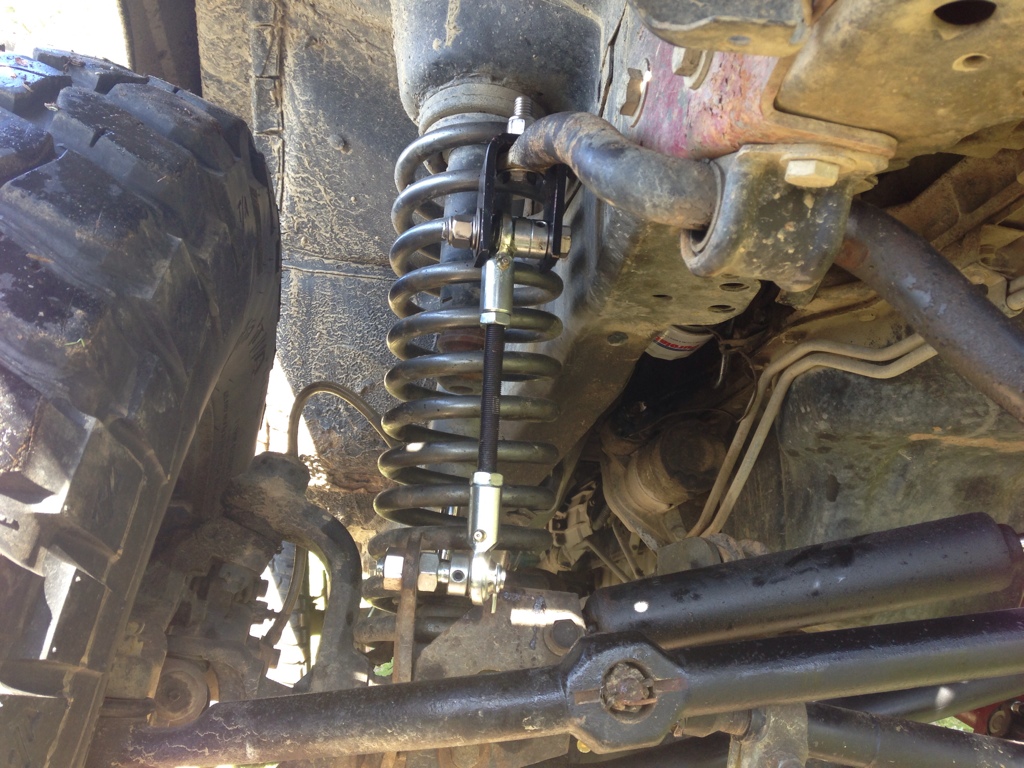
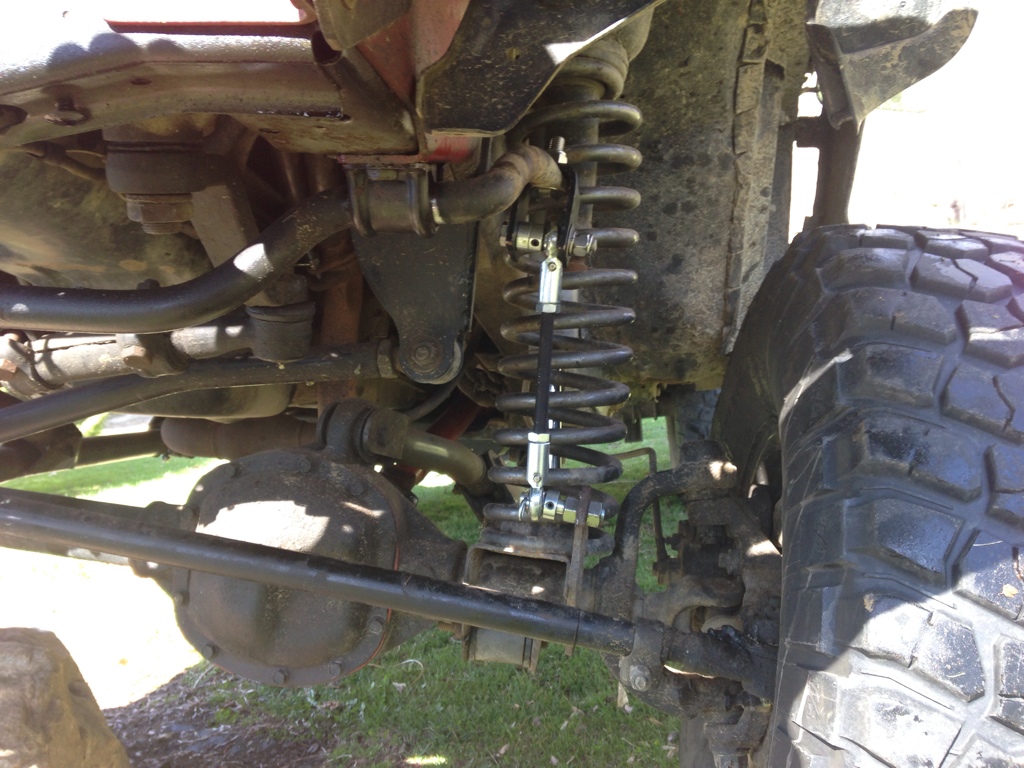
Ill update this more when I get home but here are some better pictures of them installed.
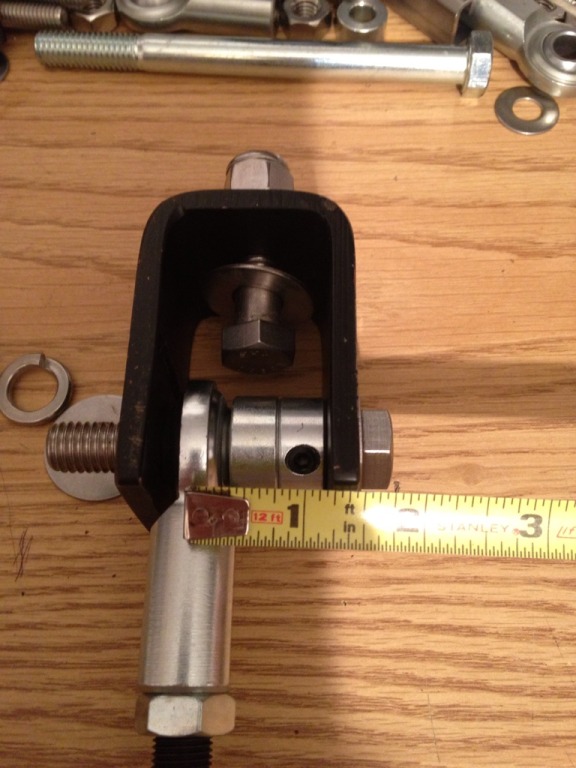
Any ideas on how to make the lower bolt shorter? I made it that length to ensure that the rod is totally vertically and not cockeyed.
My first try I used shorter bolts (like someone pointed at) but that led to the disconnects being more horizontal than vertical.
I could bend the brackets differently and have like a side mount on the swaybar but I'm not sure if that would be better.
The 1/2 spacers all have Allen head set screws in them. You lock the bottom heim against the quick disconnect pin then push the 1/2" spacer up against it and lock it in place. No clicking or anything.
I shipped cotter pins with that first order and apologize about that. There are two quick disconnect pins enroute to your house now. Tell me if you have any questions.
On the bottom part of the link is that thing to keep it from sliding back & forth?Looks like it has a set screw.
You could use a small piece of tubing for a spacer.
Thread Starter
Seasoned Member
Joined: Jul 2012
Posts: 484
Likes: 3
From: New Milford, CT
Year: 1999
Model: Cherokee
Engine: 4.0
This stops the heim from rattling back and forth and making that "popping/clicking" noise most disconnects make. Same goes for the top of that. The heim is wedged between two 1/2" spacers that are tight against the bracket. No popping/clicking up there either.
The only complaint i'm seeing (and attempting to correct) is making the bottom pin shorter to reduce the leverage/pressure on the mount while keeping the linkage vertical and not horizontal/cockeyed.
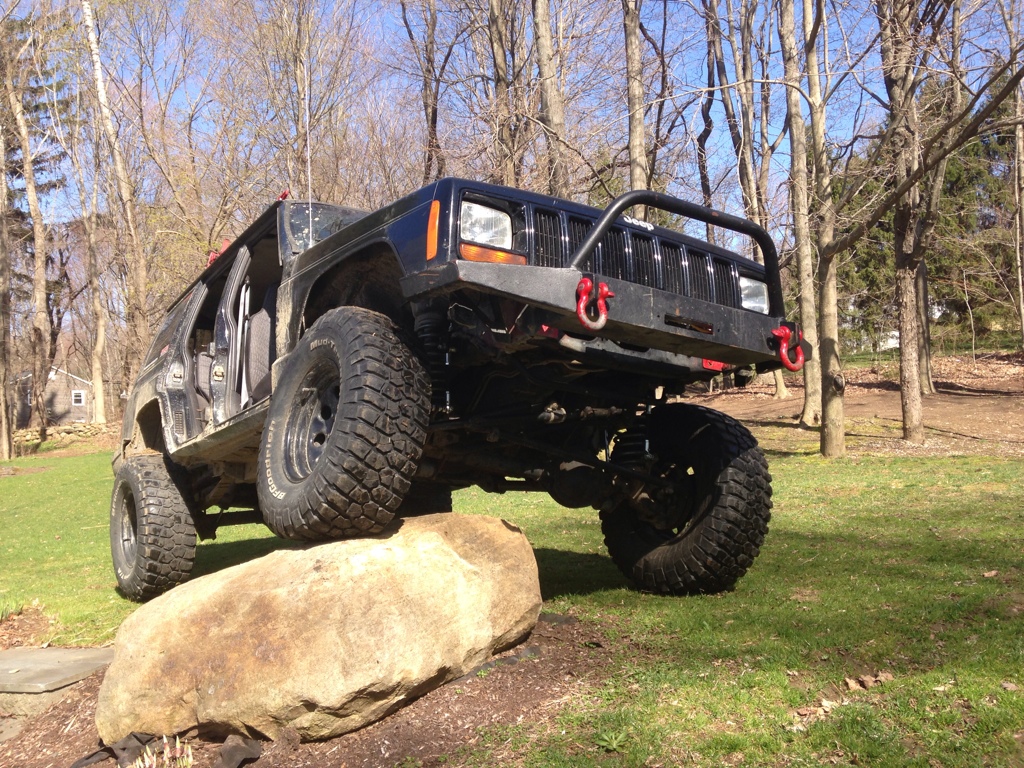
As you can see by the pictures i've flexed my suspension a little bit with them on and they hold up fine. The point is to disconnect them when you go wheeling. They will hold up to daily street/dirt roads fine.
A small piece of tubing as a spacer for where?

Member
Joined: Sep 2009
Posts: 136
Likes: 0
From: Colorado Springs, CO
Year: 2000
Model: Cherokee
Engine: 4.0
Looks good man! Like the setup, and your desire to build it right.
However, I have to agree with mastrbastr, I think the length of the lower pin puts too much leverage on the mount. I have ripped the lower mounts off of two D30's, more than once each (does help to remember to actually unhook the discos , but I often don't have time to do that when responding on a call). And that was with a 3/4" lower pin which was just long enough to reach through the lower link. Granted, the SB mounts on the 30's are pretty puny. I have built new, much beefier mounts for the new front axle I'm building which will hopefully survive.
I don't know if the idea he had about taking the spacer out of the upper heim to reduce the angle a shorter pin would create will work though, looks like the body of the heim might hit the bracket, unless you did some serious grinding and radiused the open end of the bracket.
You might be better to use a longer bolt on the upper mount, and actually move the heim out to the outside of the bracket. You wouldn't have the heim in a good double-shear loading like you do now, but if you ran a longer bolt through the heim, and both holes in the bracket would be pretty stiff, and still stiffer than the lower mount. That should fix the lower pin length, and solve the angle problem, or at least reduce it a lot.
One poss problem with that which I can see, is a small chance of tire rubbage, but you are close enough to the axle center line that it should be ok.
Just my thoughts. Good work though, I hope you can sell a bunch of 'em
However, I have to agree with mastrbastr, I think the length of the lower pin puts too much leverage on the mount. I have ripped the lower mounts off of two D30's, more than once each (does help to remember to actually unhook the discos
, but I often don't have time to do that when responding on a call). And that was with a 3/4" lower pin which was just long enough to reach through the lower link. Granted, the SB mounts on the 30's are pretty puny. I have built new, much beefier mounts for the new front axle I'm building which will hopefully survive. I don't know if the idea he had about taking the spacer out of the upper heim to reduce the angle a shorter pin would create will work though, looks like the body of the heim might hit the bracket, unless you did some serious grinding and radiused the open end of the bracket.
You might be better to use a longer bolt on the upper mount, and actually move the heim out to the outside of the bracket. You wouldn't have the heim in a good double-shear loading like you do now, but if you ran a longer bolt through the heim, and both holes in the bracket would be pretty stiff, and still stiffer than the lower mount. That should fix the lower pin length, and solve the angle problem, or at least reduce it a lot.
One poss problem with that which I can see, is a small chance of tire rubbage, but you are close enough to the axle center line that it should be ok.
Just my thoughts. Good work though, I hope you can sell a bunch of 'em
CF Veteran
Joined: Jun 2011
Posts: 2,720
Likes: 44
From: Gainesville GA
Year: 1999
Model: Cherokee (XJ)
Engine: 4.0
At the first sentence.But nevermind.
I do agree about offsetting the top to match the bottom.It would lessen the stress.
Last edited by Big David; Apr 19, 2013 at 10:59 PM.
Thread Starter
Seasoned Member
Joined: Jul 2012
Posts: 484
Likes: 3
From: New Milford, CT
Year: 1999
Model: Cherokee
Engine: 4.0
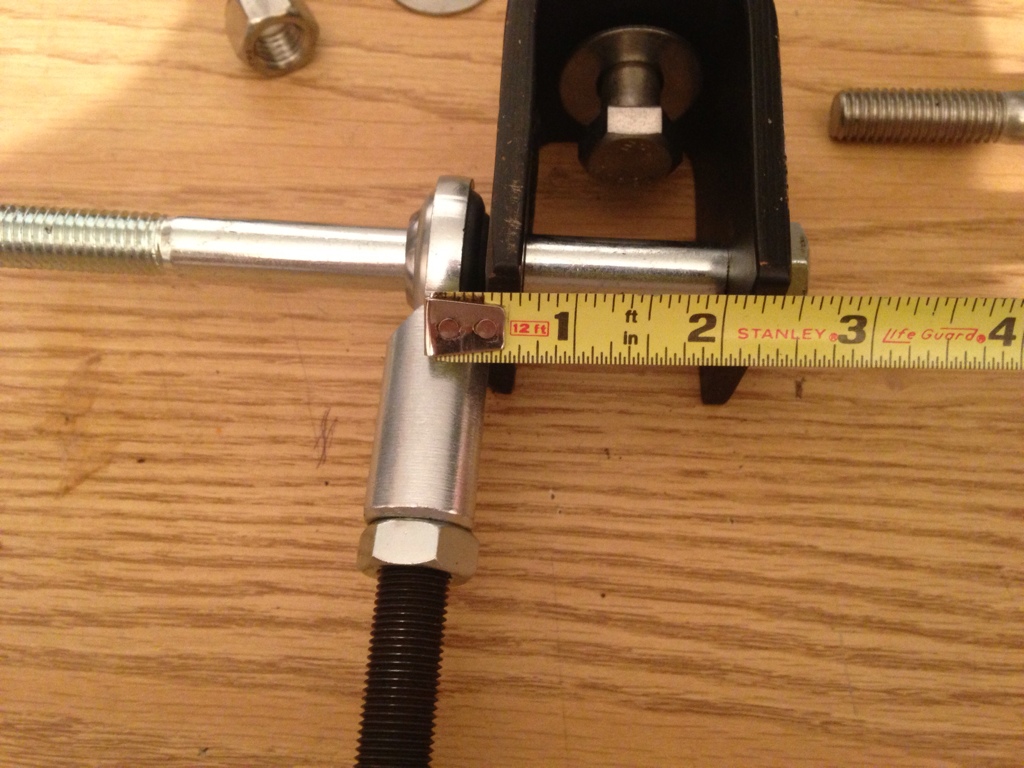
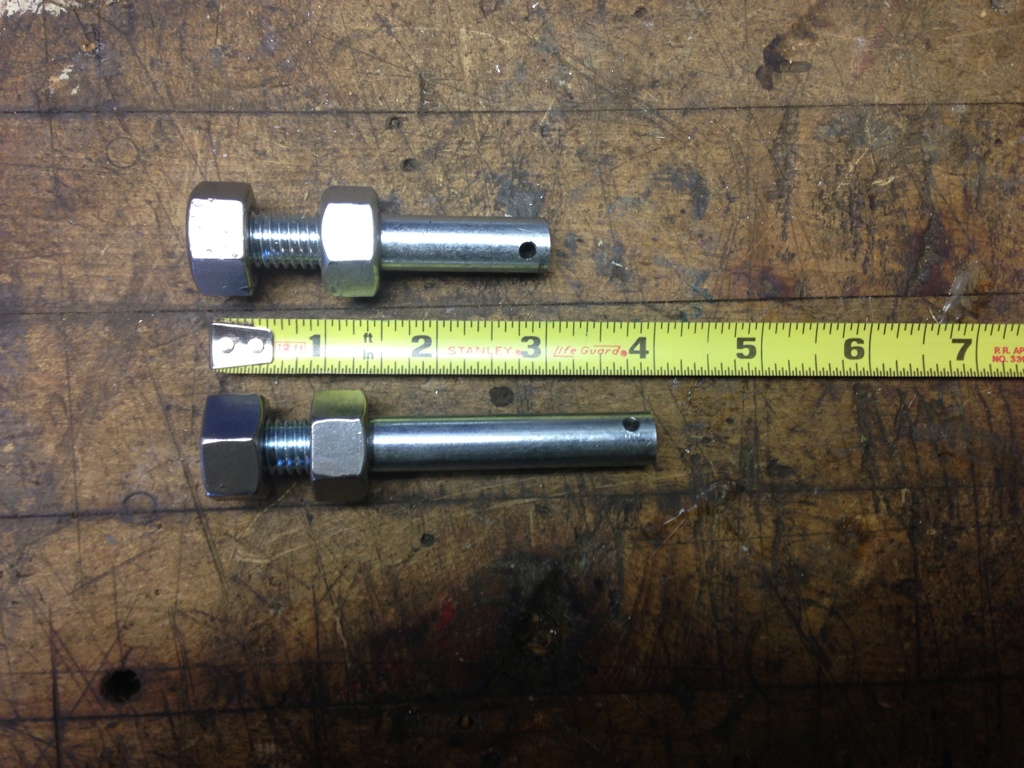
Well I took your suggestions and made some measurements. If I put the heim on the outside of the bracket I will gain about 1 1/4" or so and put the heim right up against the bottom bolt. Would actually be perfect.
I also took a measurement with the heim still in the bracket just moved over one spot (wedged against the side of the bracket). Think I should put it on the outside or keep it inside?
Ill switch the ones on my jeep to this tomorrow and see how it looks and will post some pictures then.
Thanks for all the support by the way
Here are some pictures of the measurements.
Member
Joined: Sep 2009
Posts: 136
Likes: 0
From: Colorado Springs, CO
Year: 2000
Model: Cherokee
Engine: 4.0
Well, looks like I was wrong about the body of the heim hitting the bracket, so that is even better. You may still want to consider clearancing the bottom of the bracket if it is close, hard to tell from the pic.
As for which way, I think either would work fine. The heim to the outside is probably slightly less desirable, as it is effectively in single shear that way, as opposed to inside without the spacer being double shear. But, I would say try them both, and see which aligns better.
But, if you do run it outside, you will need to put a sleeve of tubing or shims inside the bracket so it doesn't "squish" when you tighten up the heim on the outside.
Last edited by mntnresq; Apr 20, 2013 at 01:01 AM.
Thread Starter
Seasoned Member
Joined: Jul 2012
Posts: 484
Likes: 3
From: New Milford, CT
Year: 1999
Model: Cherokee
Engine: 4.0
What do you mean by, "clearancing the bottom of the bracket if it is close, hard to tell from the pic."?
I didn't even think about needing a sleeve in there to stop the crush. I think ill keep the heim in the bracket to keep it a double shear. I don't like the whole "heim outside the bracket idea".
I didn't even think about needing a sleeve in there to stop the crush. I think ill keep the heim in the bracket to keep it a double shear. I don't like the whole "heim outside the bracket idea".

Junior Member
Joined: Dec 2012
Posts: 65
Likes: 0
From: B.C. Canada
Year: 1993
Model: Cherokee
Engine: 4.0 L
I'd keep it inside the top mount. Too much strain on the mounting bolt if you move it to the outside. Will still look good slid to the inside of the mount and will give you that added 1/2"ish to the outside.
On a second note, knowing that the bottom arm mount is weak on the D30, maybe come up with a kit to improve the strength and sell it with your disconnects as a complete kit? Just thinking outside the box a little!!
On a second note, knowing that the bottom arm mount is weak on the D30, maybe come up with a kit to improve the strength and sell it with your disconnects as a complete kit?
Just thinking outside the box a little!!
Member
Joined: Sep 2009
Posts: 136
Likes: 0
From: Colorado Springs, CO
Year: 2000
Model: Cherokee
Engine: 4.0
Yeah, if you can keep it inside, and still get a decent angle on it, that would be best. But, even if you didn't it would still be more solid than the bottom mount. The bottom is in single-shear, and the upper outside would be stiffened by the bolt going through both holes in the bracket. I guess the other option would be make the bracket wide enough to fit the heim inside, or offset the SB hole in the bracket.
What I meant by clearancing the bracket is, that it looks like the bottom edge of the bracket comes pretty close to contacting the lower threaded body of the heim joint. It may not be an issue, since these really won't have a significant range of motion, but if it looked like it would hit, then you might want to trim/grind off the bottom of the bracket a bit for clearance.
Good luck!
Thread Starter
Seasoned Member
Joined: Jul 2012
Posts: 484
Likes: 3
From: New Milford, CT
Year: 1999
Model: Cherokee
Engine: 4.0
Going to work on them now.
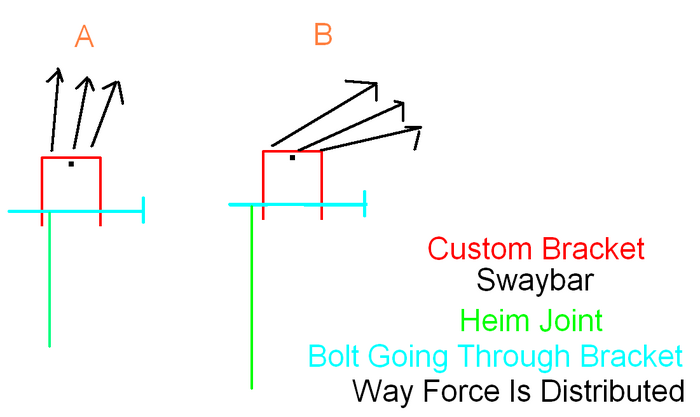
Here is why i want to keep the heim inside the bracket. I think if i put the heim on the outside of the bracket (B) the force is going to be pushed more diagonally and not straight up into the swaybar like (A.).
I originally had it dead smack in the center so the force would go straight up. Just my thinking though and not even sure if it force even works like that. Hahah.
I think (A) is a better option and that is what i'm going to do now on my jeep.

Thread Starter
Seasoned Member
Joined: Jul 2012
Posts: 484
Likes: 3
From: New Milford, CT
Year: 1999
Model: Cherokee
Engine: 4.0
Well guys you were right.
Seems to have worked perfectly. Took an inch off each bolt and they're still standing up vertical. Not sure how much of a difference this will make, but i feel a lot better with that idea.
Pictures make it look like they're cockeyed, but it's just the the angle of the picture. I think these are good to go now, everyone agree?


