
XJ Fender Flare bracket repair

Thread Starter
Junior Member
Joined: Aug 2010
Posts: 33
Likes: 0
From: DFW
Year: 1998
Model: Cherokee
Engine: 4.0
Over the years the paint on my fender flares had started to peel. So I decided to repaint them. I started by prepping the bolts with PB Blaster...and still managed to break every single stud on the very first flare.
I priced a new set of brackets, but I could think of better ways to spend $90 for a set to cover all four corners. Besides, I'm all about DIY.
TOOLS:
10mm & 11mm deep-well sockets
1/4" socket (for the tiny metal screws on the bottom of the flare)
Dremel w/ cut-off wheel
Center punch & hammer
Drill w/ 1/4" bit
ViseGrip pliers
MIG welder
Gloves
Eye protection
HARDWARE:
20x 1" 1/4-20 hex bolts
20x 1/4" cut washers
20x 1/4" nylon lock nuts
ADDITIONAL:
Krylon Fusion Black paint
Assorted grit sandpaper
Never-Seize (highly recommended)
I sanded the fender flare so I could get the first coat of paint curing while I repaired the brackets. Focusing on stripping off the old paint, I got a little too aggressive with the coarse grit. I was able to smooth it out some with the finer grits, but there were still some gouges left. Ah well, it's a Jeep after all.
I've had really good results using Krylon Fusion on plastics, I've never had it crack from flexing. But I'm sure just about any spray paint would be fine. YMMV.
First coat on the fender flare:
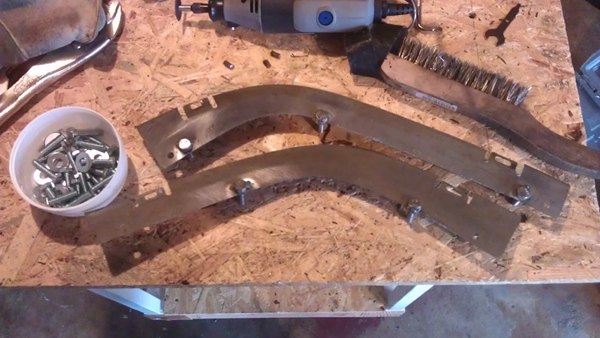
While the first coat was curing, I started on the brackets. The broken studs needed to be cut off:
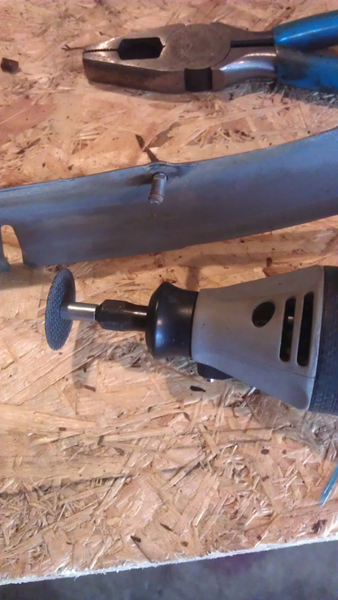
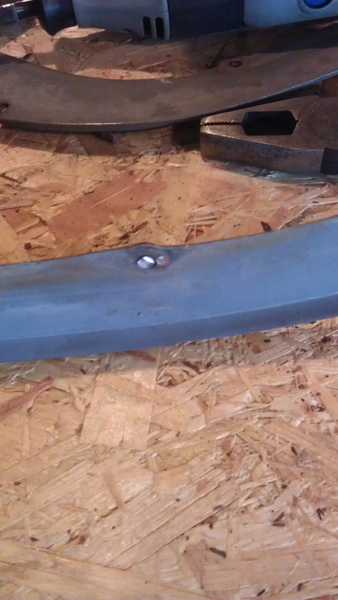
With the cuts made, I center punched the studs and drilled through with the 1/4" bit. I decided to leave the heads of the studs rather than remove them, which would give me more metal for the tack welds. The ViseGrips not only hold the new bolts straight, but they soak up heat. Very important for such thin metal even when tack welding. (ALTERNATE METHOD: I have read elsewhere that strong adhesives like Gorilla Glue work for sticking the replacement bolts to the brackets. If you don't have a welder you might try this instead.):

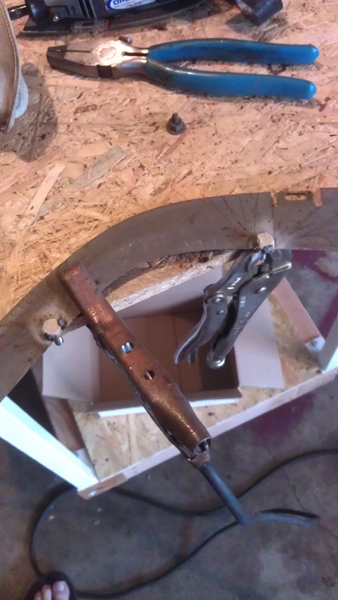
I left the brackets to cool and applied a second coat of paint to the fender flare. While that was drying I decided to scrub the welds on the brackets and have a beer:
Then I had another beer to give the paint a bit more time to dry . I gave the brackets a little tweak to make sure they were straight and then popped them back in the fender flare:
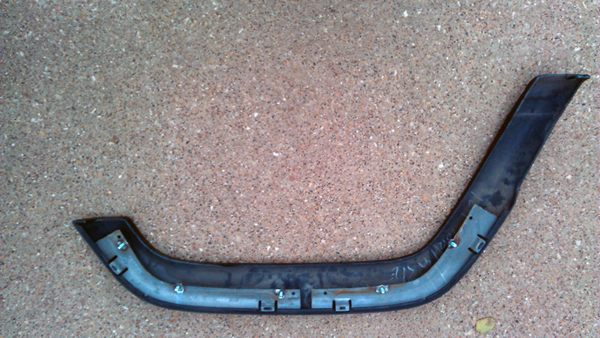
It took a tiny bit of tweaking to get the larger bolts to all go in. The hole in the fender nearest the rear passenger door had a bit of sheet metal lapping over on the back side, but it opened up easily with my drill. Once the bolts were all the way in, I dabbed a light coat of Never-Sieze on them and then put the washers & ny-lock nuts on.
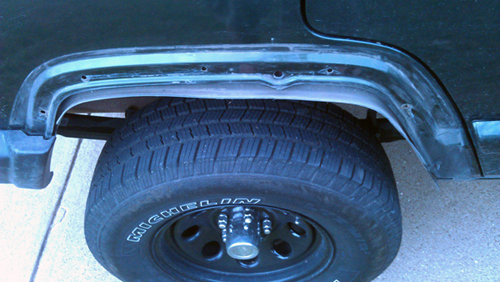
BEFORE:
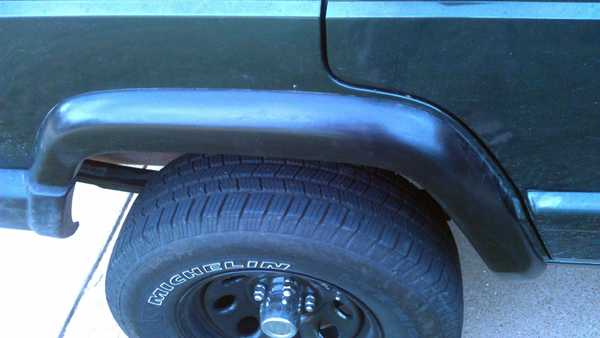
AFTER:
After thoughts:
The satin finish of the Krylon Fusion paint just doesn't look right to me. I think it's because the sheen and dark color of the body makes them blend a bit more than I had hoped for. Luckily I have some military flat black that I'll hose 'em with after a much finer sanding. It'll be much easier getting the flares off the next time around! But the DIY repair was TOTALLY worth the couple of bucks in hardware and 1 hour (maybe) in labor. Now to do the other three
I priced a new set of brackets, but I could think of better ways to spend $90 for a set to cover all four corners. Besides, I'm all about DIY.
TOOLS:
10mm & 11mm deep-well sockets
1/4" socket (for the tiny metal screws on the bottom of the flare)
Dremel w/ cut-off wheel
Center punch & hammer
Drill w/ 1/4" bit
ViseGrip pliers
MIG welder
Gloves
Eye protection
HARDWARE:
20x 1" 1/4-20 hex bolts
20x 1/4" cut washers
20x 1/4" nylon lock nuts
ADDITIONAL:
Krylon Fusion Black paint
Assorted grit sandpaper
Never-Seize (highly recommended)
I sanded the fender flare so I could get the first coat of paint curing while I repaired the brackets. Focusing on stripping off the old paint, I got a little too aggressive with the coarse grit. I was able to smooth it out some with the finer grits, but there were still some gouges left. Ah well, it's a Jeep after all.
I've had really good results using Krylon Fusion on plastics, I've never had it crack from flexing. But I'm sure just about any spray paint would be fine. YMMV.
First coat on the fender flare:
While the first coat was curing, I started on the brackets. The broken studs needed to be cut off:
With the cuts made, I center punched the studs and drilled through with the 1/4" bit. I decided to leave the heads of the studs rather than remove them, which would give me more metal for the tack welds. The ViseGrips not only hold the new bolts straight, but they soak up heat. Very important for such thin metal even when tack welding. (ALTERNATE METHOD: I have read elsewhere that strong adhesives like Gorilla Glue work for sticking the replacement bolts to the brackets. If you don't have a welder you might try this instead.):
I left the brackets to cool and applied a second coat of paint to the fender flare. While that was drying I decided to scrub the welds on the brackets and have a beer:
Then I had another beer to give the paint a bit more time to dry
. I gave the brackets a little tweak to make sure they were straight and then popped them back in the fender flare:It took a tiny bit of tweaking to get the larger bolts to all go in. The hole in the fender nearest the rear passenger door had a bit of sheet metal lapping over on the back side, but it opened up easily with my drill. Once the bolts were all the way in, I dabbed a light coat of Never-Sieze on them and then put the washers & ny-lock nuts on.
BEFORE:
AFTER:
After thoughts:
The satin finish of the Krylon Fusion paint just doesn't look right to me. I think it's because the sheen and dark color of the body makes them blend a bit more than I had hoped for. Luckily I have some military flat black that I'll hose 'em with after a much finer sanding. It'll be much easier getting the flares off the next time around! But the DIY repair was TOTALLY worth the couple of bucks in hardware and 1 hour (maybe) in labor. Now to do the other three

Thread
Thread Starter
Forum
Replies
Last Post
dshirk
Stock Grand Cherokee Tech. All ZJ/WJ/WK Non-modified/stock questions go here!
0
Sep 24, 2015 10:17 PM
Currently Active Users Viewing This Thread: 1 (0 members and 1 guests)