
How to fit a 31" spare in the back of 97-01

Thread Starter
CF Veteran

Joined: Jan 2013
Posts: 19,219
Likes: 45
From: west chester, pa
Year: 1999
Engine: 4.0
I wanted my spare 31x10.5x15 tire in the back in the cargo space, not on the roof or flat on the floor.
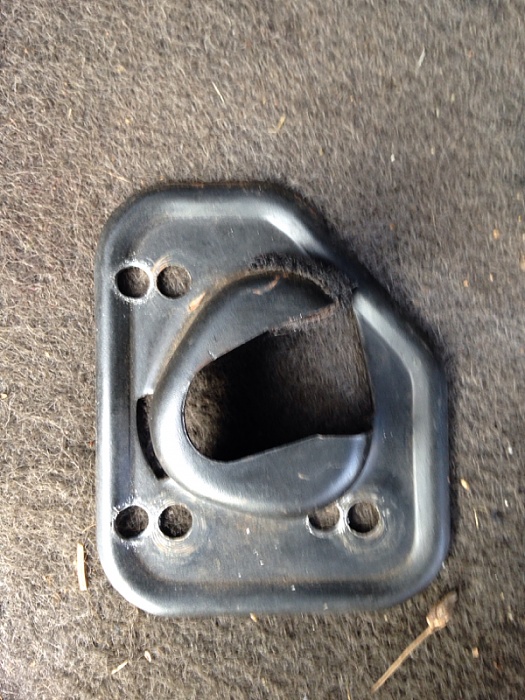
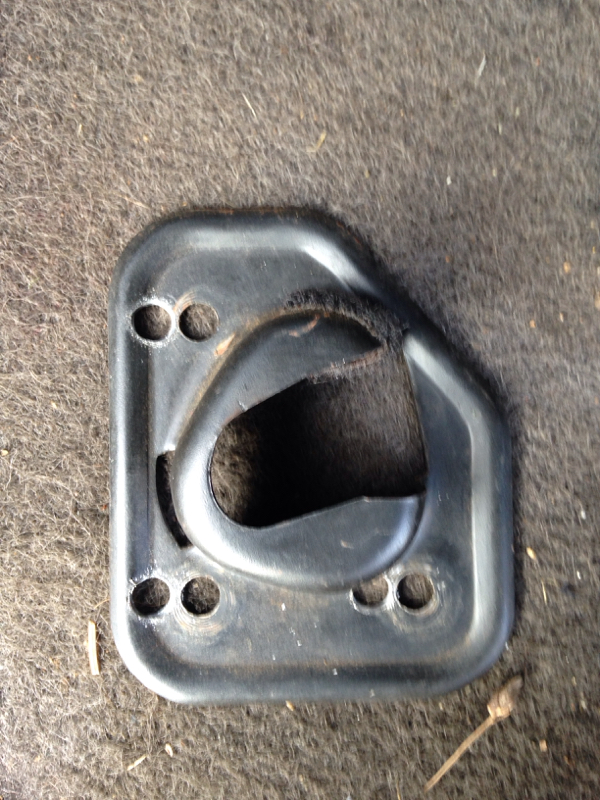
After thinking and staring at the back for a whole, I decided to move the driver's side seat upper bracket forward.
I took the bracket out, using 8mm socket with a ratchet. There were three bolts holding it on the wall.
Then I drilled new holes about 3/8 inch away from the center of the old holes.
After thinking and staring at the back for a whole, I decided to move the driver's side seat upper bracket forward.
I took the bracket out, using 8mm socket with a ratchet. There were three bolts holding it on the wall.
Then I drilled new holes about 3/8 inch away from the center of the old holes.
Thread Starter
CF Veteran
Joined: Jan 2013
Posts: 19,219
Likes: 45
From: west chester, pa
Year: 1999
Engine: 4.0
With holes drilled, now go ahead and bolt it back on the wall using three new holes u just drilled..
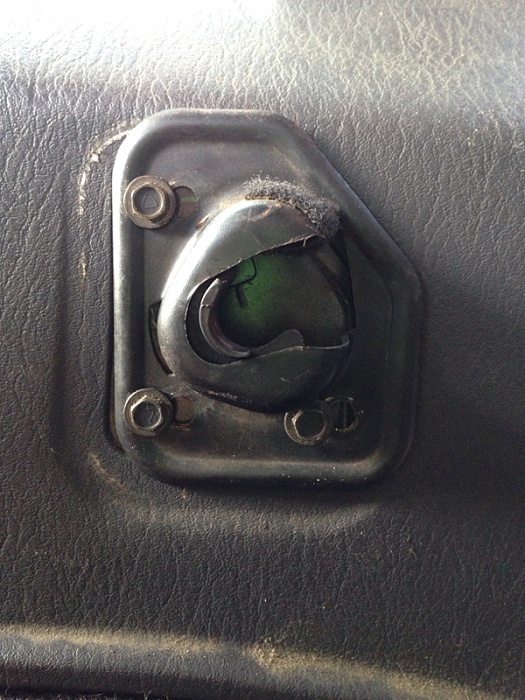
Now u ll be able to fit in a 31" spare tire fully inflated with the hatch fully closed.
I'm not sure if this could apply to 96 and older Cherokees, I never had one before.

Now u ll be able to fit in a 31" spare tire fully inflated with the hatch fully closed.
I'm not sure if this could apply to 96 and older Cherokees, I never had one before.
Thread Starter
CF Veteran
Joined: Jan 2013
Posts: 19,219
Likes: 45
From: west chester, pa
Year: 1999
Engine: 4.0
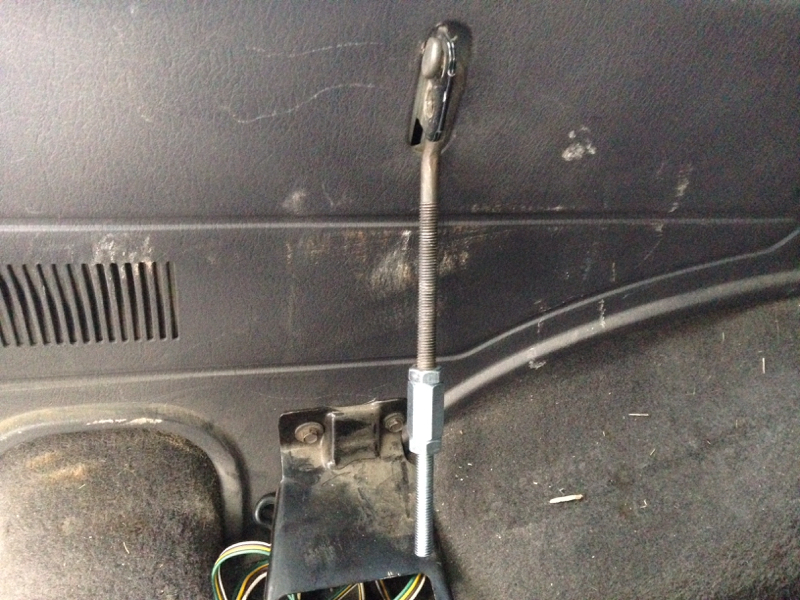
I ordered 10mm x 1.5 coupler, two nuts, and about 4 inches long of threaded rod. That way I'm able to re use the factory spare tire holder.
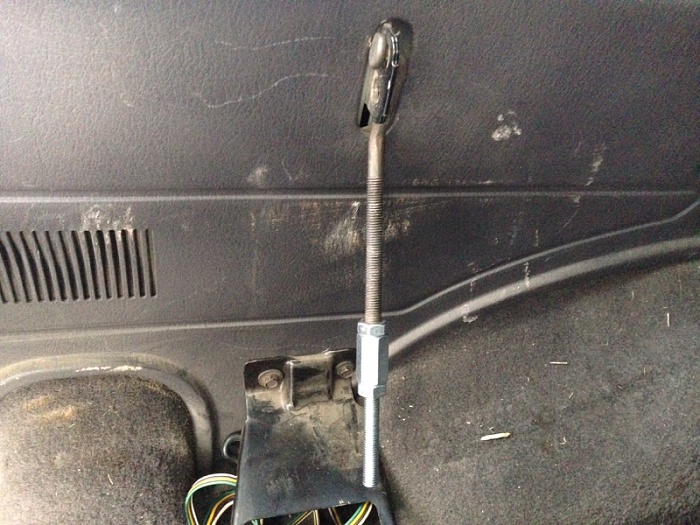
(My spare rim is a Cragar d window rim with 3.75 back spacing) so depending on what rim you are using, u may need shorter or longer threaded rod. Maybe u won't even need it at all and do a custom set up.
(My spare rim is a Cragar d window rim with 3.75 back spacing) so depending on what rim you are using, u may need shorter or longer threaded rod. Maybe u won't even need it at all and do a custom set up.
CF Veteran
Joined: Sep 2010
Posts: 12,692
Likes: 6
From: Mercer County, NJ
Year: 2001
Model: Cherokee
Engine: 4.0L I6 HO
Thanks for renewing this. Seen it once before while back. I believe for a 32" you do this and have to cut the hatch slightly too. When i get a spare 235/85/16 i will see
Thread Starter
CF Veteran
Joined: Jan 2013
Posts: 19,219
Likes: 45
From: west chester, pa
Year: 1999
Engine: 4.0
when I moved the seat bracket forward appx 1/2". I did notice that I still have plenty of room to move it forward but I didn't because the amount of distance I moved was sufficient for 31's.
CF Veteran
Joined: Sep 2010
Posts: 12,692
Likes: 6
From: Mercer County, NJ
Year: 2001
Model: Cherokee
Engine: 4.0L I6 HO
i believe to move the bracket further, you need to drill and thread new holes?? True??
Trending Topics
Thread Starter
CF Veteran
Joined: Jan 2013
Posts: 19,219
Likes: 45
From: west chester, pa
Year: 1999
Engine: 4.0
Thread Starter
CF Veteran
Joined: Jan 2013
Posts: 19,219
Likes: 45
From: west chester, pa
Year: 1999
Engine: 4.0
the piece behind the body is "floating". U could lightly thread the bolts to hold the bracket and push it as far as u can and tighten it. Probably add another 3/16" to the length. U could try drilling new holes on the body and move the floating piece to new set of holes. I didn't attempt that though.
CF Veteran
Joined: Sep 2010
Posts: 12,692
Likes: 6
From: Mercer County, NJ
Year: 2001
Model: Cherokee
Engine: 4.0L I6 HO
the piece behind the body is "floating". U could lightly thread the bolts to hold the bracket and push it as far as u can and tighten it. Probably add another 3/16" to the length. U could try drilling new holes on the body and move the floating piece to new set of holes. I didn't attempt that though.
Senior Member
Joined: Dec 2012
Posts: 606
Likes: 20
From: cariboo, bc
Model: Cherokee
I ordered 10mm x 1.5 coupler, two nuts, and about 4 inches long of threaded rod. That way I'm able to re use the factory spare tire holder.
Attachment 272522
(My spare rim is a Cragar d window rim with 3.75 back spacing) so depending on what rim you are using, u may need shorter or longer threaded rod. Maybe u won't even need it at all and do a custom set up.
Attachment 272522
(My spare rim is a Cragar d window rim with 3.75 back spacing) so depending on what rim you are using, u may need shorter or longer threaded rod. Maybe u won't even need it at all and do a custom set up.
tailgate is snug, in that you have to push it in before you use the handle to unlatch
Thread Starter
CF Veteran
Joined: Jan 2013
Posts: 19,219
Likes: 45
From: west chester, pa
Year: 1999
Engine: 4.0
After I did this mod, I can now fully close the hatch without holding the latch open. The tire is not even snug, it still got plenty of room on either side between hatch and the seat. I would prefer it that way.
Beach Bum
Joined: Jul 2011
Posts: 6,123
Likes: 22
From: Cape Hatteras, North Carolina
Year: 2000 WJ
Model: Grand Cherokee
Engine: 4.0
On my 1996 I loosened the seat-back bracket and pushed it forward. This was just enough clearance to close the hatch door with no issues.
As for the threaded mount, I used a trailer shackle, which is just a 1/4" thick piece of flat stock with a hole at each end. One end rounded and clearanced to fit the low-profile attachment on chassis. J-bolt goes in opposite end.
As for the threaded mount, I used a trailer shackle, which is just a 1/4" thick piece of flat stock with a hole at each end. One end rounded and clearanced to fit the low-profile attachment on chassis. J-bolt goes in opposite end.
Thread Starter
CF Veteran
Joined: Jan 2013
Posts: 19,219
Likes: 45
From: west chester, pa
Year: 1999
Engine: 4.0
Originally Posted by SteveMongr
On my 1996 I loosened the seat-back bracket and pushed it forward. This was just enough clearance to close the hatch door with no issues.
As for the threaded mount, I used a trailer shackle, which is just a 1/4" thick piece of flat stock with a hole at each end. One end rounded and clearanced to fit the low-profile attachment on chassis. J-bolt goes in opposite end.
As for the threaded mount, I used a trailer shackle, which is just a 1/4" thick piece of flat stock with a hole at each end. One end rounded and clearanced to fit the low-profile attachment on chassis. J-bolt goes in opposite end.