
Project: Zombie Olive


Thread Starter
Senior Member
Joined: Aug 2010
Posts: 1,012
Likes: 1
From: NC/SC
Year: 1990
Model: Cherokee
Engine: 4.0
Thanks for the complements guys.
Sure sounds good, Id like to hit up some trails soon when the weather gets a bit nicer.
dbmountain: The tires on the jeep when I first bought it were 31s with zero lift. It rubbed pretty bad though and tore up the inner fender. Now its running new 31s (Falken Rocky mountain A/Ts) and a 2inch lift with the stock fenders taken off. I havent had it rub at all since doing the lift and fenders.
zraffz: Its actually a 1985 firebird with a camaro front end and trans am ground FX. It was in a front end collision and all I had to fix it up at the time was a camaro front end. So its now dubbed the firemaro.
ptonjeep: If you look at I think 5th pic down where the front is painted I did scruff up the original paint up first before painting. The actual steps I took was, sand with 220grit, rinse jeep, sand a couple small rust spots again, rinse, wipe down with acetone, apply primer in original rust spots, paint the green, mask off star and numbers, apply white. and its done.
Also sorry to those who asked me about the bronco tire carrier. Ive been busy and its raining all day today. I'll try to grab pics of the mount tomorrow.


Thread Starter
Senior Member
Joined: Aug 2010
Posts: 1,012
Likes: 1
From: NC/SC
Year: 1990
Model: Cherokee
Engine: 4.0
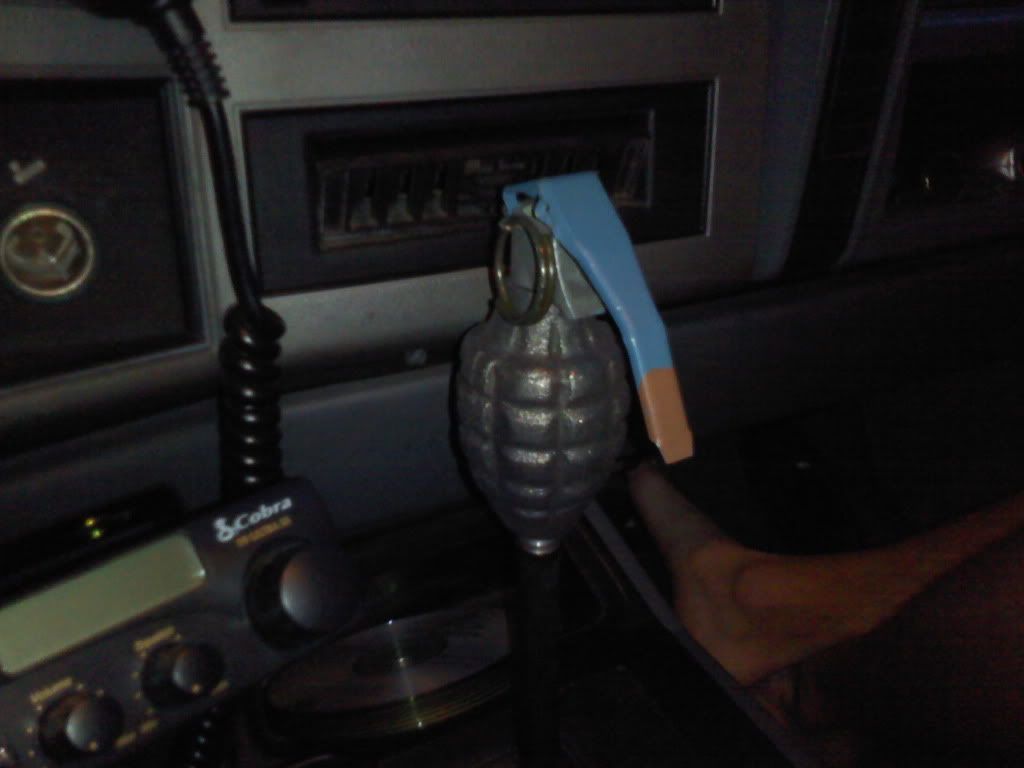
The new lights are amazing. Makes a huge difference. The stock lights are just plain dangerous IMO. Also today I went to an army surplus store and bought a grenade. I made it into a shift ****. Yes the safety button still works. You have to push on the grenade lever to unlock it.


Thread Starter
Senior Member
Joined: Aug 2010
Posts: 1,012
Likes: 1
From: NC/SC
Year: 1990
Model: Cherokee
Engine: 4.0
Got the new bumper mounted. Previous owner wreaked it at one point and the passenger frame rail was bent (FML). It took me a lot longer than it should have to get the bumper mounted. Also got my cherokee forum stickers in the mail yesterday YAY. Also had to replace the water pump since the old one went bad. Still need to cut and fold the front fenders to make the bumper look correct.


Thread Starter
Senior Member
Joined: Aug 2010
Posts: 1,012
Likes: 1
From: NC/SC
Year: 1990
Model: Cherokee
Engine: 4.0
Thought Id post a better pic of the cherokee than the ****ty cellphone pic. Also I added lil headlight bars to kinda give it a cool look. Also those who asked me about the bronco mount heres a couple pics of the side mounts. I added reinforcement plates on the inside of the body to not warp the body.


Thread Starter
Senior Member
Joined: Aug 2010
Posts: 1,012
Likes: 1
From: NC/SC
Year: 1990
Model: Cherokee
Engine: 4.0
Also heres a lil tutorial about how I did the grenade shifter functional for an automatic since a few people have PMed me and asked me about it. I might go back and make a better tutorial later if theres enough interest. Total cost was like 11 bucks with the metal rod.
Materials:
-Grenade from army surplus store. Can be any style, the cap should be the same.
-drill bits
-metal rod of some sort
-rubber gasket for shifter
-fishing wire
-cap for metal rod (must fit inside of grenade and also able to press in shift lock button)
Step 1: Remove factory shifter by pulling hard on it. I used a rubber mallet and banged it off. IT came off easily with no damage. Next disassemble the grenade so that all you have is the shell.
Step 2: My grenade already had a hole on the bottom, but it needed to be bigger so I drilled it out some. I drilled it out till it was a tiny bit bigger than the shifter itself. It fits pretty snug as is. Make sure you dont drill the hole too big. I put a piece of rubber on it after mock up and used a mallet and banged it in. BEFORE you bang it in make sure you screw the top piece back on to make sure the thread lines up correctly so the shifter is in the position you want it to be in. It should now look like this pic.

Step 3: Take your the top piece (idk what its called, refer to picture) and drill a hole all the way through it. Make sure the rod you have can slide in and out of it easily.


Step 4: Now take your rod and fit the end piece on it.(this will allow it to press the shiftlock button a lot better) Without the piece it will work but it might not stay in place as well.

Step 5: Stick the rod into the grenade shell with the end piece facing down. Now put the take the top you drilled a hole in and screw it into the top with the rod sticking out of it.


Step 6: Now take your lever piece and hinge it back in place. Wrap a piece of fishing wire around the lever and the bottom hole of the shifter on both sides so that it doesnt fall out of place. Also relocate the little ring and pin to a different hole.It should not look like this.

Materials:
-Grenade from army surplus store. Can be any style, the cap should be the same.
-drill bits
-metal rod of some sort
-rubber gasket for shifter
-fishing wire
-cap for metal rod (must fit inside of grenade and also able to press in shift lock button)
Step 1: Remove factory shifter by pulling hard on it. I used a rubber mallet and banged it off. IT came off easily with no damage. Next disassemble the grenade so that all you have is the shell.
Step 2: My grenade already had a hole on the bottom, but it needed to be bigger so I drilled it out some. I drilled it out till it was a tiny bit bigger than the shifter itself. It fits pretty snug as is. Make sure you dont drill the hole too big. I put a piece of rubber on it after mock up and used a mallet and banged it in. BEFORE you bang it in make sure you screw the top piece back on to make sure the thread lines up correctly so the shifter is in the position you want it to be in. It should now look like this pic.
Step 3: Take your the top piece (idk what its called, refer to picture) and drill a hole all the way through it. Make sure the rod you have can slide in and out of it easily.
Step 4: Now take your rod and fit the end piece on it.(this will allow it to press the shiftlock button a lot better) Without the piece it will work but it might not stay in place as well.
Step 5: Stick the rod into the grenade shell with the end piece facing down. Now put the take the top you drilled a hole in and screw it into the top with the rod sticking out of it.
Step 6: Now take your lever piece and hinge it back in place. Wrap a piece of fishing wire around the lever and the bottom hole of the shifter on both sides so that it doesnt fall out of place. Also relocate the little ring and pin to a different hole.It should not look like this.
Last edited by sam24th; Apr 13, 2011 at 07:32 PM.


