View Poll Results: Grille color


Multiple Choice Poll. Voters: 7. You may not vote on this poll
Project: Clockwork Orange
 05-12-2014, 02:18 PM
#46
Member
Thread Starter

Join Date: Sep 2009
Location: Colorado Springs, CO
Posts: 136
Likes: 0
Received 0 Likes
on
0 Posts
Year: 2000
Model: Cherokee
Engine: 4.0
Nice! I love the strips. So cheap and easy to work with. So is the adhesive sticking to the headliner pretty well? I could see it un-sticking after awhile. I did a combo of green and white in my car to give it the light-green color of the dash and instrument panel.
So far, so good. Though, it hasn't been out in the heat of summer yet, so will see. But I have done some "test pulls" and it seems to want to tear the felt off before it's coming off.
 05-12-2014, 08:20 PM
#47
Member
Thread Starter
Join Date: Sep 2009
Location: Colorado Springs, CO
Posts: 136
Likes: 0
Received 0 Likes
on
0 Posts
Year: 2000
Model: Cherokee
Engine: 4.0
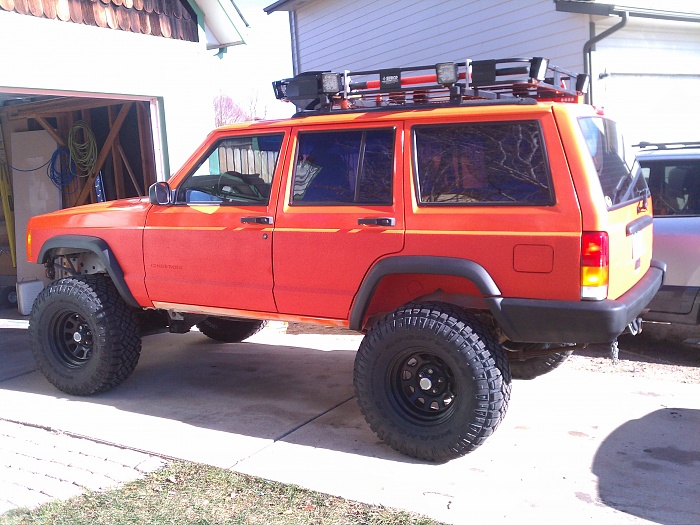
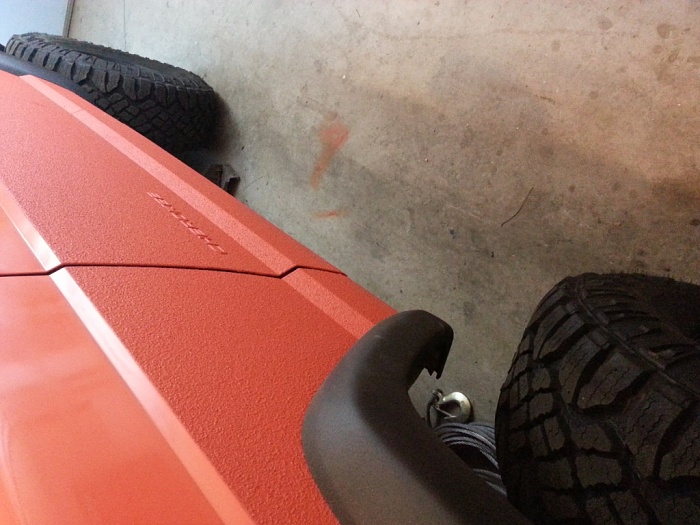
This became orange, because I had the orange bedliner, and it goes well with the SAR-centric function.
05-12-2014, 08:42 PM
#48
Member
Thread Starter
Join Date: Sep 2009
Location: Colorado Springs, CO
Posts: 136
Likes: 0
Received 0 Likes
on
0 Posts
Year: 2000
Model: Cherokee
Engine: 4.0
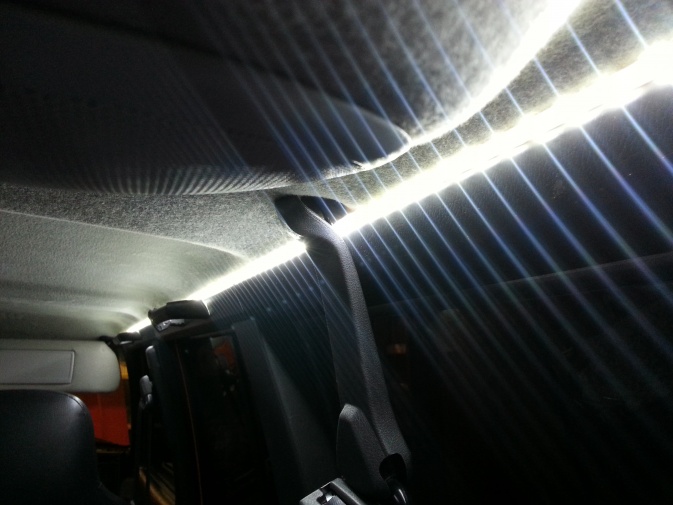
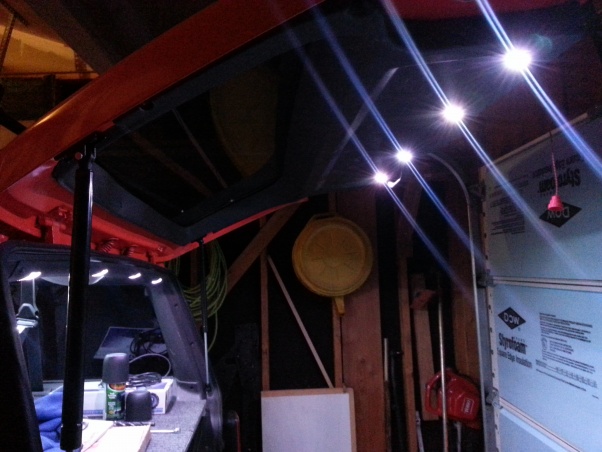
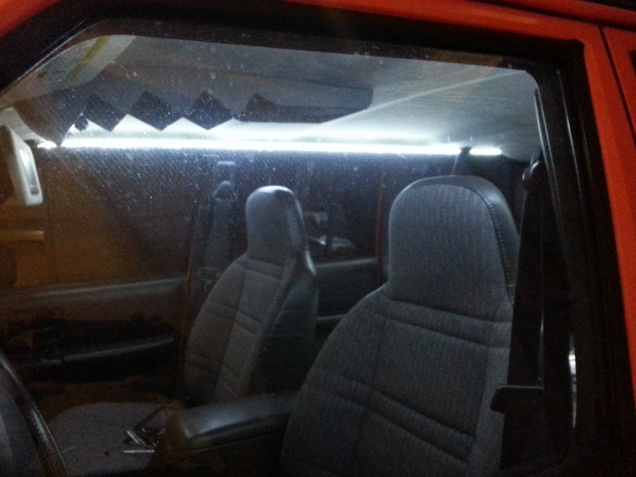
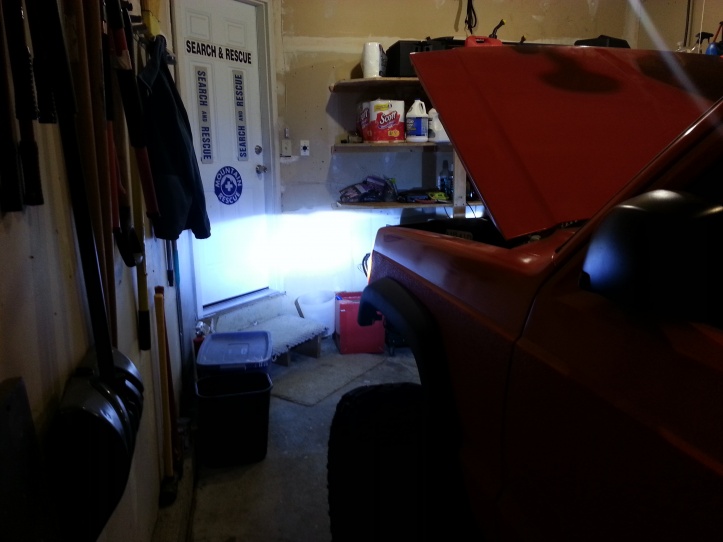
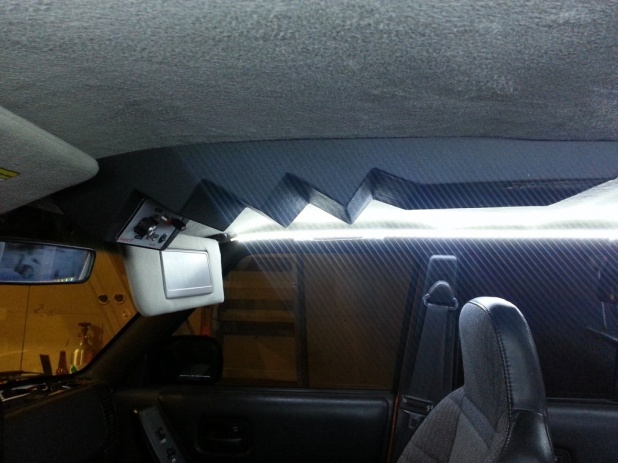
 I'm a LED freak
But, here's a few.

 05-12-2014, 08:46 PM
#49
Member
Thread Starter
Join Date: Sep 2009
Location: Colorado Springs, CO
Posts: 136
Likes: 0
Received 0 Likes
on
0 Posts
Year: 2000
Model: Cherokee
Engine: 4.0
Getting back to it...
After about three weeks of the reconfigured digit fiasco, I got to a point where I could at least attempt to work on the Jeep. So, I continued to try to get the headlights set up.
[old pic]
I wont go into a lot of detail, as this mod has been covered several times, but I got some AutoPal phenolic housings, heated them apart, dremeled out the back for the H2 projectors to fit in, then machined some backing plates to cover the hole and center the projector, adjusted and leveled everything, reinstalled the lenses and sealed it all up with silicone. I think I spent about $80 total on the housings, projectors, and HID's. The difference from the stock pitiful halogens is unreal.
{old Pics]
At some point in the future, I will probably build or buy some LED headlights, but this is a fairly inexpensive solution to MUCH better than stock lights.
Attachment 242075
There are really only two downsides to this setup. The HID's do take 15 seconds or so to fully warm up, and reach their full brightness. Not a big deal to me.
Second, and more important, is when you decide that a great place to mount your half-height HID ballast would be behind your ECM in the engine compartment- don't forget that your washer bottle is RIGHT on the other side of that inner fender that you are drilling through.
So, I goobed up a much longer screw with some urethane dum dum sealant, and ran it into the new "drain" I created in my washer bottle. So far so good. Otherwise, I will have a washer bottle with about a 1/2 cup capacity...
 05-13-2014, 12:34 AM
#50
Member
Thread Starter
Join Date: Sep 2009
Location: Colorado Springs, CO
Posts: 136
Likes: 0
Received 0 Likes
on
0 Posts
Year: 2000
Model: Cherokee
Engine: 4.0
Moving on..
I mentioned in the beginning of the thread, that I was starting to have some really screwy handling and such, which was a big part of the reason I decided to park it, which led to the rebuild.
The really unnerving thing was that occasionally when turning left, it almost felt like the Right rear suspension was collapsing. But, it didn't do it all the time.
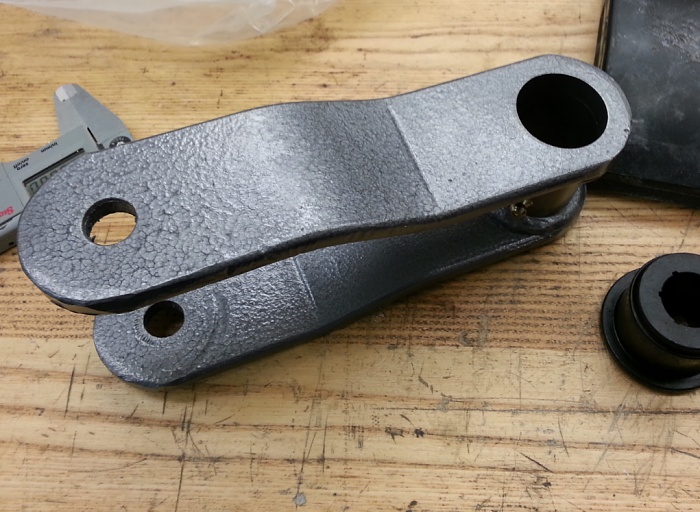
What I found was that the outer hole in the Pass side shackle bucket (where the shackle pivot bolt goes through) was elongated to about 1.5" long vertically. This was probably caused by the terrible 90 degree shackle angle just hammering the pivot point, but who can be sure. (Honestly I never thought the ride was all that bad.)
That was all I could see at the time, but figured that there was enough friction on the sheet metal of the box between the bolt head and shackle, that it would not move under moderate loads, but a hard turn would let it slide up and down- the "collapsing" suspension feeling I was having. Thought I had taken some pics of all this, but can't find anything.
So, the next issue was that the pivot bolt was frozen into the bushing sleeve in the shackle. Many attempts at brute force and drowing it in PB did nothing but leave me with a headless bolt.
After some consideration of how to fix both the mount and the shackle issue, I decided to get a set of HD Offroad Engineering no-lift shackle brackets. Perfect fix for my issue. Sort of.
Out came the sawzall, and finally was able to get the shackle pivot bolt cut, and after hacking out the factory mount, was able to see the real damage. All that up and down flexing had also ripped the nutsert from the body on the backside, along with most of the "nut hump".
So, I cut everything else out, ground it smooth, and stuck in the new mount. They are currently bolted, but will get welded as soon as I get some more weld gas.
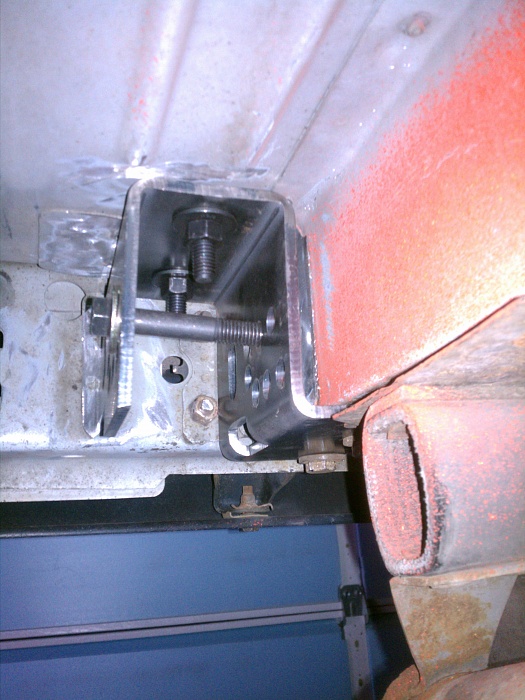
I had to clearance the bracket slightly for the bumper bolts, but no big deal. There is supposed to be a bolt in the original shackle hole but obviously I couldn't do that, since the nut was ripped out. Another reason to weld them.

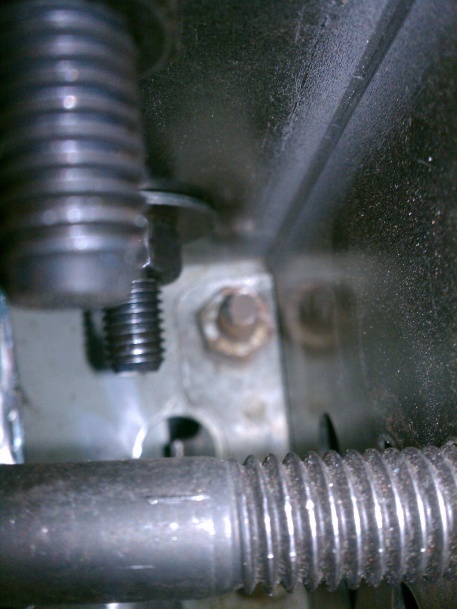
I burned the wasted shackle bushings out of the shackles, cleaned them up, and stuffed new bushings-mostly.
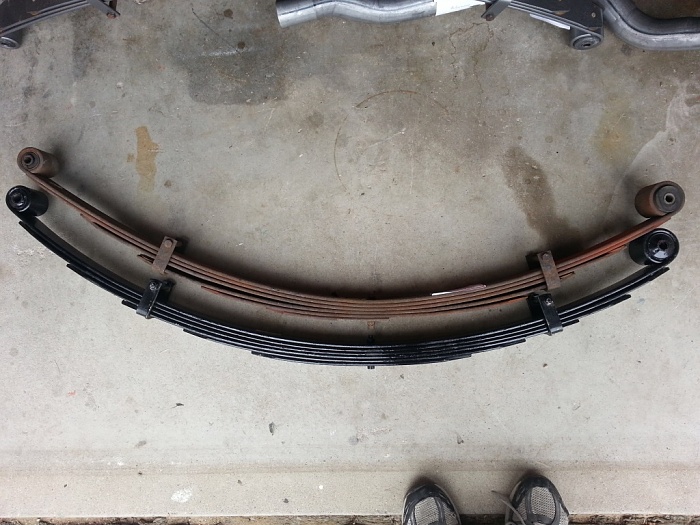
I got a new set of rear springs, as the old ones had broken bottom leafs on both sides. That's how it sits right now, on stands, no rear springs waiting on me to make new u bolt plates, and get my missing bushing.
I mentioned in the beginning of the thread, that I was starting to have some really screwy handling and such, which was a big part of the reason I decided to park it, which led to the rebuild.
The really unnerving thing was that occasionally when turning left, it almost felt like the Right rear suspension was collapsing. But, it didn't do it all the time.
What I found was that the outer hole in the Pass side shackle bucket (where the shackle pivot bolt goes through) was elongated to about 1.5" long vertically. This was probably caused by the terrible 90 degree shackle angle just hammering the pivot point, but who can be sure. (Honestly I never thought the ride was all that bad.)
That was all I could see at the time, but figured that there was enough friction on the sheet metal of the box between the bolt head and shackle, that it would not move under moderate loads, but a hard turn would let it slide up and down- the "collapsing" suspension feeling I was having. Thought I had taken some pics of all this, but can't find anything.
So, the next issue was that the pivot bolt was frozen into the bushing sleeve in the shackle. Many attempts at brute force and drowing it in PB did nothing but leave me with a headless bolt.
After some consideration of how to fix both the mount and the shackle issue, I decided to get a set of HD Offroad Engineering no-lift shackle brackets. Perfect fix for my issue. Sort of.
Out came the sawzall, and finally was able to get the shackle pivot bolt cut, and after hacking out the factory mount, was able to see the real damage. All that up and down flexing had also ripped the nutsert from the body on the backside, along with most of the "nut hump".
So, I cut everything else out, ground it smooth, and stuck in the new mount. They are currently bolted, but will get welded as soon as I get some more weld gas.

I had to clearance the bracket slightly for the bumper bolts, but no big deal. There is supposed to be a bolt in the original shackle hole but obviously I couldn't do that, since the nut was ripped out. Another reason to weld them.
I burned the wasted shackle bushings out of the shackles, cleaned them up, and stuffed new bushings-mostly.
I got a new set of rear springs, as the old ones had broken bottom leafs on both sides. That's how it sits right now, on stands, no rear springs waiting on me to make new u bolt plates, and get my missing bushing.
Last edited by mntnresq; 05-14-2014 at 10:41 AM.
05-14-2014, 12:37 PM
#51
Member
Thread Starter
Join Date: Sep 2009
Location: Colorado Springs, CO
Posts: 136
Likes: 0
Received 0 Likes
on
0 Posts
Year: 2000
Model: Cherokee
Engine: 4.0
Still playing catch up.
As much as some new vehicles are apparent cruel jokes on history (take the new "Cherokee") many of them do have some nice features which are desirable. One of those things are the infotainment systems many of them have.
Because of that, I knew early on that I wanted to get rid of my factory stereo, and replace it with an in-dash tablet, that would handle my audio, provide navigation, mapping, internet, etc. Just doing that would have been fairly easy. Of course, I can't do easy. So, I decided to do something a bit different with my setup, and of course make it more complicated.
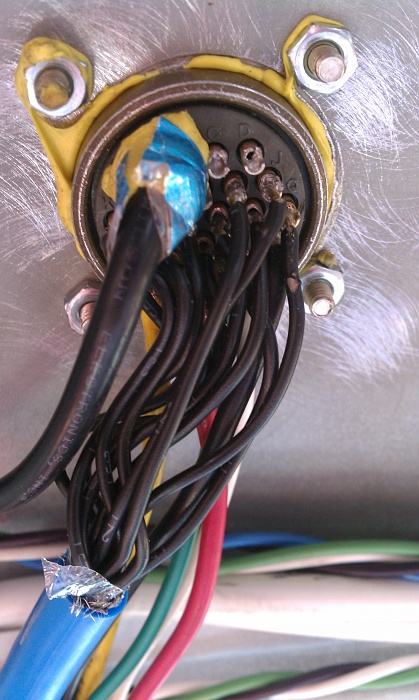
I thought, it would be cool if I could basically control all of my accessory stuff through the tablet as well. So, I pursued a setup which would allow me to control all of my regular and emergency lights, lockers, etc, basically all of my switching, from the tablet, and/or my phone via Bluetooth. Once I decided what to do, I prepared for it in a lot of the wiring I did while I had the interior apart.
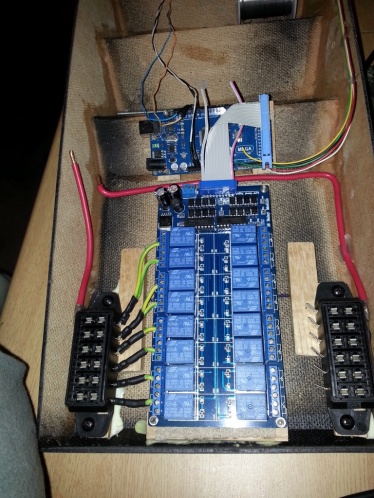
The first thing was what components do I need to do this, how do they have to be connected, and what software has to be written. Using an Arduino Mega 2560 open-source micro controller, and a relay board, I started my development phase.
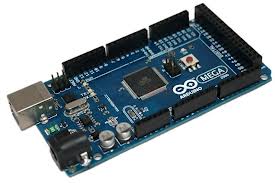
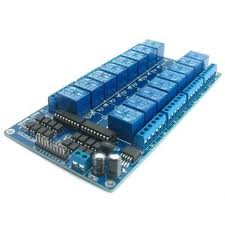
I won't bore you with details of learning how to figure out connections, coding, etc, but if you are interested, there is a ton of info out there. I would start at arduino.cc
Right now, I have the Arduino code mostly written and functional, sending the commands directly through a Bluetooth terminal. Still working on development of the Java App for my Android, but have it about 70%.
Next, was where and how to mount and contain everything.
I previously had a custom overhead console in the jeep that I had built, so I decided to make a new one, structured around what I wanted to do. It needed to hold my siren controller, radios, and all of the controller components, plus left a bit of room for future add ons.
I drew up the console components in MasterCam, and then cut the pieces out of 1/8" hardboard on the mill.
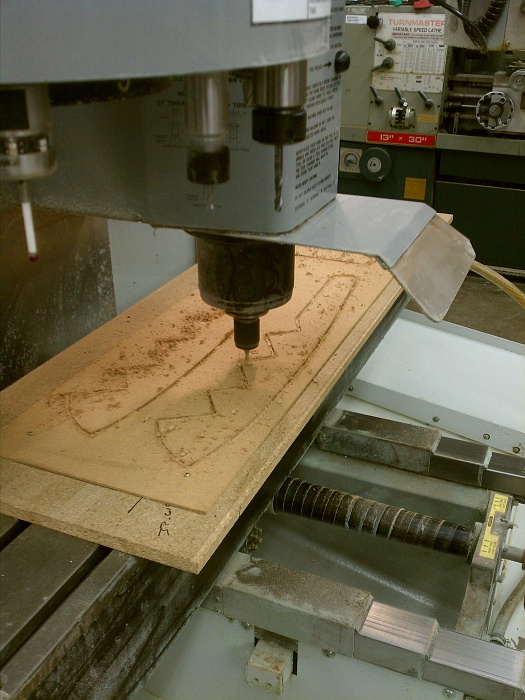
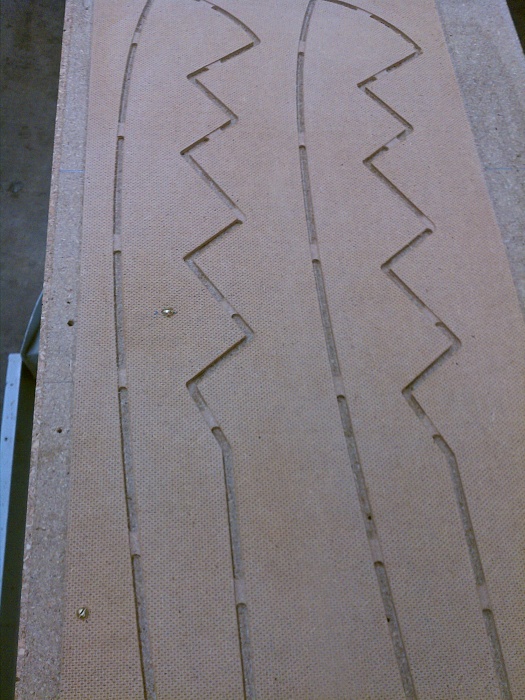
Once I cut all the pieces, they were assembled and glued together. Some necessary braces were put in, and I started working out the layout and wiring of the interior components.

As much as some new vehicles are apparent cruel jokes on history (take the new "Cherokee") many of them do have some nice features which are desirable. One of those things are the infotainment systems many of them have.
Because of that, I knew early on that I wanted to get rid of my factory stereo, and replace it with an in-dash tablet, that would handle my audio, provide navigation, mapping, internet, etc. Just doing that would have been fairly easy. Of course, I can't do easy. So, I decided to do something a bit different with my setup, and of course make it more complicated.
I thought, it would be cool if I could basically control all of my accessory stuff through the tablet as well. So, I pursued a setup which would allow me to control all of my regular and emergency lights, lockers, etc, basically all of my switching, from the tablet, and/or my phone via Bluetooth. Once I decided what to do, I prepared for it in a lot of the wiring I did while I had the interior apart.
The first thing was what components do I need to do this, how do they have to be connected, and what software has to be written. Using an Arduino Mega 2560 open-source micro controller, and a relay board, I started my development phase.
I won't bore you with details of learning how to figure out connections, coding, etc, but if you are interested, there is a ton of info out there. I would start at arduino.cc
Right now, I have the Arduino code mostly written and functional, sending the commands directly through a Bluetooth terminal. Still working on development of the Java App for my Android, but have it about 70%.
Next, was where and how to mount and contain everything.
I previously had a custom overhead console in the jeep that I had built, so I decided to make a new one, structured around what I wanted to do. It needed to hold my siren controller, radios, and all of the controller components, plus left a bit of room for future add ons.
I drew up the console components in MasterCam, and then cut the pieces out of 1/8" hardboard on the mill.

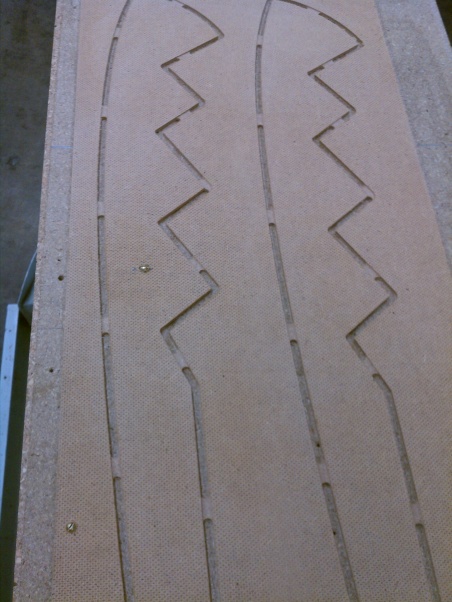
Once I cut all the pieces, they were assembled and glued together. Some necessary braces were put in, and I started working out the layout and wiring of the interior components.
Last edited by mntnresq; 05-19-2014 at 01:44 AM.
05-14-2014, 12:50 PM
#52
Member
Thread Starter
Join Date: Sep 2009
Location: Colorado Springs, CO
Posts: 136
Likes: 0
Received 0 Likes
on
0 Posts
Year: 2000
Model: Cherokee
Engine: 4.0
Just working through the wiring-

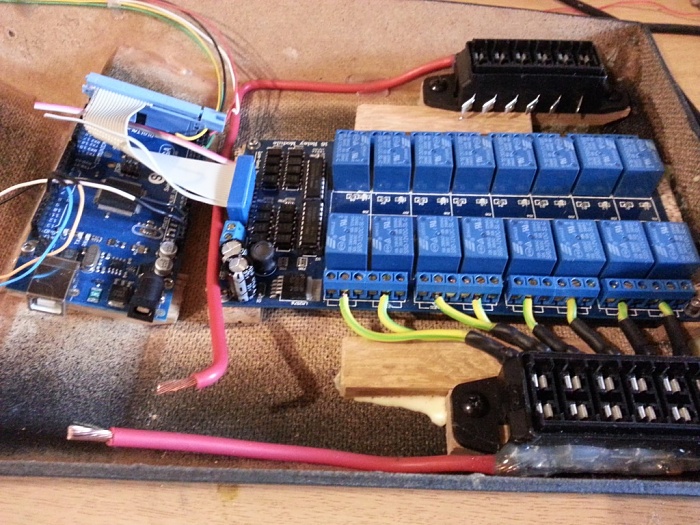
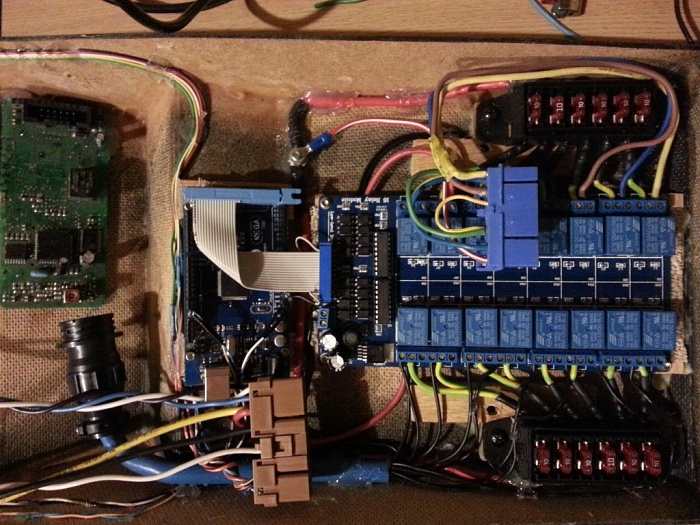

Threw it in for a test fit, ensuring all the connectors would clear, and that everything functions as planned. It does.

I have to work out some more interior wiring, build some voltage regulators and install those, and related.


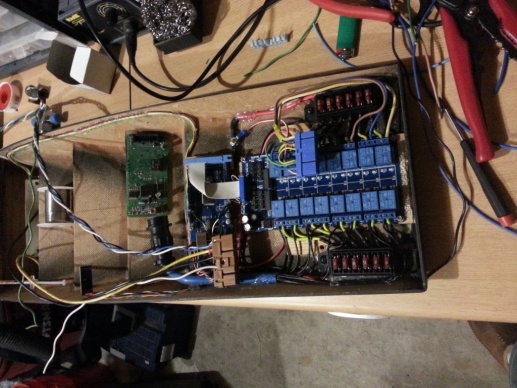
Threw it in for a test fit, ensuring all the connectors would clear, and that everything functions as planned. It does.
I have to work out some more interior wiring, build some voltage regulators and install those, and related.
Last edited by mntnresq; 05-15-2014 at 09:18 AM.
05-16-2014, 12:10 AM
#53
Member
Thread Starter
Join Date: Sep 2009
Location: Colorado Springs, CO
Posts: 136
Likes: 0
Received 0 Likes
on
0 Posts
Year: 2000
Model: Cherokee
Engine: 4.0
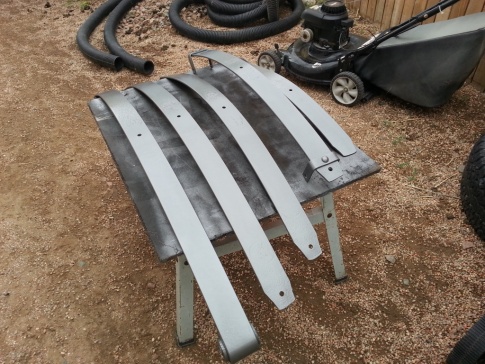
Not too much to report. Been working through some issues with 4wp on warranting my leaf springs. When I pulled it apart, both had broken bottom leafs. First they said they would warranty them, now they are trying to say they aren't RE springs.
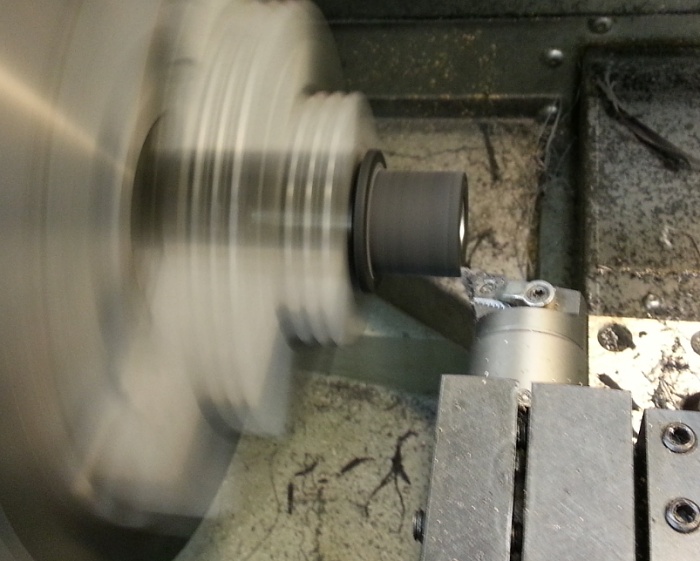
Next was to try to prep my shackles for reinstall. Burned out the old bushings, cleaned them up and painted them. A long while back I bought a Daystar poly spring and shackle bushing set. Unfortunately, I didn't think about the fact that I have aftermarket springs and shackles, so none of it fit. It had been too long to return it, so I had to see what I could do to make them work.
I decided to just machine the shackle bushings down to the right size. Since I'm replacing the springs, I won't use the other bushings yet, but may find another use for them.
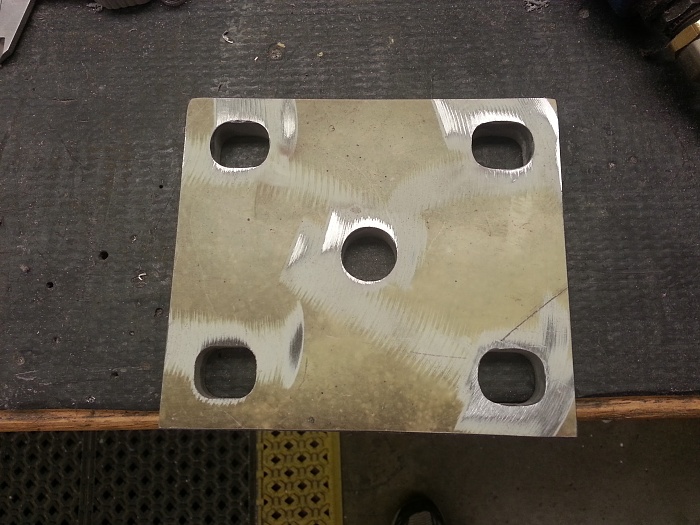
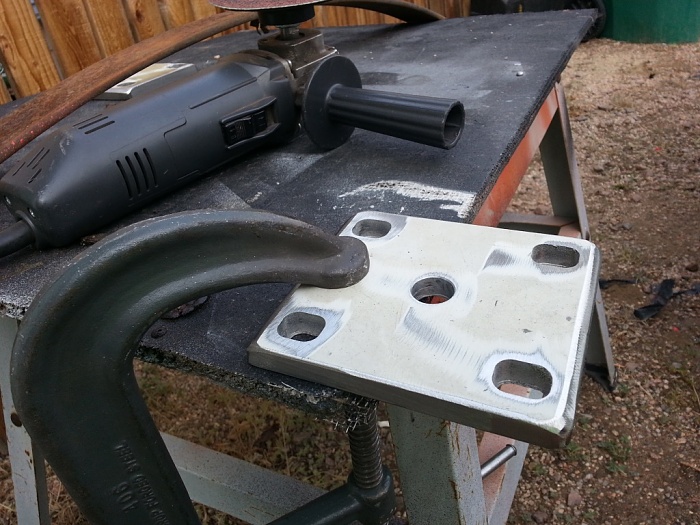
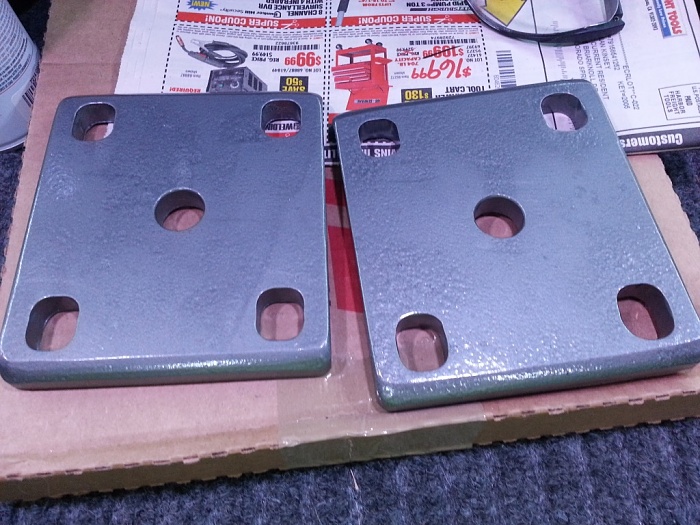
After that, I cut out some pieces of 1/2" plate steel, to make some new spring plates. The new U bolts I have are 5/8" shank, and won't fit the holes in the factory spring plates. I could have just opened up the holes, but that wouldn't leave very much metal between the hole and the edge. This will be good for later as well, as I have a better platform to weld to if I decide I need bumpstops in the back.

Tomorrow I will radius the edges, and get the holes machined into them. If I can get that done, then maybe there's a chance I can actually get the axle back under the Jeep this weekend, which would be really nice. I would like to get it out of the garage so I can move some things around...
Next was to try to prep my shackles for reinstall. Burned out the old bushings, cleaned them up and painted them. A long while back I bought a Daystar poly spring and shackle bushing set. Unfortunately, I didn't think about the fact that I have aftermarket springs and shackles, so none of it fit. It had been too long to return it, so I had to see what I could do to make them work.
I decided to just machine the shackle bushings down to the right size. Since I'm replacing the springs, I won't use the other bushings yet, but may find another use for them.


After that, I cut out some pieces of 1/2" plate steel, to make some new spring plates. The new U bolts I have are 5/8" shank, and won't fit the holes in the factory spring plates. I could have just opened up the holes, but that wouldn't leave very much metal between the hole and the edge. This will be good for later as well, as I have a better platform to weld to if I decide I need bumpstops in the back.
Tomorrow I will radius the edges, and get the holes machined into them. If I can get that done, then maybe there's a chance I can actually get the axle back under the Jeep this weekend, which would be really nice. I would like to get it out of the garage so I can move some things around...
Last edited by mntnresq; 05-16-2014 at 10:14 AM.
05-16-2014, 12:17 AM
#54
Member
Thread Starter
Join Date: Sep 2009
Location: Colorado Springs, CO
Posts: 136
Likes: 0
Received 0 Likes
on
0 Posts
Year: 2000
Model: Cherokee
Engine: 4.0
Ok.. fixed my screwy post from last night... Don't try to update from your phone at midnight, when you are half asleep.
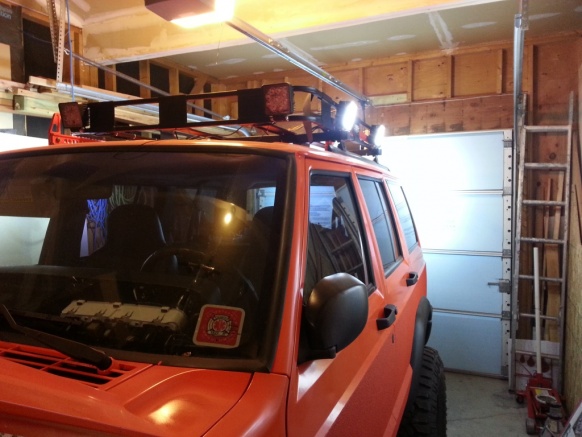
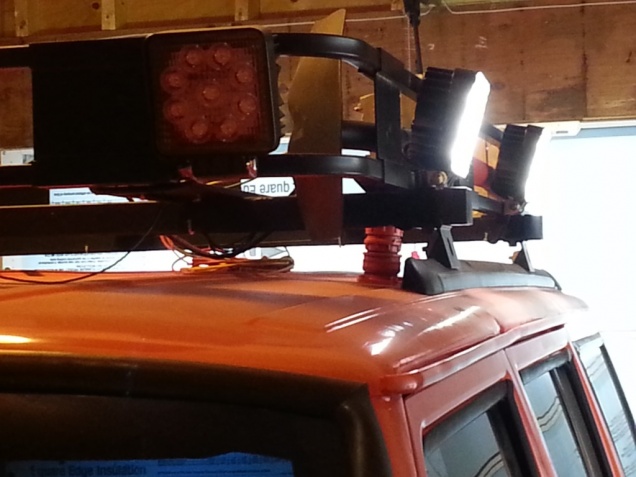
More stuff- Another thing I needed to figure out was my emergency light setup. With the roof rack on, a regular lightbar wasn't going to work, as it would be blocked by the rack.
So, I decided I would build some new housings to hold the heads from the lightbar I have, which would allow perimeter lighting from the rack.
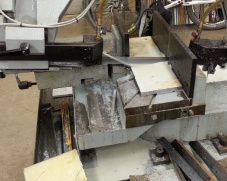
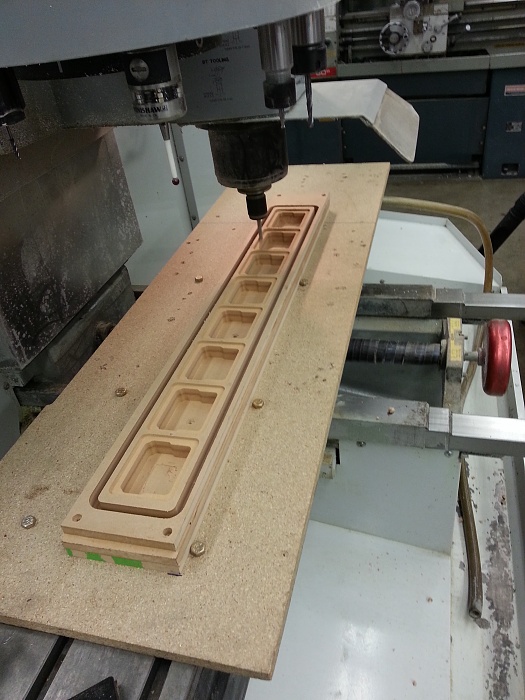
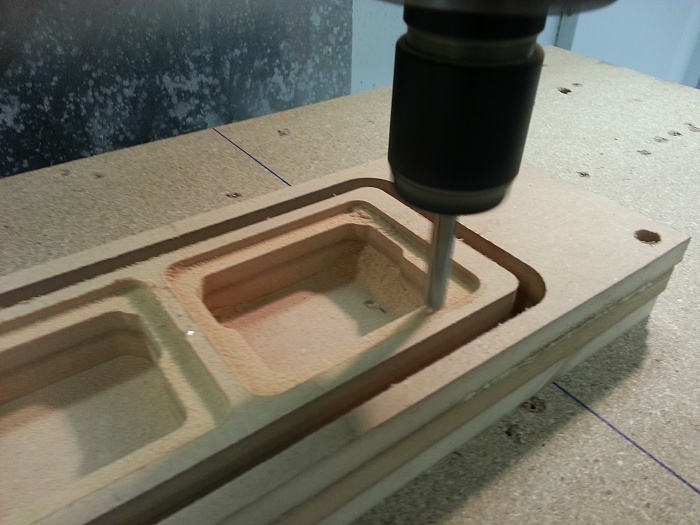
I measured the heads, and available space on the rack, considering the area lights already installed, and the spotlight bar I plan to add. I drew up some housings in CAD, and machined the sections out of MDF.
Then I sanded and sealed them, then covered them in the same aerosol bedliner I used before.
These will get mounted on the front and rear of the rack, with eight heads each, and the sides will get three each. I am also building some custom 10 watt LED's for the grille, tail lights, side markers, and maybe elsewhere.
The front one also includes a recess for the light controller, rather than mount it inside, as I already have enough wires going out through the roof.
More stuff- Another thing I needed to figure out was my emergency light setup. With the roof rack on, a regular lightbar wasn't going to work, as it would be blocked by the rack.

So, I decided I would build some new housings to hold the heads from the lightbar I have, which would allow perimeter lighting from the rack.
I measured the heads, and available space on the rack, considering the area lights already installed, and the spotlight bar I plan to add. I drew up some housings in CAD, and machined the sections out of MDF.


Then I sanded and sealed them, then covered them in the same aerosol bedliner I used before.
These will get mounted on the front and rear of the rack, with eight heads each, and the sides will get three each. I am also building some custom 10 watt LED's for the grille, tail lights, side markers, and maybe elsewhere.
The front one also includes a recess for the light controller, rather than mount it inside, as I already have enough wires going out through the roof.

Last edited by mntnresq; 05-16-2014 at 10:34 AM.
05-16-2014, 07:23 PM
#55
Member
Join Date: Apr 2014
Location: The Isle of Long, in happy and sunny New York.
Posts: 202
Likes: 0
Received 0 Likes
on
0 Posts
Year: 1999
Model: Cherokee
Engine: Supercharged 440 Magnum punched .60 - yeah right.. 4.0 like everyone else.
After reading your entire build thread, drooling over many of the custom options you added...I have come to terms with the fact that you my friend are an Engineering God and your house is the Mt.Olympus of machine shops. Thank you.
05-16-2014, 10:11 PM
#56
Member
Thread Starter
Join Date: Sep 2009
Location: Colorado Springs, CO
Posts: 136
Likes: 0
Received 0 Likes
on
0 Posts
Year: 2000
Model: Cherokee
Engine: 4.0
As for the shop, not mine (I only wish)- but I am very lucky to work in an Aeronautical Engineering/Testing lab where we have a fully equipped machine shop, that I have access to.
05-16-2014, 10:52 PM
#57
Member
Thread Starter
Join Date: Sep 2009
Location: Colorado Springs, CO
Posts: 136
Likes: 0
Received 0 Likes
on
0 Posts
Year: 2000
Model: Cherokee
Engine: 4.0
Well, thought I might have the axle back in permanently by now, but noooo.
4WhelPutz declared my original RE springs unworthy of warranty replacement, basically because they couldn't determine that they were indeed RE springs. Well, they are 10 years old, and believe it or not, the sticker fell off already.
But clearly these are no where near the same springs.
Oh well, I know better than to expect much from that place. I might even be willing to believe they could be different springs. Ok, I offer to buy them, on their "price match" policy. Says right on their website, " If you find a lower price on a product from a competitor, we will match it." Well, only as long as that price is really close to their current price apparently. The identical springs I found on Amazon for $50ea less, with free shipping, are apparently too good a deal, and I was told there is no way they can honor that price. **** bags.
So, plan B.5 comes in. I tore the old packs apart, wire wheeled the remaining leafs to death, and hosed them in some Rustoleum hammered grey.

They will get thrown back on with the original spring plates and Ubolts for now, so I can at least move it around. Now just need to figure out what I want to do for new springs, Deavers or Alcans would be great, but I'm too cheap (broke) for that.
Then, in preparation for whatever springs I end up with, I finished up the new spring plates.
They will get set aside until I get ready to do the new springs. I am leaning toward a swap to an 8.8, so it may all happen then.
4WhelPutz declared my original RE springs unworthy of warranty replacement, basically because they couldn't determine that they were indeed RE springs. Well, they are 10 years old, and believe it or not, the sticker fell off already.
But clearly these are no where near the same springs.

Oh well, I know better than to expect much from that place. I might even be willing to believe they could be different springs. Ok, I offer to buy them, on their "price match" policy. Says right on their website, " If you find a lower price on a product from a competitor, we will match it." Well, only as long as that price is really close to their current price apparently. The identical springs I found on Amazon for $50ea less, with free shipping, are apparently too good a deal, and I was told there is no way they can honor that price. **** bags.
So, plan B.5 comes in. I tore the old packs apart, wire wheeled the remaining leafs to death, and hosed them in some Rustoleum hammered grey.
They will get thrown back on with the original spring plates and Ubolts for now, so I can at least move it around. Now just need to figure out what I want to do for new springs, Deavers or Alcans would be great, but I'm too cheap (broke) for that.
Then, in preparation for whatever springs I end up with, I finished up the new spring plates.


They will get set aside until I get ready to do the new springs. I am leaning toward a swap to an 8.8, so it may all happen then.
05-16-2014, 11:02 PM
#58
Member
Thread Starter
Join Date: Sep 2009
Location: Colorado Springs, CO
Posts: 136
Likes: 0
Received 0 Likes
on
0 Posts
Year: 2000
Model: Cherokee
Engine: 4.0
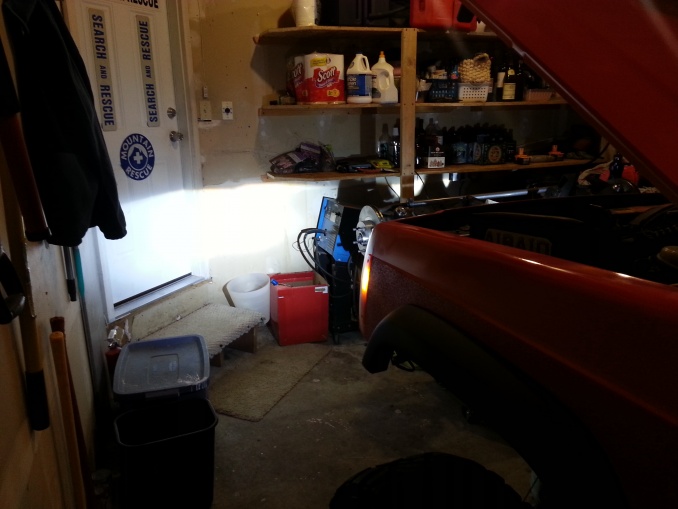
...and, some random pics from today. No real reason, was playing with the Bluetooth remote switching of the roof lights.


 05-18-2014, 01:45 AM
#59
Member
Thread Starter
Join Date: Sep 2009
Location: Colorado Springs, CO
Posts: 136
Likes: 0
Received 0 Likes
on
0 Posts
Year: 2000
Model: Cherokee
Engine: 4.0
Good God, is this thing done yet?
Noooo.
Oh well. So, I spent most of the day on the Jeep, and have a seemingly very small amount to show for it.
As I mentioned, 4WheelPutz screwed me on my warranty leafs, so I had to try to make due with my old springs, minus the bottom leaf. I basically had to wait for paint to dry, so I found something to do.
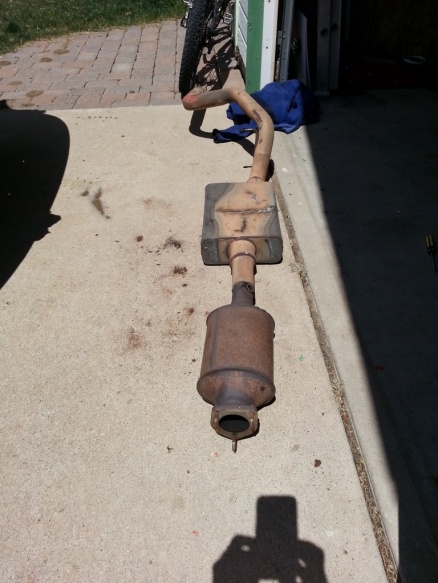
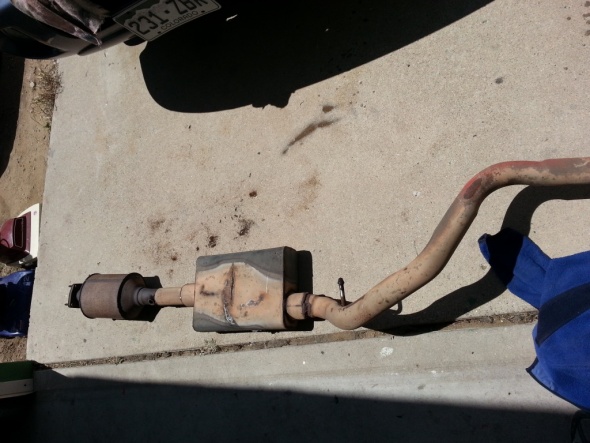
My old exhaust has been getting progressively worse over time, and my muffler seemed about to break in half.
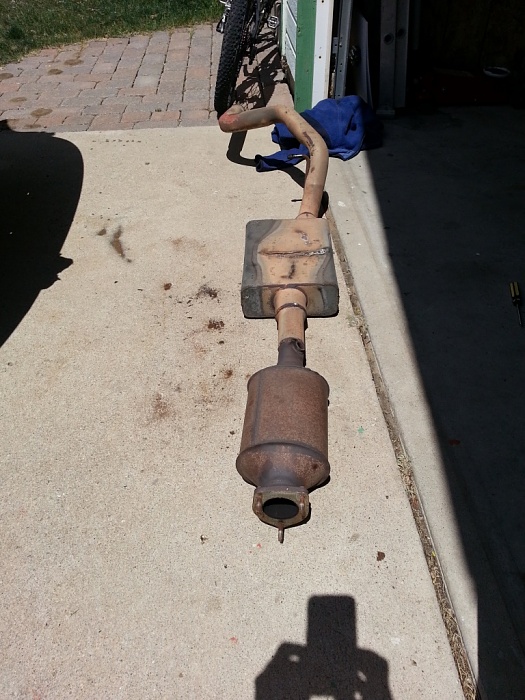

So, I rang Summit, and ordered up a new high-flow universal cat, some clamps, mandrel-bent tailpipe, and related. I have been sitting on a Flowmaster 40 series for about 20 years. Bought it for one of my Chevelles years ago, and been taking up space in the garage ever since... until today.
It took several tries of fitting to get it right, but I am pretty happy right now with how it came out.
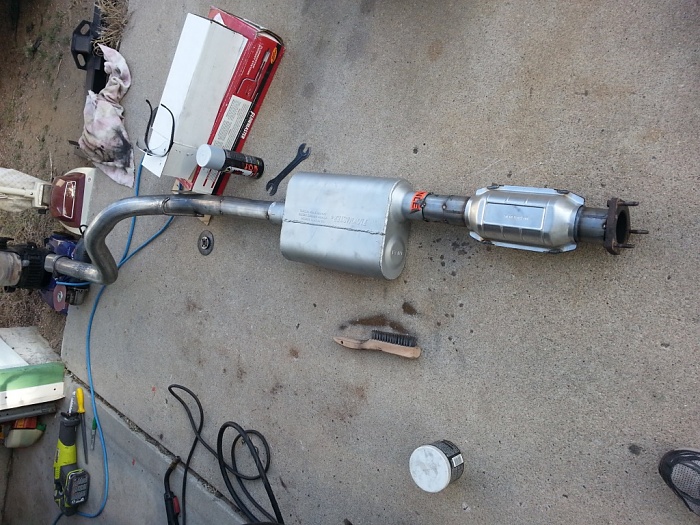

Yes, my welds look like poo, but that is what you get when you get in a hurry, and try to weld with only my wimpy 110V welder, and no gas... But, it doesnt' leak..
So, the new exhaust is back in. Fits better than the old one, but not perfect. My ancient Flowmaster sounds good!
Sorry, didn't get too many pics, trying to get stuff done between SAR Calls today.
After the exhaust, I reassembled the spring pack from yesterday, and installed it with the old Ubolts and spring plates. Those will change when the permanent stuff comes in, because these are now waay too soft. . But, at least she is back on all fours, and I can pull it out of the garage and stuff.
Noooo.
Oh well. So, I spent most of the day on the Jeep, and have a seemingly very small amount to show for it.
As I mentioned, 4WheelPutz screwed me on my warranty leafs, so I had to try to make due with my old springs, minus the bottom leaf. I basically had to wait for paint to dry, so I found something to do.
My old exhaust has been getting progressively worse over time, and my muffler seemed about to break in half.
So, I rang Summit, and ordered up a new high-flow universal cat, some clamps, mandrel-bent tailpipe, and related. I have been sitting on a Flowmaster 40 series for about 20 years. Bought it for one of my Chevelles years ago, and been taking up space in the garage ever since... until today.
It took several tries of fitting to get it right, but I am pretty happy right now with how it came out.


Yes, my welds look like poo, but that is what you get when you get in a hurry, and try to weld with only my wimpy 110V welder, and no gas... But, it doesnt' leak..
So, the new exhaust is back in. Fits better than the old one, but not perfect. My ancient Flowmaster sounds good!
Sorry, didn't get too many pics, trying to get stuff done between SAR Calls today.
After the exhaust, I reassembled the spring pack from yesterday, and installed it with the old Ubolts and spring plates. Those will change when the permanent stuff comes in, because these are now waay too soft. . But, at least she is back on all fours, and I can pull it out of the garage and stuff.