
The Pajero XJ

Thread Starter
Newbie
Joined: Nov 2018
Posts: 26
Likes: 1
From: North Carolina
Year: 1999
Model: Cherokee (XJ)

CF Veteran

Joined: Oct 2015
Posts: 7,517
Likes: 1,626
Year: 2000
Model: Cherokee (XJ)
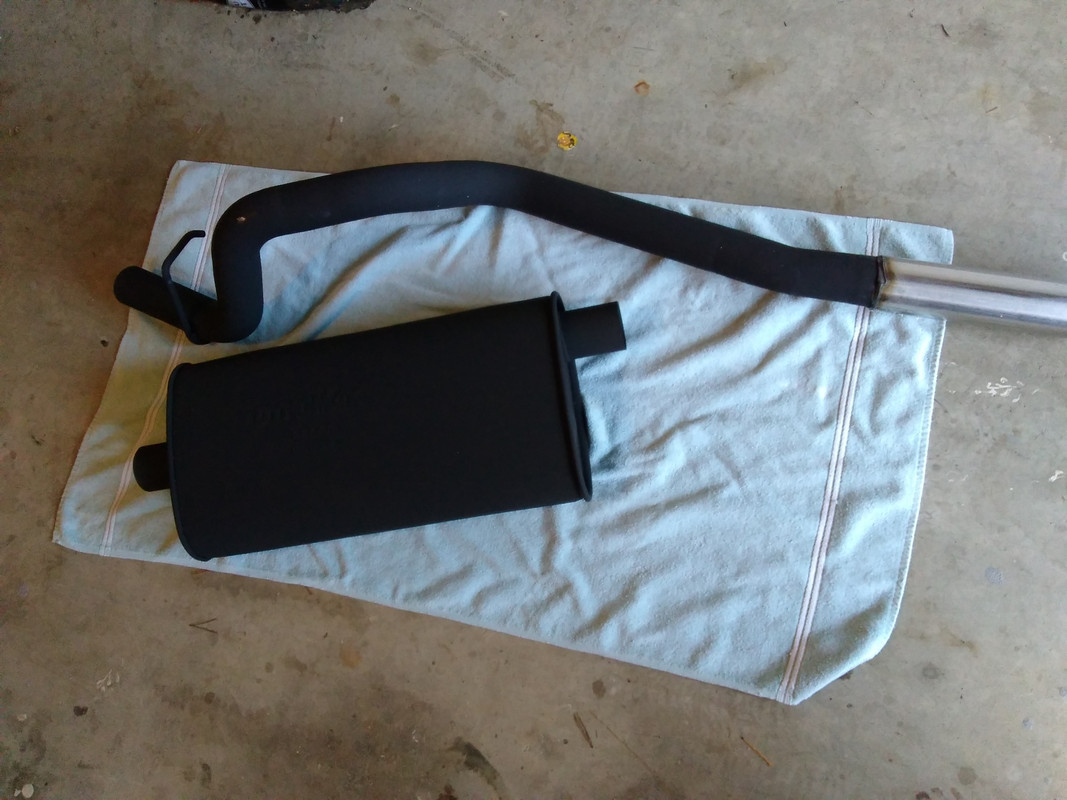
I am curious as to how you prepped the muffler and tail pipe before painting. I used the POR 15 High Temp on a brand new Walker exhaust. I cleaned everything with brake cleaner first. Did not hold well but I think it was because I did not prep well enough. User error. LOL.
One thing I did was spray the inside of the tail pipe. I used the wand that you can use with a Fluid Film spray can with the High Temp paint to spray the inside.

Senior Member

Joined: Feb 2011
Posts: 822
Likes: 3
From: orrville ohio
Year: 1994
Model: Cherokee
Engine: 4.0
I am curious as to how you prepped the muffler and tail pipe before painting. I used the POR 15 High Temp on a brand new Walker exhaust. I cleaned everything with brake cleaner first. Did not hold well but I think it was because I did not prep well enough. User error. LOL.
One thing I did was spray the inside of the tail pipe. I used the wand that you can use with a Fluid Film spray can with the High Temp paint to spray the inside.
One thing I did was spray the inside of the tail pipe. I used the wand that you can use with a Fluid Film spray can with the High Temp paint to spray the inside.
2) if your stuff was new you never stood a chance, POR stands for paint over rust it will not and can not hold to new un rusted metal
Thread Starter
Newbie
Joined: Nov 2018
Posts: 26
Likes: 1
From: North Carolina
Year: 1999
Model: Cherokee (XJ)
I am curious as to how you prepped the muffler and tail pipe before painting. I used the POR 15 High Temp on a brand new Walker exhaust. I cleaned everything with brake cleaner first. Did not hold well but I think it was because I did not prep well enough. User error. LOL.
One thing I did was spray the inside of the tail pipe. I used the wand that you can use with a Fluid Film spray can with the High Temp paint to spray the inside.
One thing I did was spray the inside of the tail pipe. I used the wand that you can use with a Fluid Film spray can with the High Temp paint to spray the inside.
CF Veteran
Joined: Oct 2015
Posts: 7,517
Likes: 1,626
Year: 2000
Model: Cherokee (XJ)
Basically, I just sanded it really good with 220, and then a degreaser cleaner. I don't like to use Brake Cleaner on projects unless absolutely necessary. Also, if the VHT does not cure correctly it will likely deteriorate anyway...I am not too worried about it. Just wanted an extra layer against rust.
Thread Starter
Newbie
Joined: Nov 2018
Posts: 26
Likes: 1
From: North Carolina
Year: 1999
Model: Cherokee (XJ)
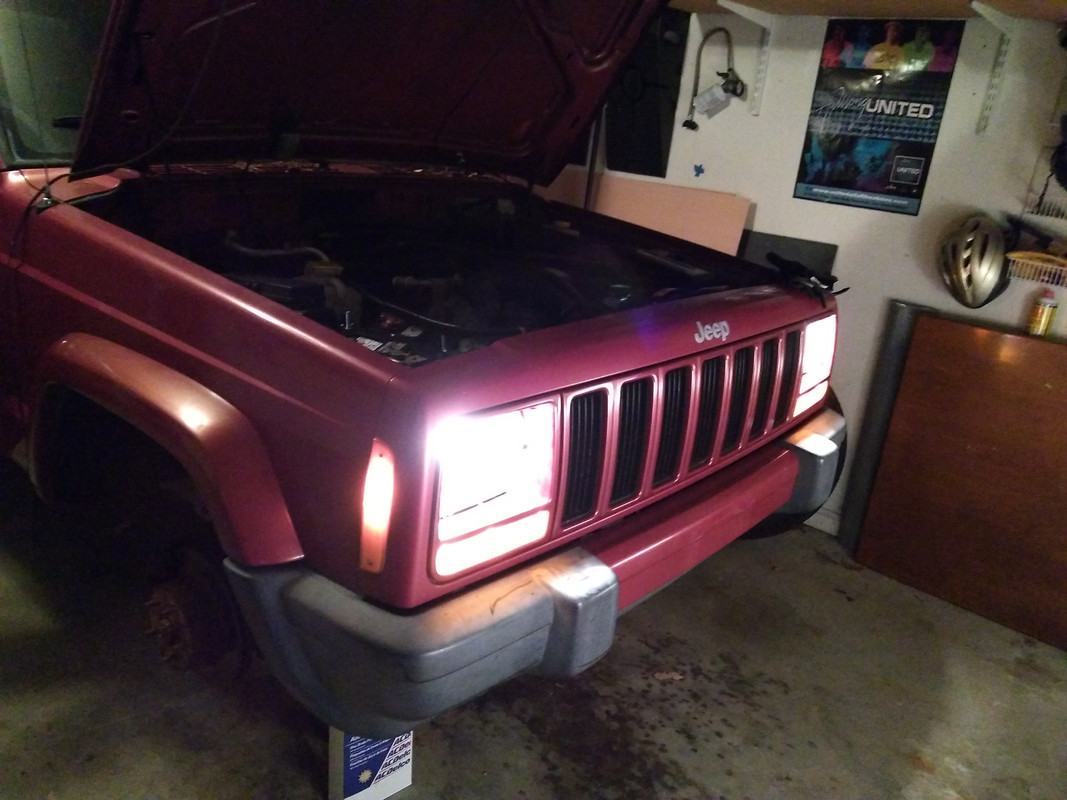
This weekend was upgrading headlights to H4 halogens, and installation of an upgraded wiring harness relay from K Suspension. I also decided to plastidip the front grill to see how I liked it. I definitely like it! I know some prefer color-match, and I can always peel it if I get tired of the black.


Relay kit was pretty simple to snake through the front end, but I was a bit disappointed in build quality. I had issues with both the quick connect terminals and spade terminal to battery, where the brass either snapped or wires easily slipped out and disconnected. Extra time wasted here re-fabricating, and I really could have used a soldering kit but I cobbled it all together with pliers and zip ties. Anyway, it turned out well, and the pics don't really show just how huge a difference there is over factory headlights.
Before
After
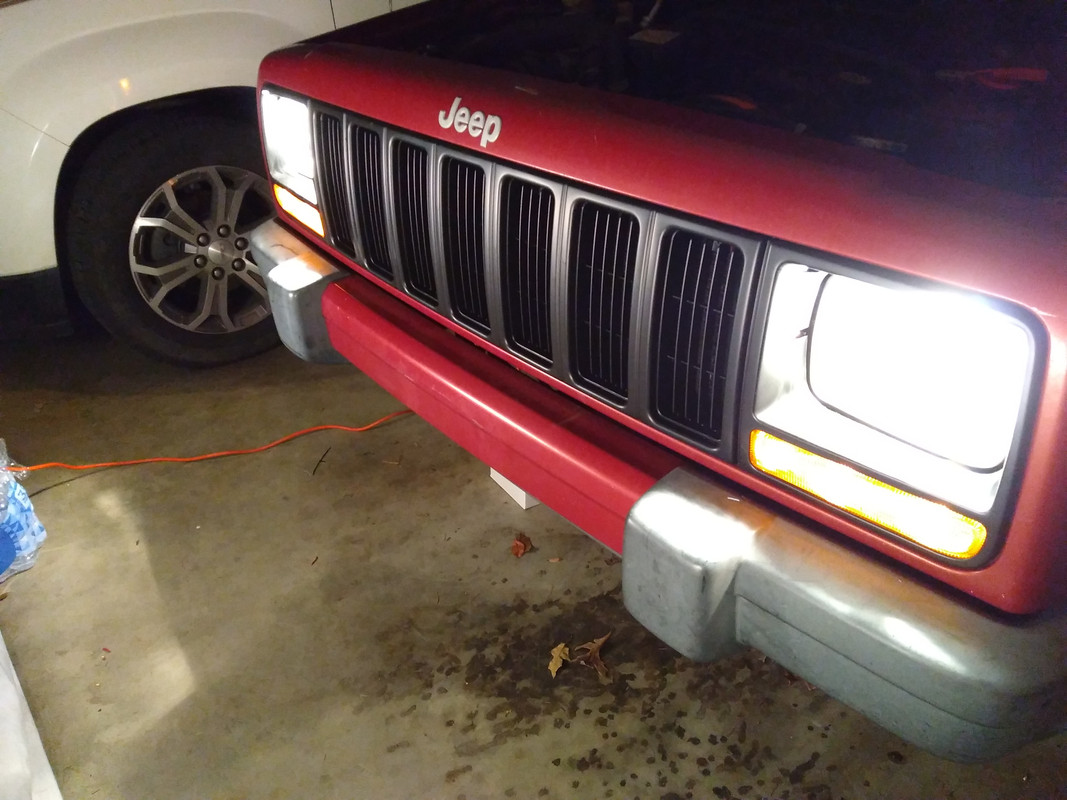
CF Veteran
Joined: Oct 2015
Posts: 7,517
Likes: 1,626
Year: 2000
Model: Cherokee (XJ)
I did the headlight harness upgrade. And just used the Wagner BriteLite versions of factory headlights. Very happy with them.
Certain color Jeeps need the black trim IMO. Red, white, maybe gold, or maybe most lighter colors. Black grill, headlight bezels, black bumper caps, and the bumpers themselves. On a white Jeep even the fender flares maybe. Think that is a great look.
Certain color Jeeps need the black trim IMO. Red, white, maybe gold, or maybe most lighter colors. Black grill, headlight bezels, black bumper caps, and the bumpers themselves. On a white Jeep even the fender flares maybe. Think that is a great look.
Senior Member

Joined: Nov 2010
Posts: 682
Likes: 134
From: Good 'ol WI
Year: 1987
Model: Cherokee
Engine: 4.0
Looks good.
One thing you might consider when you get some of the mechanical upgrades done is a complete interior shampooing. I can tell by some of your pictures that it probably hasn't been cleaned for years (if ever). Not criticizing, just suggesting it basically looks like a good interior and a little cleaning would probably make it look like new.
One thing I do is wait for a period where it will be dry and sunny for a few days. Then get a bucket of warm (or hot) soapy water and apply it on the seats with my hands and a sponge. Start at the top of one seat, Rub it in. Use plenty of soap. Then suck out with a shop vac (upholstery attachment). Then the seat bottom. Then, take a garden hose with a fine sprayer and just spray the seats and suck that out (that's the *rinse* stage!). Maybe give it a second rinse. Then do the rest.
Let dry and/or put a fan inside with windows cracked down. Start in the morning so the sun can build up heat inside.
Anyway, looks good.
Thread Starter
Newbie
Joined: Nov 2018
Posts: 26
Likes: 1
From: North Carolina
Year: 1999
Model: Cherokee (XJ)
Thanks for the comments, Ralph77.
Great suggestion! I have been thinking that exact same thing every time I open the doors and smell musty carpet/upholstery. Very similar to what you wrote, I read a write-up about interior deep cleaning in these forums and am simply waiting for the weather to cooperate. It is on my list of top priorities for when the temps here in NC decide to go above 60F someday soon. Same thing with my headliner project [spoiler: authentic ripstop DCU fabric]...outdoor temps are too low right now for adhesive to stick.
Looks good.
One thing you might consider when you get some of the mechanical upgrades done is a complete interior shampooing. I can tell by some of your pictures that it probably hasn't been cleaned for years (if ever). Not criticizing, just suggesting it basically looks like a good interior and a little cleaning would probably make it look like new.
One thing I do is wait for a period where it will be dry and sunny for a few days. Then get a bucket of warm (or hot) soapy water and apply it on the seats with my hands and a sponge. Start at the top of one seat, Rub it in. Use plenty of soap. Then suck out with a shop vac (upholstery attachment). Then the seat bottom. Then, take a garden hose with a fine sprayer and just spray the seats and suck that out (that's the *rinse* stage!). Maybe give it a second rinse. Then do the rest.
Let dry and/or put a fan inside with windows cracked down. Start in the morning so the sun can build up heat inside.
Anyway, looks good.
One thing you might consider when you get some of the mechanical upgrades done is a complete interior shampooing. I can tell by some of your pictures that it probably hasn't been cleaned for years (if ever). Not criticizing, just suggesting it basically looks like a good interior and a little cleaning would probably make it look like new.
One thing I do is wait for a period where it will be dry and sunny for a few days. Then get a bucket of warm (or hot) soapy water and apply it on the seats with my hands and a sponge. Start at the top of one seat, Rub it in. Use plenty of soap. Then suck out with a shop vac (upholstery attachment). Then the seat bottom. Then, take a garden hose with a fine sprayer and just spray the seats and suck that out (that's the *rinse* stage!). Maybe give it a second rinse. Then do the rest.
Let dry and/or put a fan inside with windows cracked down. Start in the morning so the sun can build up heat inside.
Anyway, looks good.
Thread Starter
Newbie
Joined: Nov 2018
Posts: 26
Likes: 1
From: North Carolina
Year: 1999
Model: Cherokee (XJ)
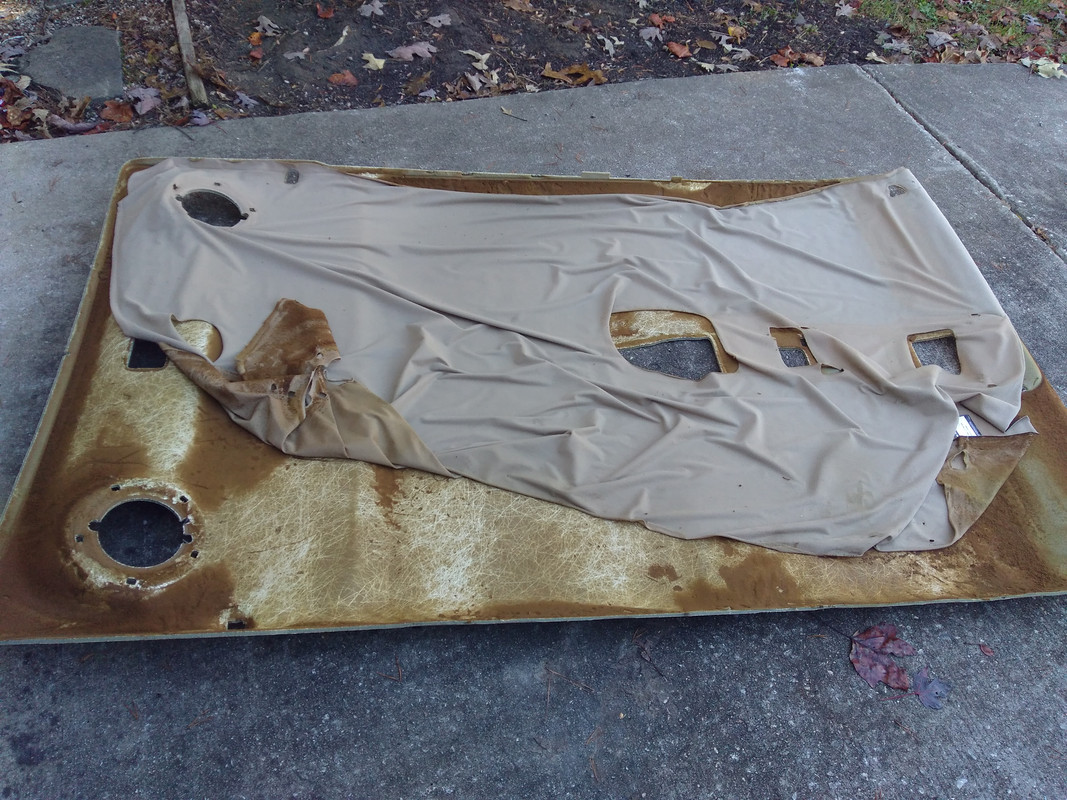
Well, the disgusting headliner from 20 years ago was done, and so this project was much-needed. Using some tutorials on YouTube I tackled the removal and replacement over a couple of months. It turned out decent, with a few 'bubbles' and wrinkles here and there. Using rip-stop fabric is not a super great headliner material, but I had my reasons and I am very pleased with the result!


Thread Starter
Newbie
Joined: Nov 2018
Posts: 26
Likes: 1
From: North Carolina
Year: 1999
Model: Cherokee (XJ)
Have been silent for awhile, as this summer has involved a lot of... life. Career changes, weddings, travel, kid starting college, etc. BUT the XJ is finally where I wanted it to be for the end of �Phase 1�.
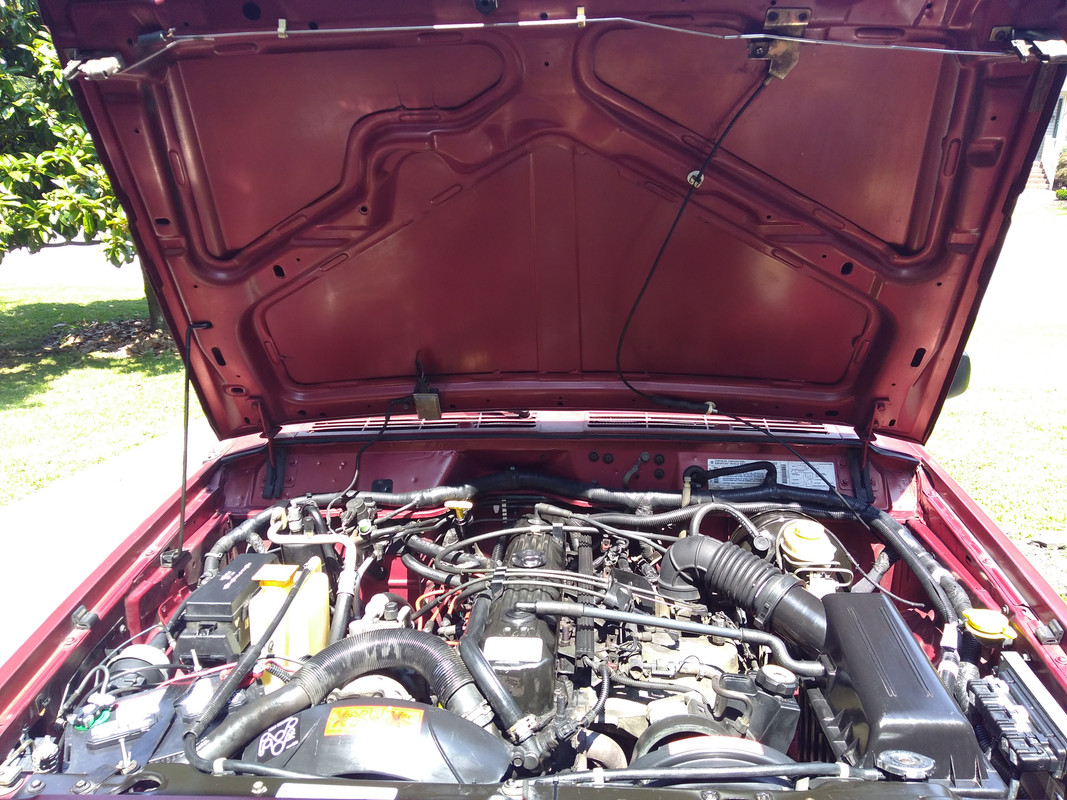
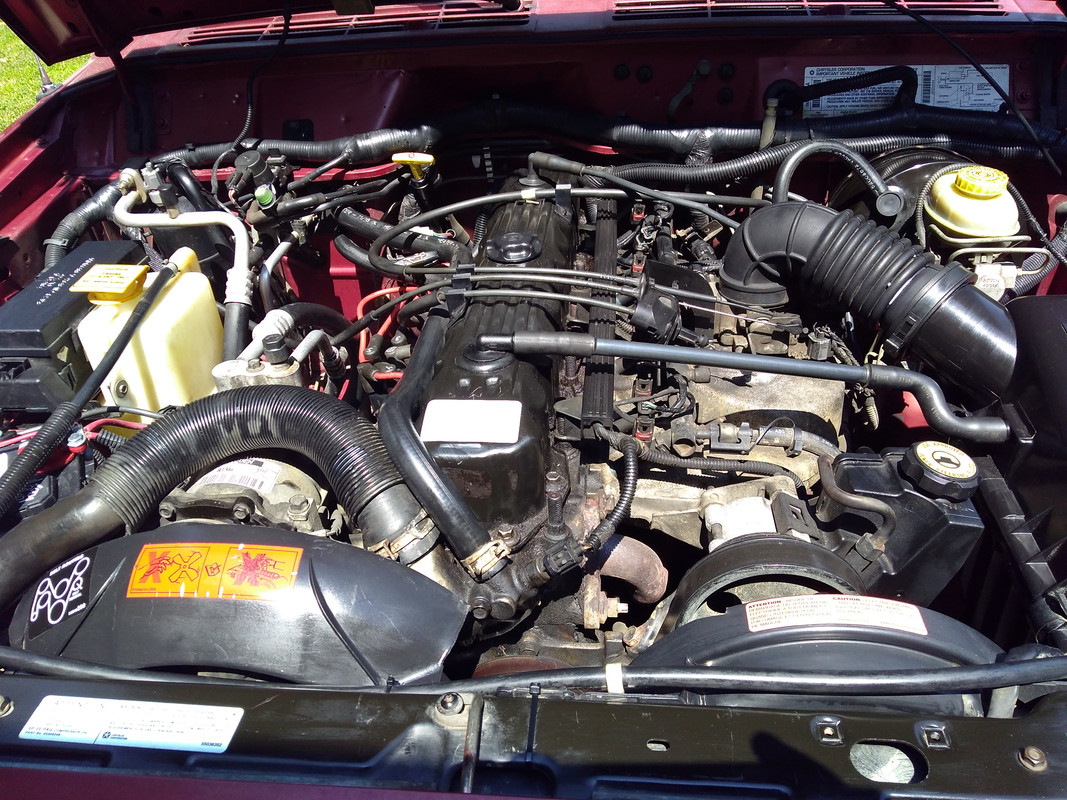
Refreshed the engine bay, and cleaned up a lot of the nasty that was in there... now I can actually see where leaks may be coming from.

Fixed the aftermarket Halogen headlight issue of headlights not switching back to low beam after clicking on the High Beams and having to turn the lights off/on again for it to correct itself. Involved rewiring the driver�s side, splicing a 20g red wire from the stock harness to the 87 pin on the aftermarket.
Added high output LED bulbs to the shift console, and finally finished prepping and mounting my cheap roof rack from Amazon. I really didn�t like the stability of the 20 yr. Old stock roof rack crossmembers, so I replaced with a gutter-mounted ladder rack, and then drilled the roof rack and installed with U-bolts from Lowes.
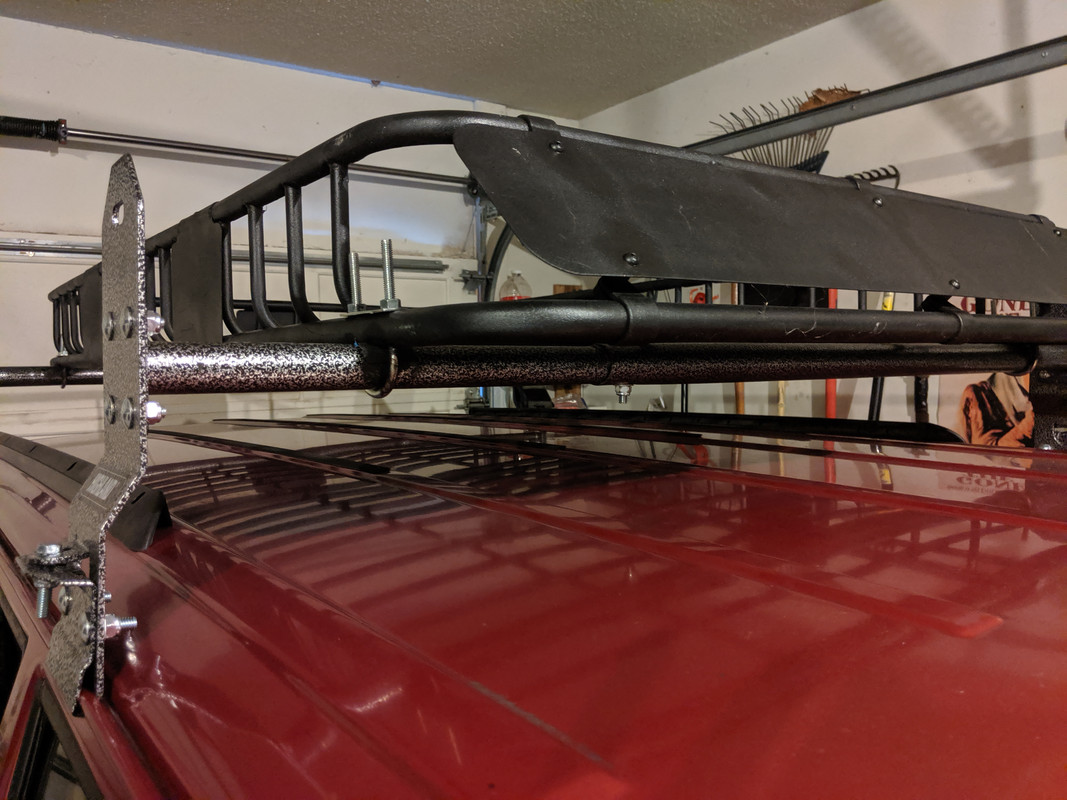

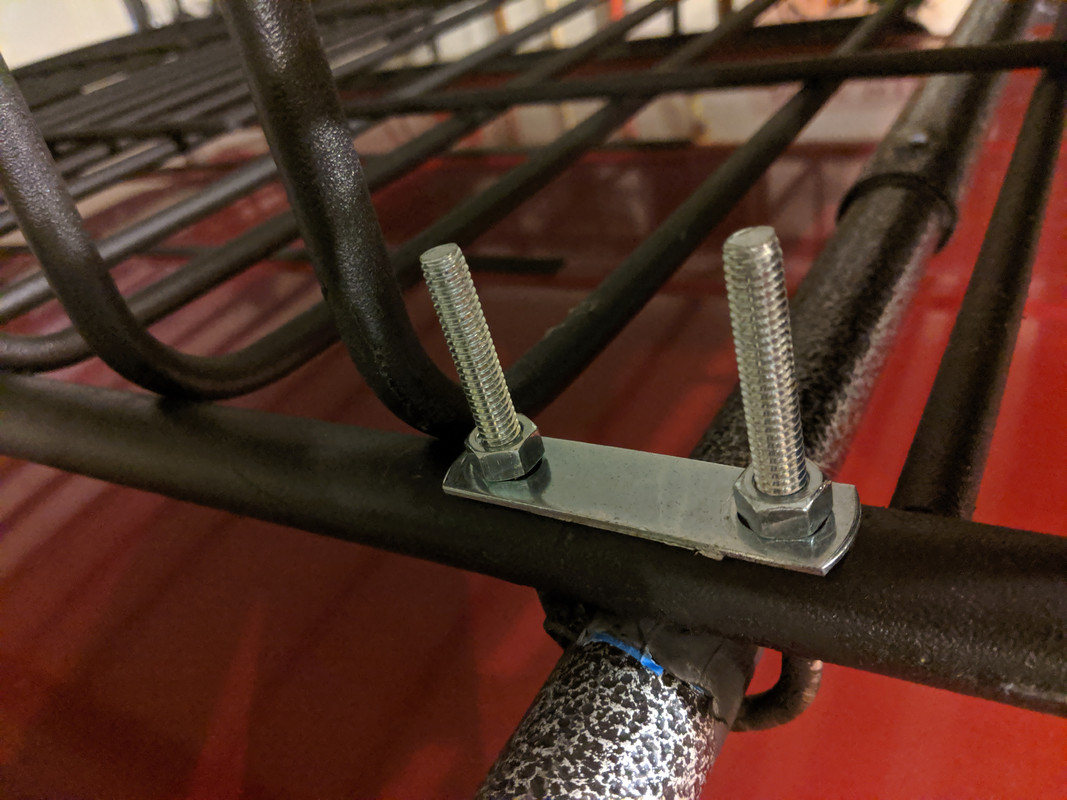
It�s super solid, no rattle, and I can basically rock the entire vehicle back and forth by grabbing a siderail of the roof rack! Clearly my shock dampers need some love during Phase 2 (suspension). Nice day in NC, so I took her out for a quick photo shoot. This thing is much nicer now than anything in the Camp Doha fleet, lol.

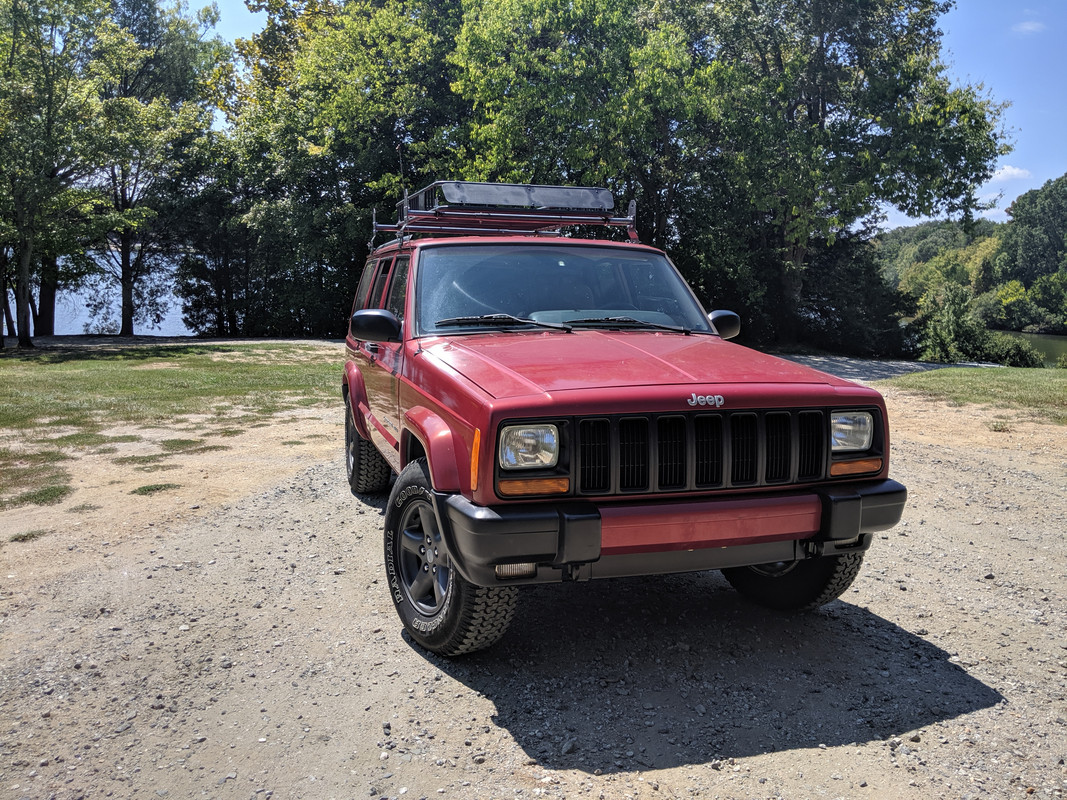
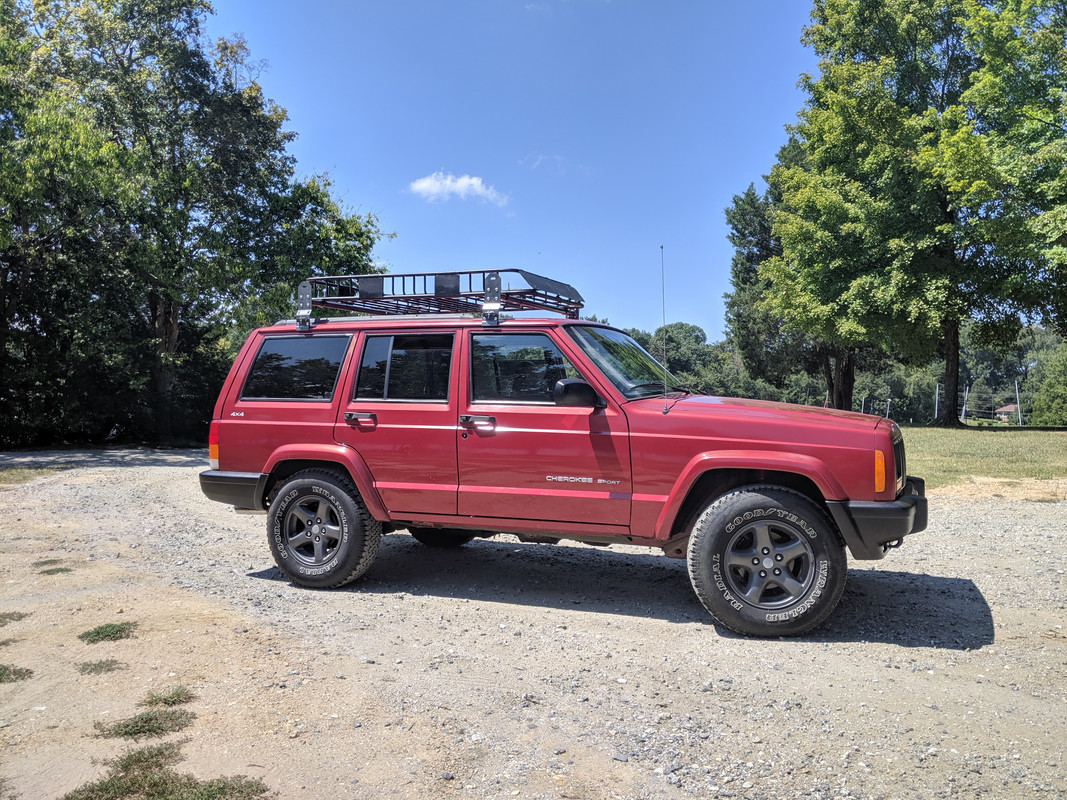

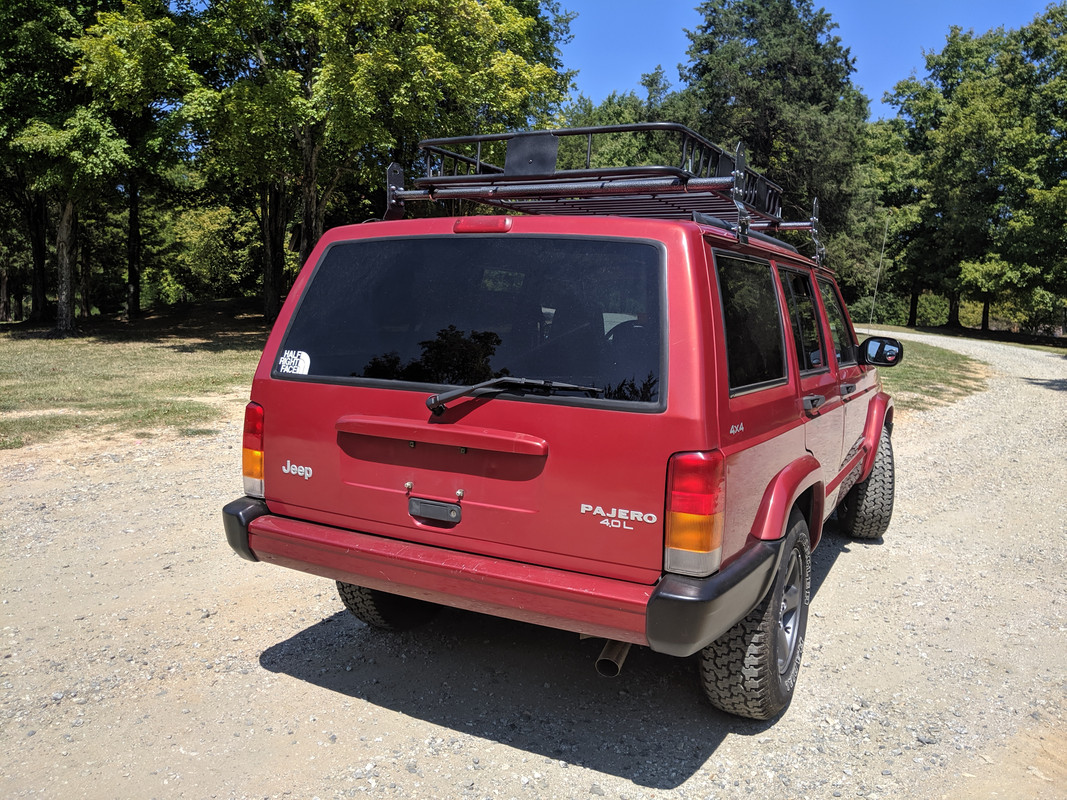
Next step: get the XJ insured, registered and on the road. Very happy with the progress...
Refreshed the engine bay, and cleaned up a lot of the nasty that was in there... now I can actually see where leaks may be coming from.
Fixed the aftermarket Halogen headlight issue of headlights not switching back to low beam after clicking on the High Beams and having to turn the lights off/on again for it to correct itself. Involved rewiring the driver�s side, splicing a 20g red wire from the stock harness to the 87 pin on the aftermarket.
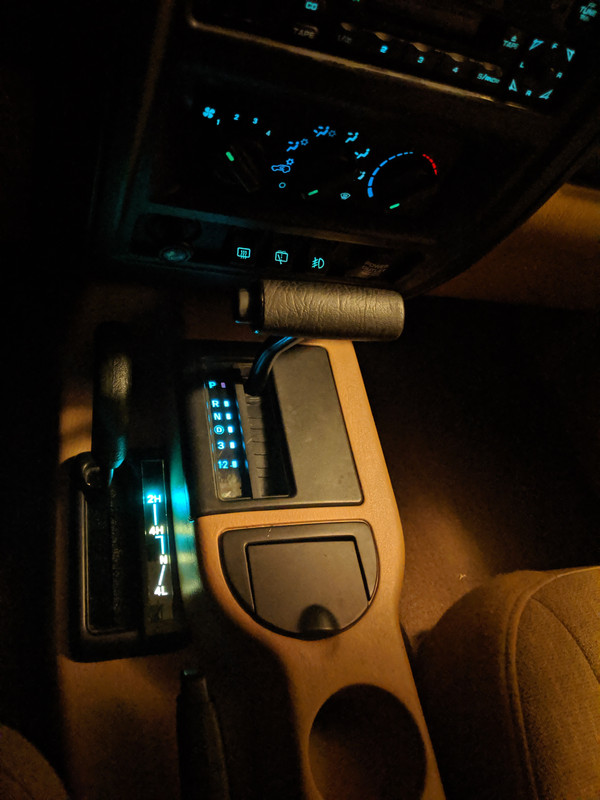
Added high output LED bulbs to the shift console, and finally finished prepping and mounting my cheap roof rack from Amazon. I really didn�t like the stability of the 20 yr. Old stock roof rack crossmembers, so I replaced with a gutter-mounted ladder rack, and then drilled the roof rack and installed with U-bolts from Lowes.
It�s super solid, no rattle, and I can basically rock the entire vehicle back and forth by grabbing a siderail of the roof rack! Clearly my shock dampers need some love during Phase 2 (suspension). Nice day in NC, so I took her out for a quick photo shoot. This thing is much nicer now than anything in the Camp Doha fleet, lol.
Next step: get the XJ insured, registered and on the road. Very happy with the progress...