When you click on links to various merchants on this site and make a purchase, this can result in this site earning a commission. Affiliate programs and affiliations include, but are not limited to, the eBay Partner Network.
Tonights progress wasn't a whole lot but it did feel good to get some where on this tcase!
Soo keeping in mind i've never rebuilt one of these and just relying on my ol noggin as this is similar to the trans I rebuild at work. Start with the idler shaft in the middle of the case. Pound it in there with a brass slug (super handy chunk of brass from a massive Mac diffs idler pin) and then tighten down the nut and washer on the opposite side of this photo.
I snuck these 2 outputs in next and sealed and snug'd down the yokes. The shiny bit below the gear mid shaft is our new thrust washer -thank goodness it was the right one! Hiding behind that is a double stack of individually placed needle bearings that you then drop the gear over. Delicate work for sure! This is also the main input/output shaft of the unit, the gear is the reduction gear for low range.
Tossed the 4 studs into the holes as the rest of the holes are meant for bolts. Dropped the shift rails/shift forks in only to realize as i was snugging down the fork bolts that i left my wire tie spool at work today :/ I guess we won't be finishing this tonight after all. Also notice the 3 bolt cap for the idler shaft.
I have a fairly busy weekend ahead of me so i'm not entirely sure i'll be getting any progress in but if i do - you guys will know
Today was gonna be my day to chop the shell up and start inching it closer to the MJ rear section but it was a wicked hot day out with the MI humidity so instead i flipped on the AC in the garage and got back into that tcase.
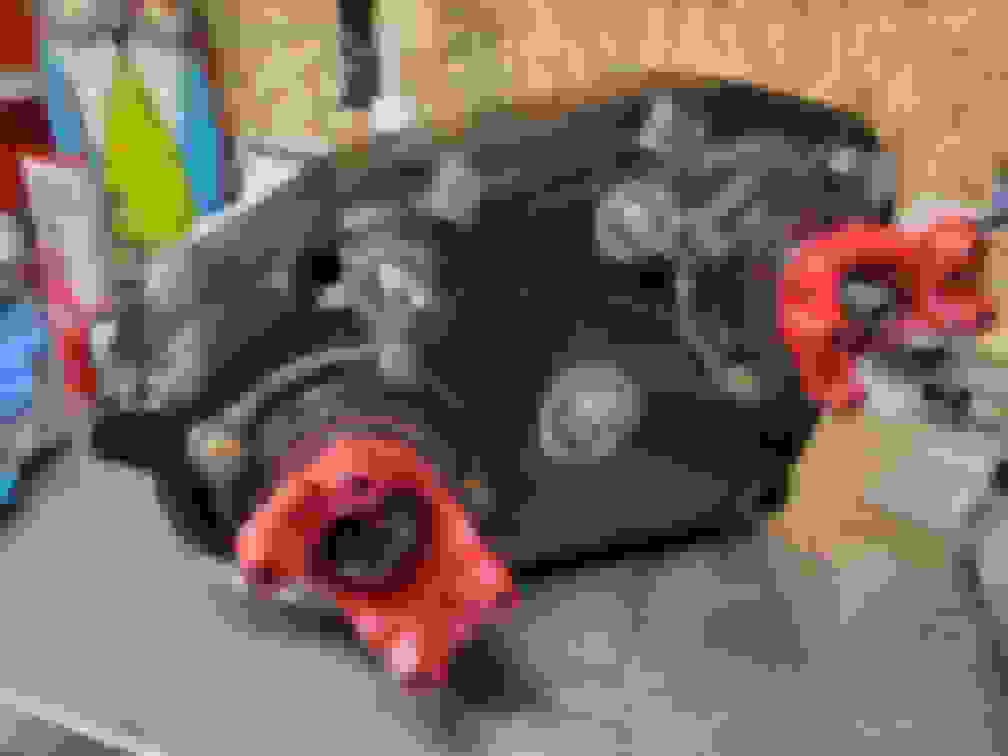
The tcase took a little puzzle work but i got it all buttoned up this morning. The input(s) ride on a ball bearing thats pretty easy to install. Tap bearing into case - slide input shaft through bearing - install yoke - finished!
The E-tape on the pictured input shaft is to keep the thrust washer tight to the gear because when the shaft falls over and the gear slides over on the shaft, ALL the needle bearings fall out. This only happened once thankfully.
More loose needle bearings that sit inside the output. I was worried about how well they would line up when installing the output side but these were cake. For those that don't know these are considered pilot bearings and the very bottom of the shaft thats pictured above is the pilot that rides on those bearings.
Just about finished up after snugging this one down and as i reached across my bench to grab a cotter pin the nut let go and exploded. I couldn't find the 3rd piece but these 2 didn't go too far. What a bummer!
You can see the old dirty side vs the shiny side... this tells me this nut has been split for a little while now. It had me concerned the others might also pop but once i noticed the color difference i realized what was really going on here. I've read that Deez Nuts are hard to come by but supposedly they are the same as a Dana 35 pinion nut. Lucky me the axle still bolted in under the rear of the truck is a Dana 35 and the nuts still there. I'll be confirming this soon.
Installed the shift rail seals and rubbed all my greasy hand prints off the unit. Looking pretty good if you ask me!
Time for some body progress! Mapped out my cuts with plenty of material to spare. I will peck away at the not needed material once i get the lines figured out between the 2 halves.
Dropped it like its hot and let the bodies hit the floor!
Didn't care for the look of that roof so i chopped some more off the top. The roof height difference is no joke! I did save the old chunk of roof and i'm gonna try to make it fit without trimming the inner structure but if i have no luck - its getting cut some more for sure.
Floor is a darn mess! For the time being just to get things rolling i cut out the top of the frame rail 6" in either direction. The MJ frame got cut just 1"~ in front of the front crossmember nut/stud. The XJ frame got cut at a seam line just about middle of the B-pillar.
Slowly working the 2 hafs together cut by cut its getting closer! Soo to my surprise these 2 halfs are actually coming together fairly simple. I won't elaborate too many specifics as some of these things need to be left a surprise for those who chose to attempt their own crewcab build.
Hey man you can elaborate all you want it's your build and your thread! You wont bore me with details. If others dont feel that way they can just look at the pictures
After 4 hrs tonight we have a near close enough fit for some welds finally!
I'll interrupt your viewing for this disclaimer - I was faced with a dilemma, Either decision would contradict the other... It was either to keep the high body line (just below the door handle) true and have a slightly off rocker-frame rail OR it was keeping the rocker-frame straight and having to move metal to get the body line back to make it look right. I chose to keep the body line and modify the rocker-frame as those will need attention regardless.
So you may also be wanting to point out that the rear door is overlapping some - i got this no worries...
Should have some more progress pics tomorrow, aiming for having it sitting on its own weight!
Time to tackle this door sill. So with favoring the body line over the rocker alignment meant this had to be moved only about 1/4". This wasn't too difficult as i split it from in the inside of the rocker, placed where it was desired for alignment, marked the line for where it will now rest, cut and welded back in place.
Now it was time for some rocker slider action! dual purpose this will also strengthen up the body and tie into the frame. I didn't however call my measurement correctly and shorted myself about 8" of material. My plan was to run this slider all the way out the back of the cab, which will still happen i will just need to add a chunk later on :/
The slider does taper into the body the further it goes towards the rear - thats the nature of how i've been doing my sliders because i like them butted up to the inside of the rocker where it meets the floor and gets seam welded there. The rear door isn't shut all the way because i still have the braces in place so it looks worse than it is.
I didn't get it pictured but this thing is sitting on its own weight now, no jack stands, just flat tires hahaha. The joining of the 2 unibody frames, door sill adjustment(driver side), welding the inside of the "new" C-pillars together and driver rock slider getting welded in took all day. SOO MUCH WELDING!
 06-18-2020, 11:14 PM