
Father and son beater Jeep (93 XJ)


Thread Starter
Senior Member


Joined: Feb 2009
Posts: 522
Likes: 28
From: Prosser, WA
Year: 1993
Model: Cherokee(XJ)
Engine: 4.0
About 7 years ago I bought my son a 1972 K5 Blazer when he was 3, I daily drove it for a couple years in Wyoming and parked it when we moved to Washington. We are going to overhaul that for his high school vehicle, and it is in too good of shape to go wheel it hard.

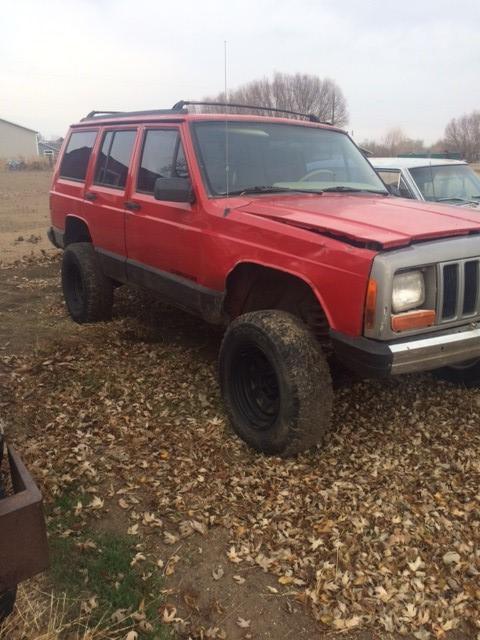
Now for the real reason you clicked on this build, we wanted a wheeler we could go beat on and not have to worry about driving it to work come Monday morning. I found this on FB marketplace and played hell trying to deal with the seller who couldn't make up her mind when and where we were supposed to meet up. 1993, 4.0L, AW4, NP231, D30/C8.25, 2.5-3" lift, cut (and already dented) fenders, Rusty's throttle body spacer, cone air filter. I have a bunch of parts already that I am going to throw at it winch, switch panel, dual batteries, Rigid lights. I ordered a bunch of other stuff for it that we are waiting on right now, 33x12.50x15 Patagonia Milestars, Spartan lockers front and read, Lube locker diff gaskets, extended brake lines, aluminum axle tube seals, new u-bolts and spring plates from Ruff Stuff. I will end up re-gearing it probably next summer, but for this winter its small things and getting out there to wheel it.
]


Besides the steering column being broke, the interior isn't bad, dirty but not bad.


You can see here the upper hinge has ripped off, so that's the first thing that needs fixed
Here you see the second repair that needs to whatever this attempt was


Now for the real reason you clicked on this build, we wanted a wheeler we could go beat on and not have to worry about driving it to work come Monday morning. I found this on FB marketplace and played hell trying to deal with the seller who couldn't make up her mind when and where we were supposed to meet up. 1993, 4.0L, AW4, NP231, D30/C8.25, 2.5-3" lift, cut (and already dented) fenders, Rusty's throttle body spacer, cone air filter. I have a bunch of parts already that I am going to throw at it winch, switch panel, dual batteries, Rigid lights. I ordered a bunch of other stuff for it that we are waiting on right now, 33x12.50x15 Patagonia Milestars, Spartan lockers front and read, Lube locker diff gaskets, extended brake lines, aluminum axle tube seals, new u-bolts and spring plates from Ruff Stuff. I will end up re-gearing it probably next summer, but for this winter its small things and getting out there to wheel it.
]
Besides the steering column being broke, the interior isn't bad, dirty but not bad.
You can see here the upper hinge has ripped off, so that's the first thing that needs fixed
Here you see the second repair that needs to whatever this attempt was
Thread Starter
Senior Member
Joined: Feb 2009
Posts: 522
Likes: 28
From: Prosser, WA
Year: 1993
Model: Cherokee(XJ)
Engine: 4.0
ordered Solid diff covers front/rear today for $65 a pop, diagnosed that I have a NSS issue, but really have not put any work into this yet because I have to finish putting the steering upgrades together on my 77 Jimmy first.
This is how I held the steering box in place while still hooked to the steering and holding the bolt in steering brace in place all while bolting it all together by myself. hooked a chain hoist to the 4x4.

This is how I held the steering box in place while still hooked to the steering and holding the bolt in steering brace in place all while bolting it all together by myself. hooked a chain hoist to the 4x4.
Thread Starter
Senior Member
Joined: Feb 2009
Posts: 522
Likes: 28
From: Prosser, WA
Year: 1993
Model: Cherokee(XJ)
Engine: 4.0
I took yesterday off work since it was supposed to be our best weather this week and work on the Cherokee, first I had to finish hooking the steering up on my 77 Jimmy.
Then I put some new battery terminal ends on the existing cables and had my kid drive it over to the shed so I could weld the driver door back on (had him drive so I didn't have to climb over the center console again lol)
its a dark pic but he had a huge smile on his face and said "this is WAY better than driving the tractor"

found a few more issues while working on it, I think I need new motor mounts lol

obviously the steering shaft has made contact with the motor mount bracket before

I am really glad i just bought this thing to beat the crap out of cause someone already made a fine start to it


Then I put some new battery terminal ends on the existing cables and had my kid drive it over to the shed so I could weld the driver door back on (had him drive so I didn't have to climb over the center console again lol)
its a dark pic but he had a huge smile on his face and said "this is WAY better than driving the tractor"
found a few more issues while working on it, I think I need new motor mounts lol
obviously the steering shaft has made contact with the motor mount bracket before
I am really glad i just bought this thing to beat the crap out of cause someone already made a fine start to it
Thread Starter
Senior Member
Joined: Feb 2009
Posts: 522
Likes: 28
From: Prosser, WA
Year: 1993
Model: Cherokee(XJ)
Engine: 4.0
Last week I stripped a bunch of stuff off like the a/c, battery and tray, alternator, and ordered motor mounts after seeing just how bad the driver side one was.
Saturday I got a bit of time to work on it and got the motor mounts changed, just put stock replacements back in for now.
motor mounts are easy once you have everything out of the way.


Im gonna say the driver side was bad, old/new

and getting my kid working on it

he was very happy to be working on it

but he didnt want me taking his picture and was laughing.

Saturday I got a bit of time to work on it and got the motor mounts changed, just put stock replacements back in for now.
motor mounts are easy once you have everything out of the way.
Im gonna say the driver side was bad, old/new
and getting my kid working on it
he was very happy to be working on it
but he didnt want me taking his picture and was laughing.
Last edited by warrpath4x4; Jan 11, 2021 at 10:12 AM.
Thread Starter
Senior Member
Joined: Feb 2009
Posts: 522
Likes: 28
From: Prosser, WA
Year: 1993
Model: Cherokee(XJ)
Engine: 4.0
vacation policy changed at work so they cashed out extra hours, little extra money there so I bought a smittybilt 2781 air compressor for it. Thinking I can squeeze it by the extra battery under the hood but cant really come up with a good location for my air tank, probably just in the cargo area for now.
Thread Starter
Senior Member
Joined: Feb 2009
Posts: 522
Likes: 28
From: Prosser, WA
Year: 1993
Model: Cherokee(XJ)
Engine: 4.0
we spent about 2 hours working with some sheet metal Saturday evening, built 2 battery trays, didn't get a chance to work on installing them yesterday because we were celebrating my sons birthday and it was snowing.
Trending Topics
Thread Starter
Senior Member
Joined: Feb 2009
Posts: 522
Likes: 28
From: Prosser, WA
Year: 1993
Model: Cherokee(XJ)
Engine: 4.0
ordered up a Barnes 4WD heim steering kit for it today, used a discount code and free shipping, I will probably end up putting a couple bends in it to clear the new diff cover.
Thread Starter
Senior Member
Joined: Feb 2009
Posts: 522
Likes: 28
From: Prosser, WA
Year: 1993
Model: Cherokee(XJ)
Engine: 4.0
been working on dual battery trays for the last week or so, getting a few minutes in here and there.
here is where the second battery will go but i am going to have to move the ECM

we built both trays basically the same, I copied the original shape of the plastic tray and made a mount, a tray, and a hold down

test fitting, we used riv-nuts the hold the tray to the mount, the passenger side we used the 3 original studs to bolt it in, the driver side we used 3 more riv-nuts to bolt it in


the top side of the tray and the bottom side of the hold down are sprayed with bedliner

This is a sheet of tool box drawer liner I am laying in the tray as a cushion from the bolt heads to the battery

second battery mounted

both batteries

there is some vibration in the brackets, thinking I will watch it once i have it running again, if I need to I can easily remove it and put a cross brace in the lower bracket.
here is where the second battery will go but i am going to have to move the ECM
we built both trays basically the same, I copied the original shape of the plastic tray and made a mount, a tray, and a hold down
test fitting, we used riv-nuts the hold the tray to the mount, the passenger side we used the 3 original studs to bolt it in, the driver side we used 3 more riv-nuts to bolt it in
the top side of the tray and the bottom side of the hold down are sprayed with bedliner
This is a sheet of tool box drawer liner I am laying in the tray as a cushion from the bolt heads to the battery
second battery mounted
both batteries
there is some vibration in the brackets, thinking I will watch it once i have it running again, if I need to I can easily remove it and put a cross brace in the lower bracket.

Thread Starter
Senior Member
Joined: Feb 2009
Posts: 522
Likes: 28
From: Prosser, WA
Year: 1993
Model: Cherokee(XJ)
Engine: 4.0
he doesnt get much screen time at all between horses and our farm, most of his summers are spent competing in rodeos. He really is a great kid and we try to keep him busy.

Senior Member
Joined: Sep 2018
Posts: 802
Likes: 140
From: NJ
Year: 1992
Model: Cherokee (XJ)
Engine: 4.0
Awesome job so far! I like the setup you are doing for the dual batteries, but if I may offer my .02 cents, use something a little heavier than the tool box liner for under the battery, or maybe just double or triple it up depending how thick it is. I doubt the bolts would wear at the bottom of the battery, but I'd rather not take the chance. Have you considered how you are going to wire them up?
Also, if you have a nice size pipe wrench, you should be able to get the front part of the frame, (where the bumper brackets mount) pretty straight. Ask me how I know.
Also, if you have a nice size pipe wrench, you should be able to get the front part of the frame, (where the bumper brackets mount) pretty straight. Ask me how I know.
Thread Starter
Senior Member
Joined: Feb 2009
Posts: 522
Likes: 28
From: Prosser, WA
Year: 1993
Model: Cherokee(XJ)
Engine: 4.0
Awesome job so far! I like the setup you are doing for the dual batteries, but if I may offer my .02 cents, use something a little heavier than the tool box liner for under the battery, or maybe just double or triple it up depending how thick it is. I doubt the bolts would wear at the bottom of the battery, but I'd rather not take the chance. Have you considered how you are going to wire them up?
Also, if you have a nice size pipe wrench, you should be able to get the front part of the frame, (where the bumper brackets mount) pretty straight. Ask me how I know.
Also, if you have a nice size pipe wrench, you should be able to get the front part of the frame, (where the bumper brackets mount) pretty straight. Ask me how I know.
for wiring the batteries i have one of these (just the VSR) and I build my own battery cables from welding ground wire, I also have 2 resettable breakers I will be wiring in also.
Ya the front "frame" is going to take some work lol. I may have to buy a slide hammer to work on it too.
Thread Starter
Senior Member
Joined: Feb 2009
Posts: 522
Likes: 28
From: Prosser, WA
Year: 1993
Model: Cherokee(XJ)
Engine: 4.0
With adding the second battery I needed to relocate the ECM, I found if I spun it around and built a new mount I wouldn't have to change any of the wiring. Here is the beginnings of the mount and location.

The kid was having a hay day with the dimple dies lol

The ECM mounts on the inside with rubber washers between it and the mounting bracket, I still may need to work on the fender side of the mount, not sure if the hood hinge bracing is going to contact it or not. (and obviously trim the mounting screws for the ECM)

The kid was having a hay day with the dimple dies lol
The ECM mounts on the inside with rubber washers between it and the mounting bracket, I still may need to work on the fender side of the mount, not sure if the hood hinge bracing is going to contact it or not. (and obviously trim the mounting screws for the ECM)
Thread Starter
Senior Member
Joined: Feb 2009
Posts: 522
Likes: 28
From: Prosser, WA
Year: 1993
Model: Cherokee(XJ)
Engine: 4.0
finally made some headway on the alternator, seems like it took forever and it kind of did with about 5 revisions.
On my last Cherokee I ditched the A/C and relocated the stock alternator to where the a/c compressor was, that time I ground down the a/c bracket to flat and used the stock alternator bracket bolting the 2 brackets together. this time I was putting a bigger alternator in and figured I would just bolt a plate over the stock a/c bracket then bolt the stock alternator bracket to it, this didn't work because then the whole thing was too tall and the hood wouldn't close and I'm not ghetto enough to just cut a hole in the hood for the alternator to stick through lol.

so I started to grind down the original a/c bracket like last time and just was not liking it this time, so I started making my own bracket.


I was going to bolt the stock alternator bracket to it but because I changed the height there was contact issues with the alt and the heater pipe running from the water pump. The first alternator used a 6 and 12 o'clock mounting position, I looked online and found an alt from a early 2000 Grand Cherokee or Dakota would fit better, I wouldn't have to swap pulleys, and its 136Amp.


it had its own small issue though, this mounting bracket that I wouldn't be using would be in the way when changing plugs

so now its not

I made a couple of cradle brackets, lined the alt up with the other pulleys and welded them in
(the sun made the pictures hard to see)


then it was onto building battery cables, there was a bracket next to the fuse box that held the overflow bottle, i cut the uprights off cut some sheet metal, bent a half inch lip to firm it up and mounted it there. here I have a resettable breaker between the alt and battery, also the (not wired yet) VSR to handle charging the second battery.


On my last Cherokee I ditched the A/C and relocated the stock alternator to where the a/c compressor was, that time I ground down the a/c bracket to flat and used the stock alternator bracket bolting the 2 brackets together. this time I was putting a bigger alternator in and figured I would just bolt a plate over the stock a/c bracket then bolt the stock alternator bracket to it, this didn't work because then the whole thing was too tall and the hood wouldn't close and I'm not ghetto enough to just cut a hole in the hood for the alternator to stick through lol.
so I started to grind down the original a/c bracket like last time and just was not liking it this time, so I started making my own bracket.
I was going to bolt the stock alternator bracket to it but because I changed the height there was contact issues with the alt and the heater pipe running from the water pump. The first alternator used a 6 and 12 o'clock mounting position, I looked online and found an alt from a early 2000 Grand Cherokee or Dakota would fit better, I wouldn't have to swap pulleys, and its 136Amp.
it had its own small issue though, this mounting bracket that I wouldn't be using would be in the way when changing plugs
so now its not
I made a couple of cradle brackets, lined the alt up with the other pulleys and welded them in
(the sun made the pictures hard to see)
then it was onto building battery cables, there was a bracket next to the fuse box that held the overflow bottle, i cut the uprights off cut some sheet metal, bent a half inch lip to firm it up and mounted it there. here I have a resettable breaker between the alt and battery, also the (not wired yet) VSR to handle charging the second battery.