

Hello All. My name is James. I have begun my second XJ build. My first consisted of Rustys 8 in. lift, ACOS adj. spacers, TJ Dana 44 front with 4.56, Ford 8.8 with Lockright out back, Tera-Low, Tom Woods DS, Warn bumper and winch, and 35 in. TSL Thornbird tires. This time I will go about things a bit different. What I have so far to install is:
Rustys 4.5 in. coils
OME 3.5-4 in. Leafsprings
Bilstein 5100 shocks
Dana 30, 4.56, open
Chrysler 8.25, 4.56, ARB
Home fabbed square control arms
RC Control Arm Drop brackets
JCR DIY Front Bumper and frame brace
Hack and Tap
33/10.5/15 BFG MT KM2's
Working on the rear gear swap/ARB install tomorrow. Front beginning next week. Cant wait! Safety Glasses on!
Rustys 4.5 in. coils
OME 3.5-4 in. Leafsprings
Bilstein 5100 shocks
Dana 30, 4.56, open
Chrysler 8.25, 4.56, ARB
Home fabbed square control arms
RC Control Arm Drop brackets
JCR DIY Front Bumper and frame brace
Hack and Tap
33/10.5/15 BFG MT KM2's
Working on the rear gear swap/ARB install tomorrow. Front beginning next week. Cant wait!
Safety Glasses on!
Will upload some pics this weekend. I am removing the Rustys 3.5 in lift with AAL, if anyone is interested in taking it off my hands.

Time for an update! I started off rebuilding the rear 8.25 with 4.56 gears and an ARB locker. This was my first time setting up gears. I bought a second set of inner and outer pinion bearings to make set up bearings. This was a great investment. Only took a couple minutes per bearing to ream the inside a bit with my die grinder. I have a 12 ton Harbor Freight press which came in handy. I also borrowed a dial inch lb. torque wrench, a dial indicator with magnetic stand, and a micrometer. The set up was pretty straight forward. Started with a slightly larger shim pack than was on the old pinion. Set it up with the proper preload. Put the ARB and ring gear in. Then, adjusted side adjusters with homemade tool to get proper backlash. Finally do a pattern check. It took 3 times, but by the end I had the process down. With the tools listed above, a novice mechanic should be able to do the job! You just don't stop until it's right. I stripped down the paint on the axle housing, placed it, and the new spring perches under the new OME springs and RE extended shackle. Set the pinion angle for the new DS and hack and tap SYE, tacked into place. Also tacked up higher clearance shock mounts. Took it all off for final welding, prime, and paint. It is now under the springs, I have the u bolt plates off to weld on some square tube for a bump stop. Then it goes back together for good. This is a before pic!

Here are some pics of the axle in progress on the bench and under the Jeep.


CF Veteran
Nice way to start things off. I envy you, if I had a garage upgrades would be so much easier for me.
A garage is a necessity for a Jeep owner. I had to do a lot to make room for this project. I used some of my bonus to buy the chop saw, press, and various other stuff that make this whole thing possible. Saved more than I spent for sure. A friend with a garage is almost like having your own sometimes. It's not what you know, but who you know. Right? Usually renting friends garages costs food and beverage.
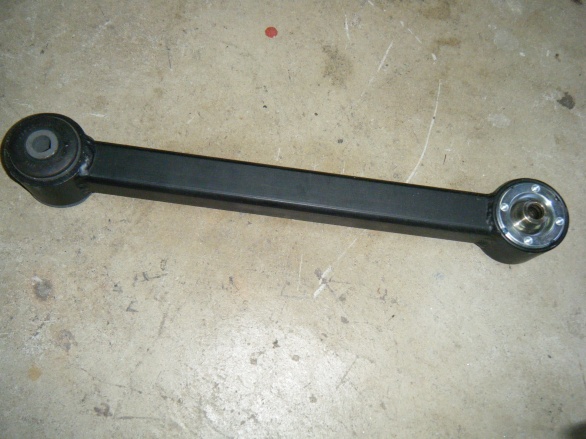
Can't wait to put on the new control arms I built for the front. Here is a pic of the lower. Each has one clevite bushing and one RE superflex joint. Uppers have a superflex joint as well.
Maybe later. Will probably do a 3 link with Clayton cross member at some point. Had a rustys long arm on my old XJ. It was fine. I like to build myself and save money though. For now I will use a set of RC drop brackets. Hope they translate to a decent ride. I'm counting on the drop brackets, rustys coils, and Bilstein 5100's to provide a quality ride. My wife and I will be traveling from California to Colorado in August for a two week vacation, which will include mostly Jeeping, but also rock climbing, hiking, and back country camping. Cant wait!
Ordered ProktoTrim today for the fenders, to finish them out after trimming. Here is the rear before trimming.

Finished welding the square tube to the rear spring plates. Will make great bumpstops! I'll post a pic when I get home tonight.
CF Veteran
Quote:
So true, have a couple friends with enough space to do some work but need to expand my circle a bit. Growing up my dad had his garage done up right only thing he didn't have was a lift, but having everything you need right there made working on the car so easy. Originally Posted by fixerupper
A garage is a necessity for a Jeep owner. I had to do a lot to make room for this project. I used some of my bonus to buy the chop saw, press, and various other stuff that make this whole thing possible. Saved more than I spent for sure. A friend with a garage is almost like having your own sometimes. It's not what you know, but who you know. Right? Usually renting friends garages costs food and beverage.
Either way I'll figure out a solution sooner or later. I don't even want to think about what I could have done with the amount of money I spent on labor.
Here are the bump stops I made today. Welded 1.5 in. square tube across the stock spring plate. Had some plastic end caps to finish off the openings.


