4.3L XJ build
 07-20-2011, 10:08 PM
#1
CF Veteran
Thread Starter
It appears I have never started a build thread here. I have just sort of nickel and dimed it. So I thought I would put it all together for you and just keep adding to this one.
I guess I never really showed my build in one piece here. I just sort of gave an incomplete few bits and pieces. So here it is.
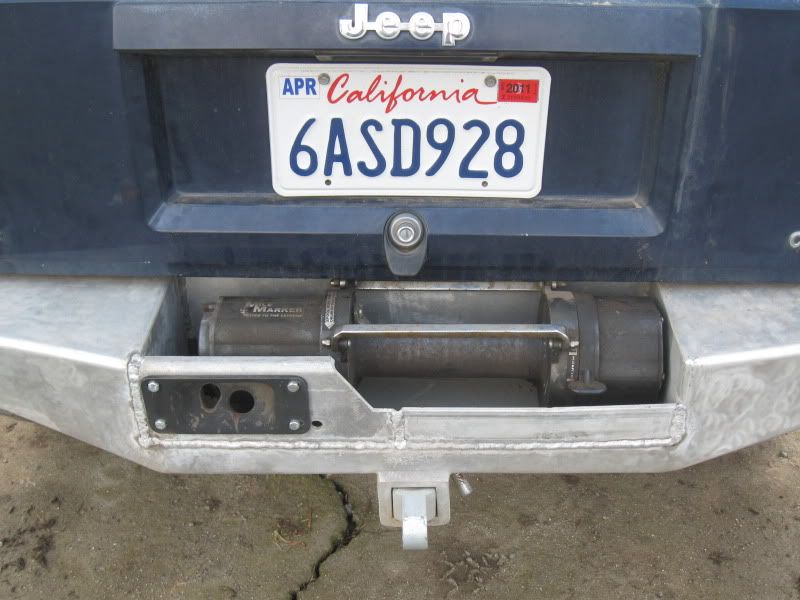
I started out with an 86 stock XJ with 2.8L 5 speed tranny. Built myself a bumper and got a winch right off. Sorry I don't have pics of the bumper build, but it is made out of 6061 Aluminum and designed to deflect animals under the rig instead of over the top when hit. All I can say is, it works and saves damage from deer and other animals. I had a Mile Marker 9,000# winch that gave up the ghost with no fanfare so I bit the bullet and bought a Warn 9.5ti to replace it. Moved to CA and found the smog police not liking my little V6 and I couldn't buy carburetor parts for it. I wasn't about to scrap it, so I started on a build that just kept growing and is still not done.
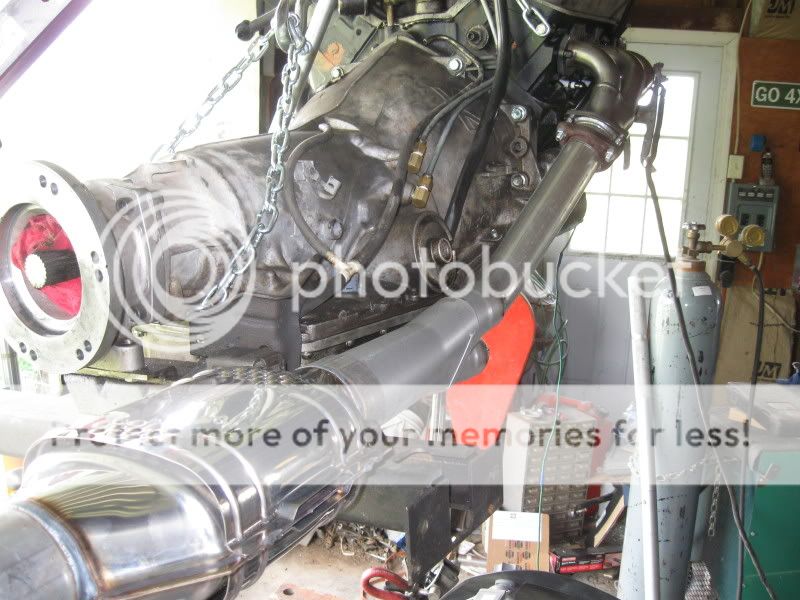
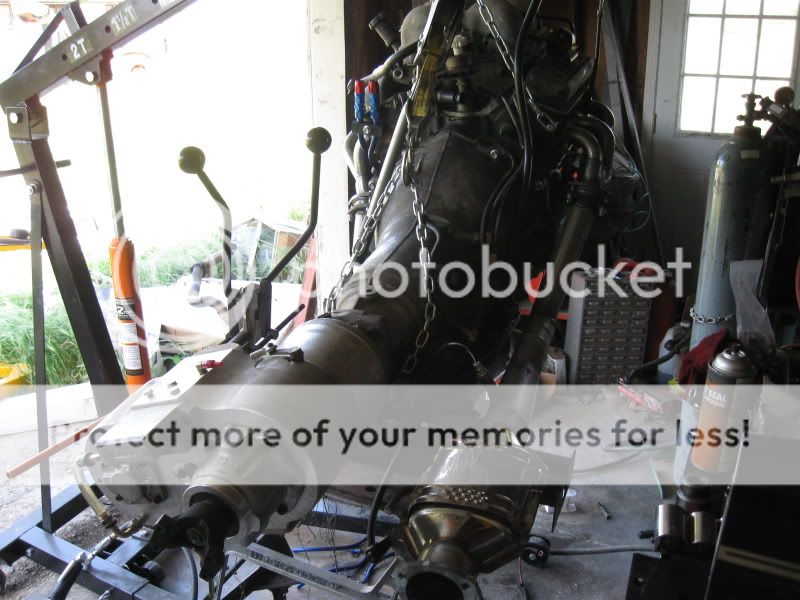
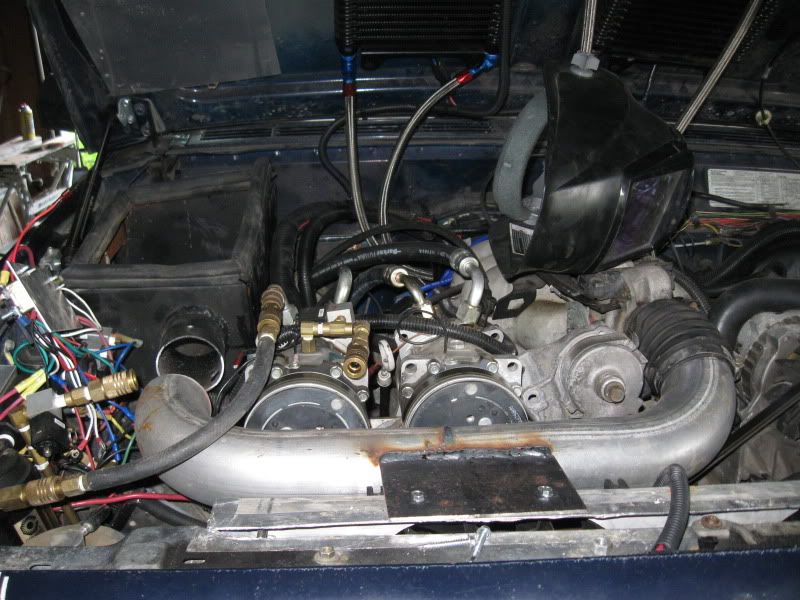
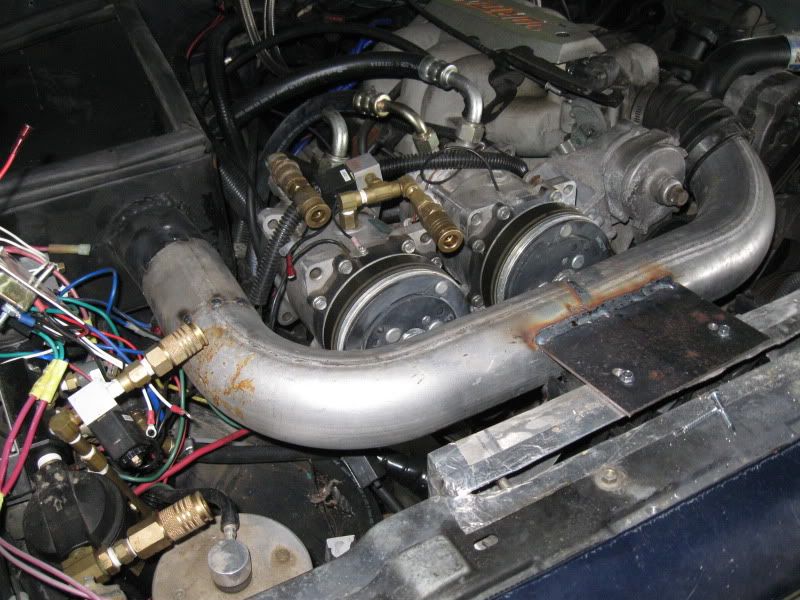
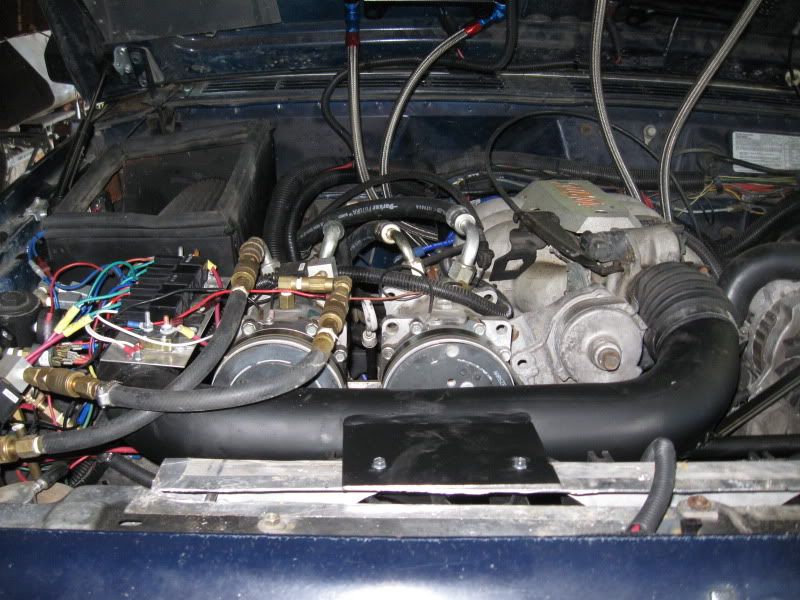
The smog police wouldn't let me use a 5 speed so I had to use a 4L60E to go with the 93 4.3L Chevy. I rebuilt the tranny with all the good stuff you need to beef it up and used an adapter from Advance adapters to get the 6 bolt flange for the New process transfer case. Also pictured is the right side header and full three inch exhaust and high flow cat from Summit Racing.
Here is the left side header and 2 1/4' exhaust with mandrel bends feeding the 3" system
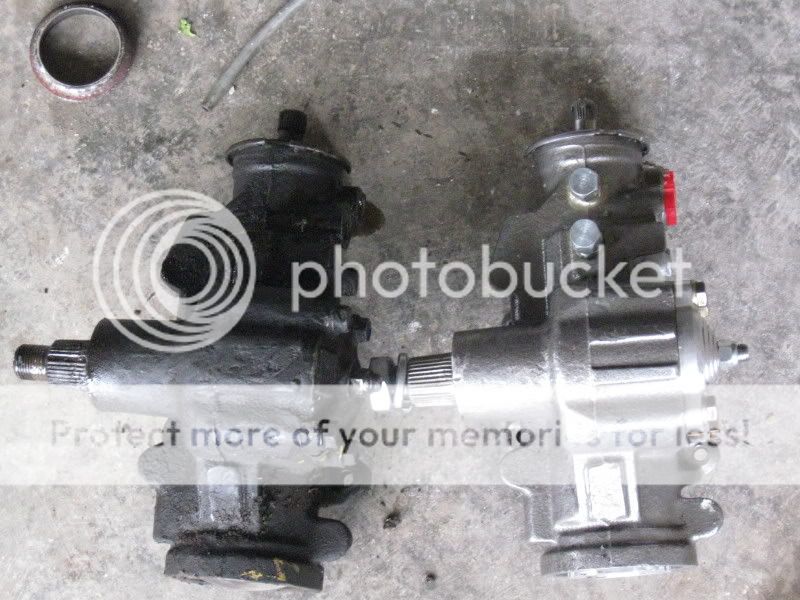
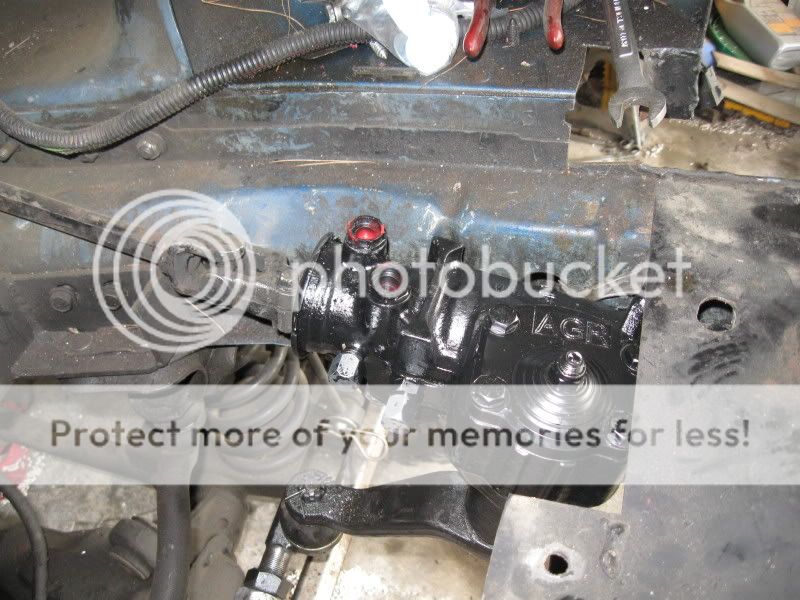
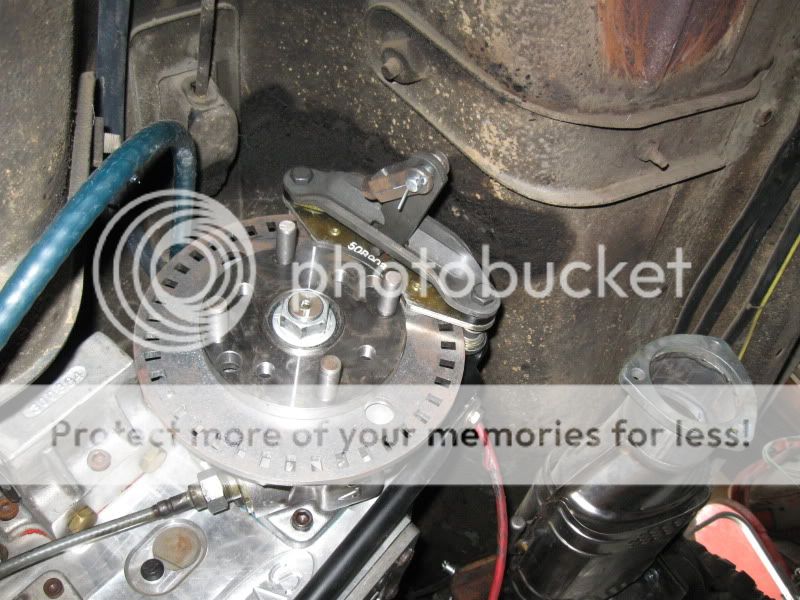
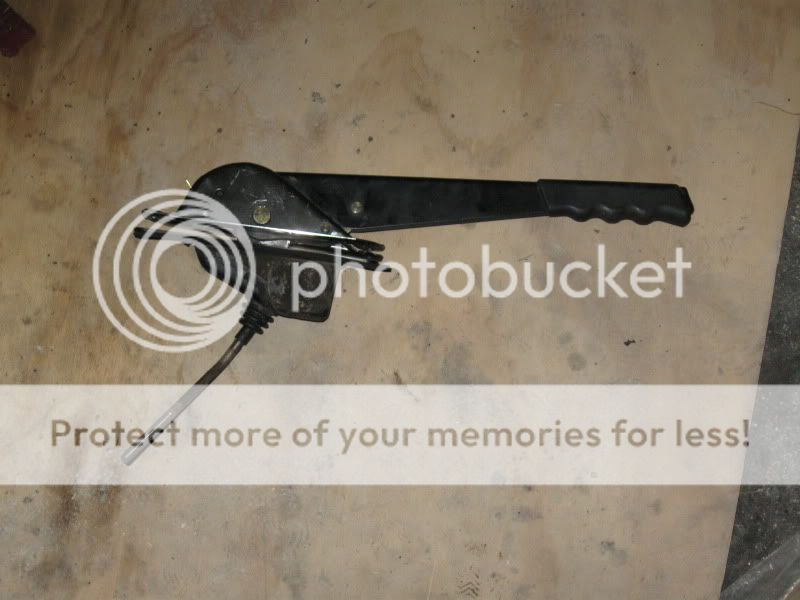
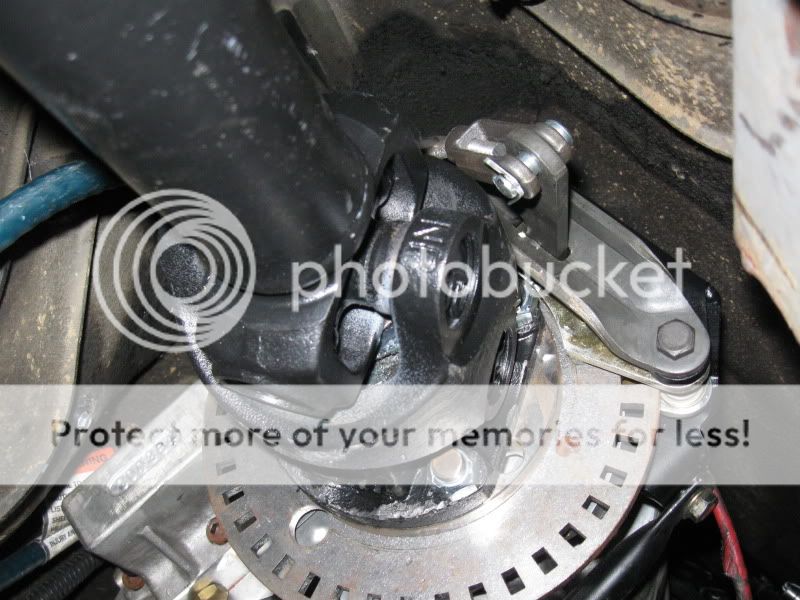
I got tired of getting junk yard steering boxes that leaked, so I bought an AGR steering box and high volume pump from 4 Wheel Parts. The box is tapped for a future rock ram.
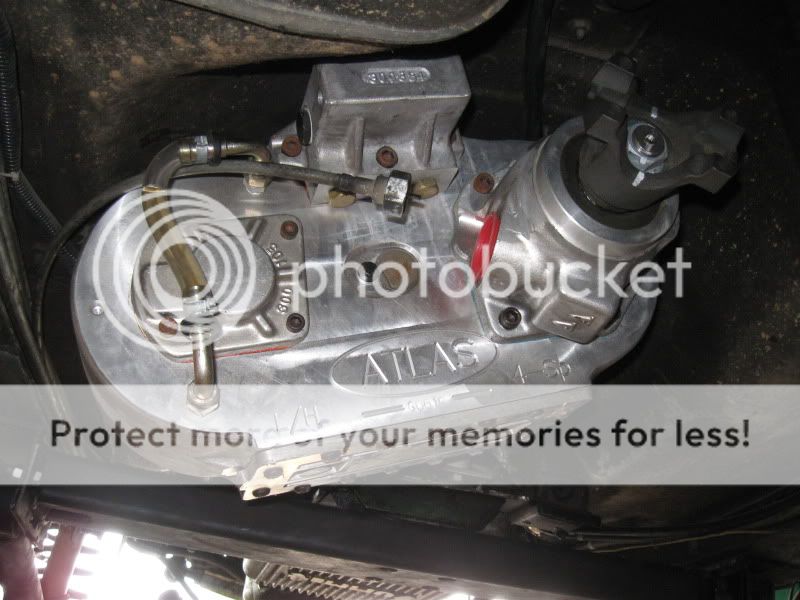
My shop cat gets in on the action when I don't make too much noise. The cat decided I needed to upgrade my NP231 tcase, so I bought an Atlas 4 speed. Here he is showing his approval.
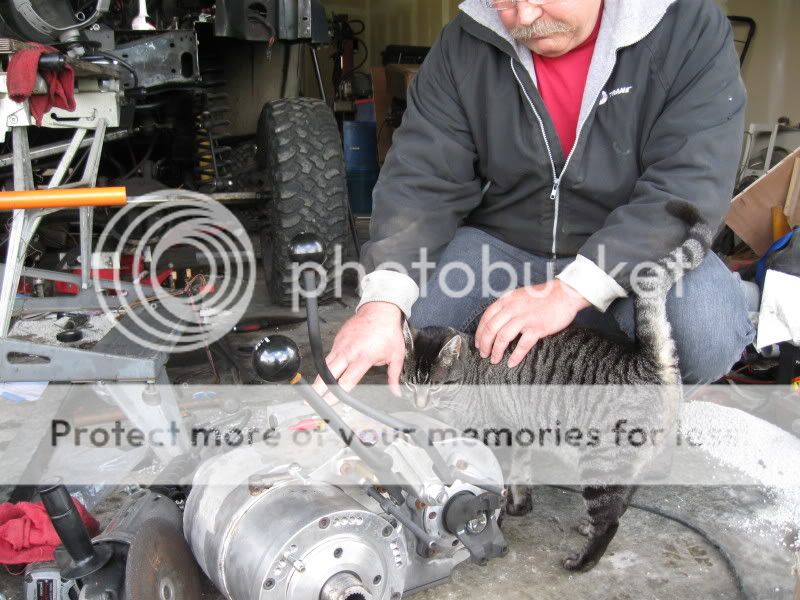
I clocked the case prior to putting it in. These things weigh about 185#. So it is much easier to do it out of the rig.

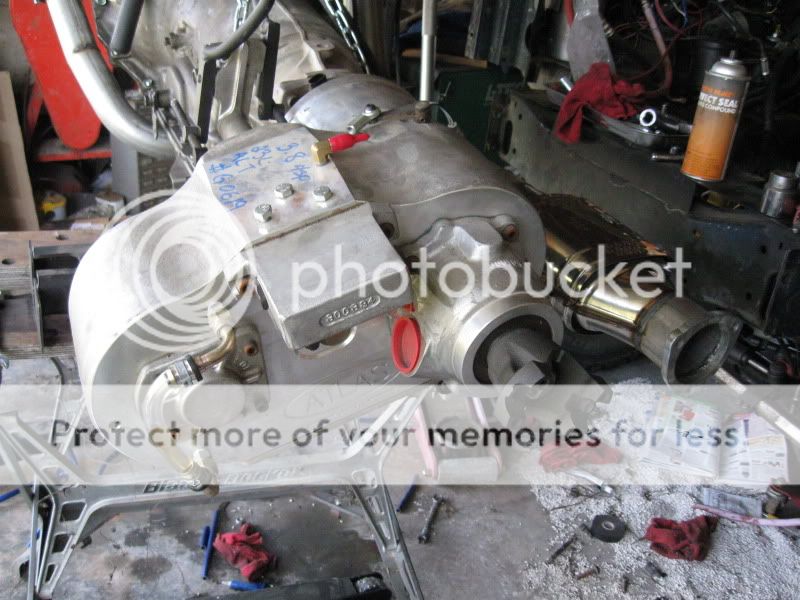
I used Advance Adapters motor mounts, but found I had to center the motor and tranny so I ended up doing a little fabbing on them. AA was kind enough to send me stuff free of charge to do this.
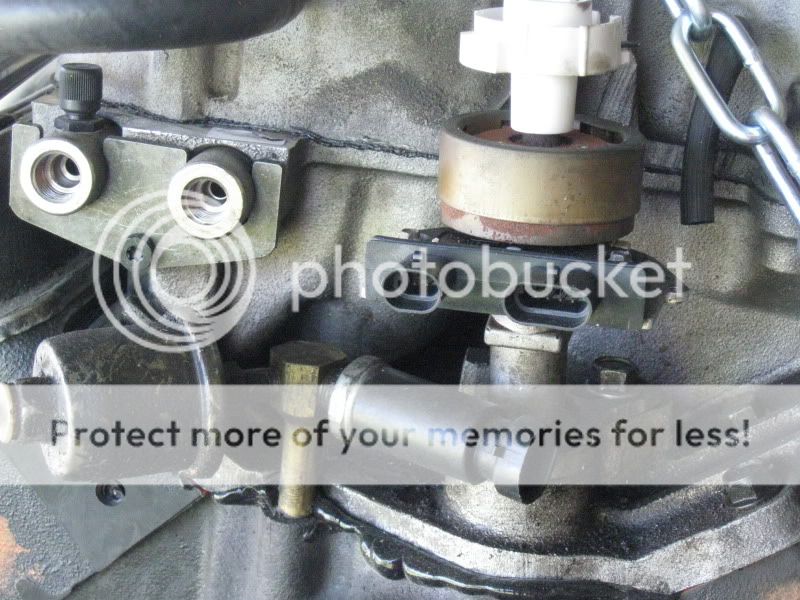
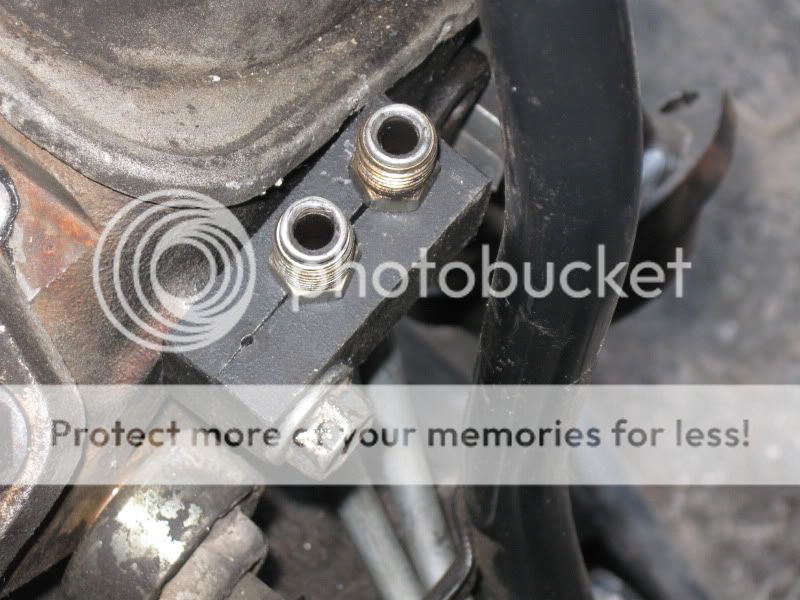
The 86 had mechanical gages while the 93 Chevy had digital. Here is the two oil pressure sensors, one on the left for the Jeep and one on the right for the Chevy ECM
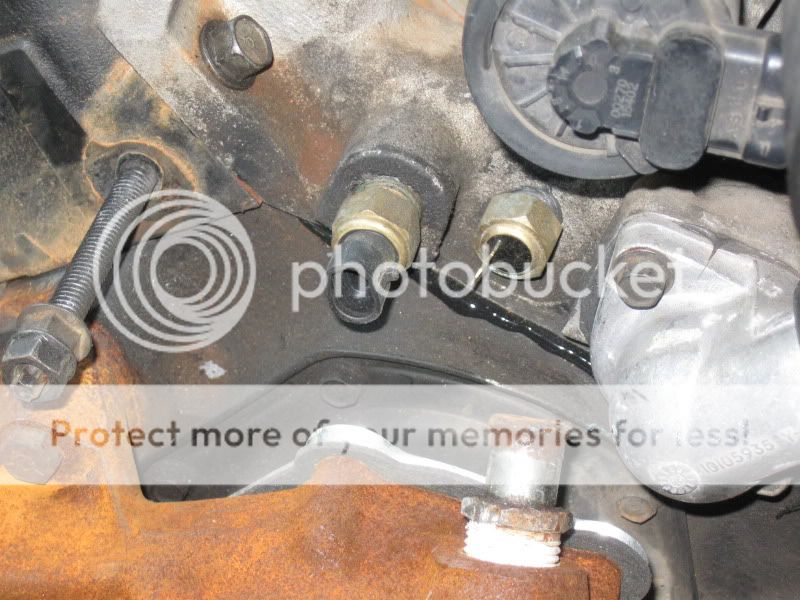
It gets worse with the temp sensors. The one on the left is for the ECM, the one on the right I tapped in for the radiator fan control switch.
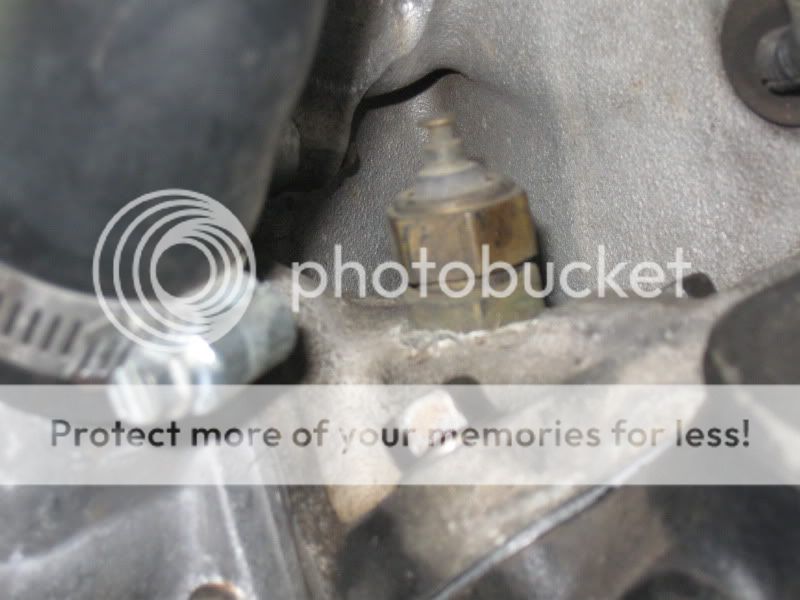
This one I tapped in for the Jeep temp gage.
I guess I never really showed my build in one piece here. I just sort of gave an incomplete few bits and pieces. So here it is.
I started out with an 86 stock XJ with 2.8L 5 speed tranny. Built myself a bumper and got a winch right off. Sorry I don't have pics of the bumper build, but it is made out of 6061 Aluminum and designed to deflect animals under the rig instead of over the top when hit. All I can say is, it works and saves damage from deer and other animals. I had a Mile Marker 9,000# winch that gave up the ghost with no fanfare so I bit the bullet and bought a Warn 9.5ti to replace it. Moved to CA and found the smog police not liking my little V6 and I couldn't buy carburetor parts for it. I wasn't about to scrap it, so I started on a build that just kept growing and is still not done.
The smog police wouldn't let me use a 5 speed so I had to use a 4L60E to go with the 93 4.3L Chevy. I rebuilt the tranny with all the good stuff you need to beef it up and used an adapter from Advance adapters to get the 6 bolt flange for the New process transfer case. Also pictured is the right side header and full three inch exhaust and high flow cat from Summit Racing.
Here is the left side header and 2 1/4' exhaust with mandrel bends feeding the 3" system
I got tired of getting junk yard steering boxes that leaked, so I bought an AGR steering box and high volume pump from 4 Wheel Parts. The box is tapped for a future rock ram.
My shop cat gets in on the action when I don't make too much noise. The cat decided I needed to upgrade my NP231 tcase, so I bought an Atlas 4 speed. Here he is showing his approval.
I clocked the case prior to putting it in. These things weigh about 185#. So it is much easier to do it out of the rig.
I used Advance Adapters motor mounts, but found I had to center the motor and tranny so I ended up doing a little fabbing on them. AA was kind enough to send me stuff free of charge to do this.
The 86 had mechanical gages while the 93 Chevy had digital. Here is the two oil pressure sensors, one on the left for the Jeep and one on the right for the Chevy ECM
It gets worse with the temp sensors. The one on the left is for the ECM, the one on the right I tapped in for the radiator fan control switch.
This one I tapped in for the Jeep temp gage.
Last edited by 4.3L XJ; 12-15-2011 at 01:13 PM.
 07-20-2011, 10:09 PM
#2
CF Veteran
Thread Starter
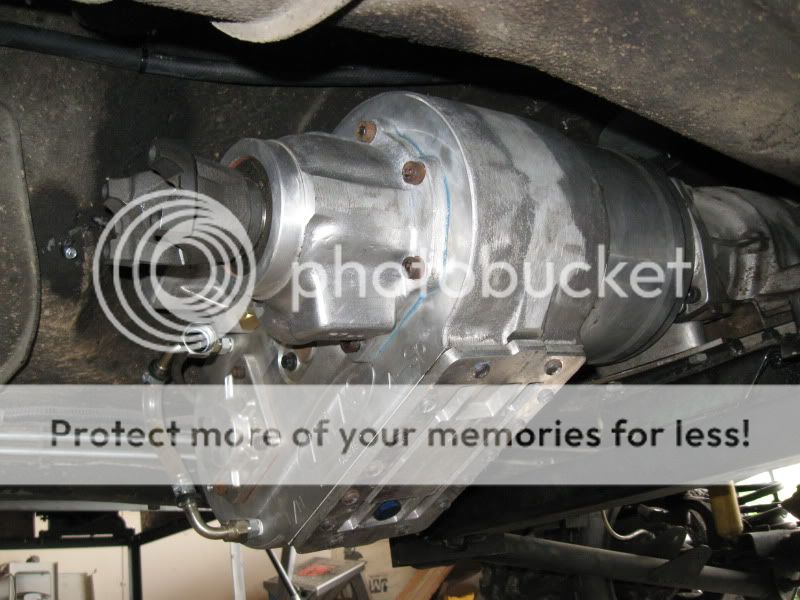
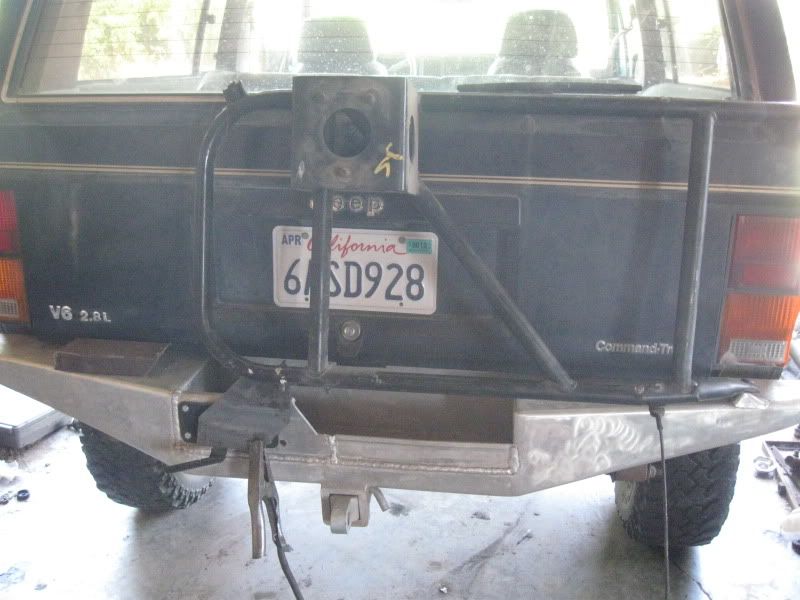
Dropped it in and made a cross member out of 2 X 4 X 1/4" rectangular tubing and got a little help hanging the tcase.
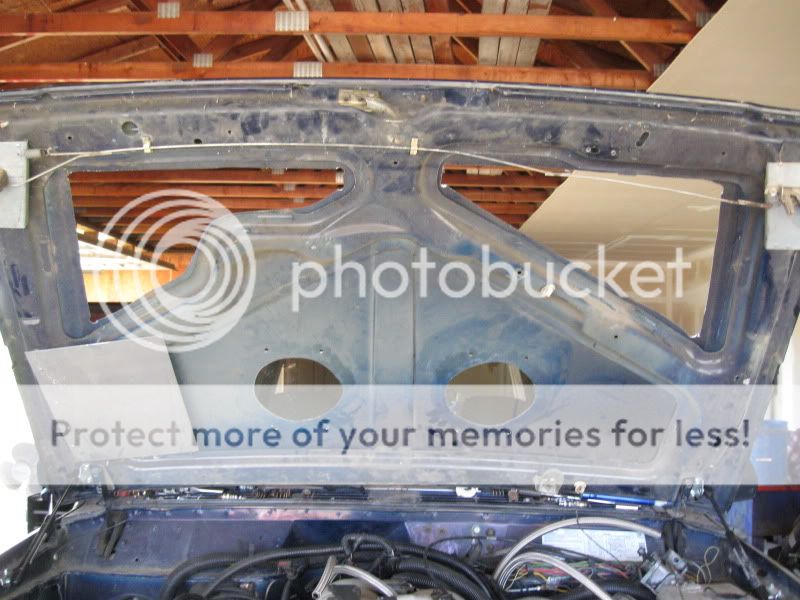
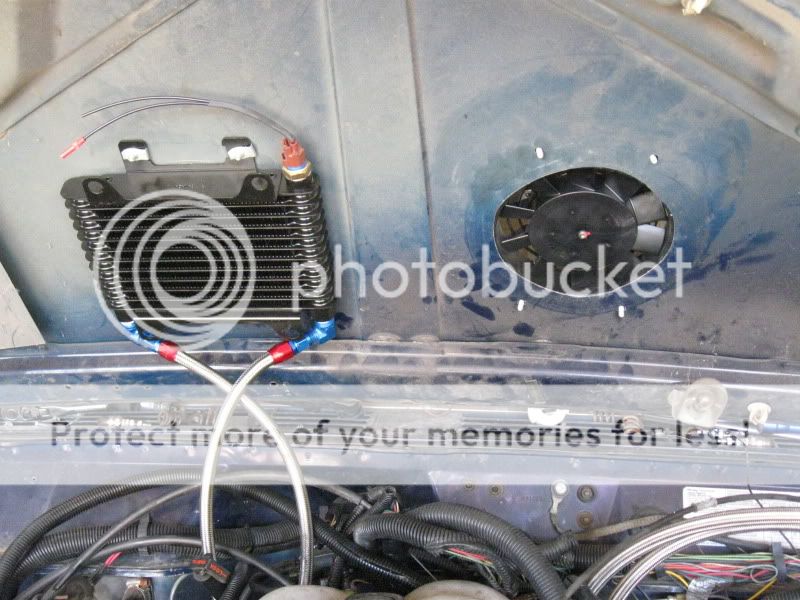
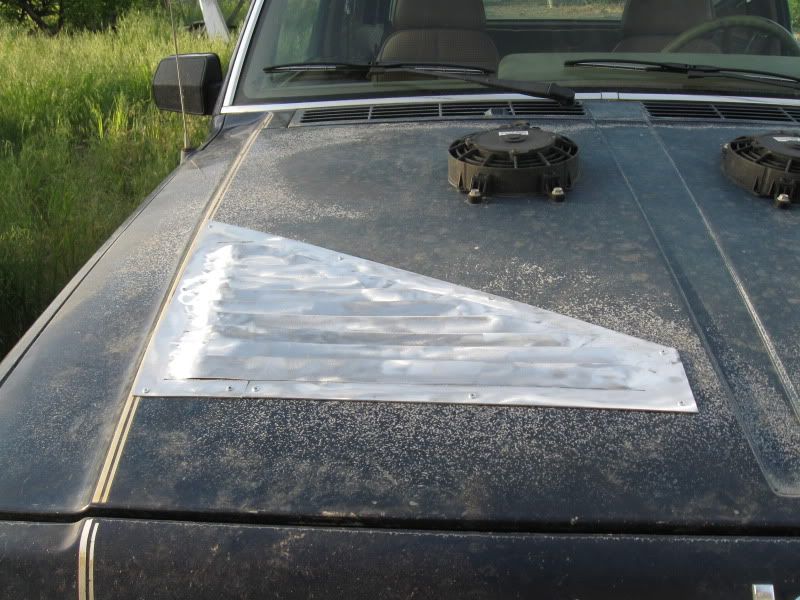
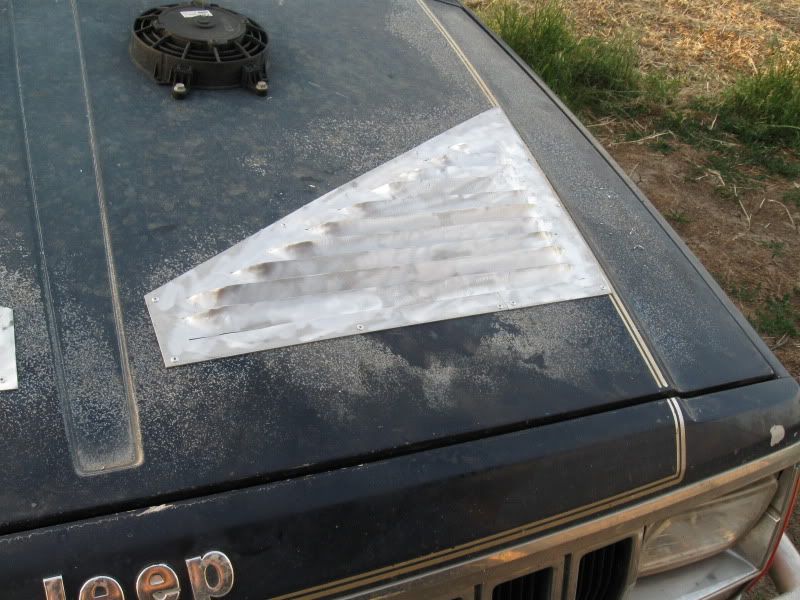
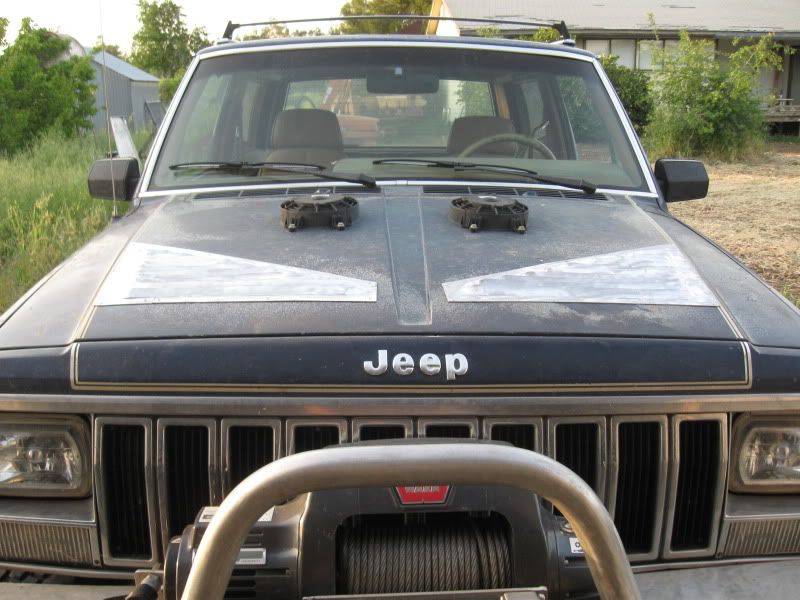
Cooling is a huge issue here in NorCal where temps can reach 115* in the summer. Whenever any kind of 90* V motor is installed in an XJ, the air flow is restricted and cooling is a real problem. To remedy that, I cut some holes in the hood. The ones in the front for air flow. The ones in the rear are fans on oil coolers that are turned on when the oil temp reaches 160* and blow cooler air into the back of the engine compartment. I am in the process of making louvers for the hood now.
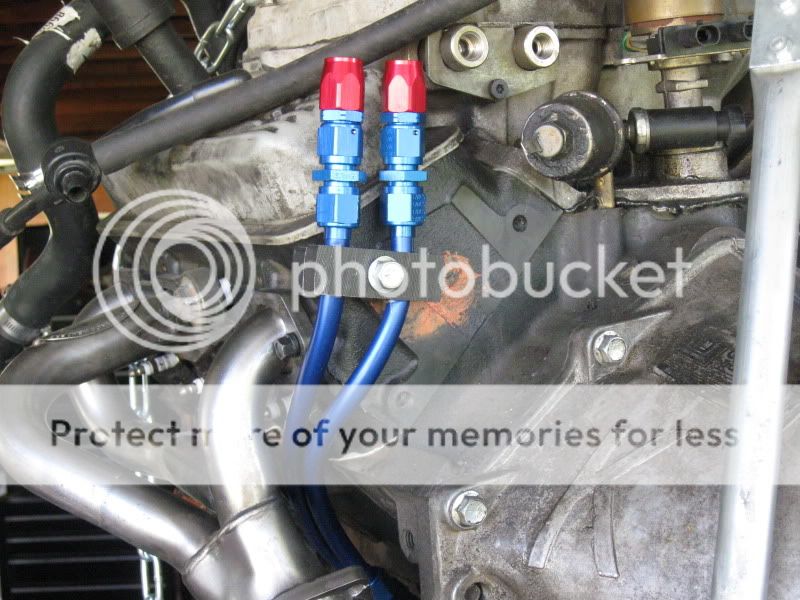
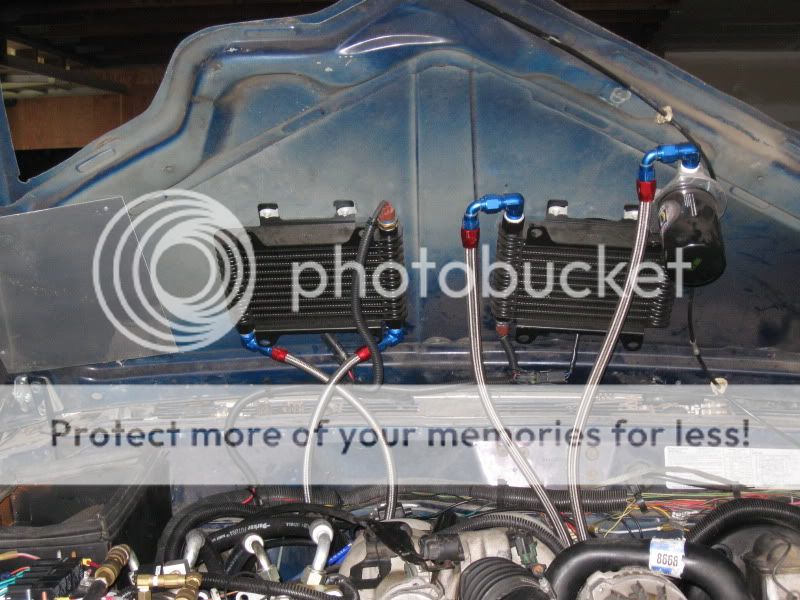
T feed the oil coolers, I tapped into the engine oil filter adapter and ran the engine oil and tranny cooler lines up the back of the engine.
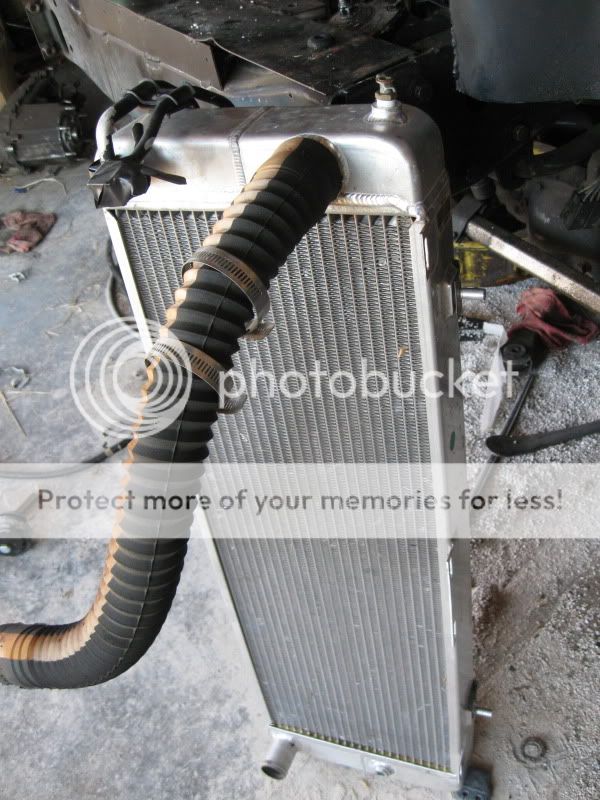
To handle the cooling duties, a Griffin radiator was ordered set up for a Chevy.
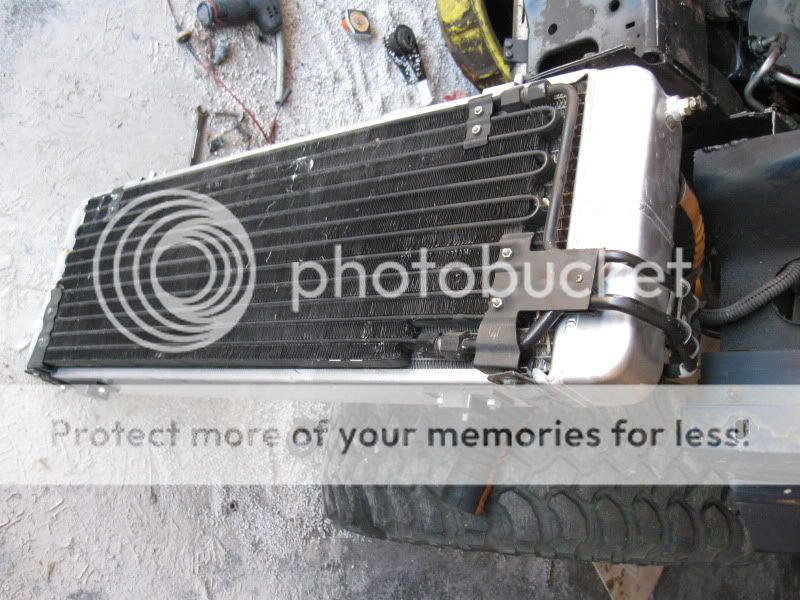
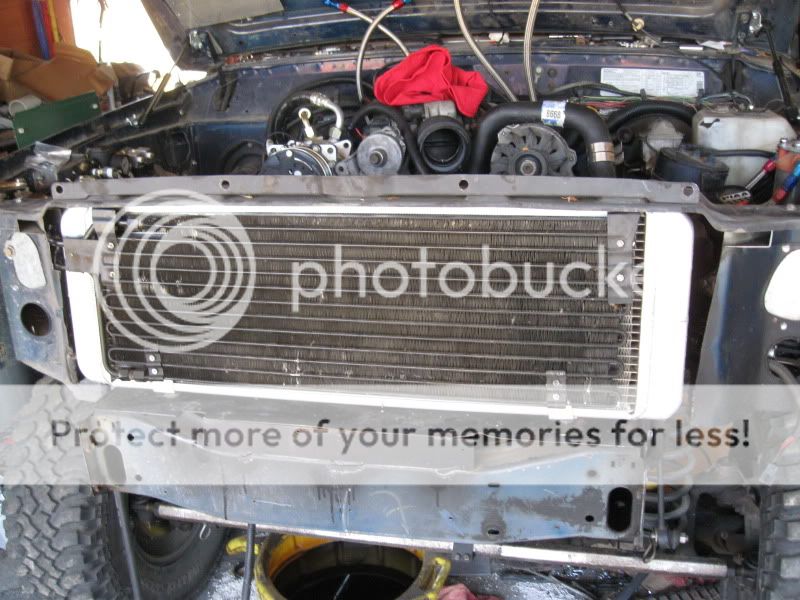
And since I melt in heat, a new AC condenser was mounted in the stock position.
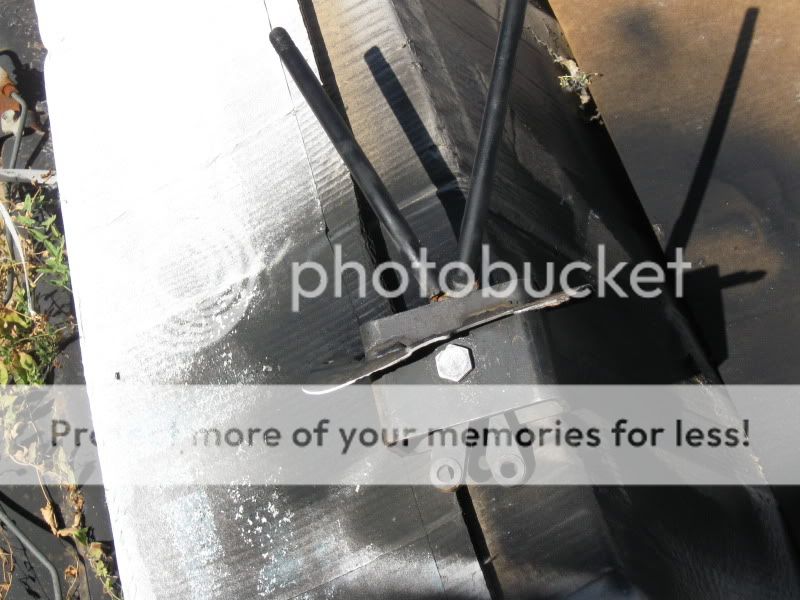
The Advance Adapters shift linkage was not console friendly, so I made this linkage for the main case and used the one they provided for the planetaries.
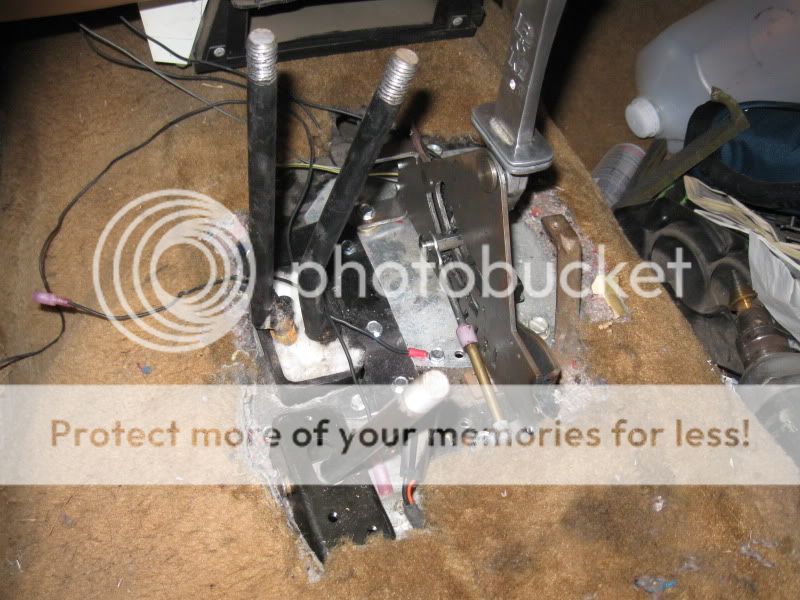
Here it is installed in the tunnel.
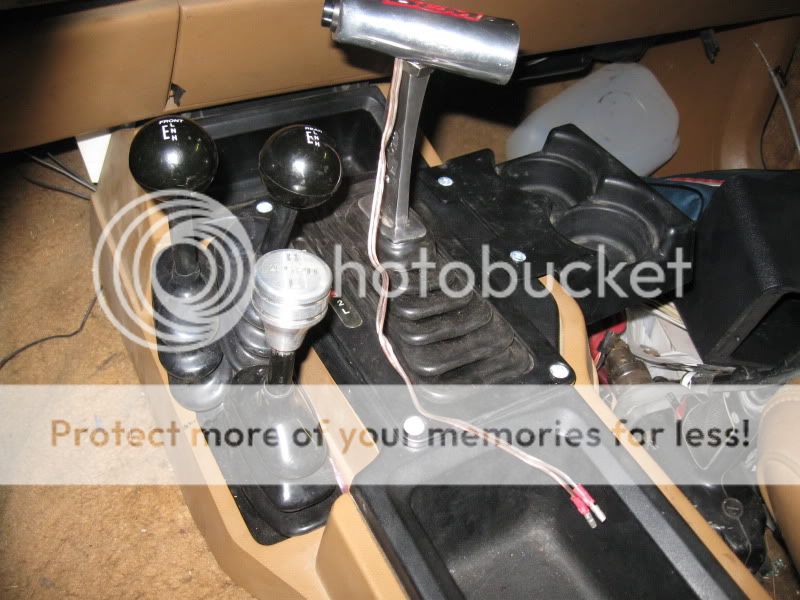
Here is how it turned out when finished. The extra wires on the T handle are for a manual torque converter lockout.
I plan on ditching the D35 this fall, so parking brakes will be a problem. To solve that, I got this parking brake from Parts Mike through Tom Woods Drivelines.
Th make it work, I modified the stock parking brake handle to have the rod come out the bottom instead of the back. You cannot tell the difference when installed.
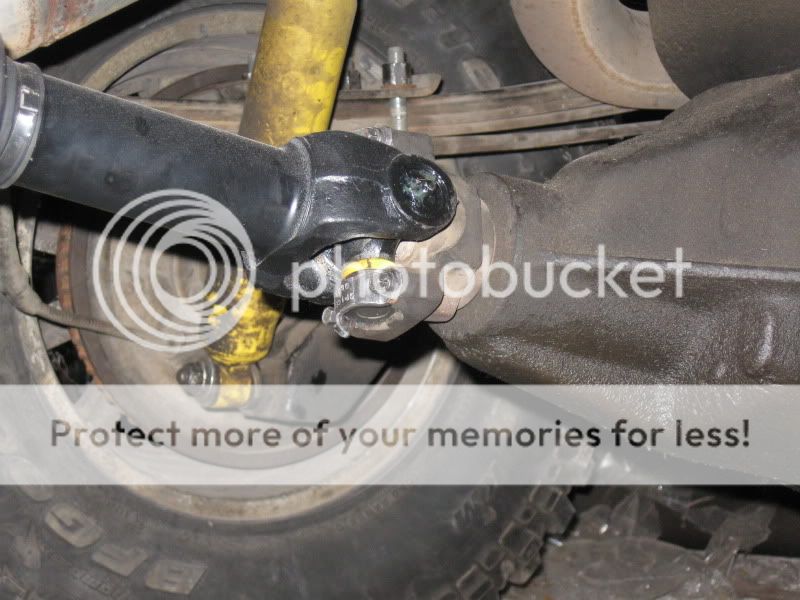
Tom Woods drivelines were installed and the pinion angle reset for a CV driveshaft.
AC is hooked up, OBA done and custom air box and horn made for the Chevy. As of this time, it does 0 - 60 in about 100 yards and gets 16 mpg. I am going to wheel it this summer and start on axles in the fall.
Last edited by 4.3L XJ; 12-15-2011 at 01:15 PM.
07-20-2011, 10:09 PM
#3
CF Veteran
Thread Starter
Then I added my on board air. I bought another new compressor and some goodies from Kilby Enterprises. Here is the compressor.

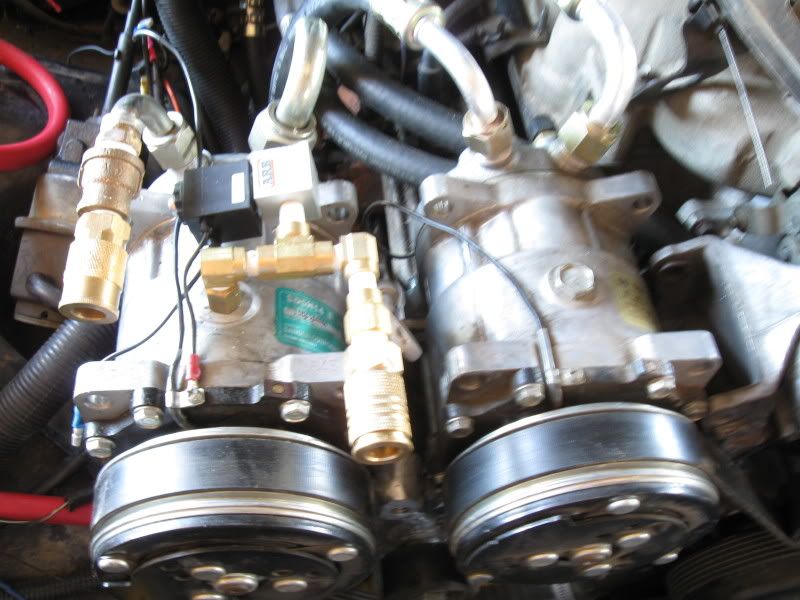
I don't have any pics of exactly how I made the bracket, but I did it all with a piece of 3/8X2" steel with four holes drilled in it and using normal shop tools and a MIG set up for aluminum. I got the idler set up parallel with the use of a hole saw in a drill press and swinging the table under the saw.
I don't have any pics of exactly how I made the bracket, but I did it all with a piece of 3/8X2" steel with four holes drilled in it and using normal shop tools and a MIG set up for aluminum. I got the idler set up parallel with the use of a hole saw in a drill press and swinging the table under the saw.
07-20-2011, 10:10 PM
#4
CF Veteran
Thread Starter
Thanks, but it is not done yet. It needs a good breather.
So I started with three inch mandrel exhaust bends. These are the ones I had left over from when I made my 3' exhaust. They have a true 3" radius throughout the bend and are the same technology used by K&N and others to make their air horns for their custom intakes.

I cut another mounting plate and started with what was half a bend and tacked it in. Then I put the air box in position and cut the 180* bend and tacked it into position.
Here it is partially welded. Then I cut a short piece to connect the air box.
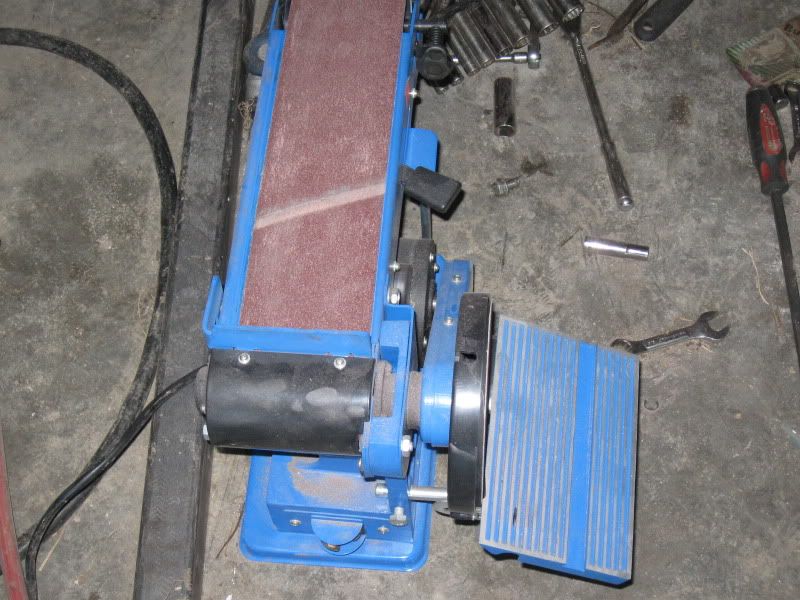
Then it was time to weld it all together. Easier said than done. Exhaust tubing is kind of thin on the long side of those bends. It is also aluminized which affects the shield gas. Many times the welds turn black instead of shiny like most MIG welds. It is necessary to get them aligned as perfectly as possible. To do this I used a bench model belt sander.
Once tacked together I put it all in the vise and proceeded to weld. The method welding two thin edges together is a little different than just regular MIG welding. Normally, you want to weld on the level if you can and set the machine for the proper penetration. But with this, I set the machine to weld 1/8" steel and then welded down hill. MIG welds do not like gravity and will start flowing down hill. I used the puddle to shield the edges of the metal and then still add a good amount of wire. The result is not real pretty, but keeps the edges from disappearing. This is not structural anyway.
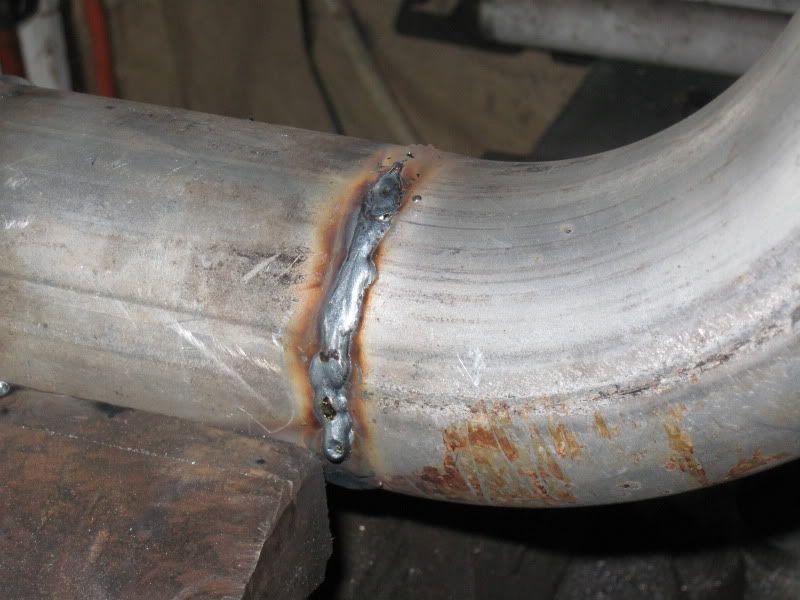
I had one spot with a crack in it and was too lazy to cut another, so I used the down hill trick again and stitched it. The nice thing about a MIG is that you can instantly turn it off and on and you don't have to go through the "striking an arc" procedure you do with stick. To weld the crack, I stitched one side down hill from the previous weld, then the other. Let the glow go out of the metal and then down hill stitch the two together, then repeated the process exactly like that. The result looked somewhat like a stick weld that had been done with little circles with the stick.
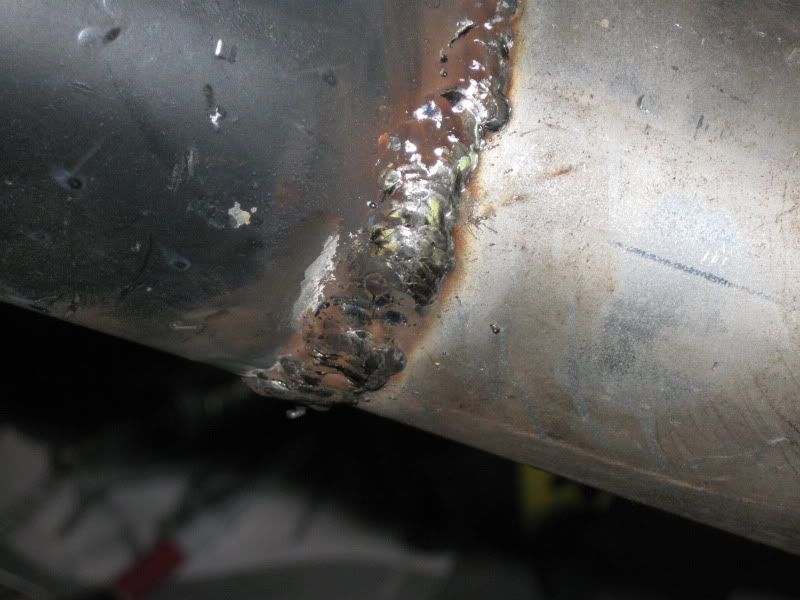
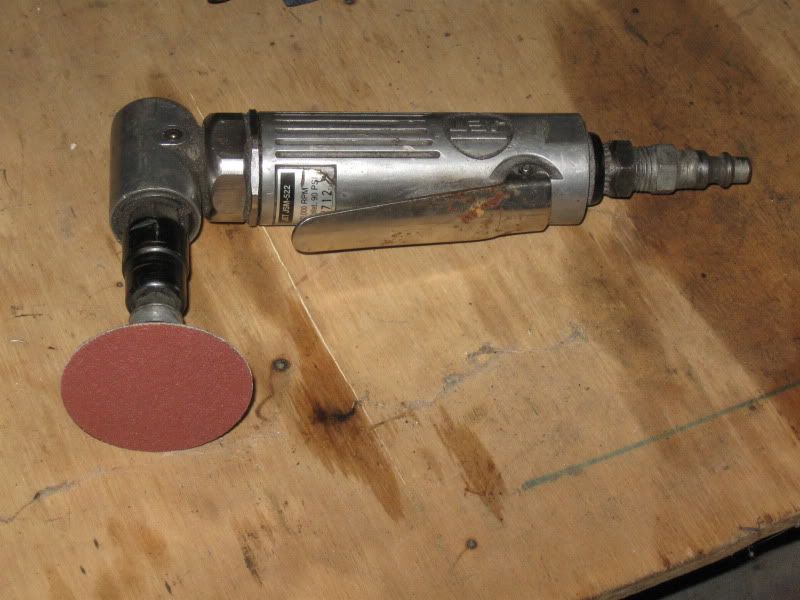
Next thing to do for a nice effect was grind the welds. I used a typical 4" angle grinder to start and then finished them with an angle die grinder with a sanding disk on it which makes it almost like a mirror.
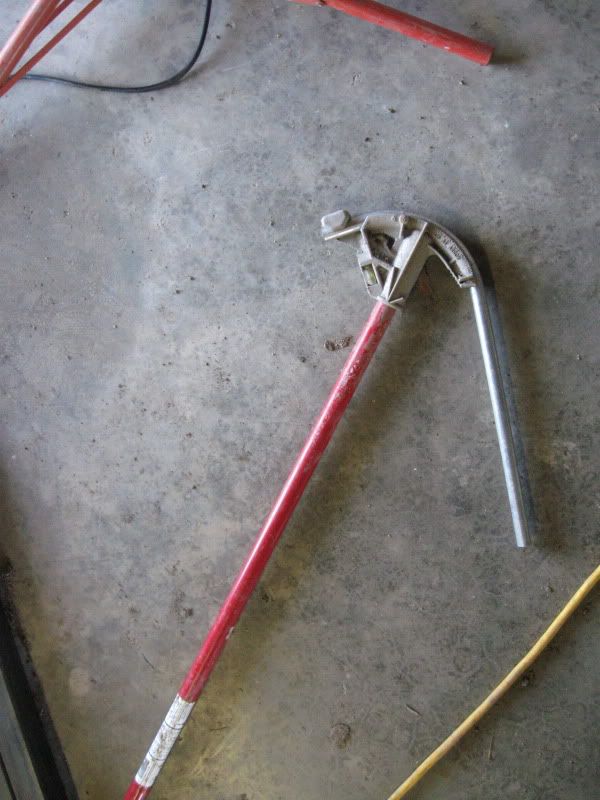
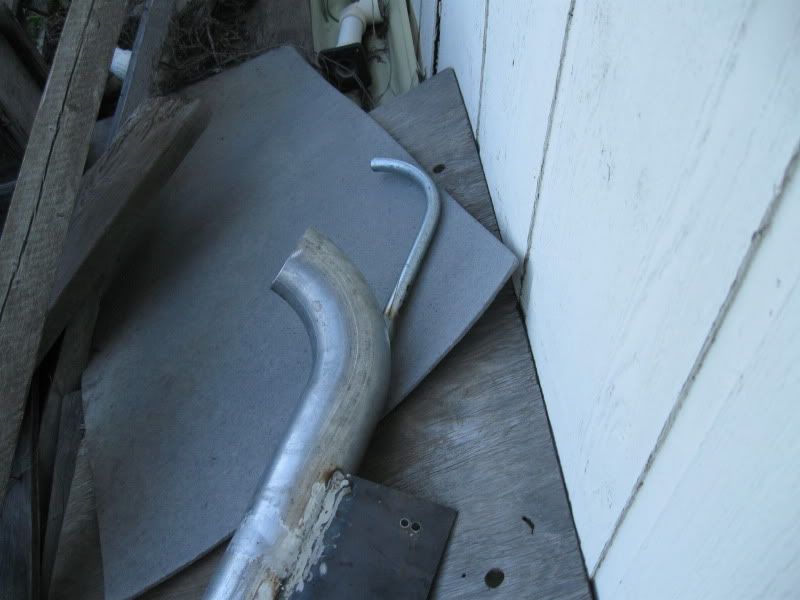
One last thing was the oil breather tube. I used 1/2" EMT tubing and bent it with a bender.
Then welded it on.
I put the AEM filter in the air box and put it all in after painting.

So I started with three inch mandrel exhaust bends. These are the ones I had left over from when I made my 3' exhaust. They have a true 3" radius throughout the bend and are the same technology used by K&N and others to make their air horns for their custom intakes.
I cut another mounting plate and started with what was half a bend and tacked it in. Then I put the air box in position and cut the 180* bend and tacked it into position.
Here it is partially welded. Then I cut a short piece to connect the air box.
Then it was time to weld it all together. Easier said than done. Exhaust tubing is kind of thin on the long side of those bends. It is also aluminized which affects the shield gas. Many times the welds turn black instead of shiny like most MIG welds. It is necessary to get them aligned as perfectly as possible. To do this I used a bench model belt sander.
Once tacked together I put it all in the vise and proceeded to weld. The method welding two thin edges together is a little different than just regular MIG welding. Normally, you want to weld on the level if you can and set the machine for the proper penetration. But with this, I set the machine to weld 1/8" steel and then welded down hill. MIG welds do not like gravity and will start flowing down hill. I used the puddle to shield the edges of the metal and then still add a good amount of wire. The result is not real pretty, but keeps the edges from disappearing. This is not structural anyway.
I had one spot with a crack in it and was too lazy to cut another, so I used the down hill trick again and stitched it. The nice thing about a MIG is that you can instantly turn it off and on and you don't have to go through the "striking an arc" procedure you do with stick. To weld the crack, I stitched one side down hill from the previous weld, then the other. Let the glow go out of the metal and then down hill stitch the two together, then repeated the process exactly like that. The result looked somewhat like a stick weld that had been done with little circles with the stick.
Next thing to do for a nice effect was grind the welds. I used a typical 4" angle grinder to start and then finished them with an angle die grinder with a sanding disk on it which makes it almost like a mirror.
One last thing was the oil breather tube. I used 1/2" EMT tubing and bent it with a bender.
Then welded it on.
I put the AEM filter in the air box and put it all in after painting.
Last edited by 4.3L XJ; 12-15-2011 at 01:17 PM.
07-20-2011, 10:10 PM
#5
CF Veteran
Thread Starter
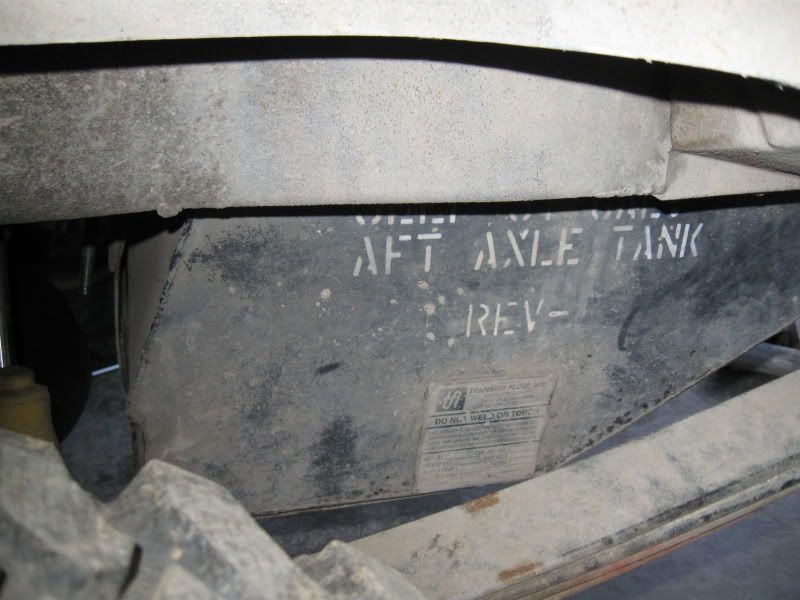
Went to the pick and pull and got an aftermarket 31 gal gas tank for $35 with sending unit, straps and skid plate. This one is apparently produced by a local company here in Chico. I was going to do something like this and try for 40 gal but I sure can't for this price.
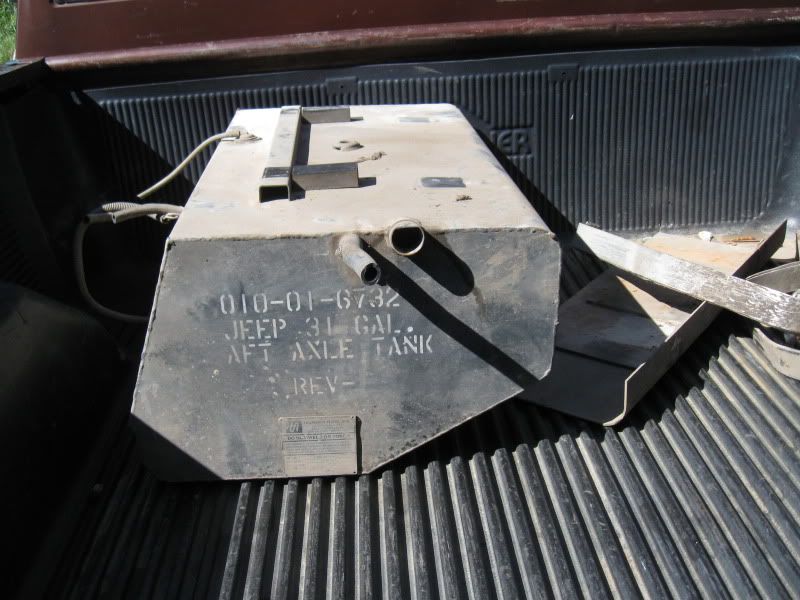
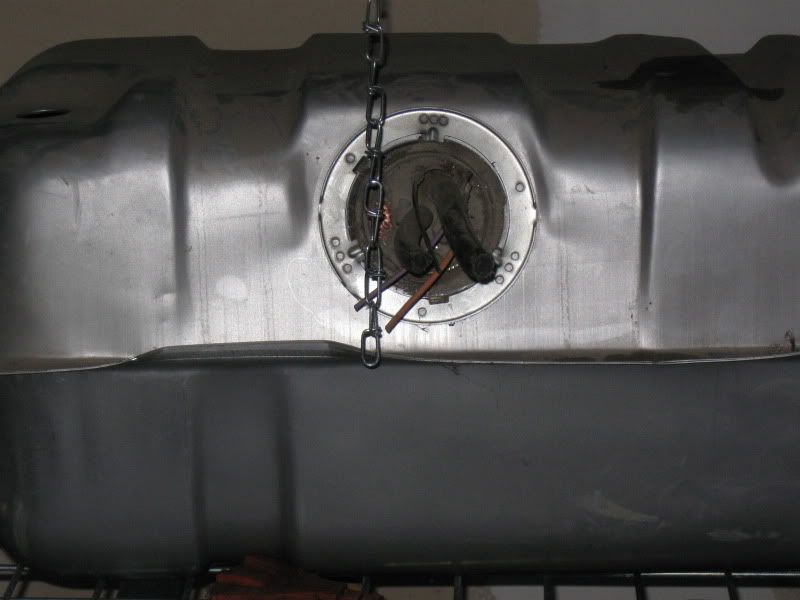
The low part of the tank sits about 2.5" lower than stock. Here is a pick of the front of the stock tank on my shelf to compare the position of the sending unit.
There are a couple of problems with it, no big deal though. They punched a hole in the bottom to drain it but since it is heavy steel it is easily welded. Also looks like it needs a new o ring for the sending unit. Fill neck is a little short too, no big deal.
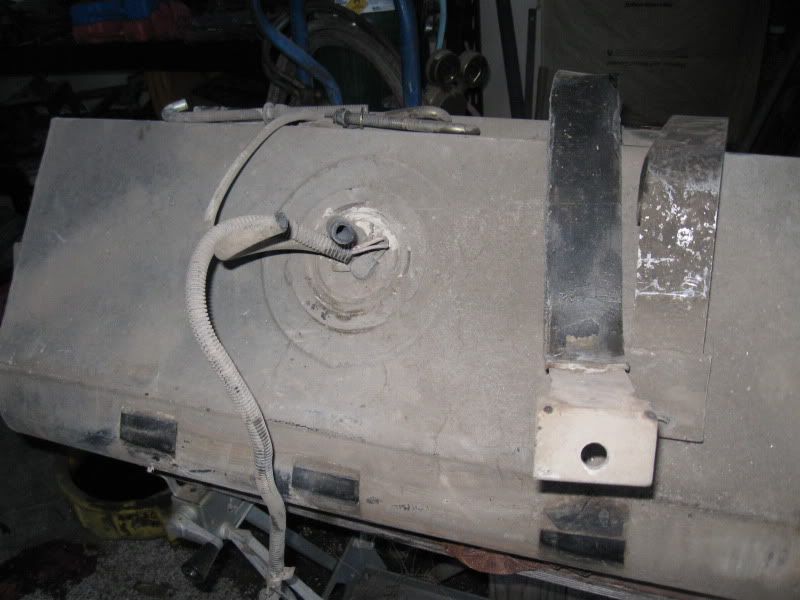
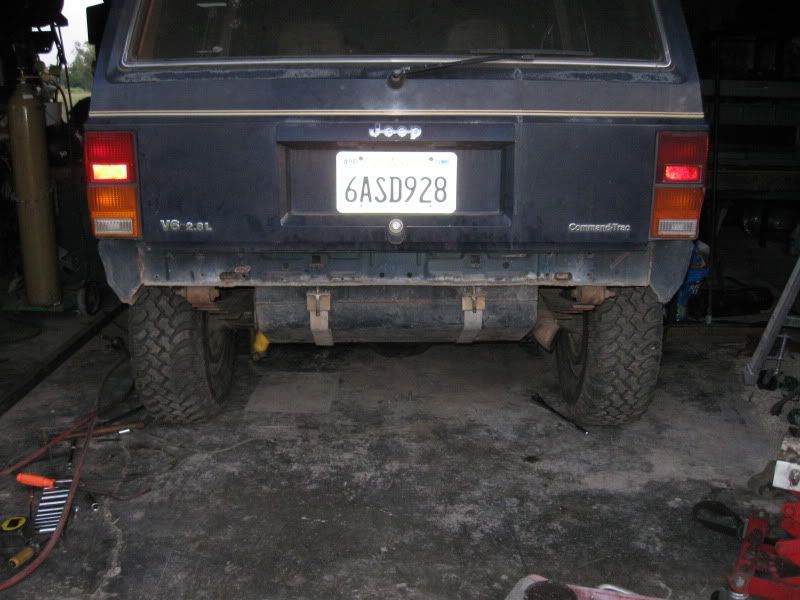
Here is a side view of the tank installed
Here is a rear view without the rear bumper.
Driving with it has been fun. Went on a trip here locally , about 160 miles with 105 of it off road. Used about 15 gal of fuel, which in a 20 gal tank would have made me a little antsy. The other thing is that it takes about 140 - 160 miles normal driving to get off full. Kind of nice.
Unfortunately, I don't have any pics of when I made my long arms. But not to worry, I will be remaking them from a y link to a true three link this winter. I will be strengthening the frame shortly.
I am sort of always tweaking my suspension to get what I want. Too cheap to just buy leaf springs I guess. I had a set of rear springs consisting of the main and a S10 heavy duty rear spring. If I used three leaves, it was good riding but not tall enough. If I used the whole thing, it had the right height but was too stiff. Our XJs are apparently quite a bit lighter than other comparable rigs which might explain why they do so well off road. So anyway, I have always wanted to experiment with some Isuzu Rodeo springs. They are slightly shorter than S10 springs, have about 2" more arch in them and have thinner leaves. The width is a metric size that is about 1/16" shy of the width of our springs, close enough. Here is the spring out of the vehicle.
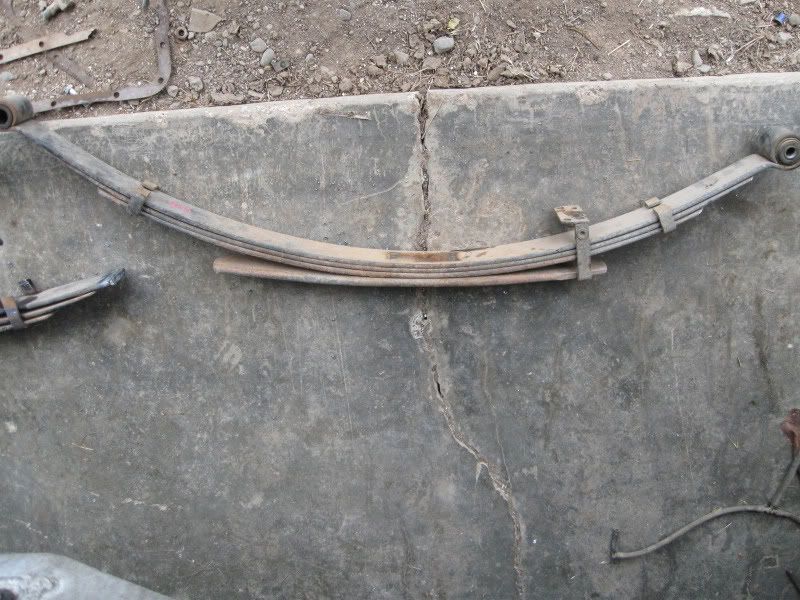
As you can see, it has quite a bit of curve to the leaves. Here is an S10 leaf next to the Rodeo leaf
 ]
]
It is a well set up spring, here it is disassembled. Notice the space between each leaf. This space is called "snap". Probably because the spring will snap apart when the center pin is cut.
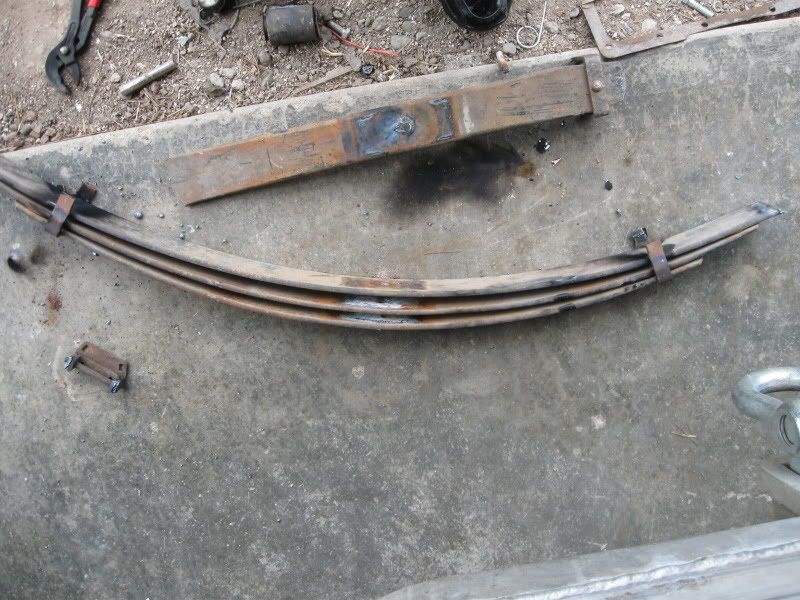
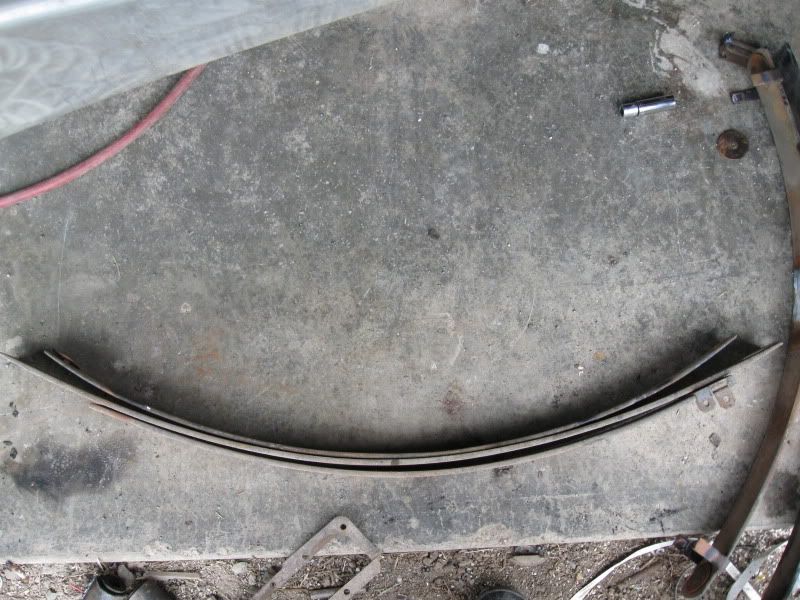
To use this spring, it is necessary to cut off the eyes with a torch and use the main leaf as our #2 leaf. I tried using all three leaves with the bottom leaf upside down. This would be a good design for a two stage spring and not allow the leaves to over flex and loose their temper. I set it down and got an amazing 6" lift with it. However it was too stiff like that. I then removed the #2 Isuzu leaf, which would be our new #3 leaf and kept the bottom leaf upside down. It looked like this.
This gave a very soft spring with something like a stock spring rate with 3" of lift. But it seemed a little soft like that. So I took the leaf I removed and cut it to 10" from center on the short side and 12" on the long side and put it right side up in the bottom. This changed the spring from a two stage spring to a single stage four leaf spring, which is what was factory and a little stiffer, but still flexible. My estimate is that it is about 1/3 greater spring rate just like my front RE coils. This netted a 4" lift together with my 1" spacer blocks gives me 5" rear lift which gets me level, which is where I started only now I have softer springs.
The low part of the tank sits about 2.5" lower than stock. Here is a pick of the front of the stock tank on my shelf to compare the position of the sending unit.
There are a couple of problems with it, no big deal though. They punched a hole in the bottom to drain it but since it is heavy steel it is easily welded. Also looks like it needs a new o ring for the sending unit. Fill neck is a little short too, no big deal.
Here is a side view of the tank installed
Here is a rear view without the rear bumper.
Driving with it has been fun. Went on a trip here locally , about 160 miles with 105 of it off road. Used about 15 gal of fuel, which in a 20 gal tank would have made me a little antsy. The other thing is that it takes about 140 - 160 miles normal driving to get off full. Kind of nice.
Unfortunately, I don't have any pics of when I made my long arms. But not to worry, I will be remaking them from a y link to a true three link this winter. I will be strengthening the frame shortly.
I am sort of always tweaking my suspension to get what I want. Too cheap to just buy leaf springs I guess. I had a set of rear springs consisting of the main and a S10 heavy duty rear spring. If I used three leaves, it was good riding but not tall enough. If I used the whole thing, it had the right height but was too stiff. Our XJs are apparently quite a bit lighter than other comparable rigs which might explain why they do so well off road. So anyway, I have always wanted to experiment with some Isuzu Rodeo springs. They are slightly shorter than S10 springs, have about 2" more arch in them and have thinner leaves. The width is a metric size that is about 1/16" shy of the width of our springs, close enough. Here is the spring out of the vehicle.
As you can see, it has quite a bit of curve to the leaves. Here is an S10 leaf next to the Rodeo leaf
]It is a well set up spring, here it is disassembled. Notice the space between each leaf. This space is called "snap". Probably because the spring will snap apart when the center pin is cut.
To use this spring, it is necessary to cut off the eyes with a torch and use the main leaf as our #2 leaf. I tried using all three leaves with the bottom leaf upside down. This would be a good design for a two stage spring and not allow the leaves to over flex and loose their temper. I set it down and got an amazing 6" lift with it. However it was too stiff like that. I then removed the #2 Isuzu leaf, which would be our new #3 leaf and kept the bottom leaf upside down. It looked like this.
This gave a very soft spring with something like a stock spring rate with 3" of lift. But it seemed a little soft like that. So I took the leaf I removed and cut it to 10" from center on the short side and 12" on the long side and put it right side up in the bottom. This changed the spring from a two stage spring to a single stage four leaf spring, which is what was factory and a little stiffer, but still flexible. My estimate is that it is about 1/3 greater spring rate just like my front RE coils. This netted a 4" lift together with my 1" spacer blocks gives me 5" rear lift which gets me level, which is where I started only now I have softer springs.
Last edited by 4.3L XJ; 12-15-2011 at 01:18 PM.
07-20-2011, 10:14 PM
#6
CF Veteran
Thread Starter
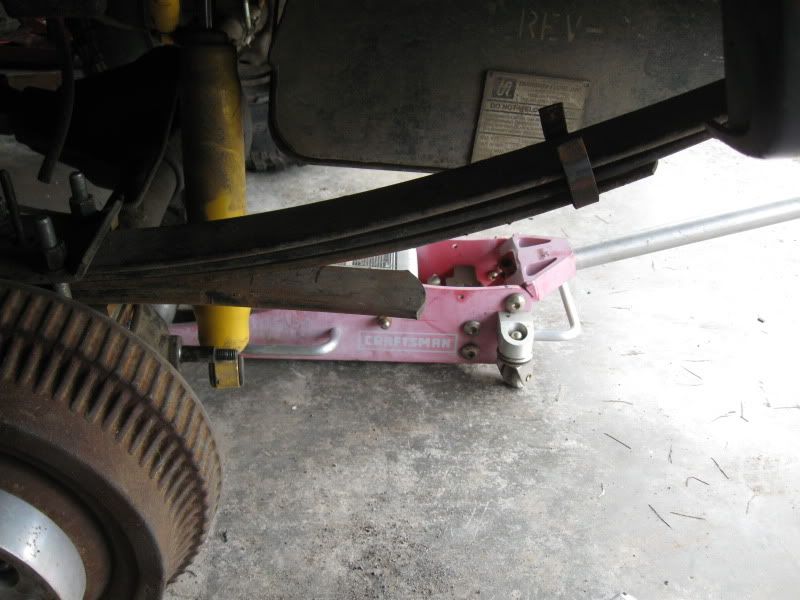
Here is something I forgot that I did the other day that doesn't cost anything. After using the Isuzu leaves, my shocks weren't long enough and they hang down anyway. So I relocated them. I did that by using a sawsall to cut the shock horizontally even with the bottom of the tube on the axle, then grind a small semicircle in the back edge and then weld in on a little to the left of the stock position. This allows it to have the same amount of up travel and longer down travel.
I got a chance to finish up one louvre for my hood today. I don't know if I am totally satisfied, but I think it will do for now. At least it is better than my last attempt. Here are some pics. A little flat black rattle can and I think it will be fine


Finished up the other one today


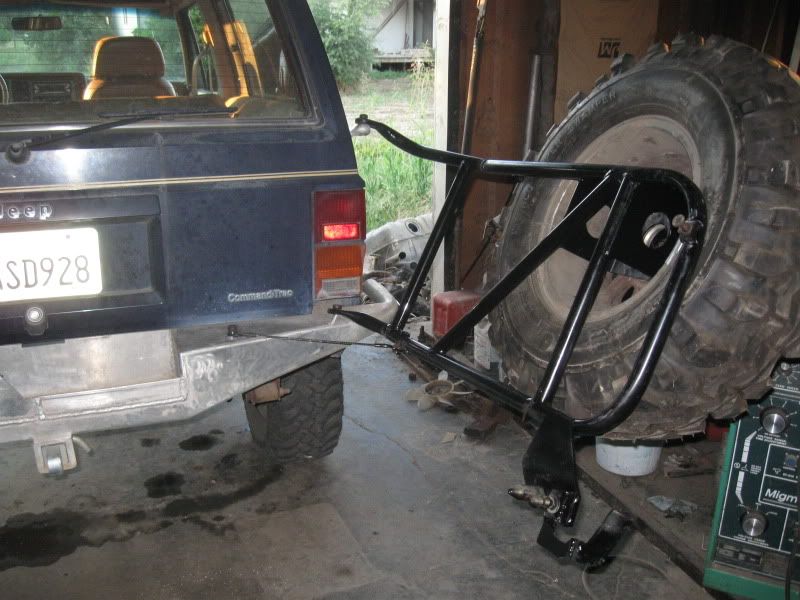
Worked on my spare tire carrier today. I started with a OEM carrier I got for $25 from the pick and pull. The way I figured it, If I didn't use any more than the latch, which would be hard to build, I was ahead of the game. I brought all the pieces home and have been thinking about this for probably a good year or so. Don't want to get in a hurry here. The thing is that I have an aluminum bumper on the rear that I built for a winch also. So I couldn't use the entire stock setup anyway. So I started out with just the brackets. I had to raise the whole thing up and slant i forward on the top and kick the top out. So I made this top bracket that is just like the original cast iron bracket, accept it is upside down on the mounting surface.
The bottom bracket is a cast piece that bolts into the factory bumper. My bumper sticks out farther to accommodate a winch, so after raising it up I made this mounting point on the bottom.
Here is a pic of the winch sitting in its intended spot and the latch receiver welded in place. Not much room left here.
Then I made some cuts in the tubing and rewelded so it had some more curve to it. I don't have any pics of this. But the bracket had to be repositioned so it was time to cut a little steel and start welding

I also repositioned the handle so it would not be so exposed to getting hit. This carrier also uses a top rubber bumper. The one that came with it was a little thrashed, so I pulled out an auxiliary spring snubber I have been carrying around for too many years now through two moves and mounted it to this aluminum plate.
I spaced it out and screwed and JB Welded it to the fiberglass tailgate. I also repositioned the adjustable snubber bolt.

Well, now it is on, but still has some uglies that need to be smoothed up and painted. Tomorrow I have to move the license plate and make a lighted frame to fit inside the spare. Will post some more tomorrow.
I got a chance to finish up one louvre for my hood today. I don't know if I am totally satisfied, but I think it will do for now. At least it is better than my last attempt. Here are some pics. A little flat black rattle can and I think it will be fine
Finished up the other one today
Worked on my spare tire carrier today. I started with a OEM carrier I got for $25 from the pick and pull. The way I figured it, If I didn't use any more than the latch, which would be hard to build, I was ahead of the game. I brought all the pieces home and have been thinking about this for probably a good year or so. Don't want to get in a hurry here. The thing is that I have an aluminum bumper on the rear that I built for a winch also. So I couldn't use the entire stock setup anyway. So I started out with just the brackets. I had to raise the whole thing up and slant i forward on the top and kick the top out. So I made this top bracket that is just like the original cast iron bracket, accept it is upside down on the mounting surface.
The bottom bracket is a cast piece that bolts into the factory bumper. My bumper sticks out farther to accommodate a winch, so after raising it up I made this mounting point on the bottom.
Here is a pic of the winch sitting in its intended spot and the latch receiver welded in place. Not much room left here.
Then I made some cuts in the tubing and rewelded so it had some more curve to it. I don't have any pics of this. But the bracket had to be repositioned so it was time to cut a little steel and start welding
I also repositioned the handle so it would not be so exposed to getting hit. This carrier also uses a top rubber bumper. The one that came with it was a little thrashed, so I pulled out an auxiliary spring snubber I have been carrying around for too many years now through two moves and mounted it to this aluminum plate.
I spaced it out and screwed and JB Welded it to the fiberglass tailgate. I also repositioned the adjustable snubber bolt.
Well, now it is on, but still has some uglies that need to be smoothed up and painted. Tomorrow I have to move the license plate and make a lighted frame to fit inside the spare. Will post some more tomorrow.
07-20-2011, 10:15 PM
#7
CF Veteran
Thread Starter
Finallt got it done, as least for right now. I managed to loose the special shoulder bolts and had to get some more, which did not fit exactly. So I had to ream out the brass spherical joints in the hinge, which was a pain because they are impregnated with oil and don't ream very fast. But I got some paint on it and got the tire on it too.
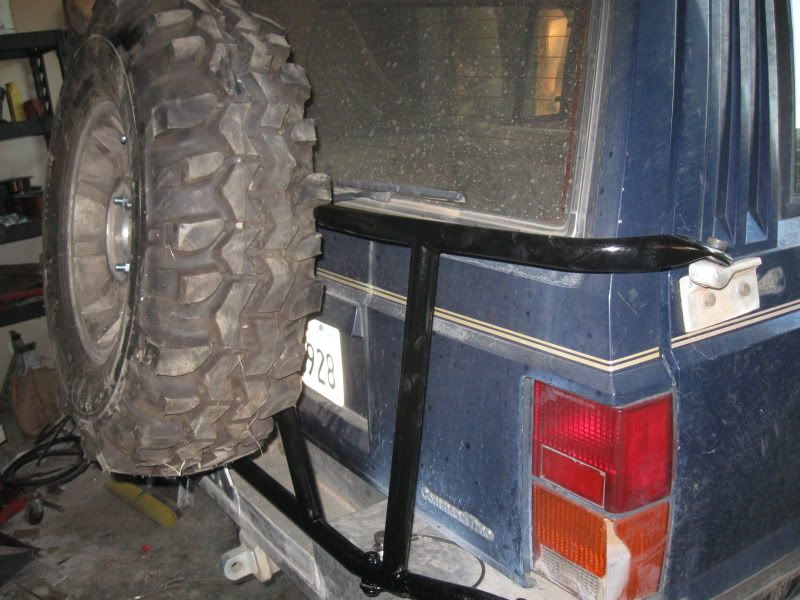
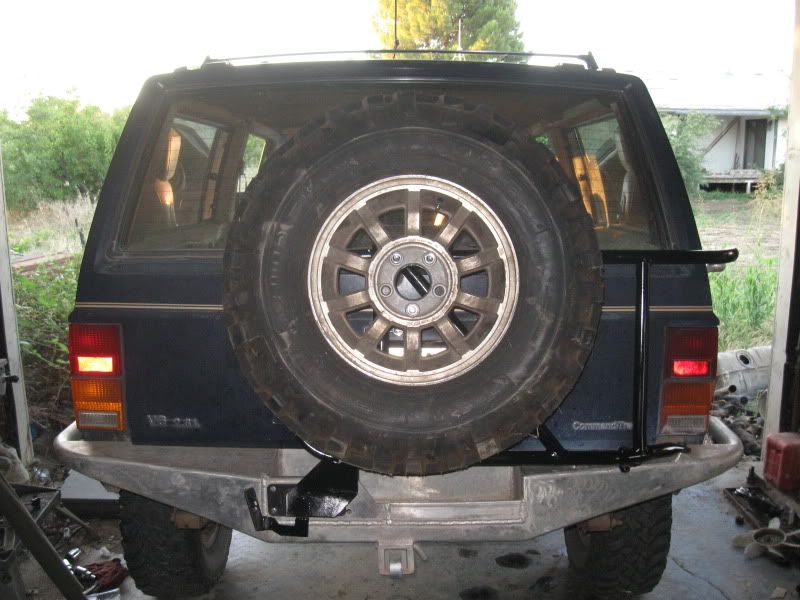
I also relocated the license plate from behind the tire, but no pic of that. I suppose I should shine up that wheel, but later. Lots of other things to do before going to the rocks.
I also relocated the license plate from behind the tire, but no pic of that. I suppose I should shine up that wheel, but later. Lots of other things to do before going to the rocks.
Trending Topics
07-20-2011, 10:19 PM
#8
CF Veteran
Thread Starter
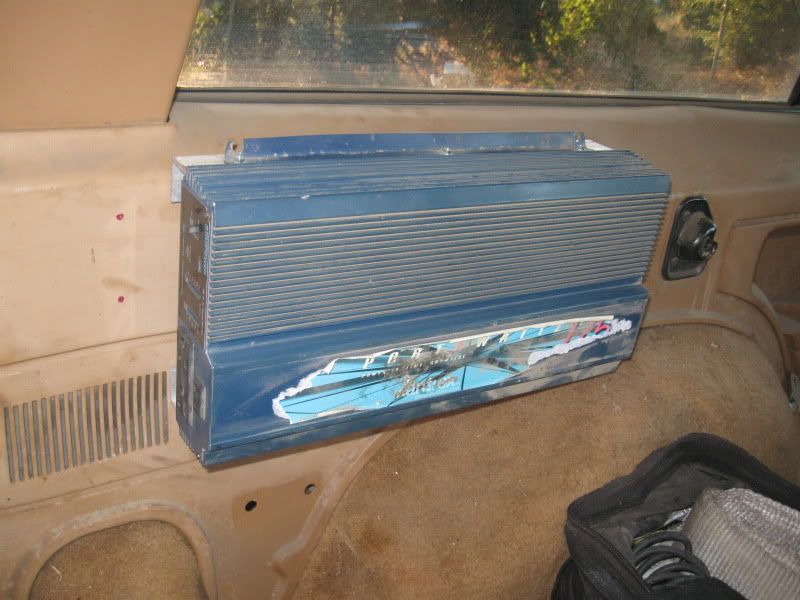
Since we are going camping in a month, the wife decided she wanted the luxury of a refrigerator. I kind of like the idea of nice cold beverages on the trail. So the inverter went back in. I used to have it mounted on top of the batteries, but it always rattled. So I took it out because it was annoying. Now I built a nice sturdy mounting frame and no rattles.
Last edited by 4.3L XJ; 12-15-2011 at 01:20 PM.
 08-01-2011, 10:58 PM
#10
CF Veteran
Thread Starter
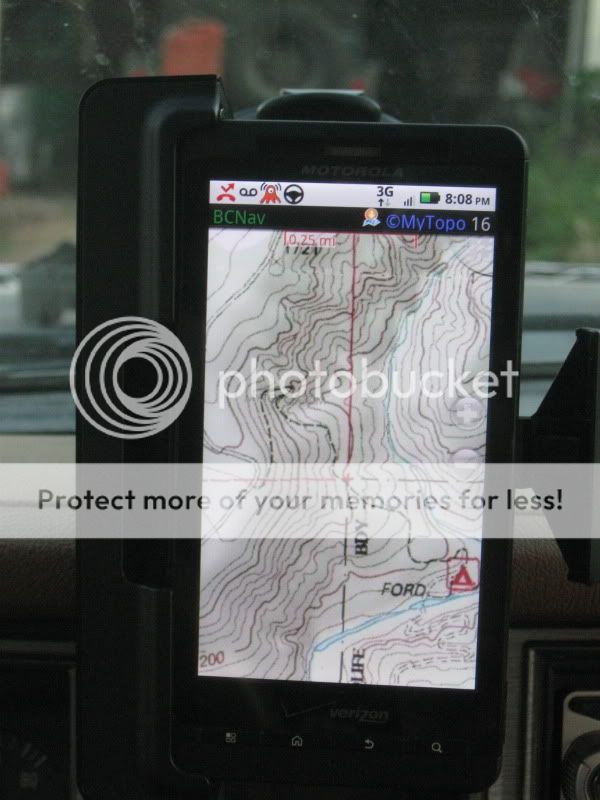
I did something I thought I would never do. I have got to stop saying that. I added GPS to my Jeep. I got a droid phone a few months ago to use as an internet car because it was cheaper and we live out in no mans land. Then I started finding apps that were all sorts of fun. Since it had GPS built in, I down loaded an off road topographical capability to the GPS. Then I got a car mount for it so I can easily see it while driving. This will be really cool when we go to Fordyce. There are some trails that go out on bare granite that if we don't find any signs prohibiting it, we will continue on. Here is a pic of it displaying Ishi Road, which I have posted on this site. It shows it as only a trail
Last edited by 4.3L XJ; 12-15-2011 at 01:21 PM.
 08-02-2011, 12:43 AM
#14
CF Veteran
Thread Starter