

Leaving some breadcrumbs about my experience replacing the motor mounts on my 91 XJ with the 4.0.
First - it was worth the effort, so if someone else is on the fence, then hop on over. I read the Quadratech article and it was helpful, but there were some differences with my 91 that required extra steps. 6 hours and a few youtube reference clips later, I hit the road for a trial and immediately felt a smoother ride, startup, idle.
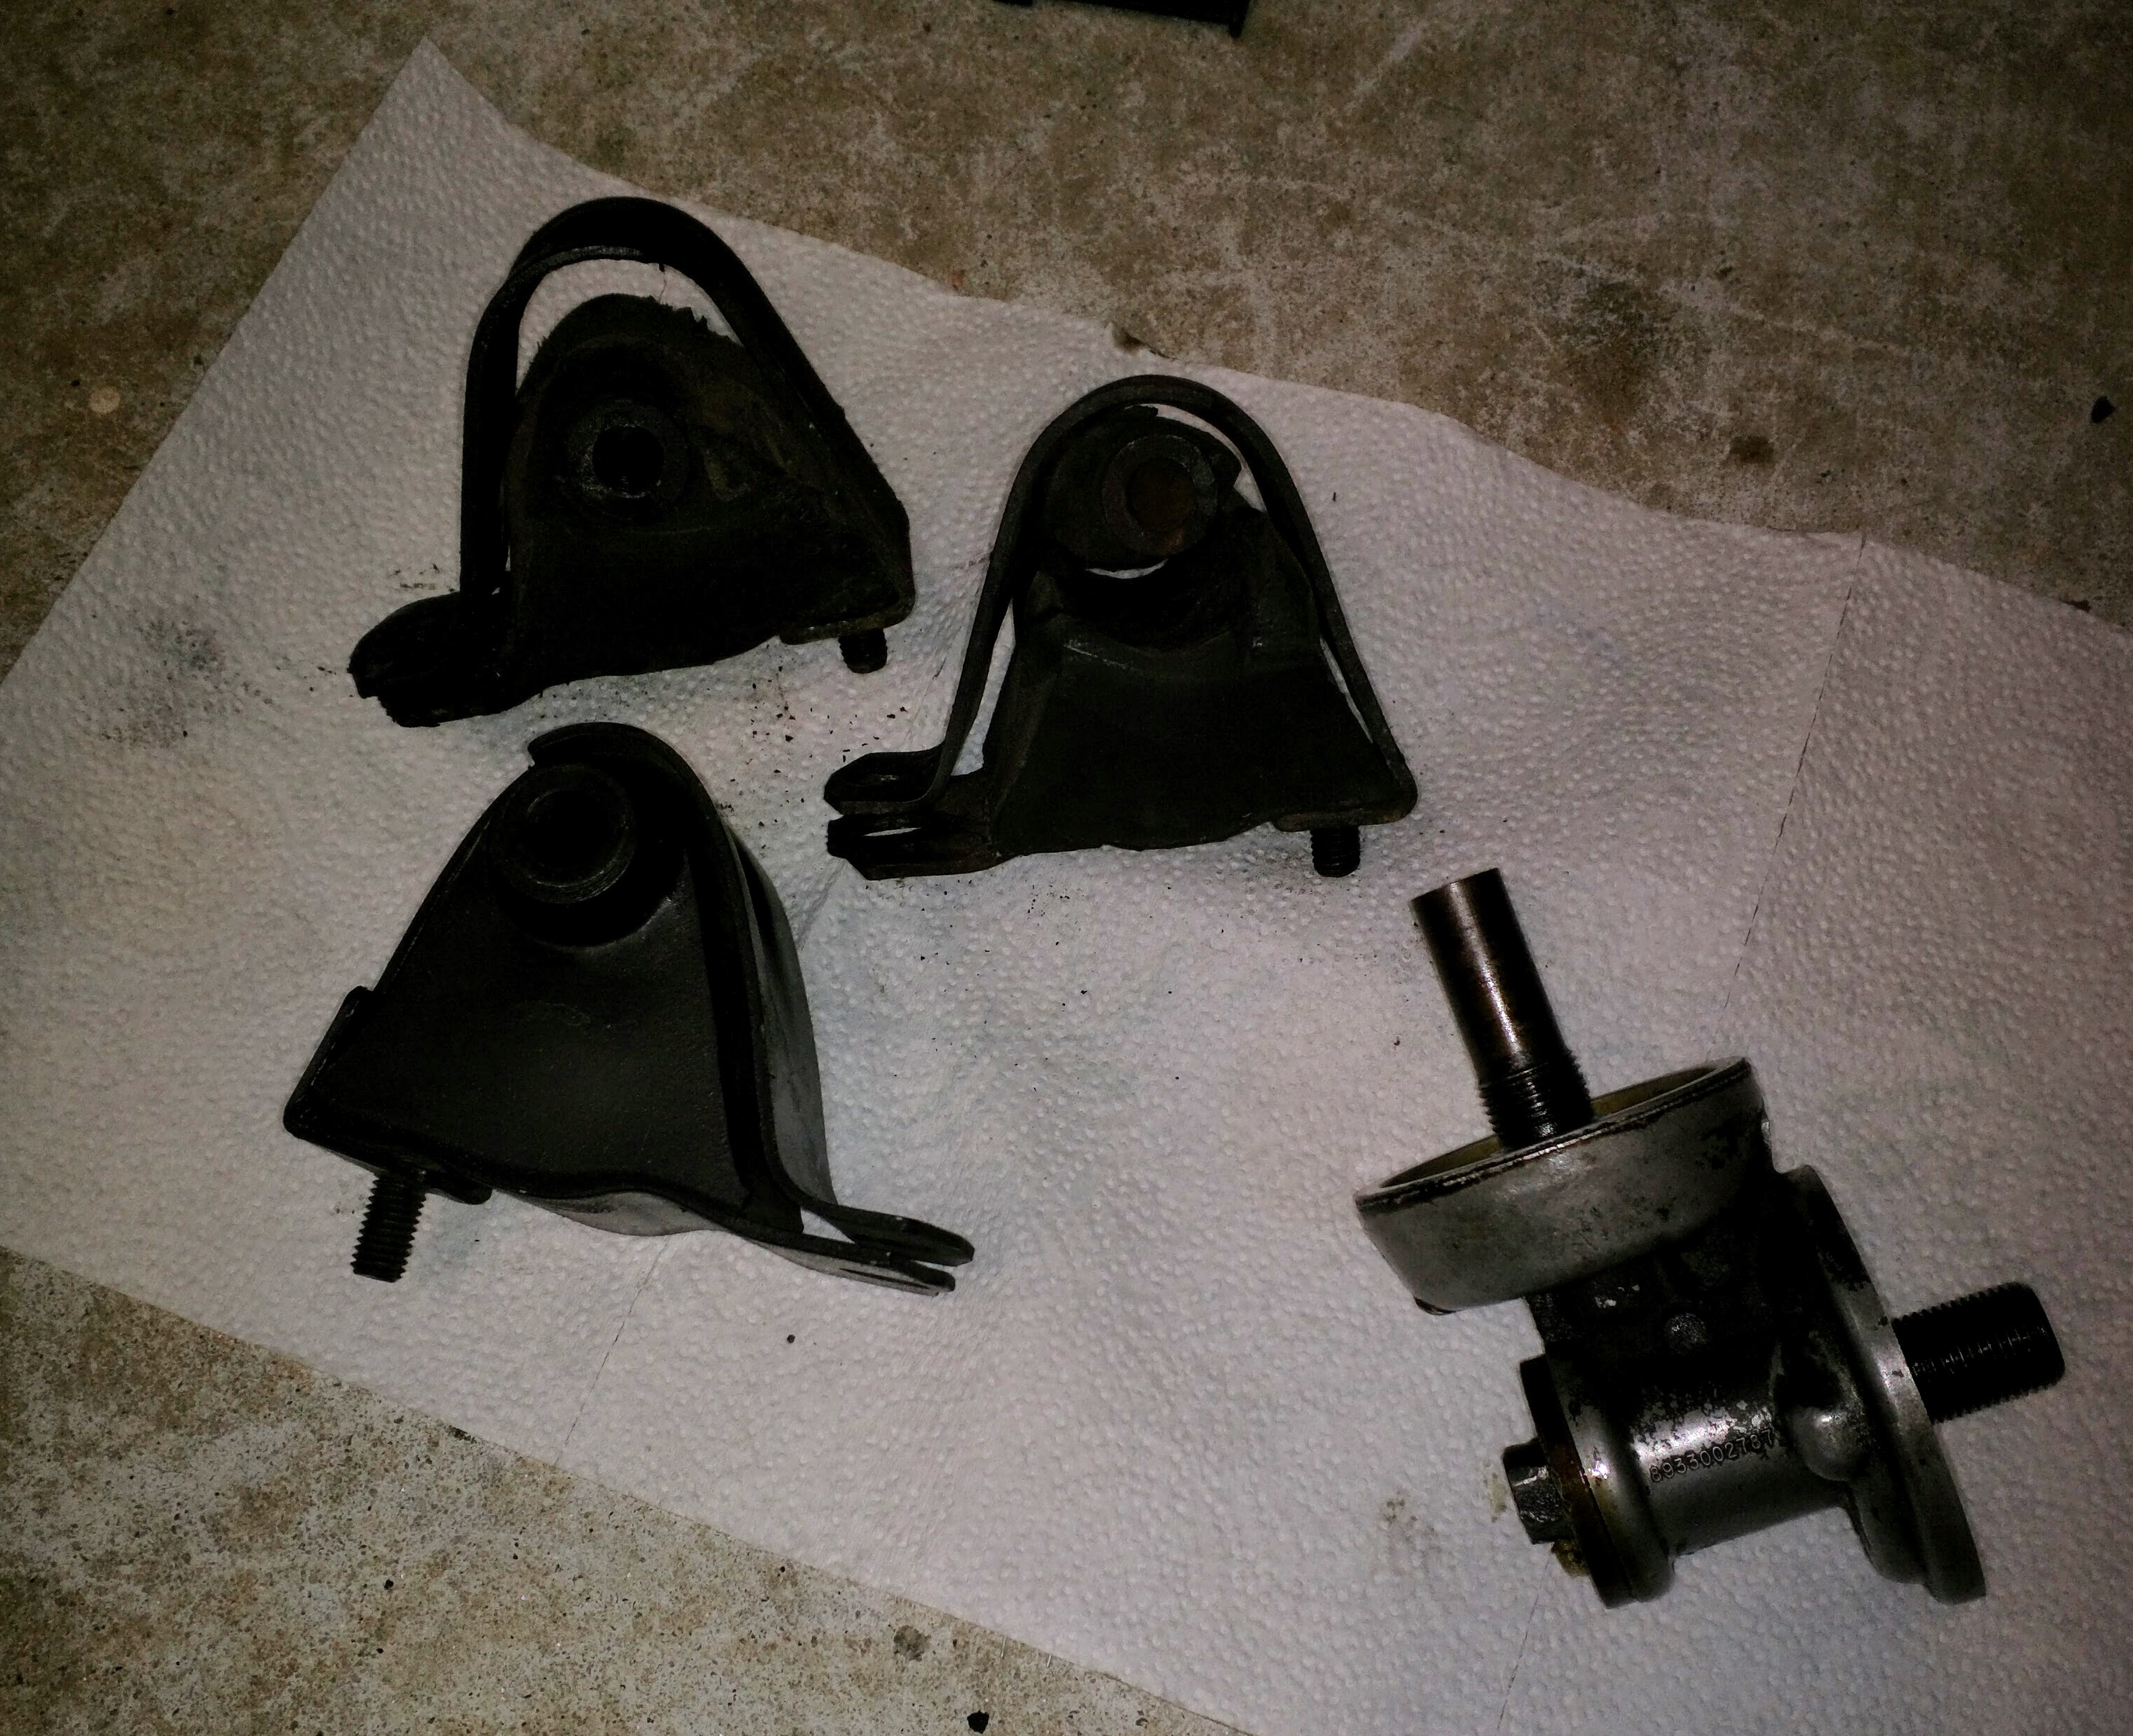
The mounts I took off must have been original, the were so dilapidated. Take a look at the photo - the bushing was completely separated and loose on the driver side, and the rubber was badly compressed on the passenger side. Adding the new mounts raise the engine at least two inches back into proper position.
In my eternal quest to search and destroy rattles and clangs on this old XJ, I found the threads dealing with the motor mounts and quickly decided this must be a priority. A scan with the flashlight and I found the telltale collapse that others had written about, and I just wonder how close I came to the engine in the radiator scenario.
I've done quite a bit of work on my jeep in the 18-months I've owned it, but this job did push me into a new category of tools. I bought (and needed very much) a four piece prybar set; and some different metric wrench combos, angles and extensions. I used the torque wrench a lot on this one, but in some places there simply was no clearance for the torque.
First Half
I tackled the driver side mount first. I think the hardest part of the job is finding the best alignment height with the floor jack lift height. As others suggested, I used block wood under the oil pan and raised the engine up with the floor jack. I found the elevation that released the pressure from the main through bolt was a lot higher than I expected. I pushed the bolt out fairly easily, but getting it back in was a chore - finally accomplished with patience and some incantations. When I pulled the old mount off and the bushing fell out of the crumbling rubber body I was extremely glad that I was doing this project.
The passenger side was the real challenge. Funny, too, because the Quadratech article said there was more room to work on that side. Not for me. Between the oil filter adapter and the air conditioner evaporator there was almost no clearance. It was obvious that the oil filter adapter would have to come off in order to get the main bolt out, and that ended up being the hardest part of this job, and is really why I decided to write this out, in case some other noob found the same situation.
Haltime - Removing Oil Filter Adapter
I wasn't expecting this to be so much of the job, but I'm learning that it takes two or three jobs to accomplish one on a Jeep. The right angle adapter that comes out of the block is threaded with a hex nut and a long threaded barrel through the adapter (see photo). Is the hex nut 18mm like the rest of the bolts I was working with? of course not - it's 5/8, and soft metal. The nut on the adapter is in a tight spot, you really have to get it from underneath - it's too close to the frame for a socket. The hex nut wouldn't budge, and my box end wrench with a breaker bar slipped off leaving two of the hex side a little rounded - alarming since you really can't do that twice.
To get enough clearance for 5/8 socket/ratchet on the bolt I had to first remove the nearby frame bolt. Finally, with a solid socket bite on the hex, the breaker, and some more prayers the oil filter adapter nut turned.
Took the mug all the way off, went to OReilly's and replaced the gasket, 'cause I wasn't going back in there again. Did the oil change too, put it all back together after I got the motor mount back on.
Second Half - Passenger Side Mount
By this time I was a little more educated making adjustments with the engine elevation and the main bolt actually slipped out and back in pretty easily. I did make good use of the prybar set that I bought - investment ROI.
Warning - While inverted, I sparked the starter positive lead with my wrench - it's on the blind side and easy to touch on this job. I disconnected the battery terminal to make sure I didn't do that again.
That's the meat of it all - back together and I have beat back entropy just a few steps.
- Bear
First - it was worth the effort, so if someone else is on the fence, then hop on over. I read the Quadratech article and it was helpful, but there were some differences with my 91 that required extra steps. 6 hours and a few youtube reference clips later, I hit the road for a trial and immediately felt a smoother ride, startup, idle.
The mounts I took off must have been original, the were so dilapidated. Take a look at the photo - the bushing was completely separated and loose on the driver side, and the rubber was badly compressed on the passenger side. Adding the new mounts raise the engine at least two inches back into proper position.
In my eternal quest to search and destroy rattles and clangs on this old XJ, I found the threads dealing with the motor mounts and quickly decided this must be a priority. A scan with the flashlight and I found the telltale collapse that others had written about, and I just wonder how close I came to the engine in the radiator scenario.
I've done quite a bit of work on my jeep in the 18-months I've owned it, but this job did push me into a new category of tools. I bought (and needed very much) a four piece prybar set; and some different metric wrench combos, angles and extensions. I used the torque wrench a lot on this one, but in some places there simply was no clearance for the torque.
First Half
I tackled the driver side mount first. I think the hardest part of the job is finding the best alignment height with the floor jack lift height. As others suggested, I used block wood under the oil pan and raised the engine up with the floor jack. I found the elevation that released the pressure from the main through bolt was a lot higher than I expected. I pushed the bolt out fairly easily, but getting it back in was a chore - finally accomplished with patience and some incantations. When I pulled the old mount off and the bushing fell out of the crumbling rubber body I was extremely glad that I was doing this project.
The passenger side was the real challenge. Funny, too, because the Quadratech article said there was more room to work on that side. Not for me. Between the oil filter adapter and the air conditioner evaporator there was almost no clearance. It was obvious that the oil filter adapter would have to come off in order to get the main bolt out, and that ended up being the hardest part of this job, and is really why I decided to write this out, in case some other noob found the same situation.
Haltime - Removing Oil Filter Adapter
I wasn't expecting this to be so much of the job, but I'm learning that it takes two or three jobs to accomplish one on a Jeep. The right angle adapter that comes out of the block is threaded with a hex nut and a long threaded barrel through the adapter (see photo). Is the hex nut 18mm like the rest of the bolts I was working with? of course not - it's 5/8, and soft metal. The nut on the adapter is in a tight spot, you really have to get it from underneath - it's too close to the frame for a socket. The hex nut wouldn't budge, and my box end wrench with a breaker bar slipped off leaving two of the hex side a little rounded - alarming since you really can't do that twice.
To get enough clearance for 5/8 socket/ratchet on the bolt I had to first remove the nearby frame bolt. Finally, with a solid socket bite on the hex, the breaker, and some more prayers the oil filter adapter nut turned.
Took the mug all the way off, went to OReilly's and replaced the gasket, 'cause I wasn't going back in there again. Did the oil change too, put it all back together after I got the motor mount back on.
Second Half - Passenger Side Mount
By this time I was a little more educated making adjustments with the engine elevation and the main bolt actually slipped out and back in pretty easily. I did make good use of the prybar set that I bought - investment ROI.
Warning - While inverted, I sparked the starter positive lead with my wrench - it's on the blind side and easy to touch on this job. I disconnected the battery terminal to make sure I didn't do that again.
That's the meat of it all - back together and I have beat back entropy just a few steps.
- Bear
CF Veteran
With new motor mounts now is a very good time for the transmission mounts also as they are carrying more weight on the old compressed ones.
Quote:
Thanks Fred, figured so, but man that's so Jeep because it's not what I want to do next.Originally Posted by Fred/N0AZZ
With new motor mounts now is a very good time for the transmission mounts also as they are carrying more weight on the old compressed ones.

What were your symptoms leading you to check motor mounts? I have a set to put on but not sure if they will fix my vibrations.
Quote:
-67, general thumps, rattle and a clang like a 16-oz hammer hitting the frame now and then. I've still got rattles, no more hammer.Originally Posted by 67 GMC
What were your symptoms leading you to check motor mounts? I have a set to put on but not sure if they will fix my vibrations.
Take a look at the clearance in the photos of those old mounts and imagine the engine being able to bounce up and down that much. I'm really surprised nothing worse happened.
Quote:
Yep - so I replaced the worn out transmission mount and it raised the rear drivetrain back up an inch or more. Jeep feels a lot smoother or maybe I am imagining it.Originally Posted by Fred/N0AZZ
With new motor mounts now is a very good time for the transmission mounts also as they are carrying more weight on the old compressed ones.
CF Veteran
Quote:
Im sure youre not just imagining it. When I replaced the motor/tranny mounts it made a huge difference. Originally Posted by grizzrob
Yep - so I replaced the worn out transmission mount and it raised the rear drivetrain back up an inch or more. Jeep feels a lot smoother or maybe I am imagining it.
My motor mounts looked like yours when I removed them, if not worse.

Currently Active Users (1)