When you click on links to various merchants on this site and make a purchase, this can result in this site earning a commission. Affiliate programs and affiliations include, but are not limited to, the eBay Partner Network.
Stock XJ Cherokee Tech. All XJ Non-modified/stock questions go hereXJ (84-01)
All OEM related XJ specific tech. Examples, no start, general maintenance or anything that's stock.
Well I've done my googling and asking guys on the Facebook page but cannot get this jeep to produce spark for the life of me. It's a 1999 jeep Cherokee sport.
I pulled the fuel rail and all injectors and spraying fine. I changed the CPS, but with a cheap $20 one. I have changed the spark plugs, cap, rotor and coil, and ignition coil pack. I have checked and cleaned all the grounds. I have swapped two other PCM's in with no luck. One big concern is that it was in an accident and the PO spliced new computer connectors in, all the clamps look good and correctly wired. Pulled the codes with a reader and I've got p0122 and p01964. The first one is low voltage to the tps, not sure if that's the cause because on the first PCM I did not get that code just the p01964, but I am cleaning it out now, as for code P01964, it's a no bus code and can't figure out the fix. Any help would be greatly appreciated as I'm pretty stuck now.
Only other thing I can think of is when I hooked up a spark tester from the new coil pack to w plug is it gets a slight glow at first crank and then disappears.
Did some more research and changed out the TCU... No bus code is gone. Getting zero codes now but still cranking without spark. Really need help on this one.
Yes these have timing chains... I'll have to look more into that as have never heard of that before. At this point my best guess is yours as im pretty stumped..
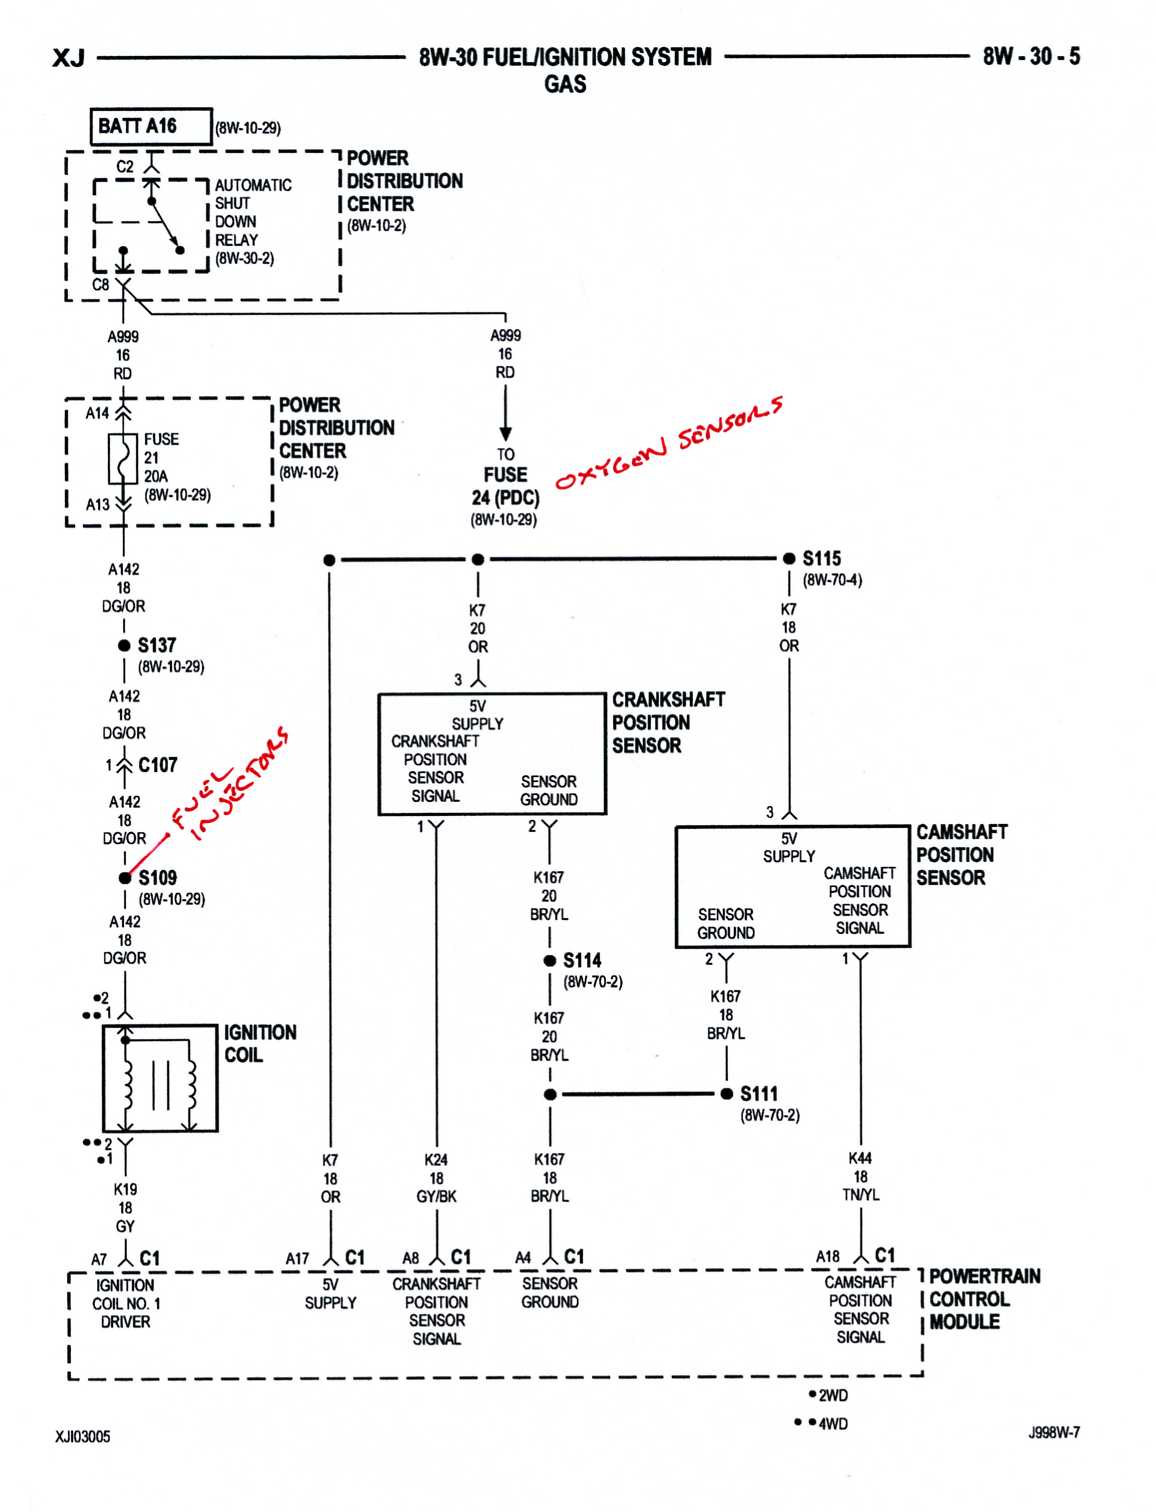
Using a digital voltmeter, probe pin cavity 1 at the ignition coil connector (Dark Green/Orange tracer wire) with the engine cranking. You should see battery voltage.
If you have voltage, there may be an issue with the coil driver wiring from the PCM to the coil. The PCM coil driver provides a ground to the coil based on the Camshaft Position Sensor in the distributor signals to the PCM. See diagram.
Using a digital voltmeter, probe pin cavity 1 at the ignition coil connector (Dark Green/Orange tracer wire) with the engine cranking. You should see battery voltage.
If you have voltage, there may be an issue with the coil driver wiring from the PCM to the coil. The PCM coil driver provides a ground to the coil based on the Camshaft Position Sensor in the distributor signals to the PCM. See diagram.
.
I had measured before and had power. Just checked again. The yellow wire to ignition coil connector has constant 12V. The dark green orange wire has power 12V when cranking. One thing to note is that my main voltmeter stopped working the other night so I'm using a more simplified one that lights up how many volts but not specific to a decimal so I cannot say exactly but it lights up 12V. Going to buy another volt meter today... If both wires are getting power could the new ignition coil pack I purchased be bad? I remember a friend saying he had an issue with the coil connector... Should I try splicing in a new connector to the coil? Thank you very much for your help.
On my ignition coil, the connector has two wires going into it, the green / orange you had mentioned, and a yellow for me. Looks like a very faded yellow. I measured when cranking and the green / orange wire you mentioned is showing 7.xx volts and the yellow wire shows 11.9Volts constant cranking or not. It's lower than 12 now because the battery is draining from cranking it over - the battery measuring 11.7volts as of now.
On my ignition coil, the connector has two wires going into it, the green / orange you had mentioned, and a yellow for me. Looks like a very faded yellow. I measured when cranking and the green / orange wire you mentioned is showing 7.xx volts and the yellow wire shows 11.9Volts constant cranking or not. It's lower than 12 now because the battery is draining from cranking it over - the battery measuring 11.7volts as of now.
I think you're talking about the Grey wire.
That's the ground/driver wire from the PCM. If you have battery voltage on that wire it's shorted to a battery voltage source somewhere. Have you tried wiggling all the wire bundles to see if that voltage goes away?
That's the ground/driver wire from the PCM. If you have battery voltage on that wire it's shorted to a battery voltage source somewhere. Have you tried wiggling all the wire bundles to see if that voltage goes away?
I'll have to get a picture once I'm home. Not to be rude but unless it was originally grey and fades to yellow... The wire on mine is yellow.
I will try wiggling the harness when cranking, one thing I did try was holding the PCM connectors in more securely while someone cranks because a friends ZJ had an issue where if you held the connectors it would start right up.
As for checking for shorts, should I pull the plastic covering on all the wires and check everything for cracks / tears?
Is there a specific wire to check for in regards to the battery short you mentioned?
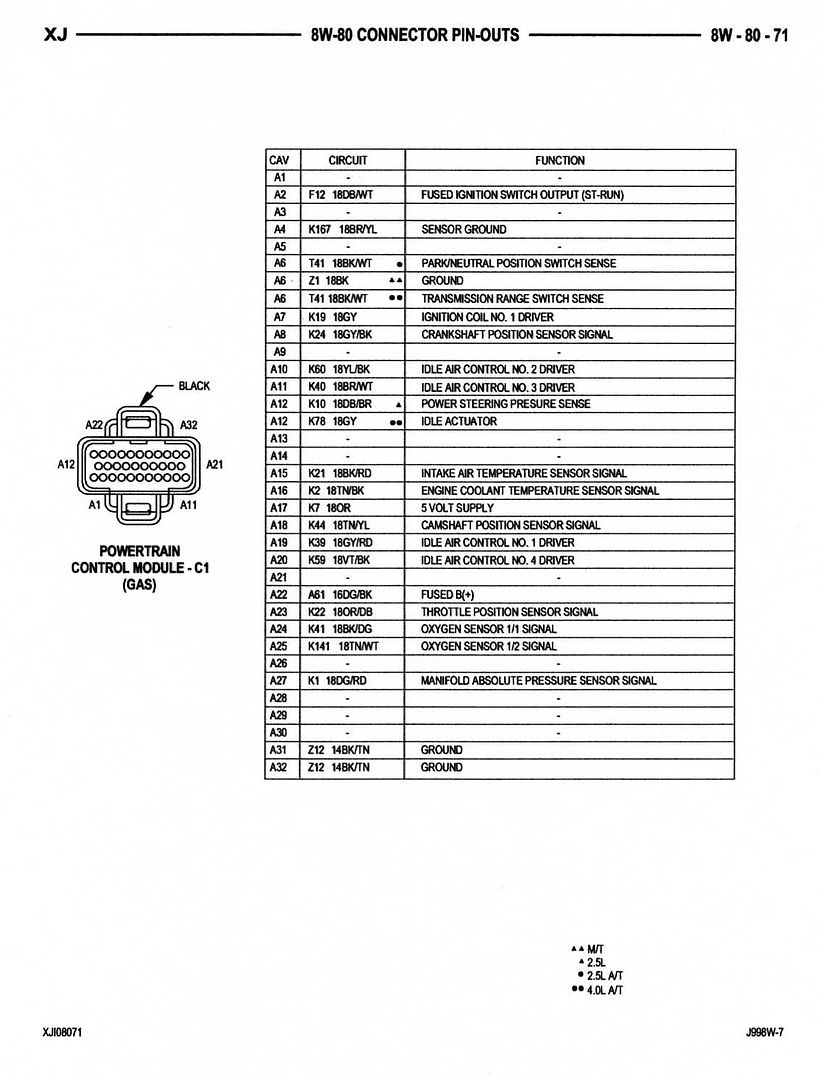
You could start by pulling the back cover off PCM connector C1 (black) and see if there is a Grey wire coming from pin A7 (see connector pin out below). Follow it to the butt splices and see if it is spliced to a Grey wire. If so, fine. If not, what color is it spliced to?
Remove connector C1 from the PCM, then using an Ohmmeter set to 200 Ohms, read from pin cavity A7 to the Ignition Coil connector pin cavity with your 'Yellow' wire. You should see continuity, but not more than 5 Ohms.
Next, at the disconnected PCM C1, pin cavity A7, use a voltmeter to see if there is voltage, key to off and key to run. There should be no voltage present. If there is, you may want to splice in a new 18 gauge wire from the PCM connector C1/A7 to the Ignition Coil connector pin cavity 2 in order to bypass the shorted existing wire.
You could start by pulling the back cover off PCM connector C1 (black) and see if there is a Grey wire coming from pin A7 (see connector pin out below). Follow it to the butt splices and see if it is spliced to a Grey wire. If so, fine. If not, what color is it spliced to?
Remove connector C1 from the PCM, then using an Ohmmeter set to 200 Ohms, read from pin cavity A7 to the Ignition Coil connector pin cavity with your 'Yellow' wire. You should see continuity, but not more than 5 Ohms.
Next, at the disconnected PCM C1, pin cavity A7, use a voltmeter to see if there is voltage, key to off and key to run. There should be no voltage present. If there is, you may want to splice in a new 18 gauge wire from the PCM connector C1/A7 to the Ignition Coil connector pin cavity 2 in order to bypass the shorted existing wire.
.
Well kind sir, I owe you. I tried the ohm test and it wasn't working at all so I ran the new wire and soddered and spliced it in and the b**** started right up. I wouldn't have found it without your help and greatly appreciate it.
Well kind sir, I owe you. I tried the ohm test and it wasn't working at all so I ran the new wire and soddered and spliced it in and the b**** started right up. I wouldn't have found it without your help and greatly appreciate it.



 No Spark.. Need help!