
newb question

Seasoned Member
Joined: Aug 2008
Posts: 494
Likes: 3
From: Maine
Year: 1991 Laredo
Model: Cherokee
Engine: 4.0L H.O.
if it's no spark then, I wouldn't worry much about the air/fuel. Make sure that the wire from coil to dist. cap isn't disconnected or worn out or something. Make sure all plug wires look decent at least. If it comes to it then next thing after that I'd do is take off the distributor cap and have a look at the rotor button. If no spark is the culprit, work from there back.
Also, when you're trying to crank it over, make sure you don't give it gas, you'll flood it.
Also, when you're trying to crank it over, make sure you don't give it gas, you'll flood it.
Seasoned Member
Joined: Aug 2008
Posts: 494
Likes: 3
From: Maine
Year: 1991 Laredo
Model: Cherokee
Engine: 4.0L H.O.
I wish I had more advice about the electrical system for you. I'm sure one of the guys on here will help ya track it down. How much time you have to spend at your Mums? 
Renix Super Guru
Joined: Mar 2008
Posts: 24,653
Likes: 19
From: In yourz postez fissin jurr spelinzs
Year: 1990XJ/1989MJ
Model: Comanche
Engine: 4.0L Renix
Check the cam position sensor now. NOT CRANK but CAM
Sync Pulse (Stator) Test: Do NOT disconnect your "distributor" to do this test! Backprobe the connectors by inserting the voltmeter's probes into the connector where the wires enter the connector from the distributor or harness! You'll have to make sure that you have good contact but it's not hard to do... the connector MUST remain connected to do these tests!
Sync Pulse (Stator) Test: Do NOT disconnect your "distributor" to do this test! Backprobe the connectors by inserting the voltmeter's probes into the connector where the wires enter the connector from the distributor or harness! You'll have to make sure that you have good contact but it's not hard to do... the connector MUST remain connected to do these tests!
Insert + voltmeter lead into BLUE wire at distributor connector.
Insert negative - lead into Gray W/trace wire at dist connector.
Set voltmeter to 15vac, turn key on & should show approximately 5.0volts.
If there is no voltage present - double check the backprobed leads to ensure good contact.
If there is STILL no voltage present; the Factory Service Manual says you need to "Perform vehicle test using DRB II tester. I don't have one. You don't either.
At this point, If you DO have voltage then remove / disconnect the ECU (computer).
Check continuity between the Blue wire and C-16 at the ECU. - If no continuity: repair harness wire.
Check continuity between Gray W/trace and pin C-5 at the ECU. - If no continuity: repair harness wire.
Check continuity between Black wire and "ground". - If no continuity: repair harness wire.
While observing analog voltmeter (That's one with a needle, folks! Your average digital meter won't show this...) crank engine & voltmeter needle should fluctuate back & forth while engine is cranking over. This confirms stator in distributor is 'pulsing' correctly and sending signal out for ECU.
If there is no sync pulse you will have to replace the stator by removing and dissassembling the "distributor" following the service manual procedure. * - Helpful Hint: Before pulling your distributor... "bump" the engine until the rotor is pointing straight forward and aligned with the side of the engine. That way you'll know where the rotor needs to end up pointing after reassembly.
Don't be surprised if your counter drone tries to hand you the wrong part as there are several common names in use for the Camshaft Position Sensor:
1-camshaft position sensor
2-stator
3-sync-pulse generator
"...Auto Zone had the (sync signal generator) but they call it a pick-up coil..." (from a post at JU)
Sync Pulse (Stator) Test: Do NOT disconnect your "distributor" to do this test! Backprobe the connectors by inserting the voltmeter's probes into the connector where the wires enter the connector from the distributor or harness! You'll have to make sure that you have good contact but it's not hard to do... the connector MUST remain connected to do these tests!
Sync Pulse (Stator) Test: Do NOT disconnect your "distributor" to do this test! Backprobe the connectors by inserting the voltmeter's probes into the connector where the wires enter the connector from the distributor or harness! You'll have to make sure that you have good contact but it's not hard to do... the connector MUST remain connected to do these tests!
Insert + voltmeter lead into BLUE wire at distributor connector.
Insert negative - lead into Gray W/trace wire at dist connector.
Set voltmeter to 15vac, turn key on & should show approximately 5.0volts.
If there is no voltage present - double check the backprobed leads to ensure good contact.
If there is STILL no voltage present; the Factory Service Manual says you need to "Perform vehicle test using DRB II tester. I don't have one. You don't either.
At this point, If you DO have voltage then remove / disconnect the ECU (computer).
Check continuity between the Blue wire and C-16 at the ECU. - If no continuity: repair harness wire.
Check continuity between Gray W/trace and pin C-5 at the ECU. - If no continuity: repair harness wire.
Check continuity between Black wire and "ground". - If no continuity: repair harness wire.
While observing analog voltmeter (That's one with a needle, folks! Your average digital meter won't show this...) crank engine & voltmeter needle should fluctuate back & forth while engine is cranking over. This confirms stator in distributor is 'pulsing' correctly and sending signal out for ECU.
If there is no sync pulse you will have to replace the stator by removing and dissassembling the "distributor" following the service manual procedure. * - Helpful Hint: Before pulling your distributor... "bump" the engine until the rotor is pointing straight forward and aligned with the side of the engine. That way you'll know where the rotor needs to end up pointing after reassembly.
Don't be surprised if your counter drone tries to hand you the wrong part as there are several common names in use for the Camshaft Position Sensor:
1-camshaft position sensor
2-stator
3-sync-pulse generator
"...Auto Zone had the (sync signal generator) but they call it a pick-up coil..." (from a post at JU)
Renix Super Guru
Joined: Mar 2008
Posts: 24,653
Likes: 19
From: In yourz postez fissin jurr spelinzs
Year: 1990XJ/1989MJ
Model: Comanche
Engine: 4.0L Renix
Yes, Toto... you aren't in Kansas anymore. You have to pull the freaking distributor to change the stator!
Remove distributor cap leaving wires in place and connected to plugs. This will save ya some headaches later. Just set it outta the way.
Pull the distributor by following the Distributor Removal & Installation Procedure as found in your service manual. (I'll get an article up on that at some point but basically ya set the engine to TDC (top dead center), bump the rotor so that it is parallel to the engine block and pointing forward, mark the rotor's direction on the distributor, remove the distributor bolt, rotate the rotor a bit as you gently pull the distributor out. DO NOT ENGAGE ENGINE STARTER NOW OR YOU'LL HAVE TO FIND TDC THE HARD WAY!!!
Remove rotor.
Place distributor shaft in a vice being careful not to overtighten or damage the surface.
Knock out the drive gear's retaining pin with a small, FLAT punch. The retaining pins are commonly called roll pins and can be found in most hardware stores.
Once ya have the pin out - grab it and put it somewhere safe... NO! You won't be reusing it but you will be using it to buy ya another one to replace it. I do not recommend ya reuse these unless the possibility of having one drop out inside your engine and your camshaft eating the distributor drive gear sounds like a fun thing.
Put the drive gear, washer & gasket in a safe place so they do not wander off and then remove the distributor shaft & pulse ring from the shaft housing. Everything is free now that you have the gear off.
Take an awl, or finishing nail and mark the stator location before removing the retaining screw, then remove the screw.
You'll have to press the grommet around the stator's wiring harness INTO the distributor then you can fish the harness on through and remove the assembly. Your new harness SHOULD have a new grommet. If it does not, be sure to pick up a new grommet as distributors do not like moisture... and you do not like walking home at 3 AM on a rainy night.
RENIX Stator Replacement
How ya do this part depends on how clumsy you are... For some it will be easier to fish the stator pigtail through the opening in the distributor housing first - for others it's easier to fish the pigtail through afterwards.
Either way - using the marks you scratched on the inside of the distributor, install your new stator being sure to reinstall the retaining screw and hold down shown.
If you haven't already done so, fish the stator harness through the harness hole & press the grommet securely into place. (* - Hint: A very few drops of dish soap (or spit) on the grommet will help it slip into place when the time comes. You most likely will NOT need to do this.)
Reinstall the distributor shaft into the distributor housing. Make sure any seals are intact and undamaged.
Replace the drive gear gasket, washer and then the drive gear onto the shaft. Be sure ya put the gear on the same way ya took it off or your engine will do bad things. Very bad things. And then you'll cry. (It's hard to mess this up but some people work extra hard and have big hammers. Just watch it and you'll be fine!)
Install your NEW drive gear retaining pin (roll pin). (Again - don't reuse the old one. Yes... you likely can get away with it... but for .30 cents or so do you really want to chance blowing an engine?)
Put the rotor back on and reinstall the distributor using the procedure outlined in the Distributor Removal & Installation Procedure as found in your service manual.
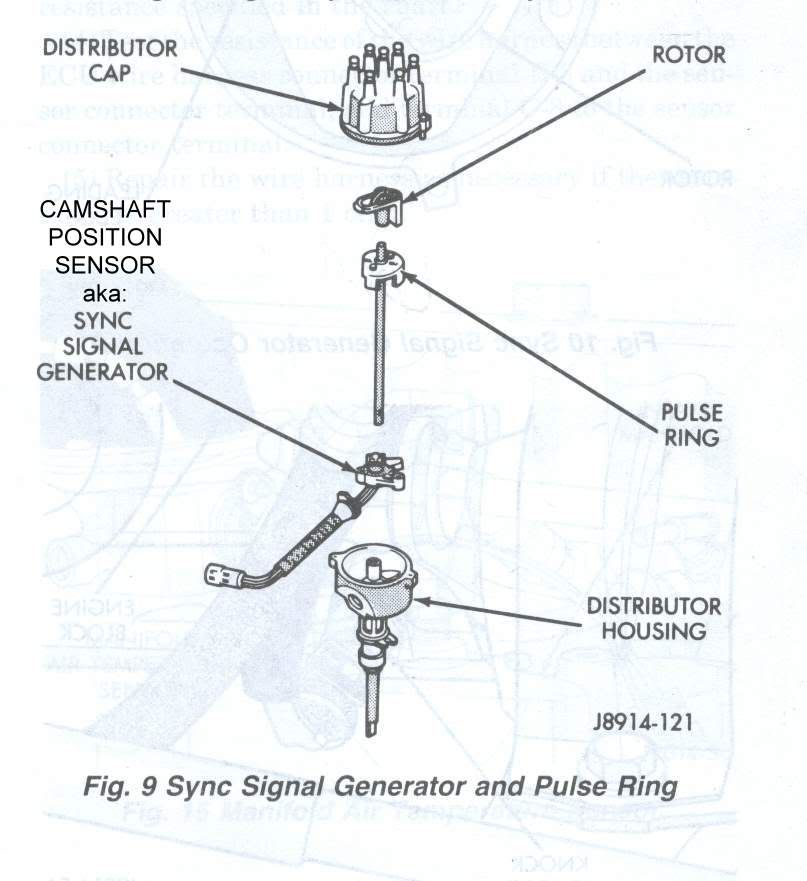
See a complete diagram of all the parts in a Jeep 4.0L RENIX distributor posted above
--------------------------------------------------------------------------------
Remove distributor cap leaving wires in place and connected to plugs. This will save ya some headaches later. Just set it outta the way.
Pull the distributor by following the Distributor Removal & Installation Procedure as found in your service manual. (I'll get an article up on that at some point but basically ya set the engine to TDC (top dead center), bump the rotor so that it is parallel to the engine block and pointing forward, mark the rotor's direction on the distributor, remove the distributor bolt, rotate the rotor a bit as you gently pull the distributor out. DO NOT ENGAGE ENGINE STARTER NOW OR YOU'LL HAVE TO FIND TDC THE HARD WAY!!!
Remove rotor.
Place distributor shaft in a vice being careful not to overtighten or damage the surface.
Knock out the drive gear's retaining pin with a small, FLAT punch. The retaining pins are commonly called roll pins and can be found in most hardware stores.
Once ya have the pin out - grab it and put it somewhere safe... NO! You won't be reusing it but you will be using it to buy ya another one to replace it. I do not recommend ya reuse these unless the possibility of having one drop out inside your engine and your camshaft eating the distributor drive gear sounds like a fun thing.
Put the drive gear, washer & gasket in a safe place so they do not wander off and then remove the distributor shaft & pulse ring from the shaft housing. Everything is free now that you have the gear off.
Take an awl, or finishing nail and mark the stator location before removing the retaining screw, then remove the screw.
You'll have to press the grommet around the stator's wiring harness INTO the distributor then you can fish the harness on through and remove the assembly. Your new harness SHOULD have a new grommet. If it does not, be sure to pick up a new grommet as distributors do not like moisture... and you do not like walking home at 3 AM on a rainy night.
RENIX Stator Replacement
How ya do this part depends on how clumsy you are... For some it will be easier to fish the stator pigtail through the opening in the distributor housing first - for others it's easier to fish the pigtail through afterwards.
Either way - using the marks you scratched on the inside of the distributor, install your new stator being sure to reinstall the retaining screw and hold down shown.
If you haven't already done so, fish the stator harness through the harness hole & press the grommet securely into place. (* - Hint: A very few drops of dish soap (or spit) on the grommet will help it slip into place when the time comes. You most likely will NOT need to do this.)
Reinstall the distributor shaft into the distributor housing. Make sure any seals are intact and undamaged.
Replace the drive gear gasket, washer and then the drive gear onto the shaft. Be sure ya put the gear on the same way ya took it off or your engine will do bad things. Very bad things. And then you'll cry. (It's hard to mess this up but some people work extra hard and have big hammers. Just watch it and you'll be fine!)
Install your NEW drive gear retaining pin (roll pin). (Again - don't reuse the old one. Yes... you likely can get away with it... but for .30 cents or so do you really want to chance blowing an engine?)
Put the rotor back on and reinstall the distributor using the procedure outlined in the Distributor Removal & Installation Procedure as found in your service manual.
See a complete diagram of all the parts in a Jeep 4.0L RENIX distributor posted above
--------------------------------------------------------------------------------
Last edited by BlueXJ; Aug 29, 2008 at 08:27 PM. Reason: Addishuns an spellinzs

Thread Starter
Newbie
Joined: Aug 2008
Posts: 12
Likes: 0
Model: Cherokee
ill try this in the morning fyi i have zero tools here... this is most def a womans house, her idea of tools is a pair of pliers, two screwdrivers, a socket set 9minus the ratchet, and a hammer... little short handed, but ill pick up a voltmeter... or ill run back to my house where 2 full roll aways full of every mechanic tool ever dreamed of are stationed... has anyone ever experienced this cam position sensor problem???
BlueXJ???
BlueXJ???
Thread Starter
Newbie
Joined: Aug 2008
Posts: 12
Likes: 0
Model: Cherokee
dont mind changing out a stator, im in the process of putting together a valvetrain in the my neon, while installing my roll cage... not tooting my own horn but im doing almost all my own work... to save costs... neons owners are cheap.
Renix Super Guru
Joined: Mar 2008
Posts: 24,653
Likes: 19
From: In yourz postez fissin jurr spelinzs
Year: 1990XJ/1989MJ
Model: Comanche
Engine: 4.0L Renix
I may not have mentioned that you need an analog meter for part of the above and a digital will not work for that part.
Renix Super Guru
Joined: Mar 2008
Posts: 24,653
Likes: 19
From: In yourz postez fissin jurr spelinzs
Year: 1990XJ/1989MJ
Model: Comanche
Engine: 4.0L Renix
Renix Super Guru
Joined: Mar 2008
Posts: 24,653
Likes: 19
From: In yourz postez fissin jurr spelinzs
Year: 1990XJ/1989MJ
Model: Comanche
Engine: 4.0L Renix
