
Mounting Trailer Hitch


Thread Starter
Member
Joined: Feb 2009
Posts: 153
Likes: 3
Year: 1996
Model: Cherokee
Engine: 4.0 HO
I just picked up a class 4 Draw-tite hitch off craigslist, and am curious how to mount it to a 96 XJ.
Could someone point me in the right direction? Bolt size? Any additional hardware needed? I've already done the electrical work. Thanks a bunch!
Could someone point me in the right direction? Bolt size? Any additional hardware needed? I've already done the electrical work. Thanks a bunch!
Member
Joined: Dec 2008
Posts: 226
Likes: 0
From: Holland Landing, Ontario, Canada (North of Toronto)
Year: 1996
Model: Grand Cherokee
Engine: 4.0L Inline 6 Cylinder
i cant remember the bolt size of hand but one thing i did when trying to install mine was i got coat hangers and welded washers to the end of em to feed through the frame because the chanel steel wont allow you to get the proper carriage bolts in. So i just got some reinforced steel bolts and some heavy nuts and used an impact gun to hook it all up. it works great.
HTH

HTH
Member
Joined: Dec 2008
Posts: 226
Likes: 0
From: Holland Landing, Ontario, Canada (North of Toronto)
Year: 1996
Model: Grand Cherokee
Engine: 4.0L Inline 6 Cylinder
btw.. before anyone chews me out about that bein unsafe kuz u cant get the nuts tight on the bolts.. it was somethin that the owner of a trailer hitch installation company told me to do.. so i trusted him and so far soo good 
CF Veteran
Joined: Nov 2008
Posts: 1,077
Likes: 23
From: Herndon, VA
Year: 1996
Model: Cherokee
Engine: 4.0
The only problem with that way is that you're just using nuts/bolts against that thin unibody frame rail and the stress is centered in a very small area. The better way to do it is to use factory nut strips which will add a layer of metal and distribute the force more evenly against the frame rail. It actually makes the installation easier too, and the nut strips can be bought at the dealer. Don't even think you can do it without removing the bumper.
CF Veteran
Joined: Nov 2008
Posts: 6,989
Likes: 4
From: Oak Harbor, WA.
Year: 1987
Model: Cherokee
Engine: 4.0 liter RENIX I-6, DIY Cold Air Intake, 2.5 FM Exhaust, 3 Core Radiator
X 2. You have to have the OEM nut strips that you feed into the end of the unibody framerail. stick your bolts through the hitch from the bottom and the hole in the unibody frame rail and through the nut in the nut strip. If your jeep had a factory metal or plastic gas tank skid plate. There should be 2 or 3 bolts of the correct size already there in the frame along with the nut strips. The towhitch uses the same bolts and holes.
Trending Topics
CF Veteran
Joined: Nov 2008
Posts: 1,077
Likes: 23
From: Herndon, VA
Year: 1996
Model: Cherokee
Engine: 4.0
I removed the hatch weather striping, the trip piece on top of the bumper and then removed the bumper mounts from the body instead of trying to remove the bumper from the mounts. It was much easier for me to do it that way.

Member
Joined: Mar 2009
Posts: 248
Likes: 0
From: Houston TEXAS
Year: 1996
Model: Cherokee
Engine: 4.0
hey, It can be a real pain in the @#$ but its not that hard, just frusterating. i got it installed in an hour or two. Honestly i would just take it someware. They can get it done in about 30 to 45 min and it will save you some thrown tools.
Thread Starter
Member
Joined: Feb 2009
Posts: 153
Likes: 3
Year: 1996
Model: Cherokee
Engine: 4.0 HO
Thanks for all the advice! I'm thinking if I pick up some 1/2 inch thick bar stock, cut it to 12" in length, and drill and tap the holes, that should work as a cheap alternative to those nut strips.
Seasoned Member
Joined: Mar 2009
Posts: 443
Likes: 0
From: Northwood, Ohio
Year: 1996
Model: Cherokee
Engine: 4.0
I thought about that and opted for a different solution.
I cut squares out of an old license plate to serve as the "strip", but I fed the bolts through the license plate "washers" and into the frame. I found it easier to push the bolt to the hole and drop it out rather that trying to line the nut up inside the frame rail. The bolts I used were Grade 8 7/16 x 1". I also used Grade 8 nuts and lock washers.
Just another possible approach. And yes remove the bumper.
CF Veteran
Joined: Nov 2008
Posts: 6,989
Likes: 4
From: Oak Harbor, WA.
Year: 1987
Model: Cherokee
Engine: 4.0 liter RENIX I-6, DIY Cold Air Intake, 2.5 FM Exhaust, 3 Core Radiator
Just soak your bumper bolts with PB Blaster or some equivelant and then get a long cheater bar. They will come out. If you break them in the process then go with your back up plan and build yourself a new rear bumper. My theory is this. If it won't go, force and if it breaks you needed a new one, anyway.....and of course, build bigger, better and stronger....YOURSELF!!
My theory is this. If it won't go, force and if it breaks you needed a new one, anyway.....and of course, build bigger, better and stronger....YOURSELF!!
CF Veteran
Joined: Nov 2008
Posts: 1,077
Likes: 23
From: Herndon, VA
Year: 1996
Model: Cherokee
Engine: 4.0
They definately would be a great alternative to just using nuts. Take pics and let us know how they turn out.
Thread Starter
Member
Joined: Feb 2009
Posts: 153
Likes: 3
Year: 1996
Model: Cherokee
Engine: 4.0 HO
Alrighty, its on. Alas, I didn't get many pictures, but the general idea:
Took bumper off mounts, 2 bolts on each side. Upper 2 bolts were a pain, they were rusted in place pretty well, and not too much space, so a small socket wrench and a rubber mallet had to suffice. (All factory bolts for this required 15mm socket)
Took bumper mounts off. Would have been a piece of cake, except one bolt was rusted/rounded... and must have been hardened steel. Once this was taken care of with a dremmel, and a chisel, the bumper mounts came right off.
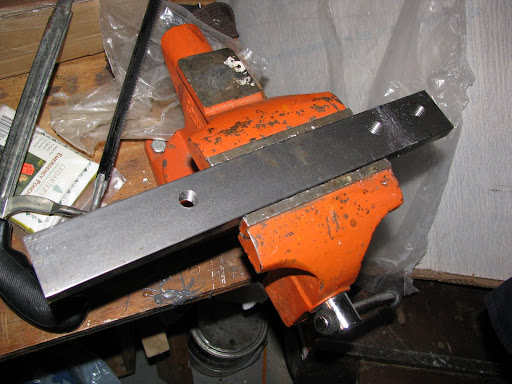
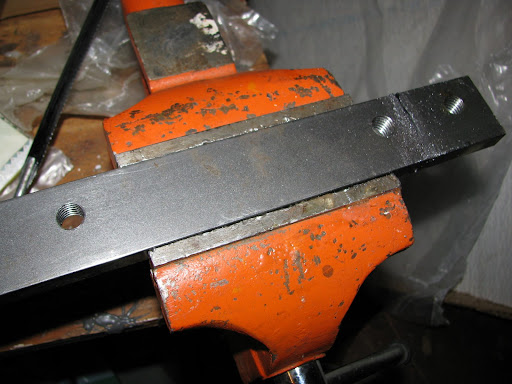
The real disapointment happened here. I had manufactured two "nut bars" out of 1018 steel. 1/2"X1.5"X12" each, with 3 threaded holes for a 13 thread/inch 1/2 inch bolt. Unfortunately, one of the holes on the car is on a separate pannel than the other two, connected by an oval hole. The bar would not lie flush, so I cut off one hole on each bar. That took care of that. On the side with the exhaust pipe, a nut was also deep in there, but in the way. Cutting off some of the extra metal at the end of the bar allowed clearance. Slid these in, bolted it up, and just put the bumper back on, missing a bolt.
Took bumper off mounts, 2 bolts on each side. Upper 2 bolts were a pain, they were rusted in place pretty well, and not too much space, so a small socket wrench and a rubber mallet had to suffice. (All factory bolts for this required 15mm socket)
Took bumper mounts off. Would have been a piece of cake, except one bolt was rusted/rounded... and must have been hardened steel. Once this was taken care of with a dremmel, and a chisel, the bumper mounts came right off.
The real disapointment happened here. I had manufactured two "nut bars" out of 1018 steel. 1/2"X1.5"X12" each, with 3 threaded holes for a 13 thread/inch 1/2 inch bolt. Unfortunately, one of the holes on the car is on a separate pannel than the other two, connected by an oval hole. The bar would not lie flush, so I cut off one hole on each bar. That took care of that. On the side with the exhaust pipe, a nut was also deep in there, but in the way. Cutting off some of the extra metal at the end of the bar allowed clearance. Slid these in, bolted it up, and just put the bumper back on, missing a bolt.
Newbie
Joined: May 2009
Posts: 10
Likes: 0
From: Upstate NY
Model: Cherokee
I've got the factory nut bar on the passenger side. The hole nearest the bumper is larger then the other two. From all the documentation I've read, they should all be the same.
Any thoughts? Thanks!
Any thoughts? Thanks!