Howler light mounts
 02-05-2009, 07:02 PM
#1
CF Veteran
Thread Starter
Join Date: Dec 2008
Location: eaton ohio
Posts: 1,533
Likes: 0
Received 0 Likes
on
0 Posts
Year: 93
Model: Cherokee
Engine: 4.0
so i recieved my light mounts from howler and they look great the following will be a write up and pics of the light mounts as promised and long awaited.
tools you will need:
-black sharpie
-phillips head screwdriver
-drill (cordless or corded mine ran out of power so i had to stop halfway thru) with a 13/64 bit and step drill or bit big enough to pass a 3/8 socket thru
-center punch
-measuring tape
-ratchet with 3/8 socket
-3/8 combo wrench
where to mount:
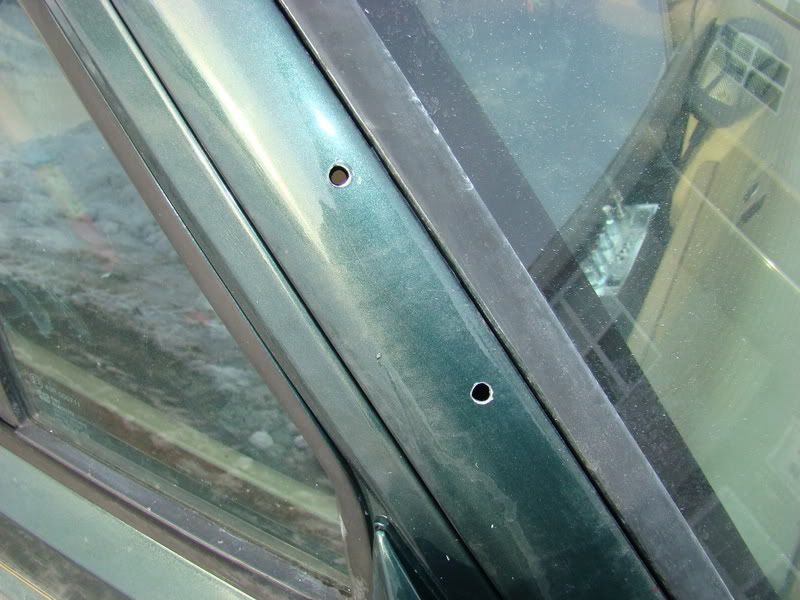
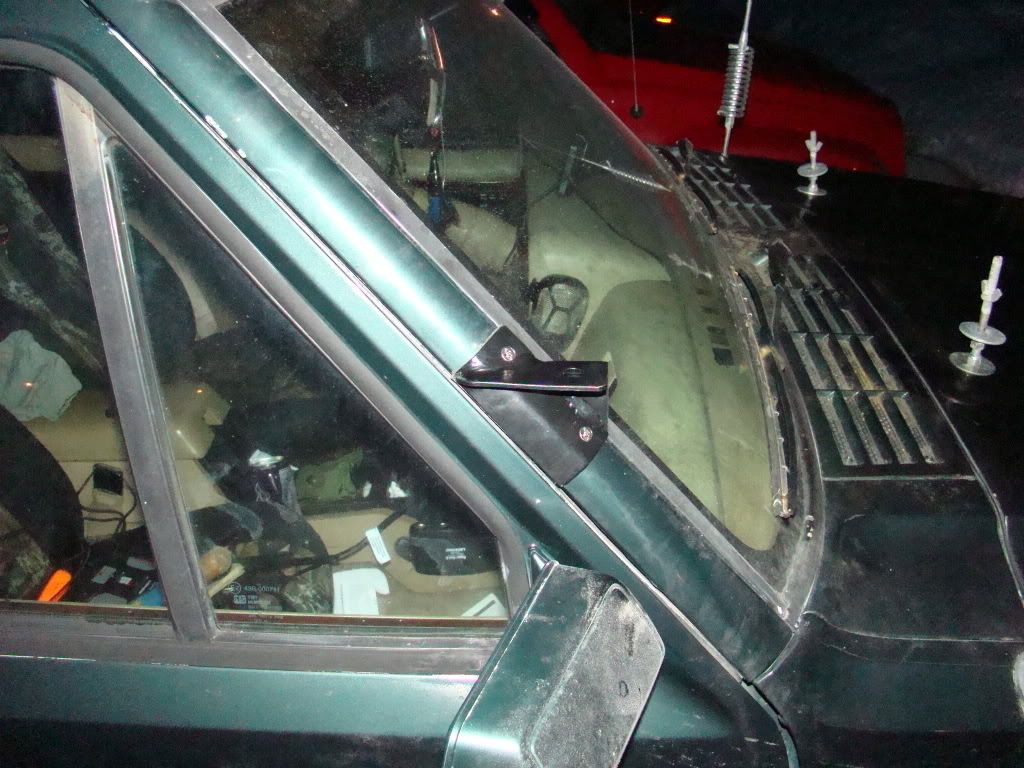
measure up 5 5/16 from the bottom of the pillar and mark with the sharpie then place the mount on the pillar lining up the bottom of the mount with the line you marked then mark the holes with your sharpie next you want to use the punch to dimple the holes

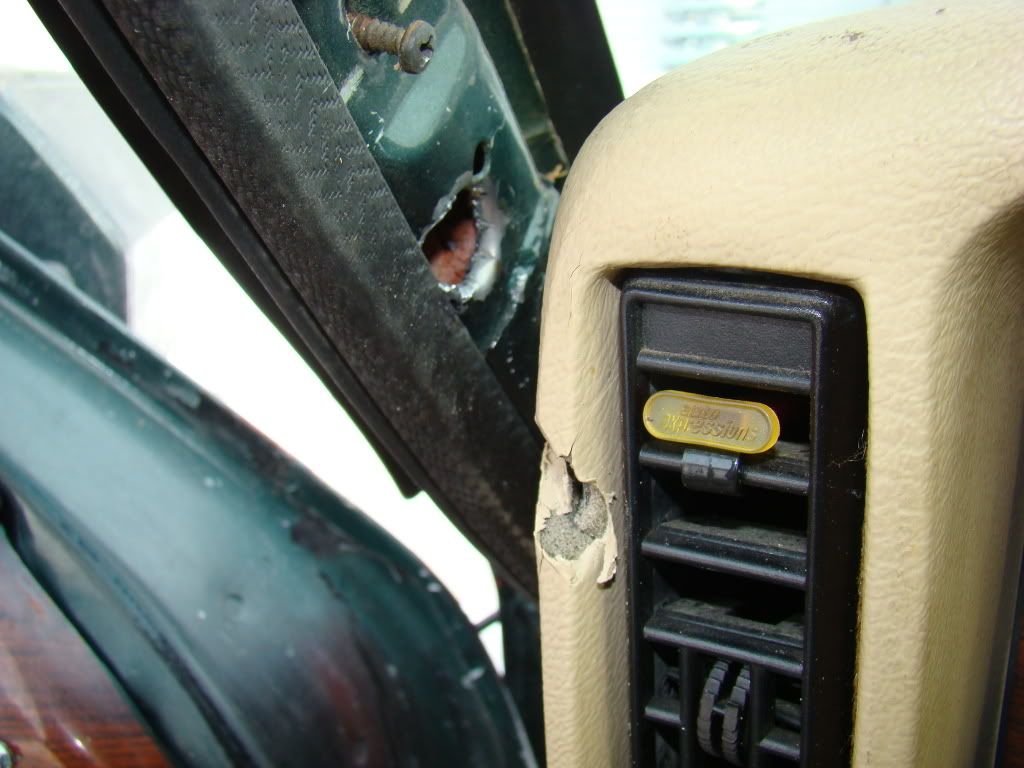
before you drill you must remove the trim on the inside so that you dont put a hole thru that too!!!
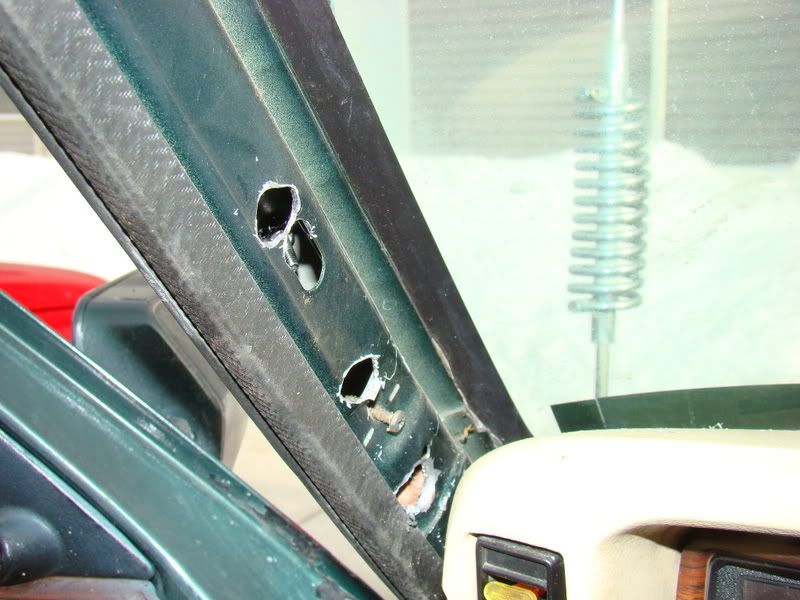
next once the holes are dimpled then you drill, when drilling go all the way thru the pillar so that you kno where you drill the bigger hole to fit the socket thru. on the bottom hole of the pillar you will not need to open up the hole becuase the screw will be long enough to go all the way thru the pillar to easy install. however on the top mounting hole you will need to drill the hole for the socket to pas thru.
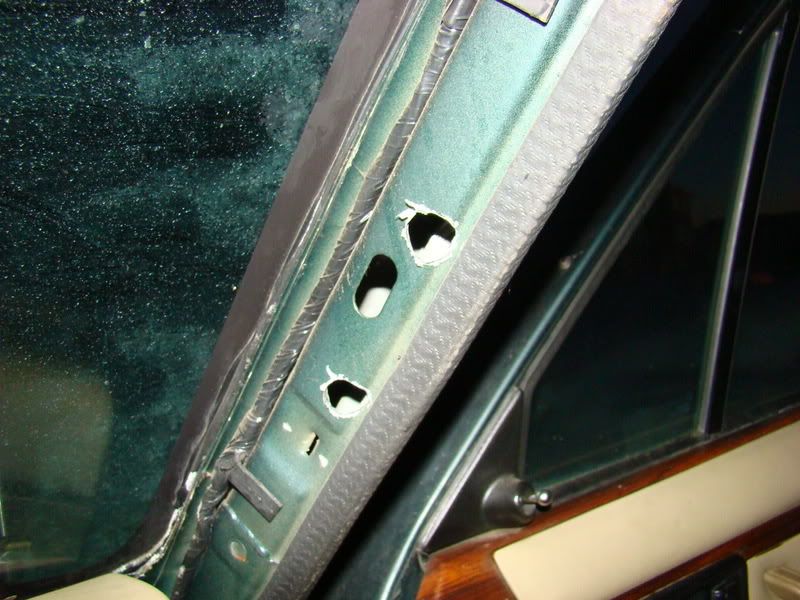
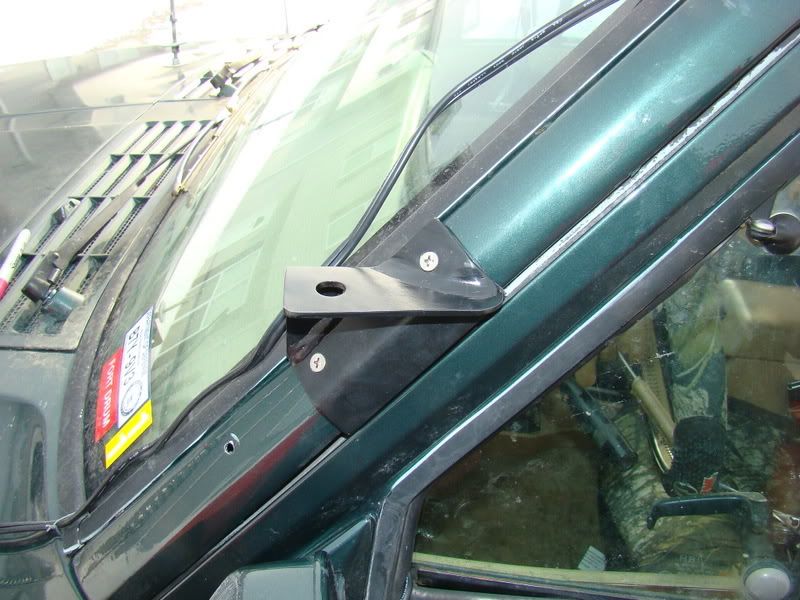
next place mount onto pillar and insert bolts next take your socket and place the nut inside the socket and carfully tighten on to top mounting bolt but not all the way next take put the stop nut on the bottom mounting bolt and then tighten them down and you are all done. instructins are exactly the same for the drivers side but take caution to not eff up your dash pad cause it will happen as you can see but that is also why howler and i have changed a few things on the install and parts.
as far as mounting lights goes which i haven't done yet but will soon you can drill a hole thru the mount or the pillar and run the wires thru there if you do do this then make sure you use some rtv to seal it up
here are some more pics for reference
if you have any questions on install please pm me
tools you will need:
-black sharpie
-phillips head screwdriver
-drill (cordless or corded mine ran out of power so i had to stop halfway thru) with a 13/64 bit and step drill or bit big enough to pass a 3/8 socket thru
-center punch
-measuring tape
-ratchet with 3/8 socket
-3/8 combo wrench
where to mount:
measure up 5 5/16 from the bottom of the pillar and mark with the sharpie then place the mount on the pillar lining up the bottom of the mount with the line you marked then mark the holes with your sharpie next you want to use the punch to dimple the holes
before you drill you must remove the trim on the inside so that you dont put a hole thru that too!!!
next once the holes are dimpled then you drill, when drilling go all the way thru the pillar so that you kno where you drill the bigger hole to fit the socket thru. on the bottom hole of the pillar you will not need to open up the hole becuase the screw will be long enough to go all the way thru the pillar to easy install. however on the top mounting hole you will need to drill the hole for the socket to pas thru.
next place mount onto pillar and insert bolts next take your socket and place the nut inside the socket and carfully tighten on to top mounting bolt but not all the way next take put the stop nut on the bottom mounting bolt and then tighten them down and you are all done. instructins are exactly the same for the drivers side but take caution to not eff up your dash pad cause it will happen as you can see but that is also why howler and i have changed a few things on the install and parts.
as far as mounting lights goes which i haven't done yet but will soon you can drill a hole thru the mount or the pillar and run the wires thru there if you do do this then make sure you use some rtv to seal it up
here are some more pics for reference
if you have any questions on install please pm me
 02-05-2009, 07:23 PM
#2
CF Veteran
Join Date: Aug 2008
Location: palm desert,ca
Posts: 1,313
Likes: 0
Received 1 Like
on
1 Post
Year: 1987
Model: Wagoneer
Engine: 4.0
just a suggestion, maybe give the size of a holesaw for the inner pillar hole so it looks cleaner. i mean i know thats what i would use but some may not.
they look nice though, i may need some of these in the near future

they look nice though, i may need some of these in the near future
02-05-2009, 07:26 PM
#3
CF Veteran
Thread Starter
Join Date: Dec 2008
Location: eaton ohio
Posts: 1,533
Likes: 0
Received 0 Likes
on
0 Posts
Year: 93
Model: Cherokee
Engine: 4.0
i think there is not so much concern for that because most people will reinstall the trim for the pillars and the holes will not be seen
also i think a hole saw will be hard to use because its not a perfectly flat and straight angle you will be drilling on
also i think a hole saw will be hard to use because its not a perfectly flat and straight angle you will be drilling on
02-05-2009, 07:54 PM
#6
CF Veteran
Join Date: Aug 2008
Location: palm desert,ca
Posts: 1,313
Likes: 0
Received 1 Like
on
1 Post
Year: 1987
Model: Wagoneer
Engine: 4.0
just one more quick question. is there a gasket for the mount or does it just bolt to the pillar? the reason i ask is because of moisture getting in there.
02-05-2009, 08:44 PM
#7
CF Veteran
Thread Starter
Join Date: Dec 2008
Location: eaton ohio
Posts: 1,533
Likes: 0
Received 0 Likes
on
0 Posts
Year: 93
Model: Cherokee
Engine: 4.0
Trending Topics
02-05-2009, 08:45 PM
#8
CF Veteran
Thread Starter
Join Date: Dec 2008
Location: eaton ohio
Posts: 1,533
Likes: 0
Received 0 Likes
on
0 Posts
Year: 93
Model: Cherokee
Engine: 4.0
i just got some hella 500's on ebay they should be here so that i can mount them next weekend if not sooner and ill update the post with pics of those too
also i got them for only 40 bucks and free shipping here is the link http://cgi.ebay.com/ebaymotors/New-H...Q5fAccessories
if the link doesnt work just look up deal-monger for the seller
also i got them for only 40 bucks and free shipping here is the link http://cgi.ebay.com/ebaymotors/New-H...Q5fAccessories
if the link doesnt work just look up deal-monger for the seller
Last edited by claygrassmann; 02-05-2009 at 08:49 PM.
02-05-2009, 09:20 PM
#9
CF Veteran
Join Date: Jul 2008
Location: Schnecksville, PA
Posts: 1,217
Likes: 0
Received 5 Likes
on
5 Posts
Year: 94 XJ
Model: Cherokee
Engine: 4.0L
Originally, the idea was to drill thru both sides of the pillar.
Then using a step-drill, enlarge the inner hole large enough for a socket.
BUT as Clays pics show...the dash becomes the major obstacle.
Sorry about the dash, man.
We have come to the agreement, the just drill thru both sides of the pillar and use longer hardware. Thusly, removing the need to step-drill (enlarge any holes)
Clay's mounts are higher than the suggested height, that was Clays choice.
I do hope he will take care of the extra hole from the first mounting attempt.
Perhaps grommet it and run the wires thru it. Hey, thats a good idea.
Each mount has a neoprene foam gasket already adhered to the underside of the base. This should keep out any unwanted moisture.
Now 76Anthony, you had mentioned riv-nuts/threaded inserts.
IF you have these, and wish to use them, by all means, do so.
For reference: Mounting hardware is 10-24 SAE F.H.
Light suggestions: Any 6" round. Shallows would work best.
ALSO: Choose a set that has covers or ones that can be covered.
Why? Just in case, your local men in blue frown on your lights, you can easily cover em up.
 02-05-2009, 11:54 PM
#14
CF Veteran
Thread Starter
Join Date: Dec 2008
Location: eaton ohio
Posts: 1,533
Likes: 0
Received 0 Likes
on
0 Posts
Year: 93
Model: Cherokee
Engine: 4.0
02-05-2009, 11:57 PM
#15
CF Veteran
Thread Starter
Join Date: Dec 2008
Location: eaton ohio
Posts: 1,533
Likes: 0
Received 0 Likes
on
0 Posts
Year: 93
Model: Cherokee
Engine: 4.0
Originally, the idea was to drill thru both sides of the pillar.
Then using a step-drill, enlarge the inner hole large enough for a socket.
BUT as Clays pics show...the dash becomes the major obstacle.
Sorry about the dash, man.
We have come to the agreement, the just drill thru both sides of the pillar and use longer hardware. Thusly, removing the need to step-drill (enlarge any holes)
Clay's mounts are higher than the suggested height, that was Clays choice.
I do hope he will take care of the extra hole from the first mounting attempt.
Perhaps grommet it and run the wires thru it. Hey, thats a good idea.
Each mount has a neoprene foam gasket already adhered to the underside of the base. This should keep out any unwanted moisture.
Now 76Anthony, you had mentioned riv-nuts/threaded inserts.
IF you have these, and wish to use them, by all means, do so.
For reference: Mounting hardware is 10-24 SAE F.H.
Light suggestions: Any 6" round. Shallows would work best.
ALSO: Choose a set that has covers or ones that can be covered.
Why? Just in case, your local men in blue frown on your lights, you can easily cover em up.
Then using a step-drill, enlarge the inner hole large enough for a socket.
BUT as Clays pics show...the dash becomes the major obstacle.
Sorry about the dash, man.
We have come to the agreement, the just drill thru both sides of the pillar and use longer hardware. Thusly, removing the need to step-drill (enlarge any holes)
Clay's mounts are higher than the suggested height, that was Clays choice.
I do hope he will take care of the extra hole from the first mounting attempt.
Perhaps grommet it and run the wires thru it. Hey, thats a good idea.
Each mount has a neoprene foam gasket already adhered to the underside of the base. This should keep out any unwanted moisture.
Now 76Anthony, you had mentioned riv-nuts/threaded inserts.
IF you have these, and wish to use them, by all means, do so.
For reference: Mounting hardware is 10-24 SAE F.H.
Light suggestions: Any 6" round. Shallows would work best.
ALSO: Choose a set that has covers or ones that can be covered.
Why? Just in case, your local men in blue frown on your lights, you can easily cover em up.
no worries bout the dash bro it happens its no biggy for me, but yeah with the diff hardware i am sure that these will be a hit and super easy to install now.