

 Sep 15, 2015, 11:44 AM
Last edit by: IB Advertising
See related guides and technical advice from our community experts:
Browse all: Interior
- Jeep Grand Cherokee ZJ 1993 to 1998 How to Replace Headlight Switch
Step by step instructions for do-it-yourself repairs.
Browse all: Interior

dimmer switch/headlights/parkinglight switch removal?????
Thread Starter
Senior Member
Joined: Dec 2008
Posts: 831
Likes: 1
From: Punxsutawney Pennsylvania
Year: 1988
Model: Cherokee
Engine: Renix 4.0 I6
well i rewired the whole front end and traced everthing back up to the firewall so i took the fuse block off and traced the wires to the switch wires look fine switch has to be bad.. if it isnt the switch then im gonna run all new wires and put switches in myself for the lights.. its really starting to get my blood boiling i hate wiring.. anyways how do i get the dimmer switch out ..ive been looking at it for a while and i cant see the wires behind it i cant get the switch out it seems to be part of the main dash.. believe me ive had everything except this switch out of the dash.. if anyone out there has replaced this switch out there i really need to know how to get it out..
p.s its a 88 not the newer style
thanks in advance
p.s its a 88 not the newer style
thanks in advance
Thread Starter
Senior Member
Joined: Dec 2008
Posts: 831
Likes: 1
From: Punxsutawney Pennsylvania
Year: 1988
Model: Cherokee
Engine: Renix 4.0 I6
thanks that would help me out alot.. i dont want to mess up my dash untill its my last resort
CF Veteran
Joined: Feb 2009
Posts: 5,900
Likes: 10
Model: Cherokee
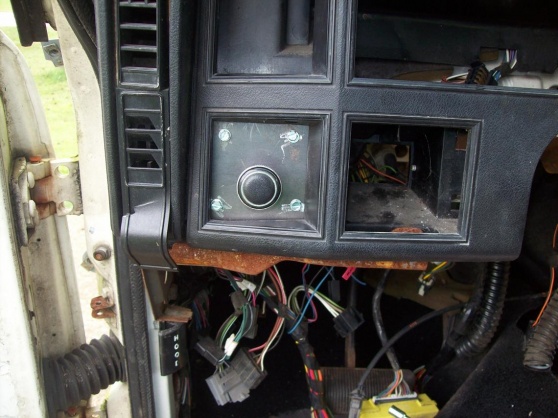
It took a minute to figure it out, and I broke the dash housing around the switch. At least know we know. The pics show the process. The switch will slide out of the bottom of the dash after you remove the locking screw.
Trending Topics
Thread Starter
Senior Member
Joined: Dec 2008
Posts: 831
Likes: 1
From: Punxsutawney Pennsylvania
Year: 1988
Model: Cherokee
Engine: Renix 4.0 I6
thanks alot .. i wouldve never figured it out till i broke somethin... im sure other people will use this thread too.. thanks again


Junior Member
Joined: Jul 2009
Posts: 66
Likes: 0
Year: 2 88 XJ/1 86 XJ/ 98 Grand Cherokee
Model: Cherokee
Engine: 4.0
Thanks for all of that Info. Do i just take my screw driver and turn it and it will unscrew and fall right out? I was working at it for 3 + hrs tonight and have no luck. The Repair Manuals Do suck *** at explainning out to take it out and put it back in. Any help would be awsome guys! Thanks
CF Veteran
Joined: Feb 2009
Posts: 5,900
Likes: 10
Model: Cherokee
You need to use a wide flat head screwdriver and be easy, like I stated in that post be easy with it. Also keep in mind that those pics were taken from a almost completely stripped dash. The release button for the **** is a pain to get to with a fully assembled dash.

Newbie
Joined: Sep 2009
Posts: 1
Likes: 0
Model: Cherokee
Winston,
The plastic piece you describe breaking while attempting to remove the headlight switch is also broken in my cherokee--though it happened while resting my foot to the left of the steering column. How do i replace the plastic that surrounds the headlight switch? As a result of it being broken the switch floats freely, making tit very difficult to turn the lights off.
Thank you!
CF Veteran
Joined: Feb 2009
Posts: 5,900
Likes: 10
Model: Cherokee
Oh, and now for the really bad news. The reason I cautioned about the plastic breaking is that the mounting spot for the headlight switch is part of the complete dash assembly. If if gets broken, the only way I know of repairing the problem is to replace the entire dash. I know you did not want to hear that, but I do not know of any other options for a repair. I still have the junker that I did that write up on so I will try and develop a patch for it and let you know.
CF Veteran
Joined: Feb 2009
Posts: 5,900
Likes: 10
Model: Cherokee
Ok folks, this is a straight ghetto repair job, but it is effective for now just to show that it can be done without replacing the entire dash assembly. Now remember this is a 35 minute patch job in the junker, so making it pretty was not a concern right now. I will fab up a more attractive panel for repairing this problem and will have it posted in the XJ tech write up section.
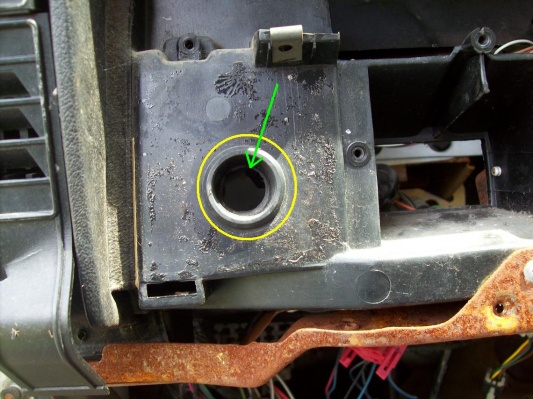
So to start, the problem is with the plastic dash that the headlight switch mounts in. It is weak and will break easily. The center section indicated by the green arrow has broken out and this is where the retaining screw goes for the switch. The area circled in yellow must be removed for the repair panel to mount flush.
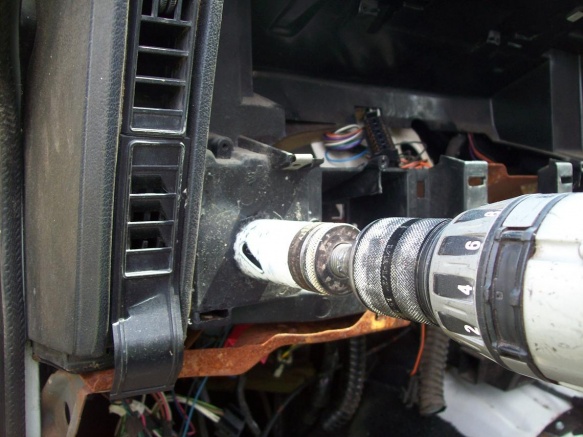
I used a 1 3/8 hole saw to remove this part of the dash to create a flat surface for the repair panel.
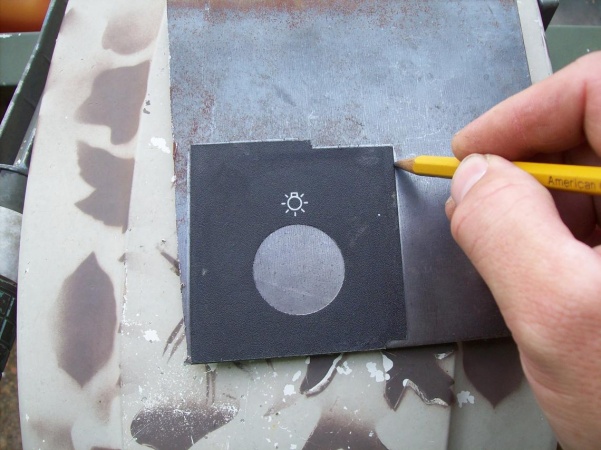
I peeled the trim cover off of the dash to trace it onto a piece of sheet metal.
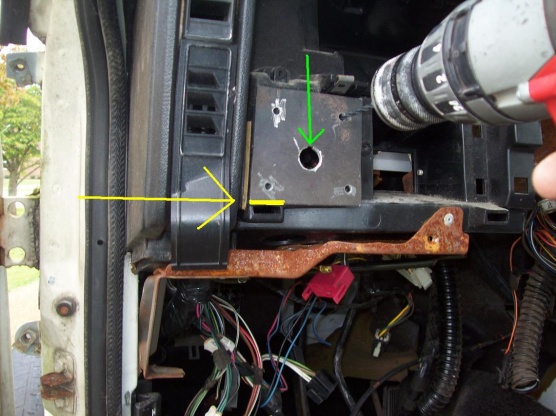
The green arrow in this pic shows the notch I had to file into the hole for the locating tab on the headlight switch. The yellow arrow indicates an area where I need to clearance for the dash trim to reinstall properly.
This pic shows the switch reinstalled with the trim panel back in place as well. Like I said it is ghetto and ugly but I will fab up something better. This was just an exercise for me to find another way to save someone else a lot of money and headaches.
So to start, the problem is with the plastic dash that the headlight switch mounts in. It is weak and will break easily. The center section indicated by the green arrow has broken out and this is where the retaining screw goes for the switch. The area circled in yellow must be removed for the repair panel to mount flush.
I used a 1 3/8 hole saw to remove this part of the dash to create a flat surface for the repair panel.
I peeled the trim cover off of the dash to trace it onto a piece of sheet metal.
The green arrow in this pic shows the notch I had to file into the hole for the locating tab on the headlight switch. The yellow arrow indicates an area where I need to clearance for the dash trim to reinstall properly.
This pic shows the switch reinstalled with the trim panel back in place as well. Like I said it is ghetto and ugly but I will fab up something better. This was just an exercise for me to find another way to save someone else a lot of money and headaches.