
'99 XJ Intake Manifold onto '97 XJ

Thread Starter
Member
Joined: Aug 2011
Posts: 127
Likes: 0
From: Concord, CA
Year: 1997
Model: Cherokee
Engine: 4.0L I6
I am soon to install a new exhaust manifold, APN, onto my '97 XJ as mine is cracked.
My intake manifold is damaged from the previous owner so since it has to come out while replacing the exhaust manifold I decided it would be a good time to replace.
Can a '99 XJ intake manifold work on a '97 XJ? I understand it will fit but I see the '97 has two slip on rubber house then what appears to be two sensors next to them...the '99 only appears to have the two slip on but no where for the other two "sensors", can they be relocated or is there some where else they go on the '99?
Not sure if I explained the situation well enough and if it all makes sense. Heard the '99 is a better intake manifold to install but want to know what I am getting myself into. Tried searching with no luck, maybe I just suck at searching and yes I used Google.
Please help!
Thread Starter
Member
Joined: Aug 2011
Posts: 127
Likes: 0
From: Concord, CA
Year: 1997
Model: Cherokee
Engine: 4.0L I6
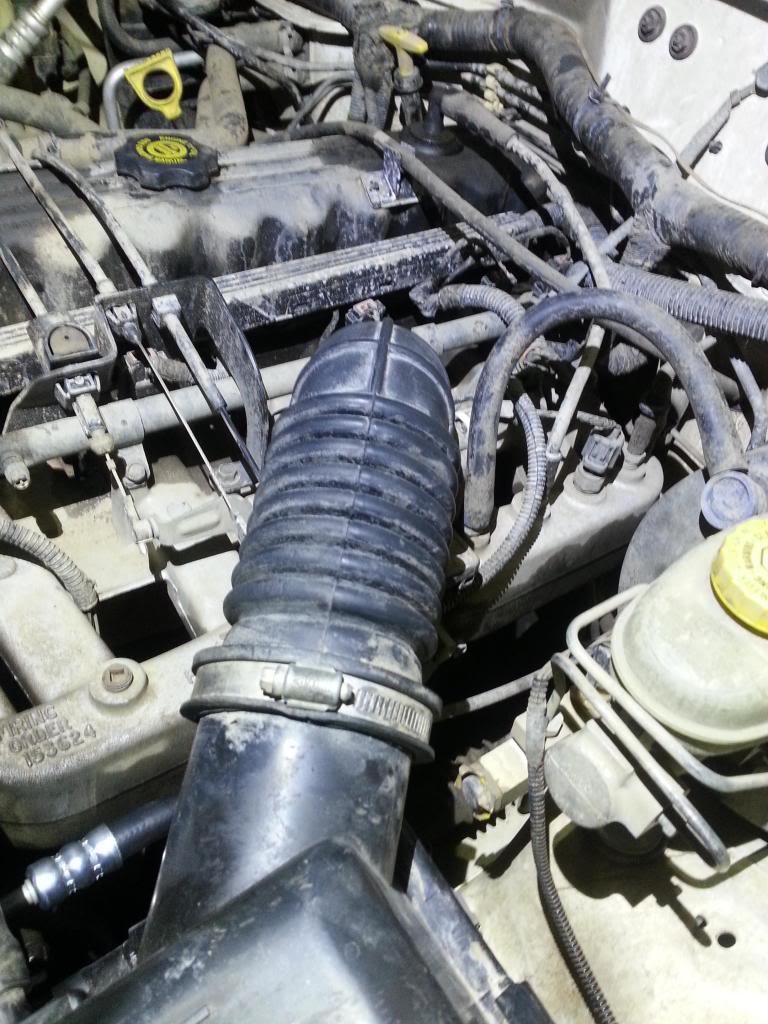
Google images brought up this picture when I searched for 1997 intake manifold:

The top is what my '97 manifold looks like and the bottom is what the '99 looks like...I will post actual pictures of what I have in just a few minutes.
The top is what my '97 manifold looks like and the bottom is what the '99 looks like...I will post actual pictures of what I have in just a few minutes.

Member
Joined: Sep 2012
Posts: 131
Likes: 2
From: Raleigh, NC
Year: 1998
Model: Cherokee
Engine: 4.0L
It all works, I have a 99-01 on my 98. Can snap some pictures tomorrow if needed, but from what I can recall, the brake booster vacuum line goes to the larger vacuum port behind(firewall side) of the throttle body. The PCV valve line from the back of the valve cover goes to the smaller vacuum port right next to the throttle body(driverside). The air intake temp sensor is mounted infront of the throttle body. I think there are some other smaller vacuum lines on the side of the manifold. Like I said, I can snap some pics and show you how mine is run if needed.
Thread Starter
Member
Joined: Aug 2011
Posts: 127
Likes: 0
From: Concord, CA
Year: 1997
Model: Cherokee
Engine: 4.0L I6
It all works, I have a 99-01 on my 98. Can snap some pictures tomorrow if needed, but from what I can recall, the brake booster vacuum line goes to the larger vacuum port behind(firewall side) of the throttle body. The PCV valve line from the back of the valve cover goes to the smaller vacuum port right next to the throttle body(driverside). The air intake temp sensor is mounted infront of the throttle body. I think there are some other smaller vacuum lines on the side of the manifold. Like I said, I can snap some pics and show you how mine is run if needed.
Did you have to plug any holes? If so, what did you use?
Thanks again.

Trending Topics
Thread Starter
Member
Joined: Aug 2011
Posts: 127
Likes: 0
From: Concord, CA
Year: 1997
Model: Cherokee
Engine: 4.0L I6
For what I can see that generally answers a few questions but if you can take some more pics of the hoses and their routing up close that would really help. Yeah I'll shoot you a PM in the morning.

Senior Member
Joined: Nov 2010
Posts: 922
Likes: 0
From: Vegas Baby!
Model: Cherokee
One more thing, dont waste your time with Felpro gaskets etc as they wont fit right. Go to the dealership and get the 99 gasket (lesss than $20) and don't forget the TB gasket.
Member
Joined: Sep 2012
Posts: 131
Likes: 2
From: Raleigh, NC
Year: 1998
Model: Cherokee
Engine: 4.0L
Snapped some pics of how my vacuum lines are run. It's raining and my iPhone doesn't take the best pics, but it shows everything.


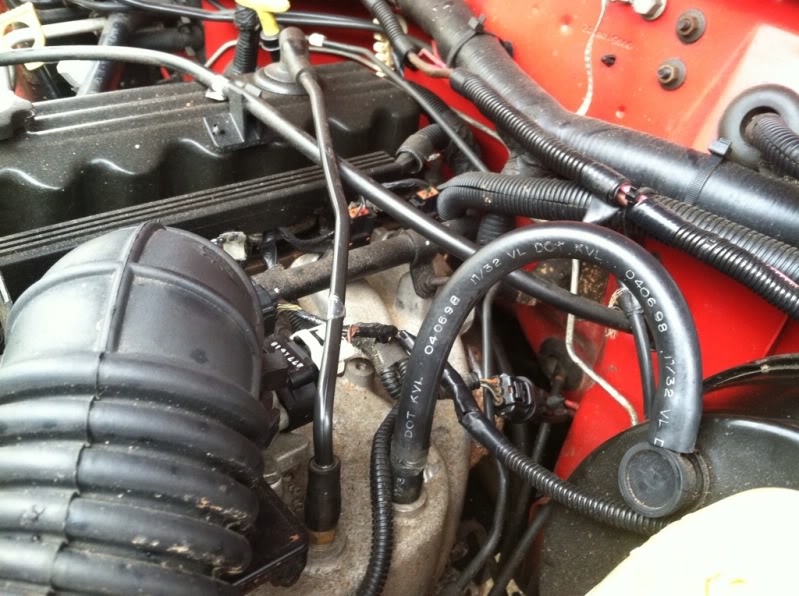


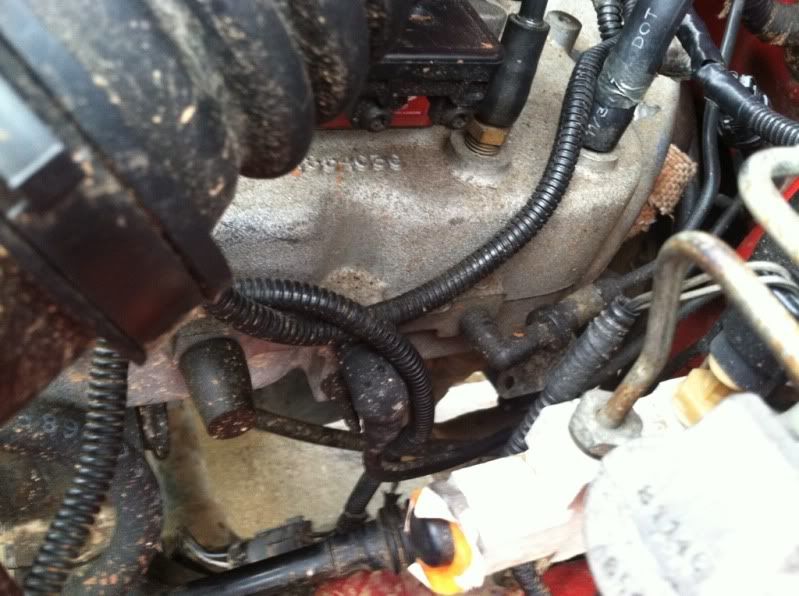
Ok, so from the pics. The upper two vacuum lines are like I said last night, the larger one goes to the brake booster, and the smaller to the pcv on the rear of the valve cover.
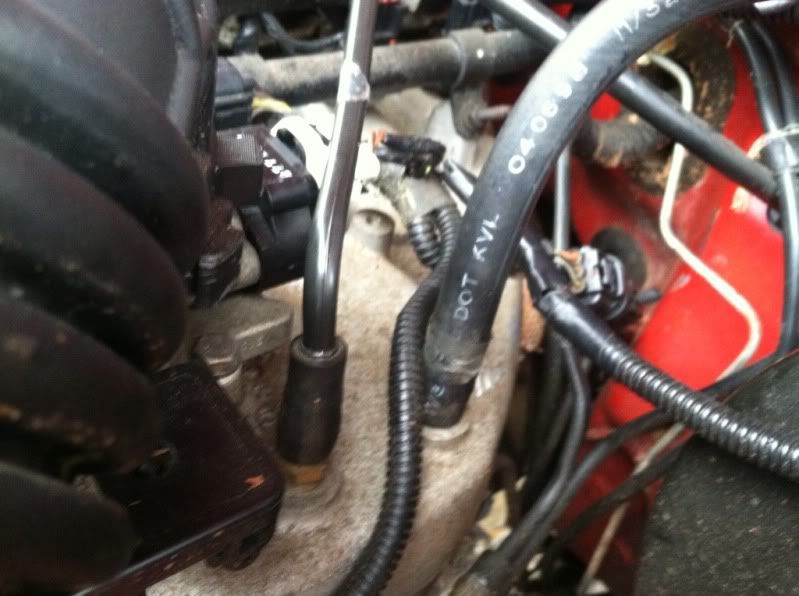
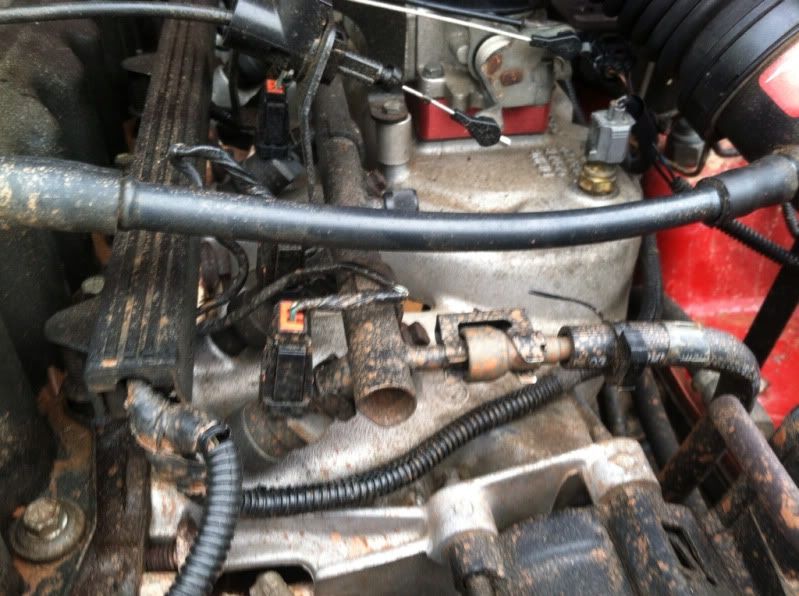
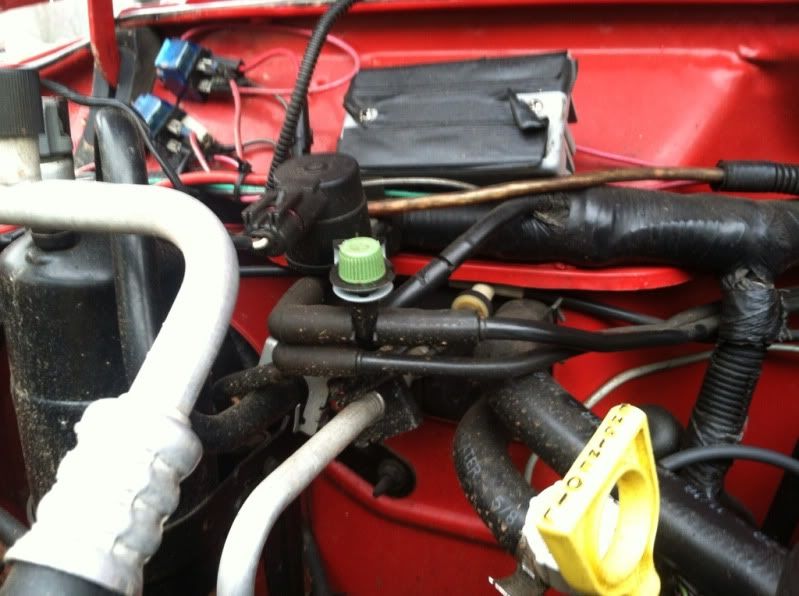
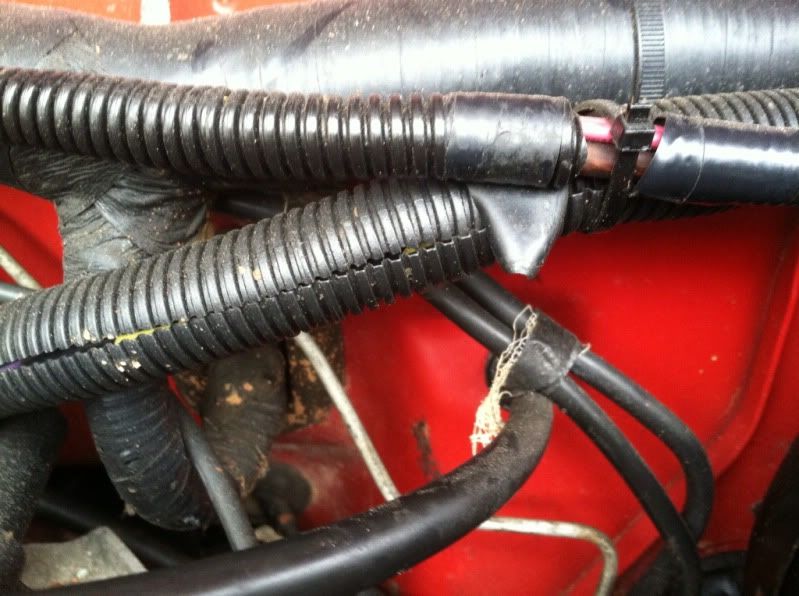
The three ports on the side of the manifold are a bit different. Looking from the driver side, the far left is capped off. The middle and far right port both go to this sensor that is mounted on my passenger side firewall where the heater core hoses enter the firewall. Not quite sure what it does or controls, but that's where they run. The lines run on the firewall to the sensor, shown in the pics. As far as I could see, that's all the lines that are run to it. Sensors should be straight up, the air intake temp sensor goes in front of the throttle body. Everything else should be the same as the older manifold.
Ok, so from the pics. The upper two vacuum lines are like I said last night, the larger one goes to the brake booster, and the smaller to the pcv on the rear of the valve cover.
The three ports on the side of the manifold are a bit different. Looking from the driver side, the far left is capped off. The middle and far right port both go to this sensor that is mounted on my passenger side firewall where the heater core hoses enter the firewall. Not quite sure what it does or controls, but that's where they run. The lines run on the firewall to the sensor, shown in the pics. As far as I could see, that's all the lines that are run to it. Sensors should be straight up, the air intake temp sensor goes in front of the throttle body. Everything else should be the same as the older manifold.
CF Veteran
Joined: Aug 2010
Posts: 1,168
Likes: 4
From: Williamsport, Pa
Year: 1997
Model: Cherokee
Engine: 4.0L
I seem to remember having to extend some wires for a sensor. For some reason there was no where to put it close enough to the existing wires and the sensor ended up too far away, so I had to extend the wires to it. Not too difficult though
Thread Starter
Member
Joined: Aug 2011
Posts: 127
Likes: 0
From: Concord, CA
Year: 1997
Model: Cherokee
Engine: 4.0L I6
Snapped some pics of how my vacuum lines are run. It's raining and my iPhone doesn't take the best pics, but it shows everything.

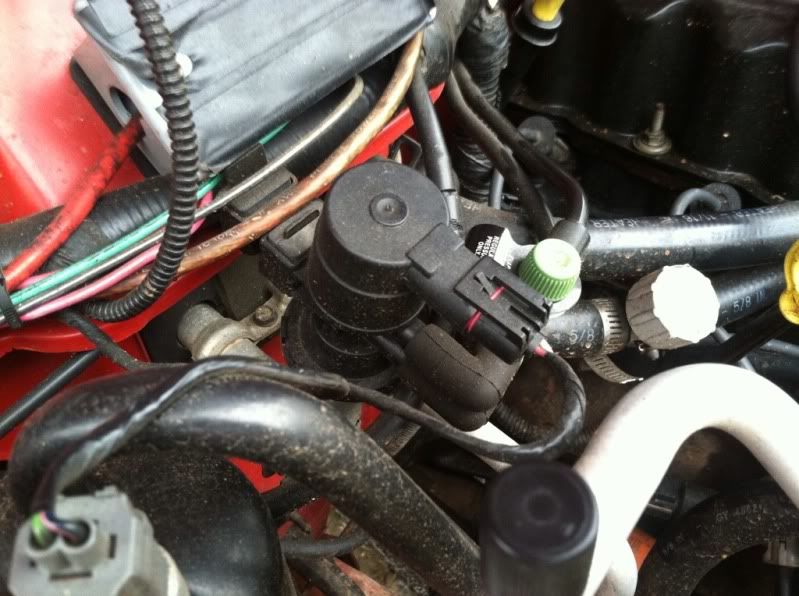

Ok, so from the pics. The upper two vacuum lines are like I said last night, the larger one goes to the brake booster, and the smaller to the pcv on the rear of the valve cover.
The three ports on the side of the manifold are a bit different. Looking from the driver side, the far left is capped off. The middle and far right port both go to this sensor that is mounted on my passenger side firewall where the heater core hoses enter the firewall. Not quite sure what it does or controls, but that's where they run. The lines run on the firewall to the sensor, shown in the pics. As far as I could see, that's all the lines that are run to it. Sensors should be straight up, the air intake temp sensor goes in front of the throttle body. Everything else should be the same as the older manifold.
So you capped 1 port on the three side ones, got it.
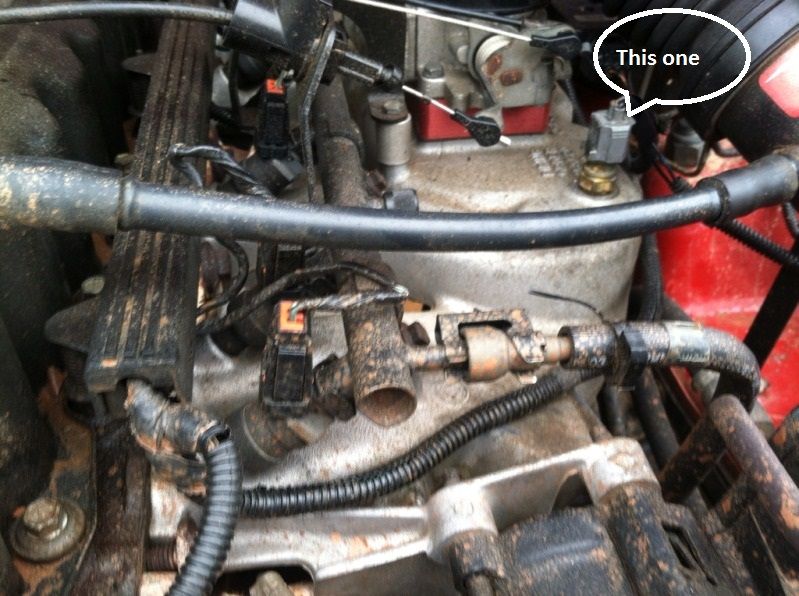
So you did not have to extend the sensor as Cherockee is mentioning?.

Thread Starter
Member
Joined: Aug 2011
Posts: 127
Likes: 0
From: Concord, CA
Year: 1997
Model: Cherokee
Engine: 4.0L I6
Member
Joined: Sep 2012
Posts: 131
Likes: 2
From: Raleigh, NC
Year: 1998
Model: Cherokee
Engine: 4.0L
Yes, mine was extended for the intake temp sensor you are pointing out. You'll need some 16g wire, some wire strippers, and a set of crimp connectors. Most will say to solder it, but if you're new at it, a set of crimps and electrical tape will do. Simply cut the harness probably 6" away from the sensor to leave yoyurself some room, strip both sides of both wires, crimp, electrical tape both wires individually around the crimp connector, and cover it all back up with wire loom. Simple as that.