
2000 Cherokee 4.0l sputtering - fighting with a connector

Thread Starter
Newbie
Joined: Apr 2010
Posts: 23
Likes: 0
Model: Cherokee
So, this jeep has been a really great vehicle.. I try to keep up on the maintenance etc and changed the spark plugs recently.
After I changed the plugs, the stupid thing has this weird random sputter. The sputter is not in any sort of pattern, it just kinda comes and goes, but i'd say is probably every 10 to 30 seconds it'll hesitate for a split second.
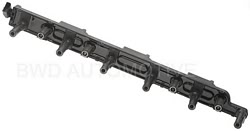
One thing I didn't do, is change the rubber boots on the rail connecting to the plugs.. (sorry I'm not sure what the name of it is). It doesn't have wires, it has 1 rail that is bolted down etc.
problem is, I can not for the life of me figure out how the hell to get the stupid connector on the backside of this rail off. It's the plug that's between the firewall and motor from the wiring harness to this "rail".
If it is in fact these rubber boots that need replacing (as far as I know they are original equipment) to stop the sputtering, how do I get that silly plug disconnected?
oh, and sorry for the ridiculously long explanation!
After I changed the plugs, the stupid thing has this weird random sputter. The sputter is not in any sort of pattern, it just kinda comes and goes, but i'd say is probably every 10 to 30 seconds it'll hesitate for a split second.
One thing I didn't do, is change the rubber boots on the rail connecting to the plugs.. (sorry I'm not sure what the name of it is). It doesn't have wires, it has 1 rail that is bolted down etc.
problem is, I can not for the life of me figure out how the hell to get the stupid connector on the backside of this rail off. It's the plug that's between the firewall and motor from the wiring harness to this "rail".
If it is in fact these rubber boots that need replacing (as far as I know they are original equipment) to stop the sputtering, how do I get that silly plug disconnected?
oh, and sorry for the ridiculously long explanation!

Member
Joined: Nov 2010
Posts: 141
Likes: 0
From: Indy
Year: 2000
Model: Cherokee
Engine: 4.0
So, this jeep has been a really great vehicle.. I try to keep up on the maintenance etc and changed the spark plugs recently.
After I changed the plugs, the stupid thing has this weird random sputter. The sputter is not in any sort of pattern, it just kinda comes and goes, but i'd say is probably every 10 to 30 seconds it'll hesitate for a split second.
One thing I didn't do, is change the rubber boots on the rail connecting to the plugs.. (sorry I'm not sure what the name of it is). It doesn't have wires, it has 1 rail that is bolted down etc.
problem is, I can not for the life of me figure out how the hell to get the stupid connector on the backside of this rail off. It's the plug that's between the firewall and motor from the wiring harness to this "rail".
If it is in fact these rubber boots that need replacing (as far as I know they are original equipment) to stop the sputtering, how do I get that silly plug disconnected?
oh, and sorry for the ridiculously long explanation!
Thread Starter
Newbie
Joined: Apr 2010
Posts: 23
Likes: 0
Model: Cherokee
I forgot to mention that I got that red tab out, but the plug won't actually release. I'm half tempted to just cut the stupid thing off and put a different connector on. I fought with that stupid connector for about an hour to no avail. it claimed victory, 'lil bastard.
Thread Starter
Newbie
Joined: Apr 2010
Posts: 23
Likes: 0
Model: Cherokee
sorry. i feel like a total tard-ball not being able to get this damned connector off. I'll have to futz with it more over the holiday weekend i guess. trying to fix it up a little and sell it eventually.
Thread Starter
Newbie
Joined: Apr 2010
Posts: 23
Likes: 0
Model: Cherokee
you think? i guess that's something to investigate for sure.. are there any tests that you know of that may lead to the ignition coil? this thing doesn't have plug wires, and I know those boots are OE.. [shruggs]
i'm usually ok with doing the work, repairing things etc, it's the diagnosis that gets me everytime. haha.
i'm usually ok with doing the work, repairing things etc, it's the diagnosis that gets me everytime. haha.

Trending Topics
Thread Starter
Newbie
Joined: Apr 2010
Posts: 23
Likes: 0
Model: Cherokee
oh! gotcha. yeah i didn't know what it was called. so the whole "rail"  is the ignition coil? and that part gets replaced completely then, and not just the rubber boots that protrude out of the coil and connect to the plugs? weird.
I'm way to used to a VW setup i guess, haha.
is the ignition coil? and that part gets replaced completely then, and not just the rubber boots that protrude out of the coil and connect to the plugs? weird. I'm way to used to a VW setup i guess, haha.
Member
Joined: Nov 2010
Posts: 141
Likes: 0
From: Indy
Year: 2000
Model: Cherokee
Engine: 4.0
oh! gotcha. yeah i didn't know what it was called. so the whole "rail" is the ignition coil? and that part gets replaced completely then, and not just the rubber boots that protrude out of the coil and connect to the plugs? weird.
I'm way to used to a VW setup i guess, haha.
is the ignition coil? and that part gets replaced completely then, and not just the rubber boots that protrude out of the coil and connect to the plugs? weird. I'm way to used to a VW setup i guess, haha.
http://www.oreillyauto.com/site/c/de...3756&ppt=C0334
Member
Joined: Nov 2010
Posts: 141
Likes: 0
From: Indy
Year: 2000
Model: Cherokee
Engine: 4.0
Thread Starter
Newbie
Joined: Apr 2010
Posts: 23
Likes: 0
Model: Cherokee
Sweet! thanks for pulling those parts up for me, that's awesome. I have an O'Reilly Auto Parts about 1/2 mile from my house too. I liked them better when they were Murray's, but everything's gotta change I guess. I think the first step is getting the stupid connector off hopefully without damaging the plug so I can take a better look at the whole thing off the car.. I'm telling you, there's a gremlin hanging around that plug!

Member
Joined: Oct 2010
Posts: 204
Likes: 1
From: NY
Year: 2001
Model: Cherokee
Engine: 4.0L


Member
Joined: Jul 2010
Posts: 182
Likes: 1
From: nanticoke pa
Year: 2000
Model: Cherokee
Engine: 4.o
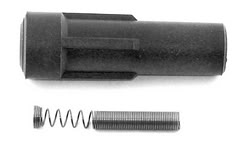
replace the spark plug boots and springs on the coil rail I would think thats part of a tune myself have a 2000xj when spark plug time comes thats what ill be doing to mine
Member
Joined: Nov 2010
Posts: 141
Likes: 0
From: Indy
Year: 2000
Model: Cherokee
Engine: 4.0
NUMBER: 18-031-03
GROUP: Vehicle Performance
DATE: Sep. 05, 2003
THIS BULLETIN SUPERSEDES TECHNICAL SERVICE BULLETIN 18-027-02, DATED SEPTEMBER 06, 2002, WHICH SHOULD BE REMOVED FROM YOUR FILES. THIS IS A COMPLETE REVISION AND NO ASTERISKS HAVE BEEN USED TO HIGHLIGHT REVISIONS.
SUBJECT:
4.0L Rough Engine Idle After Restart Following A Hot Soak
OVERVIEW:
This bulletin involves the installation of a fuel injector insulator sleeve.
MODELS:
2000-2004 (TJ) Wrangler (Domestic and International Markets)
1999-2004 (WJ) Grand Cherokee (Domestic and International Markets)
2001-2004 (WG) Grand Cherokee (International Market)
2000-2001 (XJ) Jeep Cherokee (Domestic and International Markets)
NOTE: This bulletin applies to vehicles equipped with a 4.0L engine (sales code = ERH)
SYMPTOM/CONDITION:
Customers may describe a 20 to 30 second rough idle following the restart of a heat soaked engine. This condition may be most noticeable when the engine is restarted following a prior 10 to 20 minute heat soak in hot ambient conditions of approximately 32�C (90�F) or higher. This condition may be consistent with short city stop-and-go driving trips and can be aggravated by the use of fuel with a high ethanol content. Depending upon various conditions a MIL may occur due to DTC P0303 - Cylinder # 3 Misfire.
This condition may be caused by heat from the exhaust manifold that following engine shut down migrates to the area around injector # 3 and causes fuel vapor to form within the injector. This in turn may cause a momentary misfire of cylinder # 3 until the fuel vapor is cleared of injector # 3. The insulator sleeve lowers the injector # 3 temperature to a point below which the fuel will not normally vaporize.
DIAGNOSIS:
1.If vehicle exhibits a rough idle, and if a misfire of cylinder # 3 is observed following a 10 to 20 minute hot soak, perform the Repair Procedure.

PARTS REQUIRED
REPAIR PROCEDURE:
1.Cut insulator sleeve, p/n 56028371AA, to make two (2) insulator sleeves about 25-30 mm (1 in.) in length.
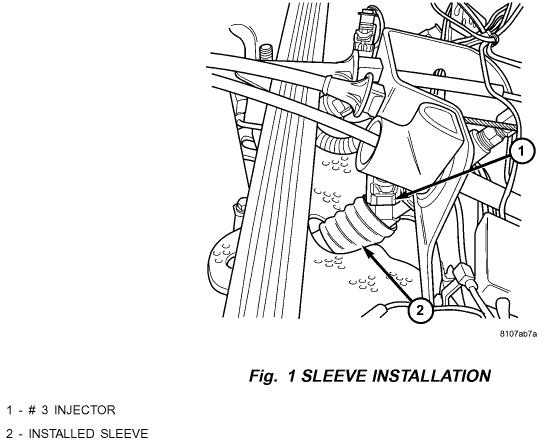
2.Install one sleeve around injector # 3, with the slit on the upward facing side of the injector. Install the other sleeve with the slit on the downward facing side of the injector.
3.Confirm sleeve is flush to intake manifold surface around injector.
4.Check injector # 3 wire and ensure that the injector is rotated to a 2 o'clock position (from driver's side of vehicle).
POLICY:
Reimbursable within the provisions of the warranty.
Member
Joined: Nov 2010
Posts: 141
Likes: 0
From: Indy
Year: 2000
Model: Cherokee
Engine: 4.0
Here is another one I found
NUMBER: 18-039-03
GROUP: Vehicle Performance
DATE: November 14, 2003
THIS BULLETIN is BEING PROVIDED IN ADVANCE. THE SOFTWARE WILL BE AVAILABLE ON TechCONNECT ON OR AFTER DECEMBER 09, 2003.
SUBJECT:
4.0L Rough Idle Due To High Ambient or Hot Soak Temperatures
OVERVIEW:
This bulletin involves selectively erasing and reprogramming the Powertrain Control Module (PCM) with new software.
MODELS:
2000 - 2001 (XJ) Cherokee (Domestic Market)
NOTE : This bulletin applies to all 2001 model year XJ vehicles equipped with a 4.0L engine, automatic transmission, and a 50 state emissions package (sales code NAS) If the vehicle is a 2000 model year 4.0L XJ this bulletin applies only if the vehicle is equipped with an automatic transmission and has a California level emissions package (sales code NAE).
SYMPTOM/CONDITION:
The customer may describe a 20 to 30 second rough idle following the restart of a heat soaked engine. This condition may be most noticeable when the engine is restarted following a 10 to 20 minute heat soak in hot ambient conditions of approximately 32�C (90�F) or higher. This condition may be consistent with short city stop-and-go driving trips and can be aggravated by the use of fuel with high ethanol content.
The new software lowers the temperature threshold used to determine when the engine cooling fans are turned on. The cooling fans will cycle on more often.
DIAGNOSIS:
Using a Scan Tool (DRBIII(R)) with the appropriate Diagnostic Procedures Manual, verify all engine systems are functioning as designed. If DTCs are present record them on the repair order and repair as necessary before proceeding further with this bulletin.
Verify that Service Bulletin 18-031-03 has been performed.
If the customer describes the Symptom/Condition, perform the Repair Procedure.
################################################## #
NOTE :Whenever a controller is programmed, the software in the DRBIII(R); must be programmed with the latest revision level available.
NOTE :If this flash process is interrupted/aborted, the flash should be restarted and then follow the directions on the DRBIII(R)
1.With the ignition switch in the "RUN" position, determine the original part number of the PCM currently in the vehicle. Using the DRBIII(R) select:
a."DRBIII(R) Standalone"
b."1998 - 2004 Diagnostics"
c."All (Except Below)"
d."Engine"
e."Module Display"
f.Record the first ten (10) characters of the "PCM part # " on the repair order for later reference.
NOTE :If the PCM is not operational, the part number can be obtained from the label on the old controller. If the label on the controller is not legible, proceed to next step.
2.Page back to the "Main Menu"
3.Determine if the vehicle is equipped with SKIM. Using the DRBIII(R) select:
a."DRBIII(R) Standalone"
b."1998 - 2004 Diagnostics"
c."All"
d."System Monitor"
e."J1850 Module Scan"
f.Look for "SKIM" in the list of modules.
4.If the vehicle is not equipped with SKIM then proceed to step 5. If the vehicle is equipped with SKIM obtain the vehicle Personal Identification Number (PIN) before continuing with step 5. This information is available from one of the following:
a.The original selling invoice.
b.The DealerCONNECT system under the "Sales" or "Parts" tabs - select "Key Codes".
c.By contacting the District Manager.
CAUTION :Failure to install the SKIM pin number into the module after flashing the PCM will cause a start and stall condition.
5.Open the hood, install a battery charger and verify battery state is above 11.5 volts.
6.If the old "PCM part # " is known, proceed to step 12. If the old "PCM part # " is not known, proceed to next step.
7.On DealerCONNECT select the "Service" tab.
8.Select "Vehicle Information Plus".
9.Manually enter the VIN and mileage and select "Enter".
10.Select the "Vehicle Option" tab.
11.Under the "Vehicle Option" window, identify and record:
a.Engine.
b.Emissions (Federal or California)
c.Transmission (Automatic, 5-speed manual, etc.).
12.Connect the DRBIII(R) to TechCONNECT and the vehicle. Open TechTOOLS and verify that the "DRBIII(R) Status: Connected" message is in the upper right corner of the TechTOOLS screen.
13.TechTOOLS should automatically populate the VIN in the "Vehicle Criteria" area and the available updates. If not, manually enter the VIN then TechTOOLS will populate the available updates.
14.Determine the proper calibration:
a.If the old "PCM part # " is known, enter the part number of the old controller in the "Parts Criteria" pin window. Proceed to step 15.
b.If the old "PCM part # " is not known, select the correct calibration based on the information that was recorded from "Vehicle Options" in step 11. Proceed to step 16.
15.Select the correct calibration.
16.Select the "Download/Update" button.
17.Monitor the "Flash Download/Update Progress" window on the TechCONNECT and follow the instructions on TechCONNECT DRBIII(R). When the flash process is completed, proceed to next step.
18.Enter the VIN in the PCM. Using the DRBIII(R) select:
a."DRBIII(R) Standalone"
b."1998 - 2004 Diagnostics"
c."All"
d."Engine"
e."Miscellaneous"
f."Check VIN"
g.If the vehicle is not equipped with SKIM proceed to step 18h. If the vehicle is equipped with SKIM follow the directions on the DRBIII(R). When the VIN and SKIM key has been programmed, proceed to step 19.
h.Enter the VIN as requested by the DRBIII(R).
19.Update the PCM mileage. Using the DRBIII(R) select:
a."DRBIII(R) Standalone"
b."1998 - 2004 Diagnostics"
c."All (Except Below)"
d."Engine"
e."Miscellaneous"
f."Check PCM Odometer"
g."NO"
h.Enter the current odometer mileage and then press "Enter"
i.Cycle the ignition key to the OFF position and back to the ON position and then press "Enter".
20.Reset pinion factor if necessary. Refer to the service information available in TechCONNECT or the appropriate service manual, section 8E, Electronic Control Modules.
NOTE ue to the PCM programming procedure, a DTC may be set in other modules (TCM, BCM, MIC, SKIM, etc.) within the vehicle, if so equipped. Some DTC's may cause the MIL to illuminate. Check all modules using "Module Scan", record the DTC's, and erase these DTC's prior to returning the vehicle to the customer. Erase any DTC's in the PCM only after all other modules have had their DTC's erased.
NUMBER: 18-039-03
GROUP: Vehicle Performance
DATE: November 14, 2003
THIS BULLETIN is BEING PROVIDED IN ADVANCE. THE SOFTWARE WILL BE AVAILABLE ON TechCONNECT ON OR AFTER DECEMBER 09, 2003.
SUBJECT:
4.0L Rough Idle Due To High Ambient or Hot Soak Temperatures
OVERVIEW:
This bulletin involves selectively erasing and reprogramming the Powertrain Control Module (PCM) with new software.
MODELS:
2000 - 2001 (XJ) Cherokee (Domestic Market)
NOTE : This bulletin applies to all 2001 model year XJ vehicles equipped with a 4.0L engine, automatic transmission, and a 50 state emissions package (sales code NAS) If the vehicle is a 2000 model year 4.0L XJ this bulletin applies only if the vehicle is equipped with an automatic transmission and has a California level emissions package (sales code NAE).
SYMPTOM/CONDITION:
The customer may describe a 20 to 30 second rough idle following the restart of a heat soaked engine. This condition may be most noticeable when the engine is restarted following a 10 to 20 minute heat soak in hot ambient conditions of approximately 32�C (90�F) or higher. This condition may be consistent with short city stop-and-go driving trips and can be aggravated by the use of fuel with high ethanol content.
The new software lowers the temperature threshold used to determine when the engine cooling fans are turned on. The cooling fans will cycle on more often.
DIAGNOSIS:
Using a Scan Tool (DRBIII(R)) with the appropriate Diagnostic Procedures Manual, verify all engine systems are functioning as designed. If DTCs are present record them on the repair order and repair as necessary before proceeding further with this bulletin.
Verify that Service Bulletin 18-031-03 has been performed.
If the customer describes the Symptom/Condition, perform the Repair Procedure.
################################################## #
NOTE :Whenever a controller is programmed, the software in the DRBIII(R); must be programmed with the latest revision level available.
NOTE :If this flash process is interrupted/aborted, the flash should be restarted and then follow the directions on the DRBIII(R)
1.With the ignition switch in the "RUN" position, determine the original part number of the PCM currently in the vehicle. Using the DRBIII(R) select:
a."DRBIII(R) Standalone"
b."1998 - 2004 Diagnostics"
c."All (Except Below)"
d."Engine"
e."Module Display"
f.Record the first ten (10) characters of the "PCM part # " on the repair order for later reference.
NOTE :If the PCM is not operational, the part number can be obtained from the label on the old controller. If the label on the controller is not legible, proceed to next step.
2.Page back to the "Main Menu"
3.Determine if the vehicle is equipped with SKIM. Using the DRBIII(R) select:
a."DRBIII(R) Standalone"
b."1998 - 2004 Diagnostics"
c."All"
d."System Monitor"
e."J1850 Module Scan"
f.Look for "SKIM" in the list of modules.
4.If the vehicle is not equipped with SKIM then proceed to step 5. If the vehicle is equipped with SKIM obtain the vehicle Personal Identification Number (PIN) before continuing with step 5. This information is available from one of the following:
a.The original selling invoice.
b.The DealerCONNECT system under the "Sales" or "Parts" tabs - select "Key Codes".
c.By contacting the District Manager.
CAUTION :Failure to install the SKIM pin number into the module after flashing the PCM will cause a start and stall condition.
5.Open the hood, install a battery charger and verify battery state is above 11.5 volts.
6.If the old "PCM part # " is known, proceed to step 12. If the old "PCM part # " is not known, proceed to next step.
7.On DealerCONNECT select the "Service" tab.
8.Select "Vehicle Information Plus".
9.Manually enter the VIN and mileage and select "Enter".
10.Select the "Vehicle Option" tab.
11.Under the "Vehicle Option" window, identify and record:
a.Engine.
b.Emissions (Federal or California)
c.Transmission (Automatic, 5-speed manual, etc.).
12.Connect the DRBIII(R) to TechCONNECT and the vehicle. Open TechTOOLS and verify that the "DRBIII(R) Status: Connected" message is in the upper right corner of the TechTOOLS screen.
13.TechTOOLS should automatically populate the VIN in the "Vehicle Criteria" area and the available updates. If not, manually enter the VIN then TechTOOLS will populate the available updates.
14.Determine the proper calibration:
a.If the old "PCM part # " is known, enter the part number of the old controller in the "Parts Criteria" pin window. Proceed to step 15.
b.If the old "PCM part # " is not known, select the correct calibration based on the information that was recorded from "Vehicle Options" in step 11. Proceed to step 16.
15.Select the correct calibration.
16.Select the "Download/Update" button.
17.Monitor the "Flash Download/Update Progress" window on the TechCONNECT and follow the instructions on TechCONNECT DRBIII(R). When the flash process is completed, proceed to next step.
18.Enter the VIN in the PCM. Using the DRBIII(R) select:
a."DRBIII(R) Standalone"
b."1998 - 2004 Diagnostics"
c."All"
d."Engine"
e."Miscellaneous"
f."Check VIN"
g.If the vehicle is not equipped with SKIM proceed to step 18h. If the vehicle is equipped with SKIM follow the directions on the DRBIII(R). When the VIN and SKIM key has been programmed, proceed to step 19.
h.Enter the VIN as requested by the DRBIII(R).
19.Update the PCM mileage. Using the DRBIII(R) select:
a."DRBIII(R) Standalone"
b."1998 - 2004 Diagnostics"
c."All (Except Below)"
d."Engine"
e."Miscellaneous"
f."Check PCM Odometer"
g."NO"
h.Enter the current odometer mileage and then press "Enter"
i.Cycle the ignition key to the OFF position and back to the ON position and then press "Enter".
20.Reset pinion factor if necessary. Refer to the service information available in TechCONNECT or the appropriate service manual, section 8E, Electronic Control Modules.
NOTE
ue to the PCM programming procedure, a DTC may be set in other modules (TCM, BCM, MIC, SKIM, etc.) within the vehicle, if so equipped. Some DTC's may cause the MIL to illuminate. Check all modules using "Module Scan", record the DTC's, and erase these DTC's prior to returning the vehicle to the customer. Erase any DTC's in the PCM only after all other modules have had their DTC's erased.