Jeep Cherokee 1984-2001: How to Replace Rear Main Seal
Oil leaks from the engine or the transmission are a hassle because they leave unsightly spots. It can also coat the bottom of your truck with ugly oil and can cause you to constantly monitor as well as top off the oil level.
This article applies to the Jeep Cherokee XJ (1984-2001).
The engine's rear main seal is the primary oil seal on the back of the crankshaft. The seal is located at the last bearing in the crankshaft on the rear of the engine block. The transmission is bolted to the back of the engine with the flywheel and starter ring gear visible beside the seal. The seal is exposed to repeated hot as well as cold cycling, and must seal a rotating shaft. These two facts commonly cause failure of the rear main seal. Sealing a rotating shaft is one of the most demanding engineering tasks in a car or truck's powertrain hydraulic system. Small scores or scratches (as small as .002mm for example) can cause a small, yet significant, oil leak at the rear main seal. If your rear main is leaking, it's time to handle it.

Materials Needed
- Rear main seal replacement
- Engine oil for refill
- Engine oil pan gasket
- Assortment of sockets and ratchet for oil pan bolts
- Drain pan for collecting engine oil
- Needle nose pliers
- Torque wrench capable of 80 ft-lbs
- Rubber mallet (optional)
- Small screwdriver
Step 1 – Lift truck, drain oil, and remove pan
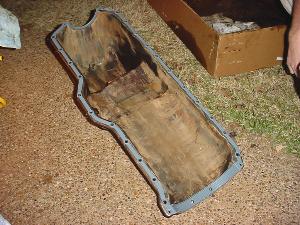
Safely lift and secure the truck with jack stands in order to gain clearance to the oil pan. Remove the drain plug from the engine oil pan and allow the oil to drain into the drain pan. Using the appropriate size socket and ratchet, remove all of the bolts on the perimeter of the engine oil pan. Gently lower the engine pan and set to the side.

Pro Tip
If the truck has many miles and the oil pan has never been removed, it might prove difficult to remove. Using a rubber mallet, gently hit the sides of the oil pan, working around all four sides of the pan. This tapping action should slowly free the sealed gasket.
It is usually not a good idea to pry the pan free (using a screwdriver) between the pan and engine mating surfaces. It is possible to scratch the surface and a large scratch can become a leak path for oil in the future.
(Related Article: How to Jack Up Your Car - CherokeeForum.com)
Step 2 – Remove the rear bearing cap
Use the appropriate size socket and a long ratchet—a 12" breaker bar may be appropriate because of the high torque on the bearing cap bolts— to remove the bolts. Take care not to round off the bolts' heads or break the bolts. A firm, yet gentle, hand is best for removing these bolts. When the bolts are removed, gently remove the bearing cap. You will see half of the seal in the bearing cap and other half of the seal inside the groove in the engine block.

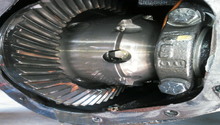
Figure 2. Rear main seal assembly. 
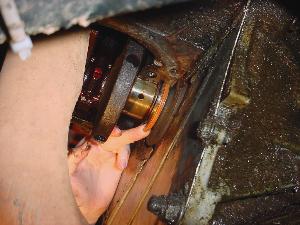
Figure 3. Bearing cap bolts. 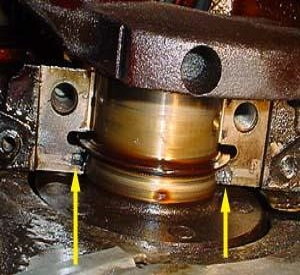
Figure 4. Bearing cap removed.
Pro Tip
Be careful not to score, scratch or damage the polished bearing surfaces on the crankshaft or the bearing cap. Also, it is very important to be as clean as possible when the bearing cap is removed; sand and dust can be lethal to the bearing surfaces.
Step 3 – Remove old seal from bearing cap and engine block
Remove the bottom half of the seal from the bearing cap. Use a small tool like a large pin or small screwdriver to pick out the seal if necessary. Be careful not to scratch the bearing surface.

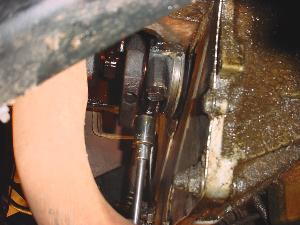
Remove the top half of the seal from engine block. Use a small tool to push the seal from one end of the groove around the groove of the other side. Only a small end of the seal is exposed on either side and it can be difficult to get the seal moved enough to grab one end. Once one end of the seal is exposed, use needle nose pliers and pull the seal through the groove.
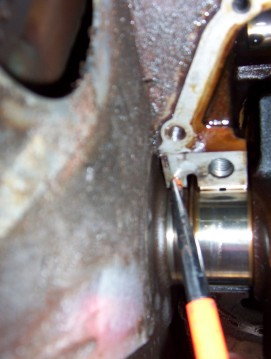
Figure 6. Pushing the top half seal. 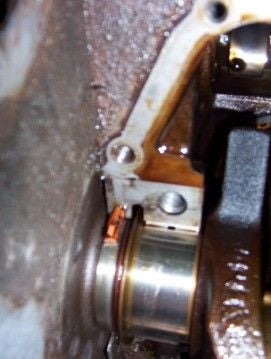
Figure 7. Small piece of seal is exposed. 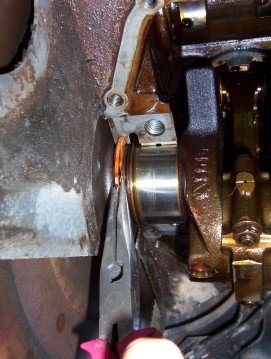
Figure 8. Pulling out the top half of the seal.
Step 4 – Install new seal
Install the new seal into the bearing cap and into the engine block. Apply a small amount of soap to the seal surface that contacts the block. Apply a small mouth of engine oil to the lip of the seal. Push the seal into the engine block, ensuring the seal lip faces the front of the engine.
- Install the seal into the bearing cap. Coat the seal with soap and oil just as you did with the top half of the seal. Ensure the seal is orientated correctly in the bearing cap.

- Apply gasket maker to the ends of the bearing cap and mating surface of the engine block.

Step 5 – Install bearing cap onto engine block
Install the bearing cap and insert the bolts. The bolts must be torqued in a specific sequence to ensure the proper torque on the bearing cap.
This is the torque sequence:
- Torque bolts to 40 ft-lbs.
- Torque bolts to 70 ft-lbs.
- Torque bolts to 80 ft-lbs.
Step 6 – Reassemble
To install the oil pan, it is the reverse of the initial disassembly. Since everything inside the motor has already been done, all you need to do it reinstall the oil pan (with new gasket). Torque the pan bolts in a "criss-cross" pattern to approximately 20 ft-lbs. Do not over-tighten the pan bolts because they strip easily. Don't forget to refill the engine oil. Now may be a good time to also replace the engine oil filter and complete the service.
Featured Video: How to Fix a Rear Main Seal
Related Discussions
- Rear Main Seal Replacement - CherokeeForum.com
- Rear Main Seal - CherokeeForum.com
- Rear Main Seal Questions - CherokeeForum.com
- Leak After Changing Rear Main Seal - CherokeeForum.com
- Rear Main Seal Blown - CherokeeForum.com