Fallon's Build Thread
 09-13-2013, 11:53 AM
#31
Member
Thread Starter
Join Date: Sep 2013
Location: White Springs, FL
Posts: 161
Likes: 0
Received 0 Likes
on
0 Posts
Year: 1990
Model: Cherokee
Engine: 4.0
My youngest, Cameron, has company. Cam was supposed to spread the play sand out in the driveway so it would dry. I can see that will take longer than expected.
And the 33" spare tire from my son Clay's CJ5, up next to the XJ. This is our goal.
And the 33" spare tire from my son Clay's CJ5, up next to the XJ. This is our goal.
 09-14-2013, 09:34 AM
#32
Seasoned Member
Join Date: Jul 2010
Location: NE FL
Posts: 337
Likes: 0
Received 0 Likes
on
0 Posts
Year: 1997
Model: Cherokee
Engine: 4.0
The stock shackles may be fine. Sometimes they can bind on the relocators depending on the angle created.
That's good getting Cameron involved. Now he can say he helped with his big brothers Jeep!
Coming along nicely!
That's good getting Cameron involved. Now he can say he helped with his big brothers Jeep!
Coming along nicely!
09-14-2013, 11:56 AM
#33
Member
Thread Starter
Join Date: Sep 2013
Location: White Springs, FL
Posts: 161
Likes: 0
Received 0 Likes
on
0 Posts
Year: 1990
Model: Cherokee
Engine: 4.0
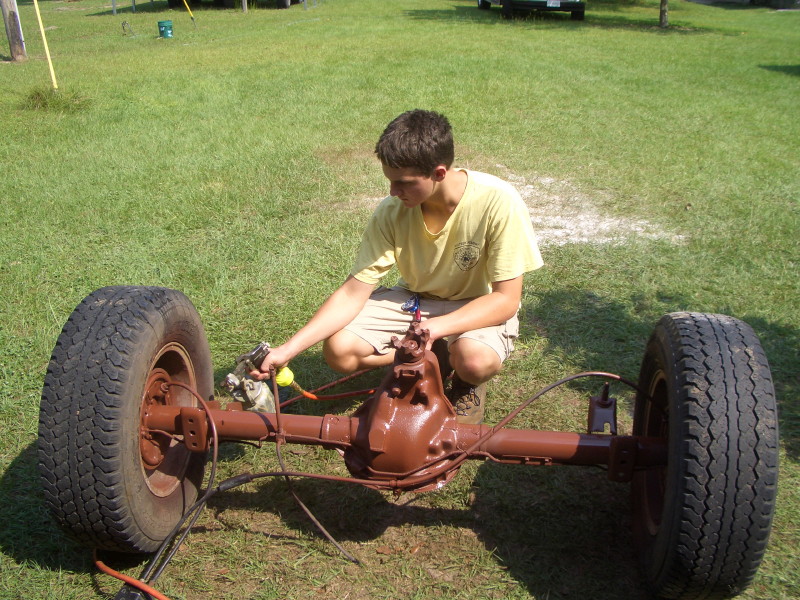
Cameron's "favorite " shop work is wire-wheeling stuff on the bench grinder. He makes old, rusty bolts look new!
 09-14-2013, 12:12 PM
#34
Member
Thread Starter
Join Date: Sep 2013
Location: White Springs, FL
Posts: 161
Likes: 0
Received 0 Likes
on
0 Posts
Year: 1990
Model: Cherokee
Engine: 4.0
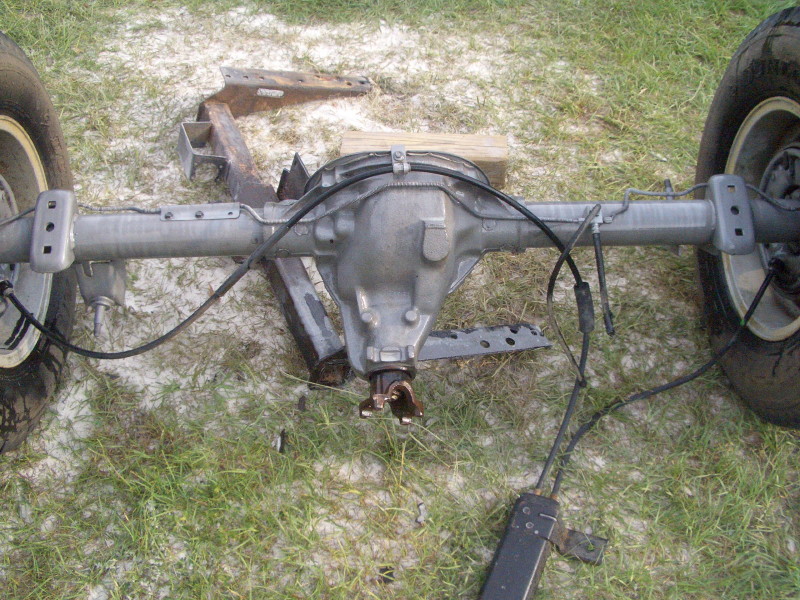
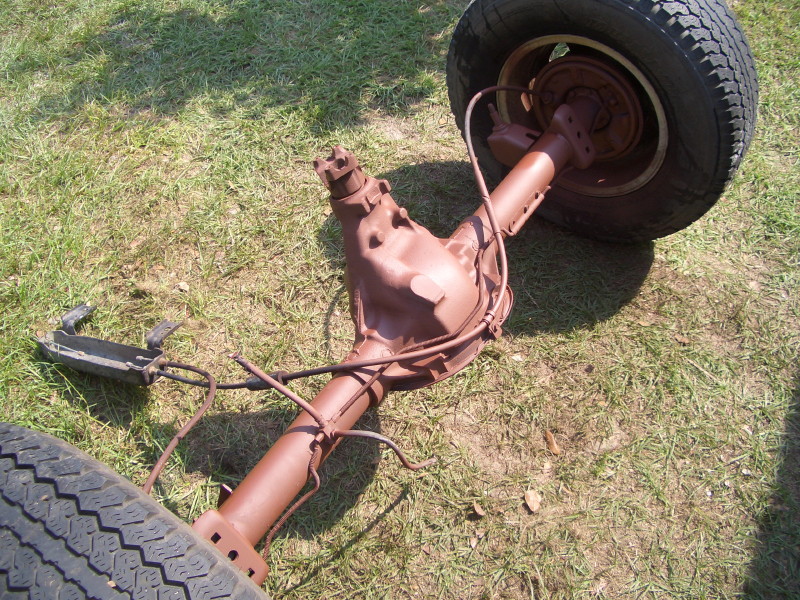
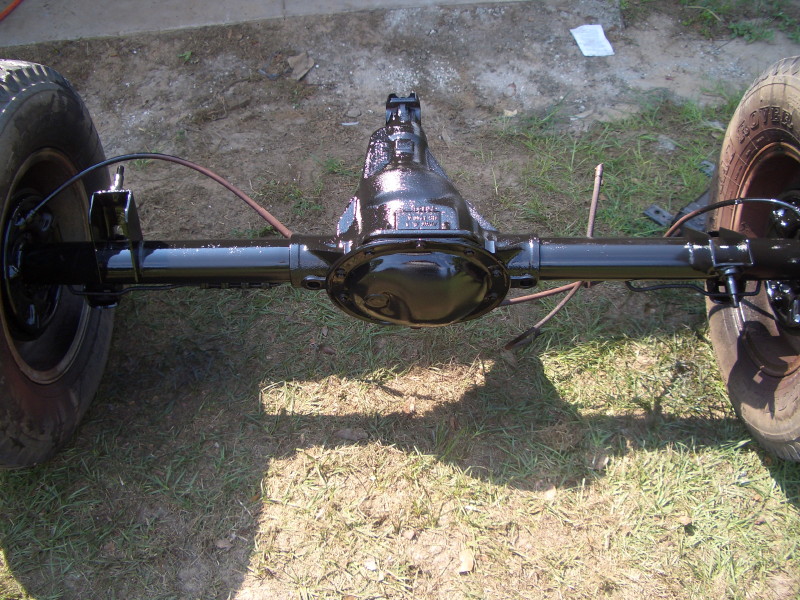
Here is the axle sequence all at once. We just finished painting it, and we're waiting for it to dry. Should definitely get it back up under Fal"s rig today. Rain is 40% around 3:00... gotta hurry!
I will redo the rear brakes since we're "in there". I work PT at Auto Zone and I get 20% off parts, so that helps some.
This is sandblasting with a 100# HF blaster, which works fair to good, Ospho on rusty metal, and Rustoleum paints applied with a suction gun.
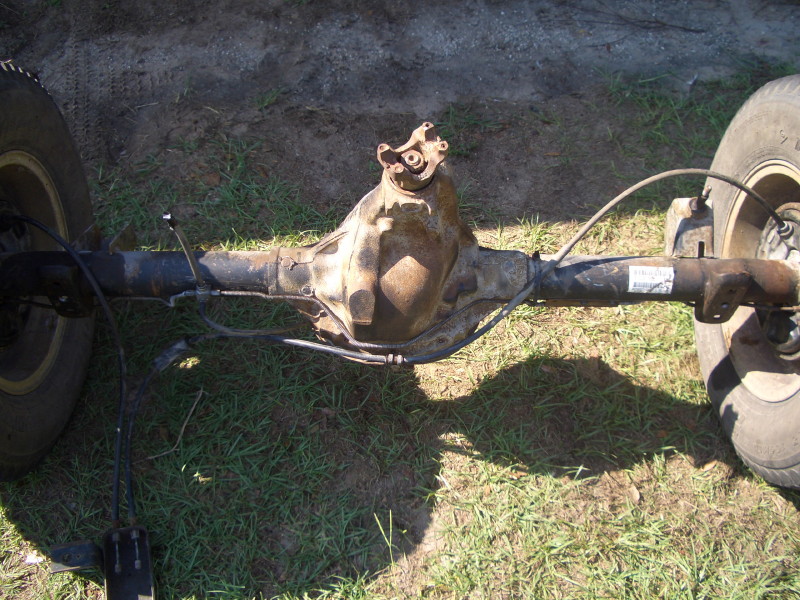
C8.25 with 3.55 ratio ready for blasting.
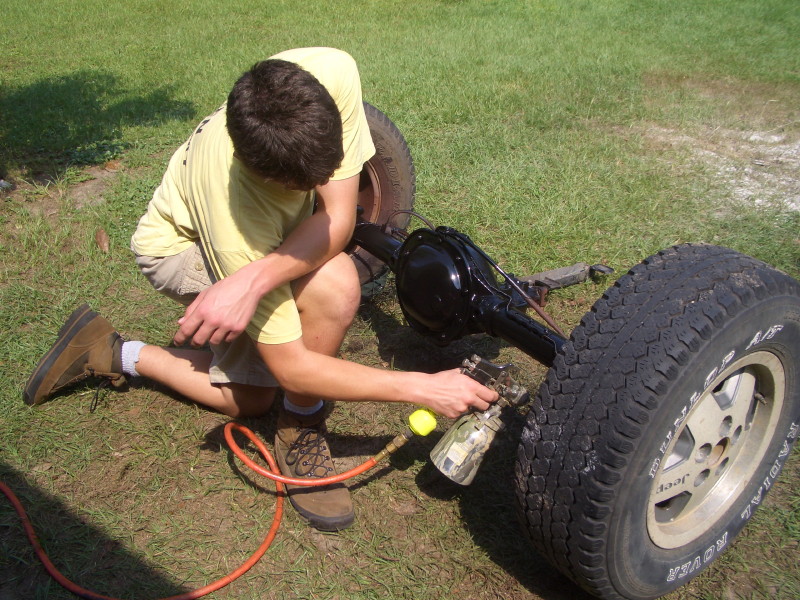
Fallon blasting the axle using dried out play sand. Not the best material to use, but only thing available locally. I rank sandblasting up there with concrete work and house painting! NOT desirable...

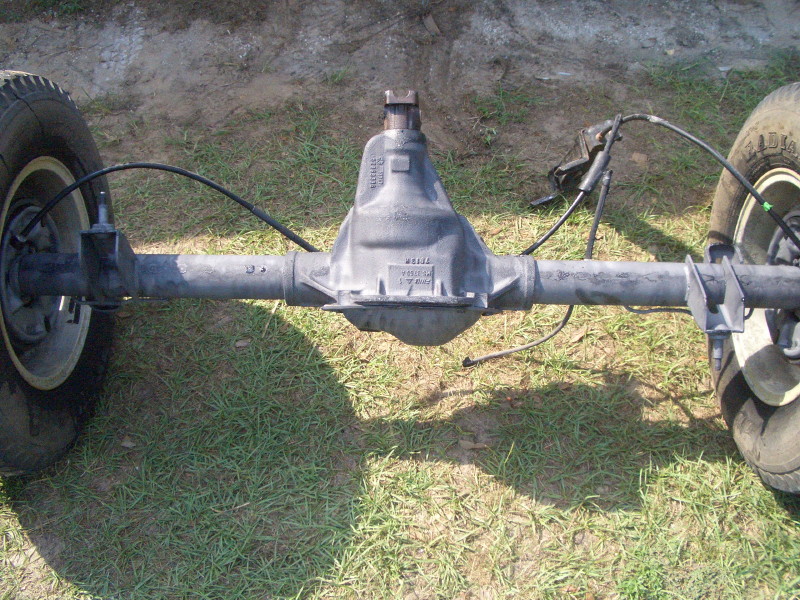
Axle is finished. Looks brand new.

Flash rust on housing immediately after washing the dust off the axle. happens before your eyes!
Axle as it appears immediately after Ospho is applied. Rust is gone!
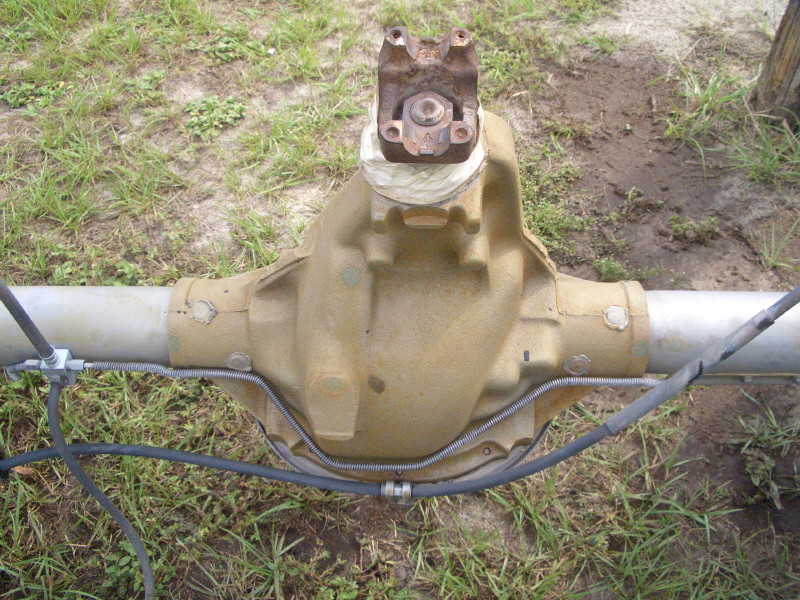
Axle with Ospho 24 hours later. Notice the color change in the metal. Brush off loose dust and paint it.
Paints being used.

Fal applying rusty metal primer.
Primer done. Thinned the material 15% with Acetone for spraying. Went on very well, good cover.
Fal applying finish coat. Same thinning process.
Waiting for it to dry so we can reinstall.
And that brings you up to where we are right now. Fal is removing his headliner and doing other things to fill in our time. He doesn't like his Jeep being in this state! I understand that, but wait until it goes back together!!
I will redo the rear brakes since we're "in there". I work PT at Auto Zone and I get 20% off parts, so that helps some.
This is sandblasting with a 100# HF blaster, which works fair to good, Ospho on rusty metal, and Rustoleum paints applied with a suction gun.
C8.25 with 3.55 ratio ready for blasting.

Fallon blasting the axle using dried out play sand. Not the best material to use, but only thing available locally. I rank sandblasting up there with concrete work and house painting! NOT desirable...

Axle is finished. Looks brand new.

Flash rust on housing immediately after washing the dust off the axle. happens before your eyes!

Axle as it appears immediately after Ospho is applied. Rust is gone!

Axle with Ospho 24 hours later. Notice the color change in the metal. Brush off loose dust and paint it.

Paints being used.

Fal applying rusty metal primer.

Primer done. Thinned the material 15% with Acetone for spraying. Went on very well, good cover.

Fal applying finish coat. Same thinning process.

Waiting for it to dry so we can reinstall.

And that brings you up to where we are right now. Fal is removing his headliner and doing other things to fill in our time. He doesn't like his Jeep being in this state! I understand that, but wait until it goes back together!!
09-14-2013, 03:35 PM
#35
Seasoned Member
Join Date: Jul 2010
Location: NE FL
Posts: 337
Likes: 0
Received 0 Likes
on
0 Posts
Year: 1997
Model: Cherokee
Engine: 4.0
Originally Posted by pittman71 View Post
The stock shackles may be fine. Sometimes they can bind on the relocators depending on the angle created.
That's good getting Cameron involved. Now he can say he helped with his big brothers Jeep!
Coming along nicely!
The stock shackles may be fine. Sometimes they can bind on the relocators depending on the angle created.
That's good getting Cameron involved. Now he can say he helped with his big brothers Jeep!
Coming along nicely!
Fallon did a great job refinishing the axle.
 Now lets see that baby under the XJ!
Last edited by pittman71; 09-14-2013 at 03:38 PM.
09-14-2013, 08:12 PM
#36
Member
Thread Starter
Join Date: Sep 2013
Location: White Springs, FL
Posts: 161
Likes: 0
Received 0 Likes
on
0 Posts
Year: 1990
Model: Cherokee
Engine: 4.0
Okay! Per Pittman... here is the final pic sequence of the axle install. I gotta say this... HOLY CRAP! Is this real? Did I do something wrong? I was expecting 3 or 4 inches. I got 10.5"!! We went from 19.5" to 30". It is so dad-gum COOL! I believe the 33s will fit without any problems. I still plan to cut and fold. Had to get some new U-bolts, 3"X8". Think I'll drive it like this for a couple weeks. Think of all the Redneck class!
I believe I will have to move the spring perches.
I believe I will need SYE.
What are longarms?
How do I order front springs??

Here's the final pics.
I believe I will have to move the spring perches.
I believe I will need SYE.
What are longarms?
How do I order front springs??
Here's the final pics.
09-14-2013, 11:30 PM
#37
Senior Member
Join Date: Jun 2012
Posts: 506
Likes: 0
Received 0 Likes
on
0 Posts
Year: 2001
Man that looks awesome!!! And to answer the question about long arms, they're basically control arms that attach further back on the Jeep, most of the time there's a new trans crossmember that comes with the long arm kit that the arms attach to. Reason for doing this is to eliminate bad control arm angles. With short arms (factory setup), when the Jeep is lifted, the arms get to extreme angles, who causes a bad ride quality and hurts the offroad performance as well. The short arms at bad angles bind up when they try to flex, because since they're pointed at the ground, they need to swing up, thus causing the Jeep to have to push itself backwards for the spring to be able to compress. Sorry for the wordiness haha, just figured I'd try to be thorough. Hopefully I was clear in what I said lol
09-15-2013, 03:02 PM
#38
Seasoned Member
Join Date: Jul 2010
Location: NE FL
Posts: 337
Likes: 0
Received 0 Likes
on
0 Posts
Year: 1997
Model: Cherokee
Engine: 4.0
Woah! Ten inches of lift is alot! What did the old leafs look like? If its a true ten you may want to think about removing a leaf from your BP. I know it seems like a bonus right now but will end up costing more in the long run. Besides you can fit 33s with less than half that amount of lift, especially with fender trimming.
09-15-2013, 03:22 PM
#39
Member
Thread Starter
Join Date: Sep 2013
Location: White Springs, FL
Posts: 161
Likes: 0
Received 0 Likes
on
0 Posts
Year: 1990
Model: Cherokee
Engine: 4.0
Man that looks awesome!!! And to answer the question about long arms, they're basically control arms that attach further back on the Jeep, most of the time there's a new trans crossmember that comes with the long arm kit that the arms attach to. Reason for doing this is to eliminate bad control arm angles. With short arms (factory setup), when the Jeep is lifted, the arms get to extreme angles, who causes a bad ride quality and hurts the offroad performance as well. The short arms at bad angles bind up when they try to flex, because since they're pointed at the ground, they need to swing up, thus causing the Jeep to have to push itself backwards for the spring to be able to compress. Sorry for the wordiness haha, just figured I'd try to be thorough. Hopefully I was clear in what I said lol
Woah! Ten inches of lift is alot! What did the old leafs look like? If its a true ten you may want to think about removing a leaf from your BP. I know it seems like a bonus right now but will end up costing more in the long run. Besides you can fit 33s with less than half that amount of lift, especially with fender trimming.
If I keep this, how do I get matching front springs? I read where you simply measure the amount of gain and buy that sized spring. I also read that Rusty's is the place to go. They show a 8.5-9.0 lift spring for $120. Am I thinking the right way?
Need ya'll's input...
Last edited by Kerrdog; 09-15-2013 at 03:29 PM.
09-15-2013, 06:15 PM
#41
CF Veteran
Join Date: Aug 2010
Location: Greensboro
Posts: 1,220
Received 0 Likes
on
0 Posts
Year: 1992
Model: Cherokee
Engine: 4.0L
The 8.25 axle has a larger tube diameter and also adds to your amount of lift over the d35. Also, give the leafs about a week or so to settle. Adding a couple hundred pounds in the rear will help accelerate that process.
To match the rear take the hub to body measurements stated above. That should get you off to a good idea of what coils you need.
To match the rear take the hub to body measurements stated above. That should get you off to a good idea of what coils you need.
09-15-2013, 06:39 PM
#42
Seasoned Member
Join Date: Jul 2010
Location: NE FL
Posts: 337
Likes: 0
Received 0 Likes
on
0 Posts
Year: 1997
Model: Cherokee
Engine: 4.0
09-16-2013, 09:44 PM
#43
Member
Thread Starter
Join Date: Sep 2013
Location: White Springs, FL
Posts: 161
Likes: 0
Received 0 Likes
on
0 Posts
Year: 1990
Model: Cherokee
Engine: 4.0
The 8.25 axle has a larger tube diameter and also adds to your amount of lift over the d35. Also, give the leafs about a week or so to settle. Adding a couple hundred pounds in the rear will help accelerate that process.
To match the rear take the hub to body measurements stated above. That should get you off to a good idea of what coils you need.
To match the rear take the hub to body measurements stated above. That should get you off to a good idea of what coils you need.
And thanks for the info on determining springs for up front. It's exciting! I lay in bed thinking of this stuff!
09-17-2013, 12:12 AM
#45
CF Veteran
Join Date: Aug 2010
Location: Greensboro
Posts: 1,220
Received 0 Likes
on
0 Posts
Year: 1992
Model: Cherokee
Engine: 4.0L
if it were drive-able you would see settling in about 2-3 with normal DD use. When I add new shackles it took a week for my leafs to return back to normal. Same happened when I did my axle swap.
I say get coils for the desired lift height and then remove/add leafs to match it.
As for long arms, it was day and night difference when I went to a 3 link over short arms. Ride quality and flex both skyrocketed in comparison to the short arms I had. Search around and find a used set or, if you're comfortable with it, build a set. I scored my 3 link arms for 200 and then got new mounts from the manufacture for another 200. This put me at half the cost of new.