Jeep Cherokee 1984-2001: Why is My Car Vibrating?
Jeep Cherokees are built with heavy duty suspensions. Over time, the components can get worn and cracked, which result in vibrations. Here's how to diagnose your vibration issues.
This article applies to the Jeep Cherokee XJ (1984-2001).
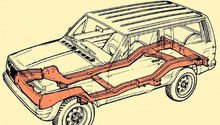
You Jeep Cherokee relies on many components that must remain in balance for it to drive smoothly. These components must attach to each other with no free play between them to achieve a responsive and tight steering feel. There are many parts that can create vibrations, including the suspension, steering, and wheels/tires; bushings and ball joints allow movement between the parts. When these fail, excessive movement and noise develops, which is felt by you as vibrations. Read on to learn about what you need to replace to retain your Jeep's smoothness.

Materials Needed
- Floor jack
- Jack stands (x2)
- Flashlight
- Pry bar
- Gloves
- Safety glasses
- Air compressor
- Tire inflation chuck
- Wheel chocks
Vibrations can come in many different forms. Observing the conditions that create the vibration along with an understanding of the parts involved will lead you to a solution. Vibrations at idle are caused only by the movement of the powertrain and drive shaft. Vibrations while driving are more likely to be caused by the wheels and tires. Play throughout front end components, such as the control arms and tie rod, results in vibrations/movement felt through the steering wheel while going over bumps.
Step 1 – Inspect the wheels and tires
The wheel and tire assembly must remain in correct balance to stay in proper contact with the road surface. An unbalanced wheel will wobble as it rotates, resulting in a contact area that moves from one side of the tire to the other.
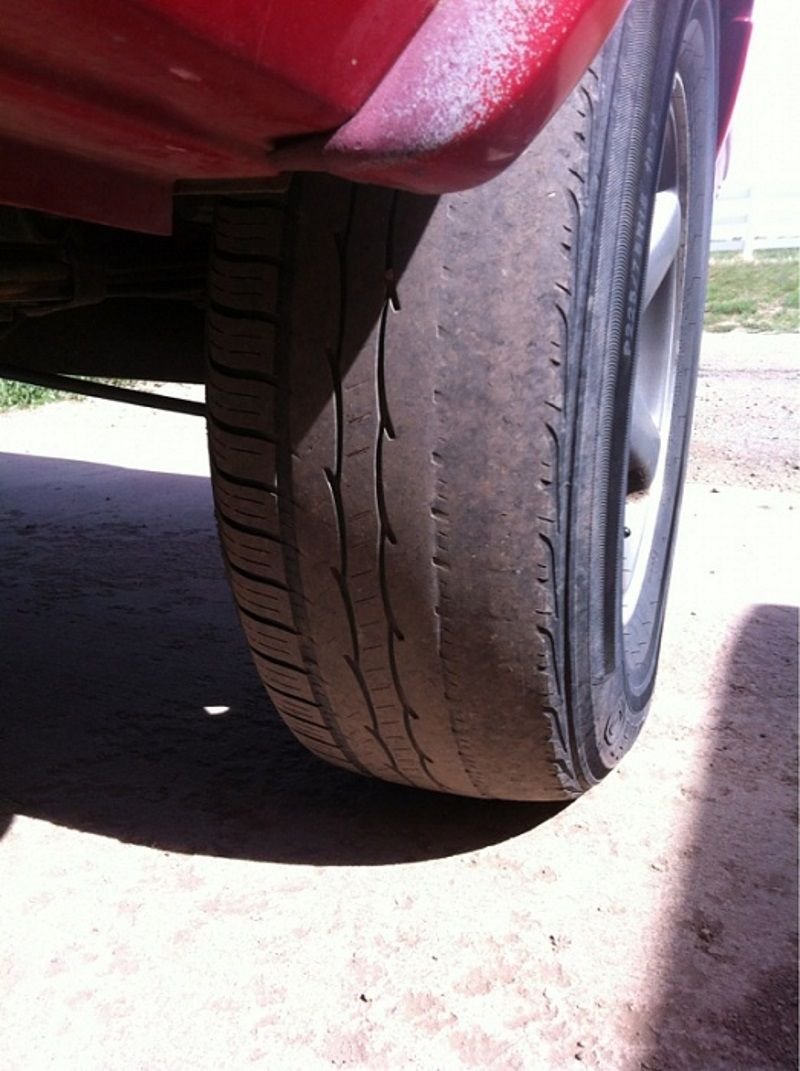
Tires must also remain at their recommended air pressure. A tire with low air will deform the steel and nylon belts inside the tire, creating uneven wear such as cupping and taper.
First, check the tire pressure of each wheel. There should be a tire placard sticker on the driver's side door jamb with the front and rear tire air pressures. The numbers are for original equipment tires only. If your tires are different, consult with the manufacturer for proper inflation levels. You can also find the tire pressure on the actual tire itself.

Once the tires are properly inflated, raise one of the wheels off the ground with a floor jack. If you're starting with a front tire, make sure the emergency brake is on. Place wheel chocks in front and behind the rear tires. Use the factory jacking point and place a jack stand near this point on the frame rail. A block of wood can be used between the jack stand and frame to reduce the chance of damage.

Figure 2. The front jacking point. 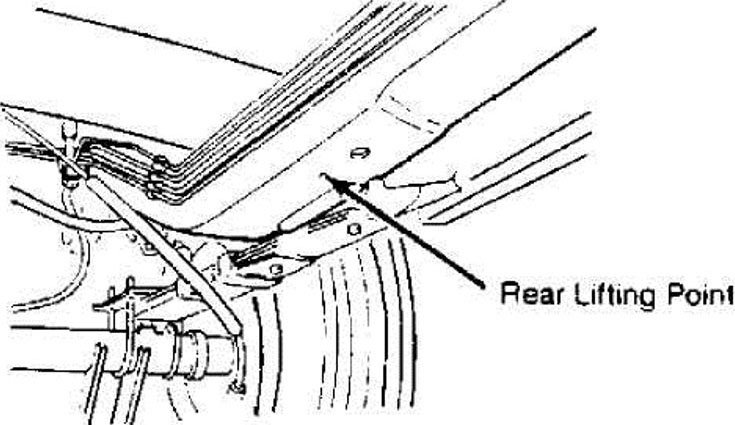
Figure 3. The rear jacking point.
With the wheel in the air, spin the wheel and watch for any in and out movements (wobbling). If movement is noticed, the wheel/tire assembly may be out of balance or the wheel may be bent.
As you rotate the wheel, look and feel for uneven wear throughout the tire's road contact area. If lumps and unevenness are noticed, chances are high that your tire has been at the wrong air pressure or the wheel/tire assembly is off balance. Your tire should not be worn past 2/32" in any location. The wheel may have been torqued incorrectly to the hub as well. Start by torquing the lug nuts to 100 ft/lbs. You will need to lower the wheel back onto the ground to do this so it doesn't turn. If torquing does not help, you'll need to take the wheel/tire to a shop with a wheel balancer for inspection. It's a good idea to have the car inspected/aligned while the tires are being balanced or replaced.
Related Articles
- How to Check Tire Pressure - CherokeeForum.com
- How to Check Tire Tread - CherokeeForum.com
Step 2 – Inspect engine and transmission mounts
These mounts use rubber inside of a metal housing to absorb vibrations generated by the movement of the powertrain. Fluid leaks and the effects of weather cause the rubber to crack as well as deteriorate. Sometimes a popping noise can be heard as the engine and transmission shift their positions in the mount. Cherokee owners with floor mounted shifters may notice the shifter move as the throttle is applied and released. This is another indication of possible engine/transmission mount damage. There are two motor mounts located on each side of the engine below the exhaust manifolds. The transmission mount is located on the bottom of the transmission above the crossmember.

Figure 5. The driver's side engine mount. 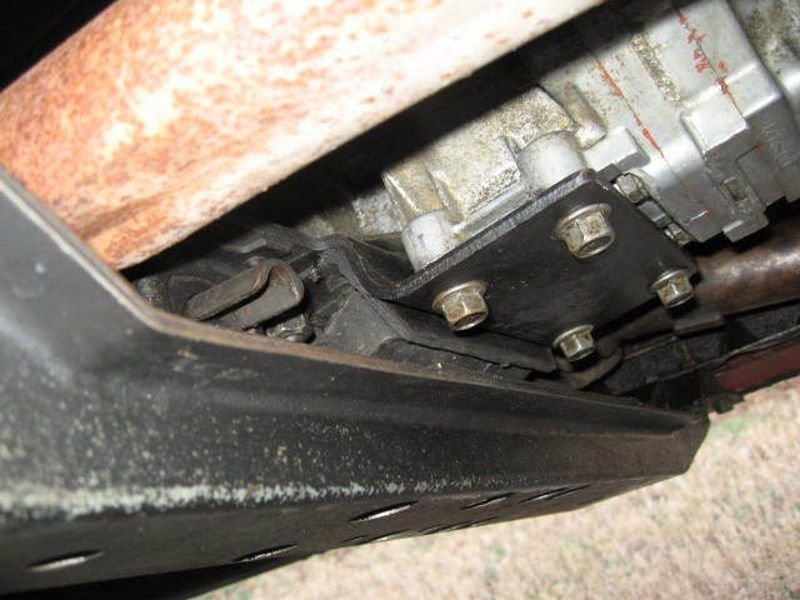
Figure 6. The transmission mount is held in place by four large bolts.
Step 3 – Inspect the drive shaft and U-joints
Drive shafts are internally and externally balanced for smooth operation. A slight bend or dent from an impact with an object can disrupt the smooth rotation, therefore creating vibration. This vibration usually gets worse as speed increases. The same can be said regarding U-joints. These are designed from the factory to operate at certain drive shaft angles. An aftermarket lift that does not account for the angle can damage the U-joints.
Pull and push on the pinions of the U-joint to check for free play. If any is noted, it needs to be replaced. To inspect a drive shaft, raise the rear wheels off the ground and watch as it rotates. Have someone vary the engine RPM. Any wobble to the drive shafts movement is indicative of a balance issue. You can have the drive shaft balanced by a shop if no damage is noted.

Figure 7. The U-joints and drive shaft. 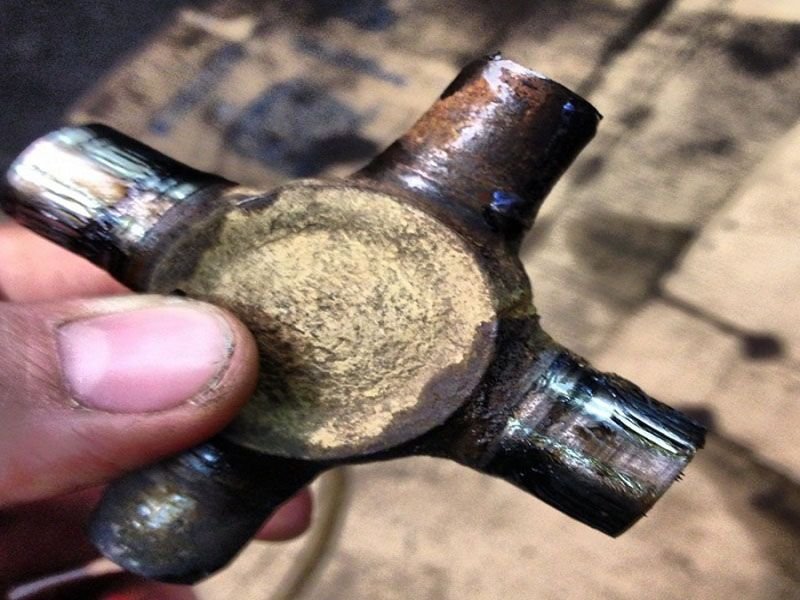
Figure 8. A badly damaged U-joint pinion.
Step 4 – Inspect the front end components
Wiggle the front end suspension and steering components with your hands to check for free play. A pry bar can also be used. Inspect the bushings and ball joints at the control arms. Also, check the pitman arm, drag link and track bar joints. Locate the sway bar end links and check them as well. If your Cherokee has a steering stabilizer, look for fluid leaking around its seals. It should compress and rebound smoothly. There must be a normal amount of weight on the wheels and tires during this test. If your Cherokee is being supported by a jack, your inspection will not be as accurate because the wear points may only be noticeable when the suspension is at rest (driving on the highway for example).

Related Discussions
- Vibration While Driving - CherokeeForum.com
- Steering Wheel Vibration - CherokeeForum.com