The tale of SuperMJ


 01-18-2018, 11:26 AM
#302
CF Veteran
Join Date: Oct 2013
Location: Greenville, SC
Posts: 5,920
Likes: 0
Received 190 Likes
on
165 Posts
Year: 1999
Model: Cherokee(XJ)
Engine: 4.0
Originally Posted by XJwonders
Just found out something really interesting. When completed I ll post pictures and maybe even a write up.
 01-22-2018, 12:38 PM
#305
CF Veteran
Thread Starter
Join Date: Jan 2013
Location: west chester, pa
Posts: 19,216
Likes: 0
Received 39 Likes
on
35 Posts
Year: 1999
Engine: 4.0
The thing is done.
I also finally put the Led festoon bulb in the other b-pillar light... last year I only put in the drivers side. Lame I know.
I also spliced in a XJ courtesy light socket & bracket under the dash on the drivers side. Put a LED in that also.
I probably will get around to doing the passenger side next year.
Also vacuumed the back of the MJ cab, behind the seat.
I was thinking about the air compressor... need ur opinion
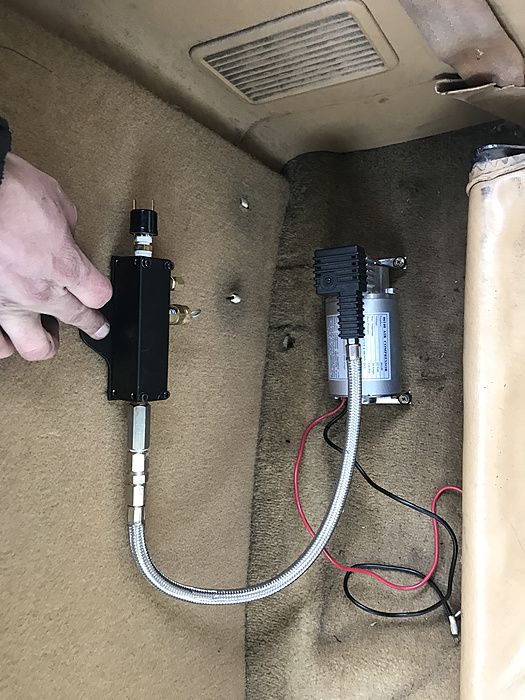
One is to lay the compressor flat on the side and plumb the manifold like so. My concern is that it could potentially look sloppy and amateurish, AND I'm not even sure about it being able to run on the side.
But it doesn't take up space.

And there's this option. Personally I like it.
The compressor would be sitting upright like intended. The manifold will still be mounted above it in both scenarios though.
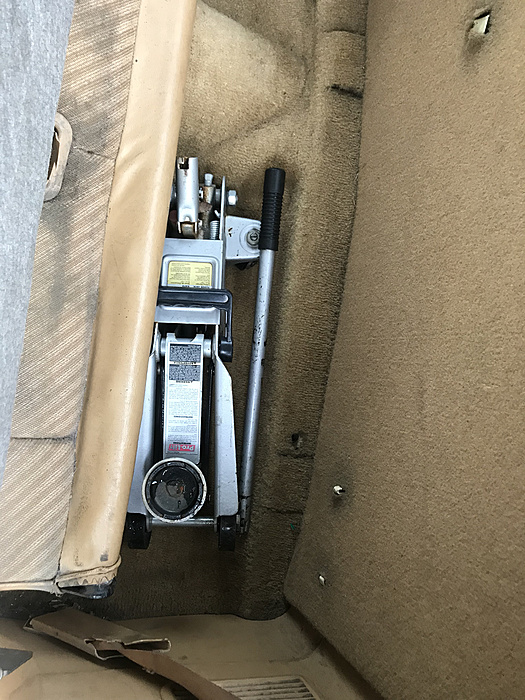
But for now I put in my jack in the spot. After the compressor is installed I ll probably move it to the passenger side later.
Hopefully I ll have time tonight to do a write up for the thingy.
I also finally put the Led festoon bulb in the other b-pillar light... last year I only put in the drivers side. Lame I know.
I also spliced in a XJ courtesy light socket & bracket under the dash on the drivers side. Put a LED in that also.
I probably will get around to doing the passenger side next year.
Also vacuumed the back of the MJ cab, behind the seat.
I was thinking about the air compressor... need ur opinion
One is to lay the compressor flat on the side and plumb the manifold like so. My concern is that it could potentially look sloppy and amateurish, AND I'm not even sure about it being able to run on the side.
But it doesn't take up space.

And there's this option. Personally I like it.
The compressor would be sitting upright like intended. The manifold will still be mounted above it in both scenarios though.

But for now I put in my jack in the spot. After the compressor is installed I ll probably move it to the passenger side later.

Hopefully I ll have time tonight to do a write up for the thingy.
01-22-2018, 01:22 PM
#306
CF Veteran
Join Date: Oct 2013
Location: Greenville, SC
Posts: 5,920
Likes: 0
Received 190 Likes
on
165 Posts
Year: 1999
Model: Cherokee(XJ)
Engine: 4.0
Originally Posted by XJwonders
The thing is done.
I also finally put the Led festoon bulb in the other b-pillar light... last year I only put in the drivers side. Lame I know.
I also spliced in a XJ courtesy light socket & bracket under the dash on the drivers side. Put a LED in that also.
I probably will get around to doing the passenger side next year.
Also vacuumed the back of the MJ cab, behind the seat.
I was thinking about the air compressor... need ur opinion
One is to lay the compressor flat on the side and plumb the manifold like so. My concern is that it could potentially look sloppy and amateurish, AND I'm not even sure about it being able to run on the side.
But it doesn't take up space.
Attachment 400832
And there's this option. Personally I like it.
The compressor would be sitting upright like intended. The manifold will still be mounted above it in both scenarios though.
Attachment 400831
But for now I put in my jack in the spot. After the compressor is installed I ll probably move it to the passenger side later.
Attachment 400833
Hopefully I ll have time tonight to do a write up for the thingy.
01-22-2018, 08:29 PM
#307
CF Veteran

Join Date: Apr 2016
Location: Pasquotank, NC
Posts: 1,679
Likes: 0
Received 15 Likes
on
13 Posts
Year: 1990
Model: Cherokee
Engine: 4.0
I'm not a small engine mechanic, but I think the vertical vs horizontal shaft mower analogy is a bad one. I believe (no knowledge, just assumption) that the two designs of engine consider oiling of critical components. I don't believe the manufacturers just rotate the same engine which ever way.
Typically oilled compressors are splash lubricated. As far as the compressor, if it has oil in it (completely ignorant to that compressor) then it will not get oil to all of the bearings if operated on it's side.
When I get around to a compressor setup on mine, I plan to fit it into the cubby on the passenger side interior panel in the cargo area.
Last edited by bad_idea; 01-22-2018 at 08:32 PM.
01-22-2018, 08:33 PM
#308
CF Veteran
Join Date: Oct 2013
Location: Greenville, SC
Posts: 5,920
Likes: 0
Received 190 Likes
on
165 Posts
Year: 1999
Model: Cherokee(XJ)
Engine: 4.0
Originally Posted by bad_idea
I'm not a small engine mechanic, but I think the vertical vs horizontal shaft mower analogy is a bad one. I believe (no knowledge, just assumption) that the two designs of engine consider oiling of critical components. For instance, in a splash lubricated engine things don't get oil if they don't splash.
As far as the compressor, if it has oil in it (completely ignorant to that compressor) then it will not get oil to all of the bearings if operated on it's side.
When I get around to a compressor setup on mine, I plan to fit it into the cubby on the passenger side interior panel in the cargo area.
As far as the compressor, if it has oil in it (completely ignorant to that compressor) then it will not get oil to all of the bearings if operated on it's side.
When I get around to a compressor setup on mine, I plan to fit it into the cubby on the passenger side interior panel in the cargo area.
01-22-2018, 08:36 PM
#309
CF Veteran
Join Date: Apr 2016
Location: Pasquotank, NC
Posts: 1,679
Likes: 0
Received 15 Likes
on
13 Posts
Year: 1990
Model: Cherokee
Engine: 4.0
One more foot in mouth moment for me. Disregard the cubby comment. I follow so many threads/builds that I forgot I was in an MJ build. (Title should have cleared that up, but it's early here)
01-22-2018, 08:47 PM
#310
CF Veteran
Join Date: Oct 2013
Location: Greenville, SC
Posts: 5,920
Likes: 0
Received 190 Likes
on
165 Posts
Year: 1999
Model: Cherokee(XJ)
Engine: 4.0
Originally Posted by bad_idea
One more foot in mouth moment for me. Disregard the cubby comment. I follow so many threads/builds that I forgot I was in an MJ build. (Title should have cleared that up, but it's early here)
01-23-2018, 09:38 AM
#311
CF Veteran
Thread Starter
Join Date: Jan 2013
Location: west chester, pa
Posts: 19,216
Likes: 0
Received 39 Likes
on
35 Posts
Year: 1999
Engine: 4.0
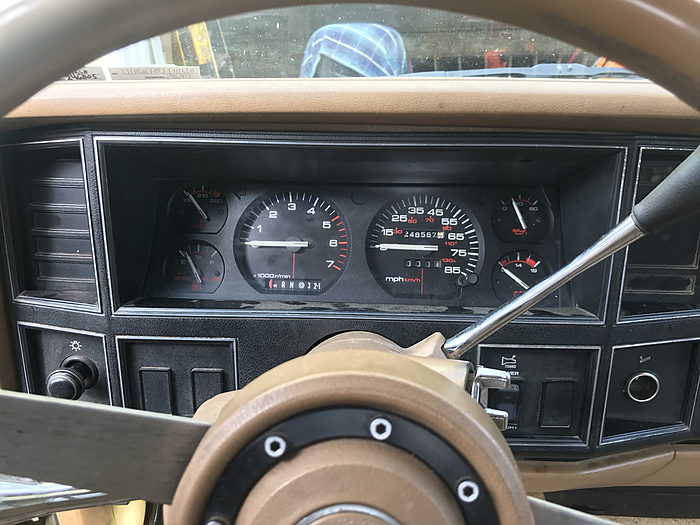
Here's my version of how to swap the "internals" of a full gauge cluster over to the idiot light body (housing).
So here's what happened that led me to do the retrofit.
I got my 88 Comanche little over a year ago and one of the features I didn't liked about it was the fact it had the idiot (3/4 gauge) light cluster. Add insult to the injury; it had the column shift, so it had the PRDNL indicator on the cluster.
I knew I had to get rid of it because when operating the Jeep, I liked to know the exact operating values of the various components to make sure they are within safe parameters. With the 3/4 cluster, it's impossible for me to know. The lights would just turn on when something goes wrong, as like if I'm an idiot.
How do you know if the engine is starting to overheat? No you won't know until it overheated. How am I supposed to stop the Jeep in time if I don't know when it's about to overheat? Stuff like that made me dislike 3/4 gauges.
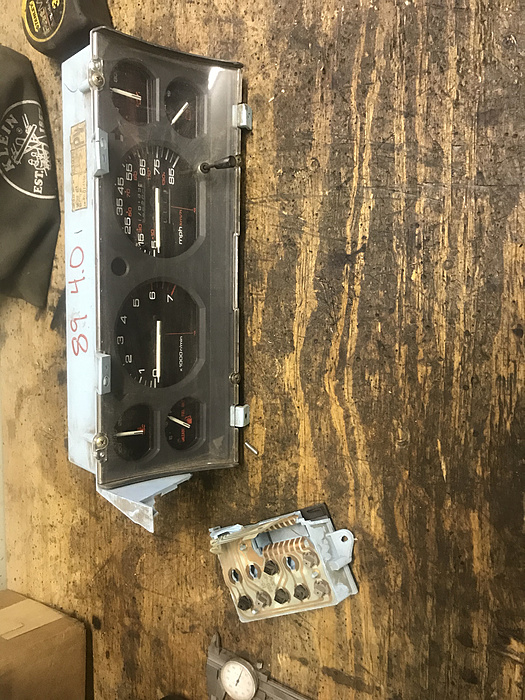
So I looked around and was able to procure a full gauge cluster from an esteemed member (username intentionally withdrawn to protect him from backlash and embarrassment) here on the forum. I paid and bought the cluster from one of his part-outs (89 XJ with 4.0L). Naturally I was excited when the box showed up at my doorstep.
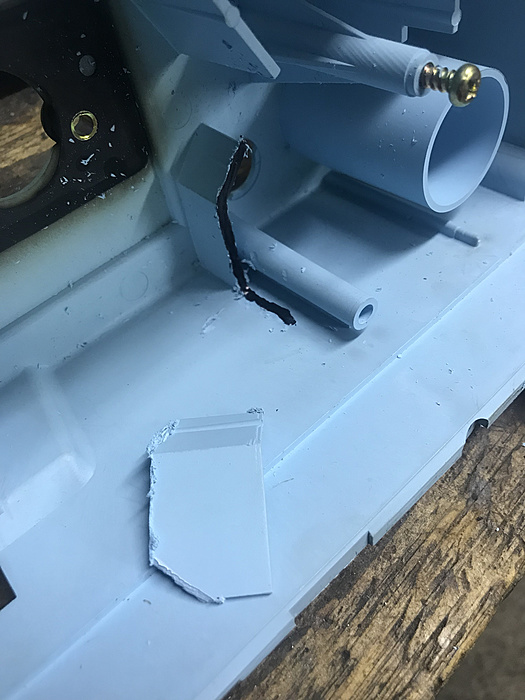
Except... this happened.
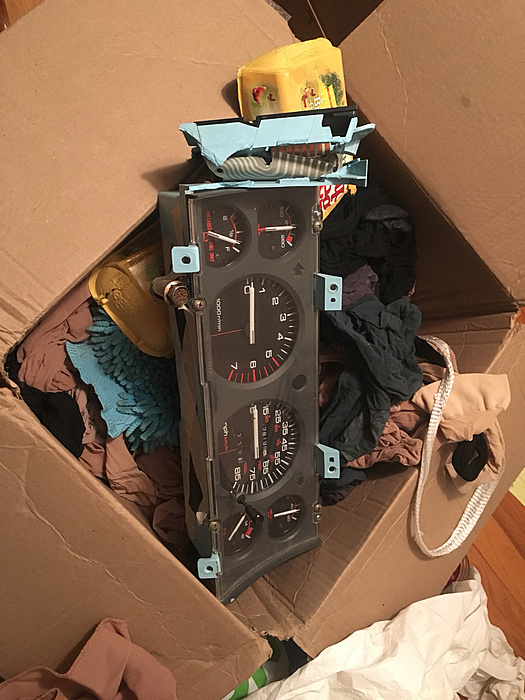
The member was like "It broke? Oh well, you can fix it".
Naturally I didn't feel like fixing it (I thought about using a soldering iron to melt the plastic together to repair the damage (I have successfully repaired plastics this way in the past)). So I decided to put it on the back burner for now.
Fast forward a year later.
I got fed up with driving with the 3/4 gauges. The oil pressure light kept lighting up every time I went over a bump. **** that ****.
I decided to go ahead with the swap. NOW, I could have done this earlier but there's a perfectly good reason why I kept delaying it...
I always planned on doing the 5 speed swap on the MJ, I figured I would just wait until I actually do the swap and then I ll change out the clusters (remember the PRNDL indicator).
Then I was thinking. Maybe I should just swap the housings with the internals from the full gauge cluster after the 5 speed swap.
Fast forward a year later. I still haven't done the 5 speed swap yet, and I was itching to do a project for the MJ so I decided to go ahead & do it just to kill time. I did a bunch of googling and I saw that most people said both housings were compatible, so I thought I would have an easy time doing it.
BOY they must have obviously assumed that because they obviously have never done the swap themselves.
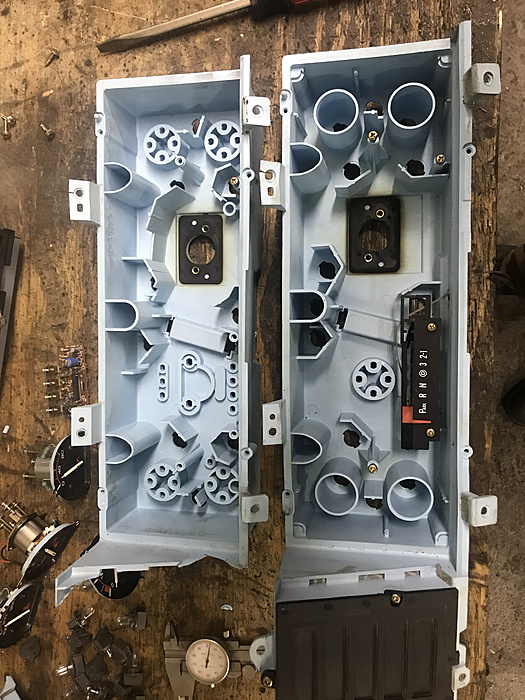
The HOUSINGS are NOT the SAME. In fact they are so much different from each other.
Geez. When the things you read on the internet that aren't a proven fact...
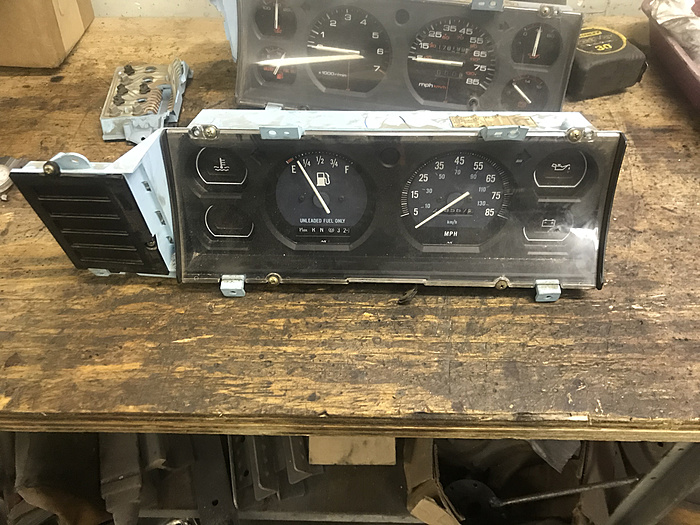
So let me back up a bit. I took the cluster out of the MJ, had to unhook the cable for the PRNDL indicator from the steering column. Brought it out to the bench next to the full cluster so I can compare them both
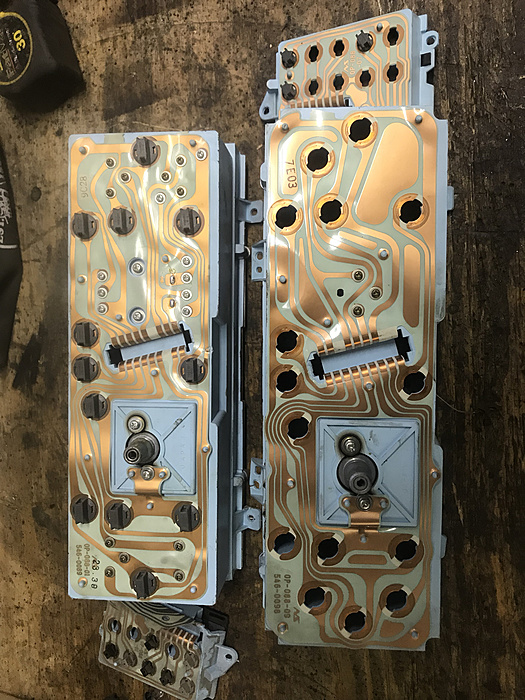
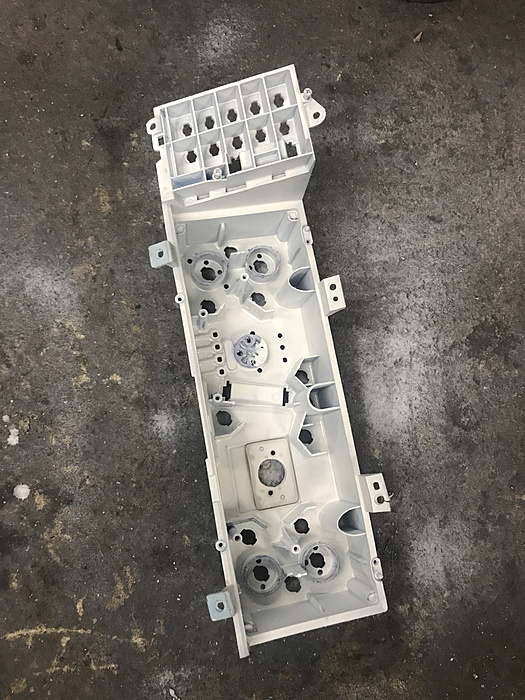
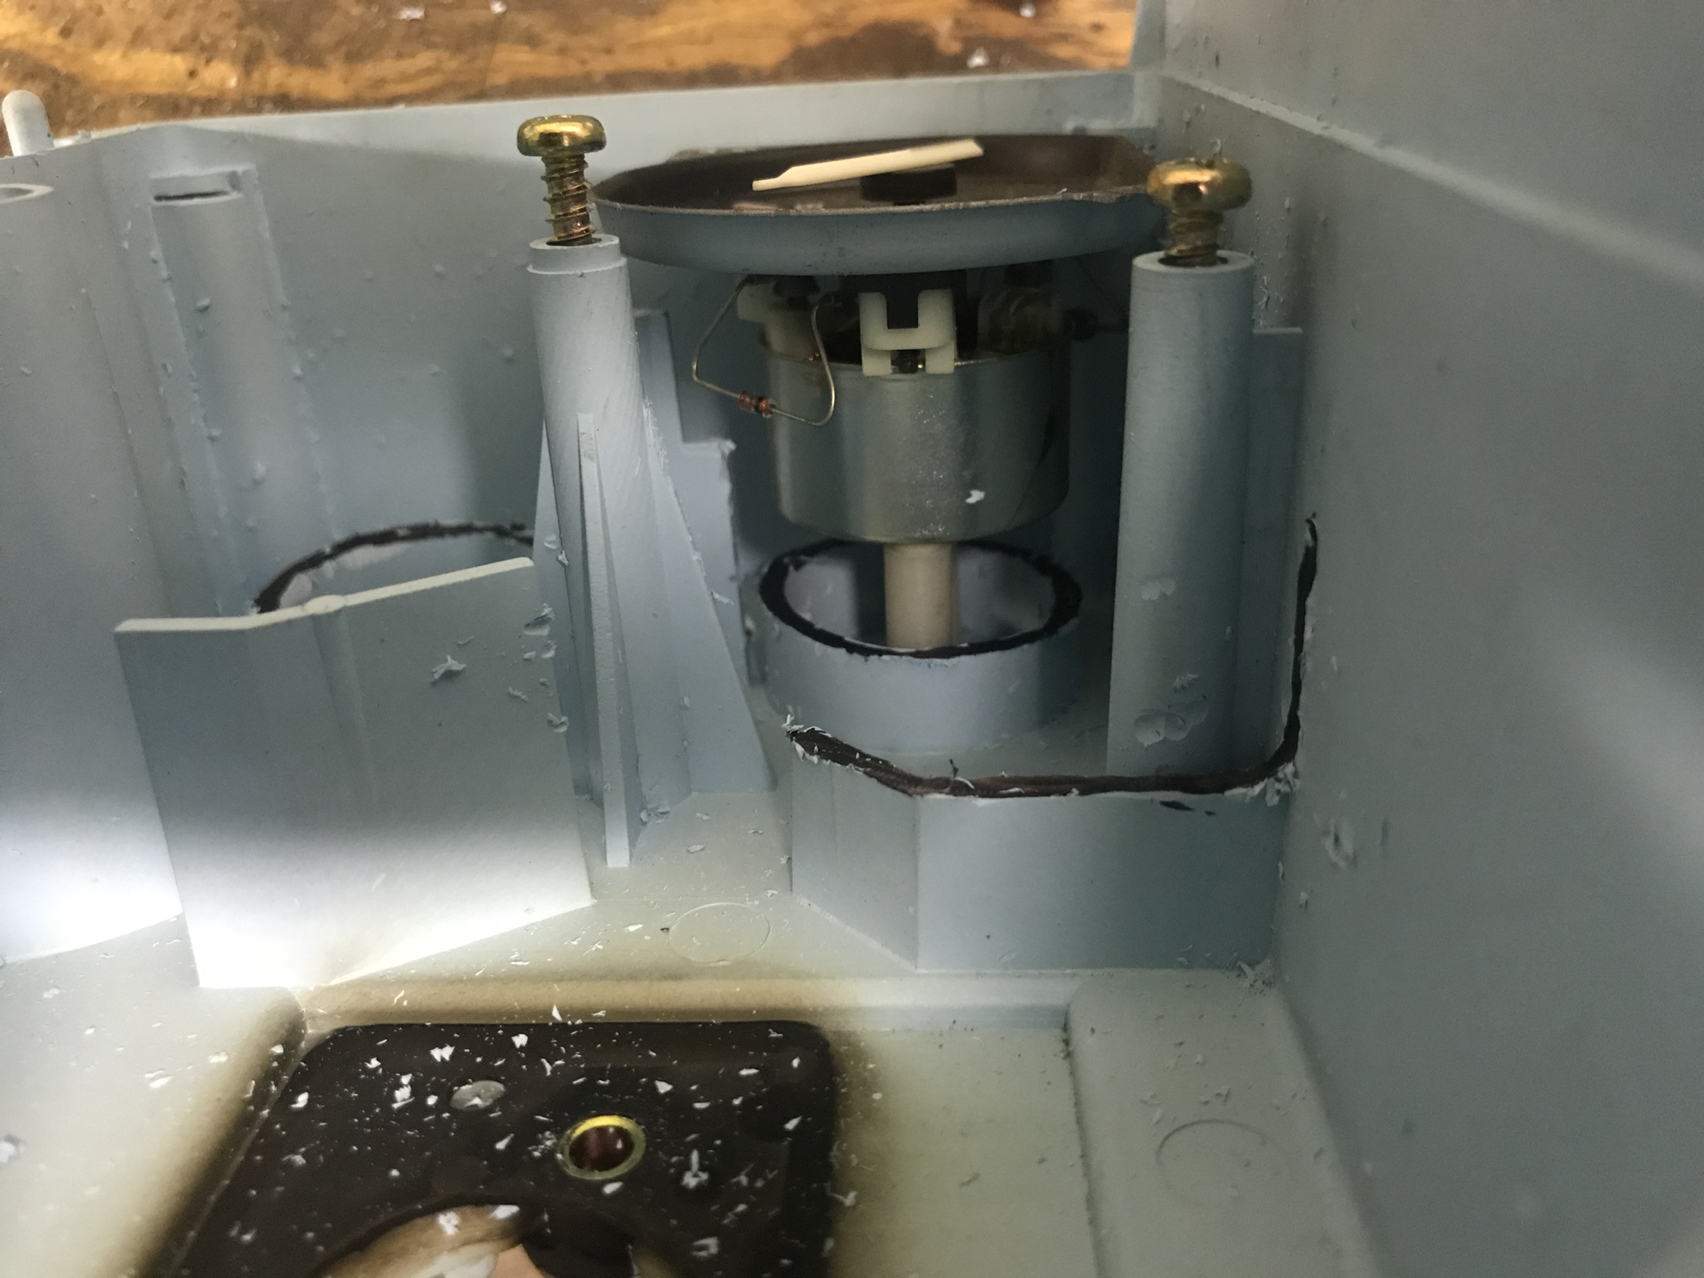
The printed circuit papers are completely different. So I flipped them over and removed the plexiglass, and the bezels so to expose the actual gauges themselves. The idiot lights are just translucent panels with pictures on it, basically nothing under it except for light bulbs.
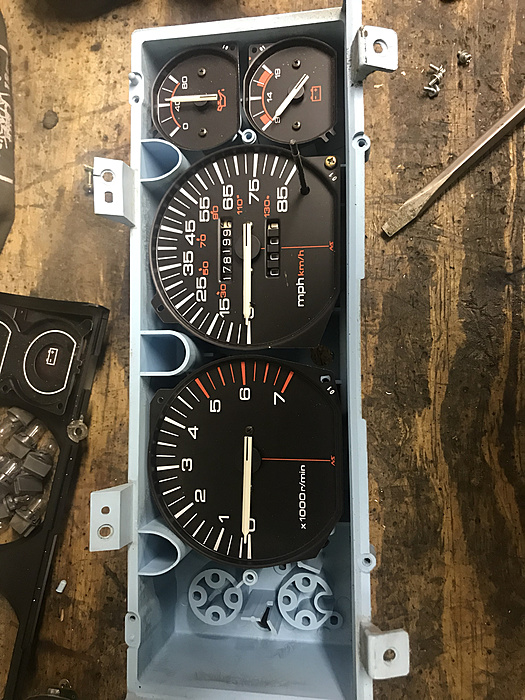
The gauges on other hand were hardwired to the printed circuit papers via screws. (There's no holes for screws on 3/4 housing.
The 3/4 housings had long tubes that rises out against to the panels so to project the light toward a single icon.
The gauges sat down on raised bumps to support it.
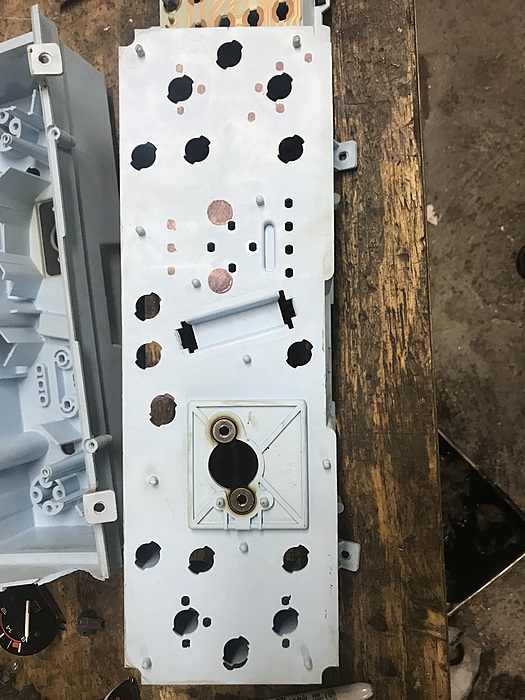
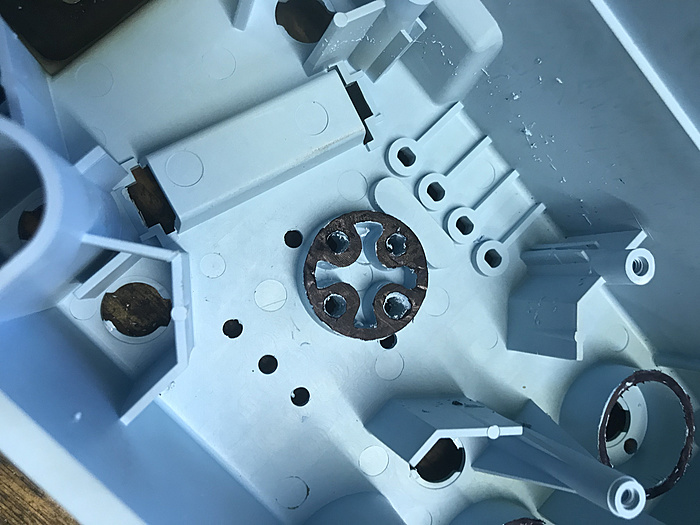
So after some thinking, I decided I ll cut the tubes down and use standoff's/ spacers to hold the gauges at same height on the other housing.
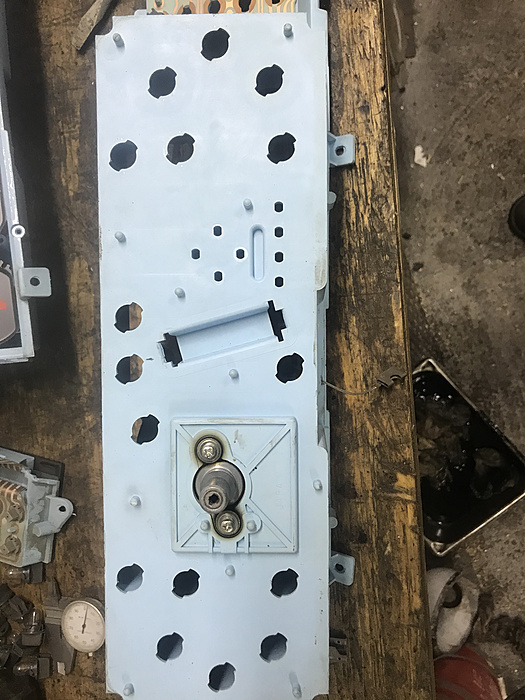
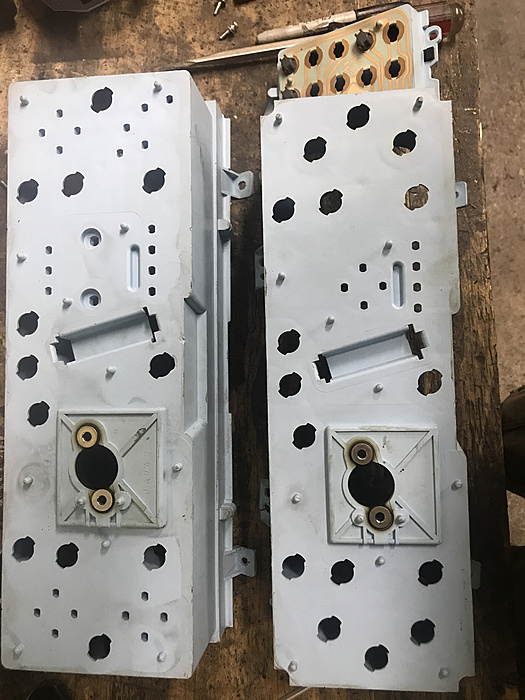
I also laid down the full printed circuit paper on the back of the 3/4 housing so to see where the holes were located, and marked them. I also saw that 3 locations for the light bulb sockets were slightly off too.
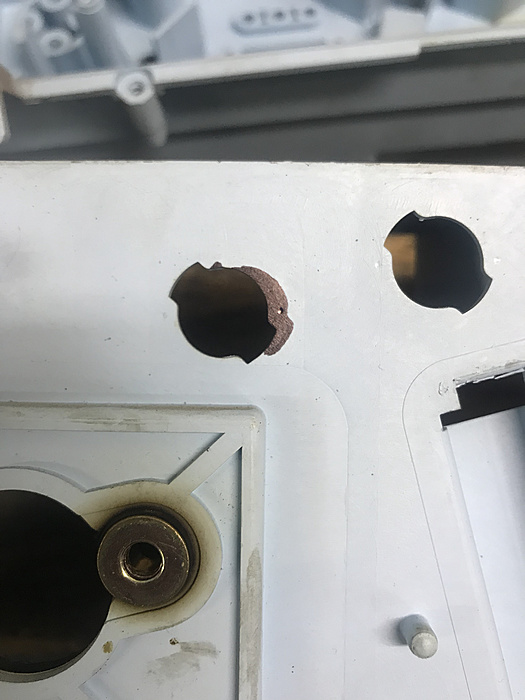
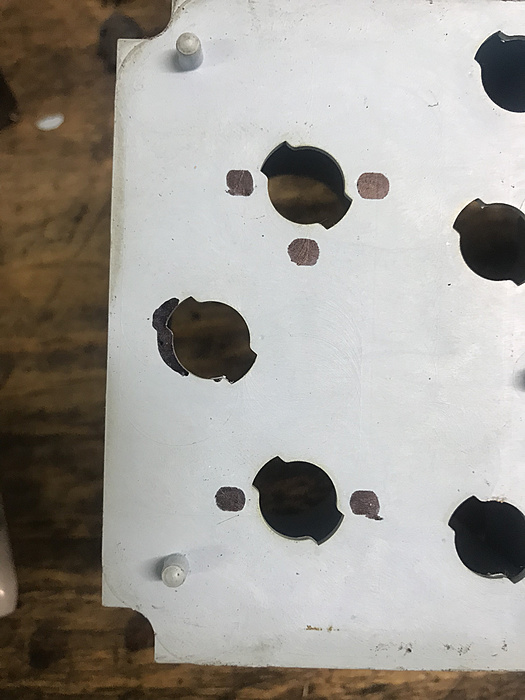
Drilled all the holes with a 3/16 bit.
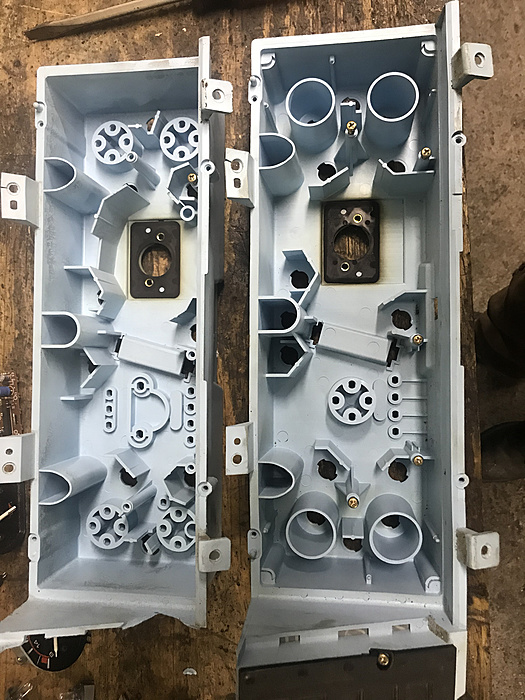
I had to go out and buy a Dremel for this project. So I used it to cut the long tubes down to less than .740 (the original height of the base where the gauges sat on on the other body).
I also had to trim one of the fins on the 3/4 housing. The speedo had a trip reset button and when you press on it to reset it, naturally the gauge would move backwards slightly. On the full cluster housing, it had a fin that was tall enough to make sure it doesn't move. So I had to measure that height and make sure when I cut the fin down, it was at same height.
I highlighted the area with a black marker so it's easier for you to see where I cut.
As for the tach, I had to sand the base down to .350 tall so the tach can sit on the correct height.
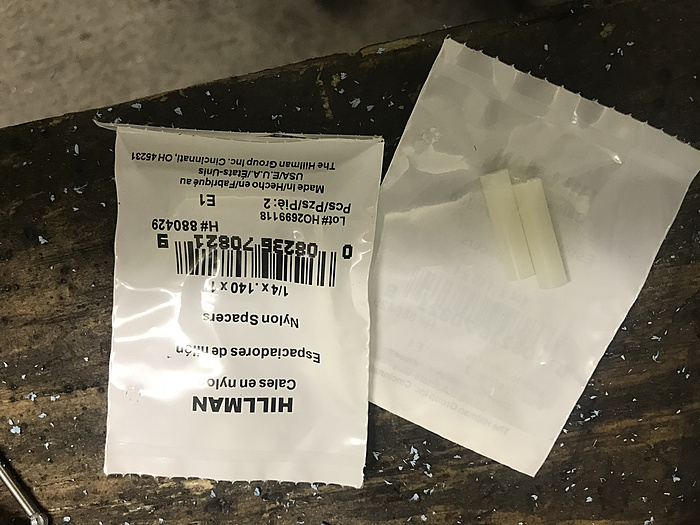
I bought some 1/4x1" nylon spacers and cut them all down to .740" I only needed 11 of them. I also got some 3/8x1" nylon spacers & cut two down to .350 and two of .150.
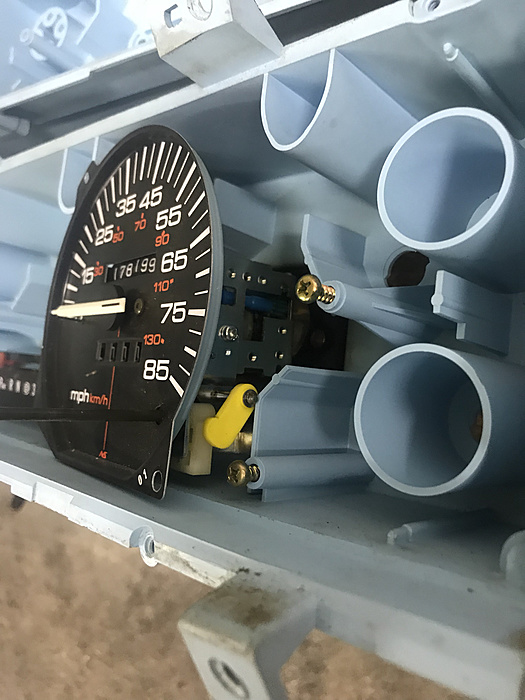
I dry fit all the gauges on the 3/4 housing with the spacers to make sure they all fit good. And they did. So I took everything off.

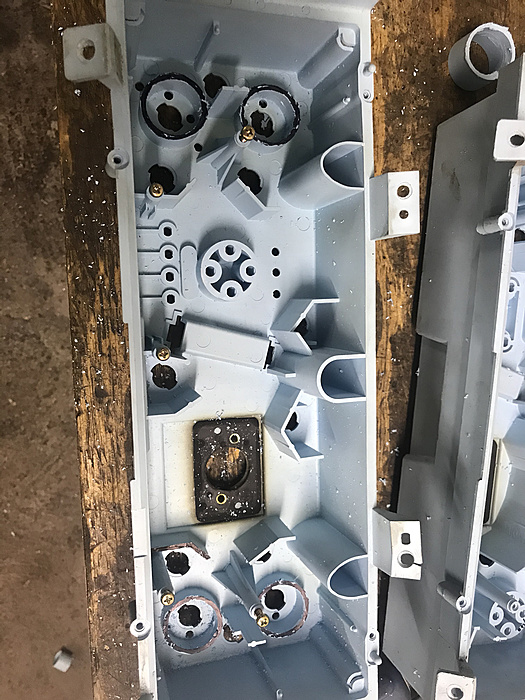
I also reset the mileage on the new speedometer to match my original cluster.

I also cut out a slot on the bottom of the tach so the PRNDL indicator will show.
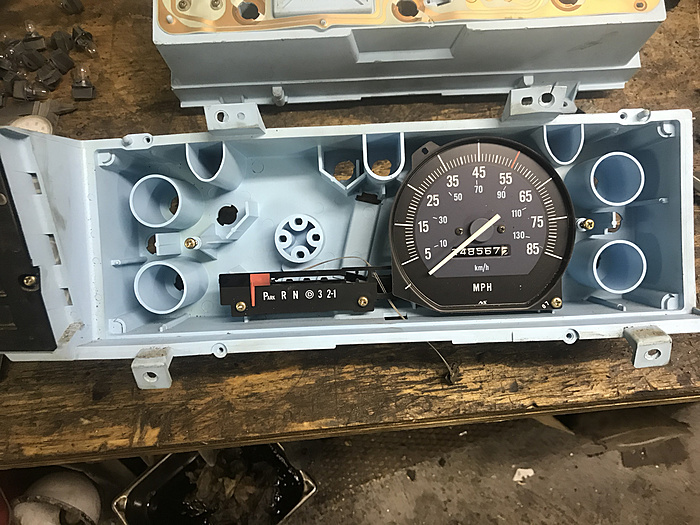
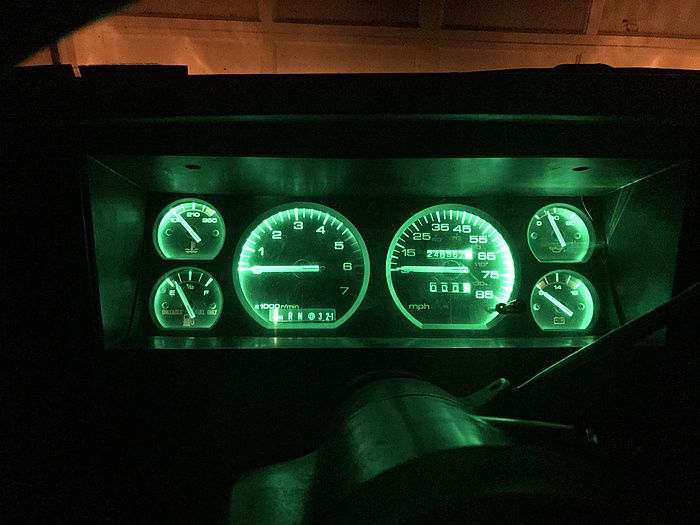
I read somewhere that painting the insides white or silvery color would help the light bulbs reflect off & make the backlighting somewhat brighter. So I thought that was a good idea. Unfortunately only white I had was ceramic engine paint so I just said **** it and used it. I think it turned out pretty well.
I assembled everything back on, plugged in the light sockets (I bought some led lights upgrade kit from One Way Lighting, thanks Jason). It was a good time to install it. I used the black bezel from the MJ 3/4 cluster with the black gauge faces off the XJ cluster along with the plexiglass cause it had the hole for the trip reset button. I think it came out nicely.
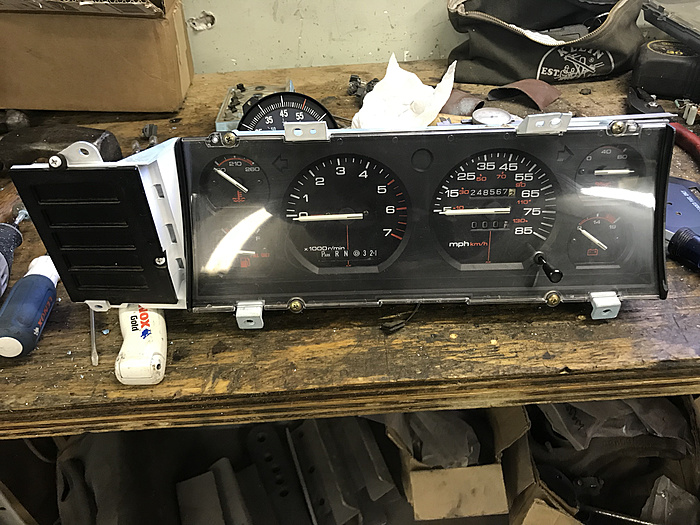
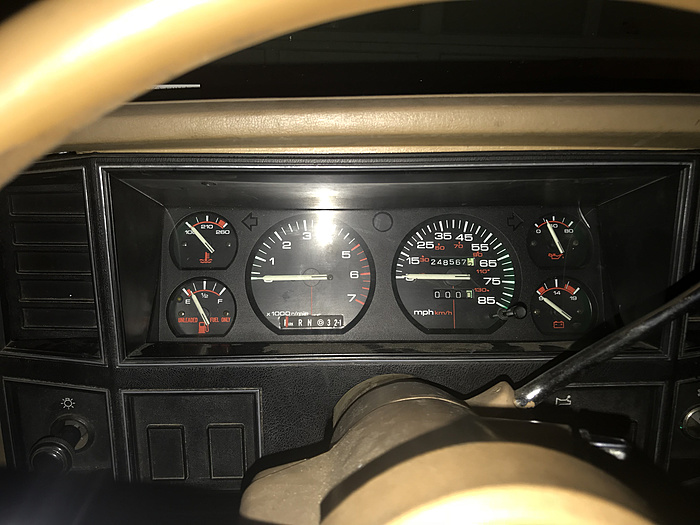
I reinstalled it back on the jeep. I like it. A lot
This swap gave me more than just one upgrade... I now have a functional cluster, a trip meter, a gas gauge with yellow light that goes on when it's low on fuel ( I don't know why the 3/4 cluster doesn't even have that considering they are called "idiot lights" haha.
So that's that.
So here's what happened that led me to do the retrofit.
I got my 88 Comanche little over a year ago and one of the features I didn't liked about it was the fact it had the idiot (3/4 gauge) light cluster. Add insult to the injury; it had the column shift, so it had the PRDNL indicator on the cluster.
I knew I had to get rid of it because when operating the Jeep, I liked to know the exact operating values of the various components to make sure they are within safe parameters. With the 3/4 cluster, it's impossible for me to know. The lights would just turn on when something goes wrong, as like if I'm an idiot.
How do you know if the engine is starting to overheat? No you won't know until it overheated. How am I supposed to stop the Jeep in time if I don't know when it's about to overheat? Stuff like that made me dislike 3/4 gauges.
So I looked around and was able to procure a full gauge cluster from an esteemed member (username intentionally withdrawn to protect him from backlash and embarrassment) here on the forum. I paid and bought the cluster from one of his part-outs (89 XJ with 4.0L). Naturally I was excited when the box showed up at my doorstep.
Except... this happened.

The member was like "It broke? Oh well, you can fix it".
Naturally I didn't feel like fixing it (I thought about using a soldering iron to melt the plastic together to repair the damage (I have successfully repaired plastics this way in the past)). So I decided to put it on the back burner for now.
Fast forward a year later.
I got fed up with driving with the 3/4 gauges. The oil pressure light kept lighting up every time I went over a bump. **** that ****.
I decided to go ahead with the swap. NOW, I could have done this earlier but there's a perfectly good reason why I kept delaying it...
I always planned on doing the 5 speed swap on the MJ, I figured I would just wait until I actually do the swap and then I ll change out the clusters (remember the PRNDL indicator).
Then I was thinking. Maybe I should just swap the housings with the internals from the full gauge cluster after the 5 speed swap.
Fast forward a year later. I still haven't done the 5 speed swap yet, and I was itching to do a project for the MJ so I decided to go ahead & do it just to kill time. I did a bunch of googling and I saw that most people said both housings were compatible, so I thought I would have an easy time doing it.
BOY they must have obviously assumed that because they obviously have never done the swap themselves.


The HOUSINGS are NOT the SAME. In fact they are so much different from each other.
Geez. When the things you read on the internet that aren't a proven fact...
So let me back up a bit. I took the cluster out of the MJ, had to unhook the cable for the PRNDL indicator from the steering column. Brought it out to the bench next to the full cluster so I can compare them both

The printed circuit papers are completely different. So I flipped them over and removed the plexiglass, and the bezels so to expose the actual gauges themselves. The idiot lights are just translucent panels with pictures on it, basically nothing under it except for light bulbs.


The gauges on other hand were hardwired to the printed circuit papers via screws. (There's no holes for screws on 3/4 housing.
The 3/4 housings had long tubes that rises out against to the panels so to project the light toward a single icon.
The gauges sat down on raised bumps to support it.


So after some thinking, I decided I ll cut the tubes down and use standoff's/ spacers to hold the gauges at same height on the other housing.
I also laid down the full printed circuit paper on the back of the 3/4 housing so to see where the holes were located, and marked them. I also saw that 3 locations for the light bulb sockets were slightly off too.


Drilled all the holes with a 3/16 bit.
I had to go out and buy a Dremel for this project. So I used it to cut the long tubes down to less than .740 (the original height of the base where the gauges sat on on the other body).
I also had to trim one of the fins on the 3/4 housing. The speedo had a trip reset button and when you press on it to reset it, naturally the gauge would move backwards slightly. On the full cluster housing, it had a fin that was tall enough to make sure it doesn't move. So I had to measure that height and make sure when I cut the fin down, it was at same height.


I highlighted the area with a black marker so it's easier for you to see where I cut.
As for the tach, I had to sand the base down to .350 tall so the tach can sit on the correct height.

I bought some 1/4x1" nylon spacers and cut them all down to .740" I only needed 11 of them. I also got some 3/8x1" nylon spacers & cut two down to .350 and two of .150.

I dry fit all the gauges on the 3/4 housing with the spacers to make sure they all fit good. And they did. So I took everything off.

I also reset the mileage on the new speedometer to match my original cluster.

I also cut out a slot on the bottom of the tach so the PRNDL indicator will show.
I read somewhere that painting the insides white or silvery color would help the light bulbs reflect off & make the backlighting somewhat brighter. So I thought that was a good idea. Unfortunately only white I had was ceramic engine paint so I just said **** it and used it. I think it turned out pretty well.

I assembled everything back on, plugged in the light sockets (I bought some led lights upgrade kit from One Way Lighting, thanks Jason). It was a good time to install it. I used the black bezel from the MJ 3/4 cluster with the black gauge faces off the XJ cluster along with the plexiglass cause it had the hole for the trip reset button. I think it came out nicely.

I reinstalled it back on the jeep. I like it. A lot
This swap gave me more than just one upgrade... I now have a functional cluster, a trip meter, a gas gauge with yellow light that goes on when it's low on fuel ( I don't know why the 3/4 cluster doesn't even have that considering they are called "idiot lights" haha.


So that's that.
01-23-2018, 03:13 PM
#312
CF Veteran
Thread Starter
Join Date: Jan 2013
Location: west chester, pa
Posts: 19,216
Likes: 0
Received 39 Likes
on
35 Posts
Year: 1999
Engine: 4.0
As of the coolant temp & oil pressure senders. Luckily the spare engine I pulled from the donor MJ a while ago had the sensors on it so I just took them & installed on the MJ. Whee
01-24-2018, 12:30 PM
#314
CF Veteran
Join Date: Jun 2016
Location: York PA
Posts: 2,929
Likes: 0
Received 5 Likes
on
5 Posts
Year: 2001
Model: Cherokee
Engine: 4.0 Litre I6
Nice work!
Is that the box the broken cluster was shipped in? Looks like the cluster was packed tight with jag rags for shipping. Only a few members of this forum are capable of such acts.
Is that the box the broken cluster was shipped in? Looks like the cluster was packed tight with jag rags for shipping. Only a few members of this forum are capable of such acts.
01-24-2018, 12:32 PM
#315
CF Veteran
Thread Starter
Join Date: Jan 2013
Location: west chester, pa
Posts: 19,216
Likes: 0
Received 39 Likes
on
35 Posts
Year: 1999
Engine: 4.0
Originally Posted by CurrySoSpicy
Nice work!
Is that the box the broken cluster was shipped in? Looks like the cluster was packed tight with jag rags for shipping. Only a few members of this forum are capable of such acts.
Is that the box the broken cluster was shipped in? Looks like the cluster was packed tight with jag rags for shipping. Only a few members of this forum are capable of such acts.