New to me XJ: is it a keeper/camper or a Craigslist Flipper?
 01-28-2014, 12:19 PM
#1
Junior Member
Thread Starter

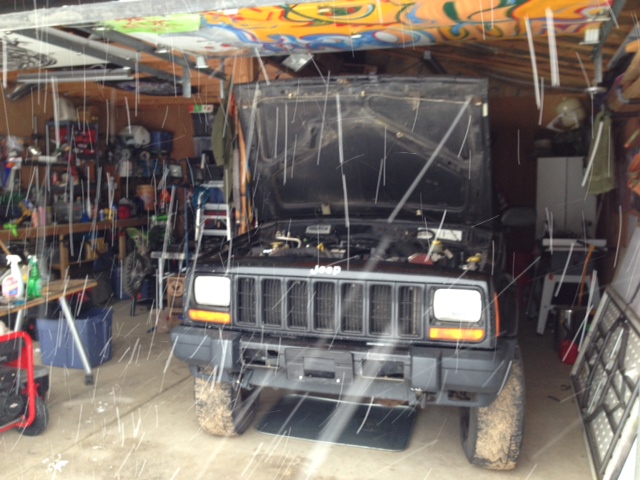
So I went and traded an old truck for an XJ. It was dark and freezing cold when we negotiated the trade, and I missed a bunch of stuff that probably would have made me turn away. But I went ahead with trade… I was too darn excited that I had found a rust-free black '99 5-speed 4x4 with a 3" lift and no wobble. I think the 8.25" rear must have clinched it for me at the time.
Of course, I should have know better. To start with, it had 230k. The front tires were pretty worn and the rears were worse. The dash and main cabin illumination didn't work, the trunk-ajar and airbag lights were on, the horn didn't work, the bumper had been cut open to fit fog lamps inside it (which were speaker-wired to a loose, floating switch which was semi- jammed into the console trim, and did not work).
The headlights worked though, and did the tail lights, brake lights, running lights, license-plate light, reverse lights, vanity lights, maps lights, turn signals, hazard flashers, and t-case selector light. There were cheap LEDs plugged into the 12v power source, which illuminated the dash. The aftermarket stereo functioned through the main door speakers and rear soundbar speakers, but the little tweeter in the passenger door fell out when I poked at it. There was oil and crud covering everything.
The next day, in the sunshine, I took an actual look at what I had gotten myself into.
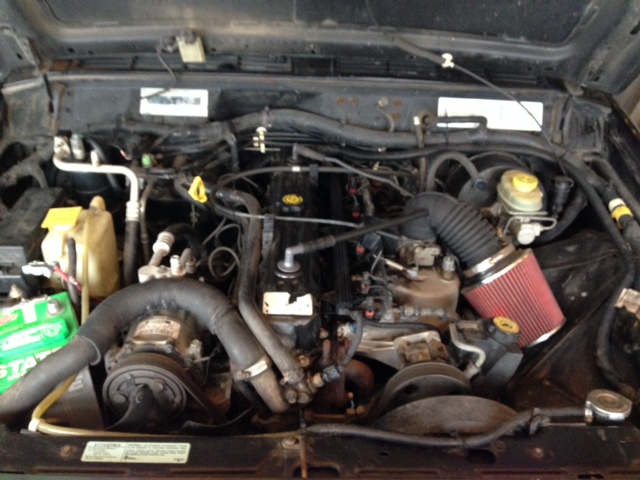
Oil build-up everywhere, especially around the oil filter area, the head gasket, the manifolds, the rear main, the t-case supports, and rear diff. Massive grease build up on the upper ball joints and tie-rod ends, looks like the steering stabilizer is leaking.
Rear shocks need replacement, the skyjacker lift uses blocks in the back and the original rear brake line which is too short, and I'm sure will tear out upon articulation. Up front, the LCAs are nice beefy rods, but the rod ends are not sitting straight as I think they should, and are instead at about an angle. At least it has a nice set of sway-bar disconnects.
Left LCA from the front:
Left LCA from behind:
Right LCA from behind:
Took it to get an emissions test, which it passed. Went to DMV and got some temp tags, filled the tank and reset the trip computer to begin MPG tracking.
I attacked the electrical system first.
Cleaned battery contacts, found corrosion in the first several inches of positive battery wires, was able to salvage the wires going to the fuse block, but I will need to buy a new one for the starter. I guess I should pull the old one out first, and measure it.
Replaced broken body-ground connector.
Removed all traces of the previous fog lamps and stupid switch.
Removed all traces of corroded hack job of a trailer wiring setup, discovered that one rear taillight assembly was held in place with jb-weld which had to be removed before I could get to the wiring. Left taillight assembly added to junkyard list.
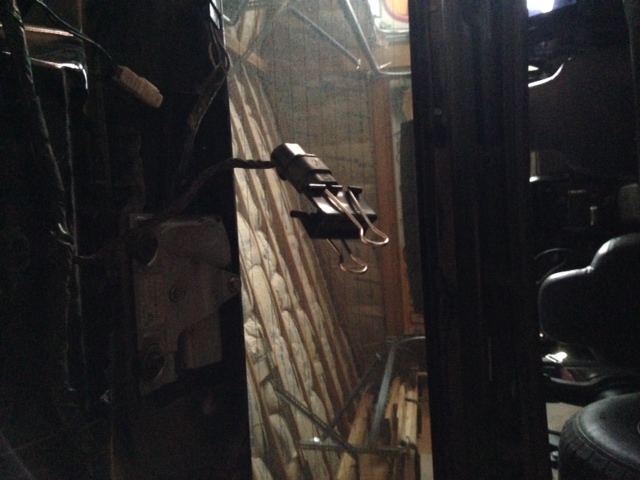
The tailgate multi-switch was unplugged and damaged so that it no longer stayed in place… but it still worked, so I plugged it in and the cargo light came on. Then I locked it into the "closed" position with a small clip, and the cargo lights went off, as did the tailgate-ajar indicator on the dash. Good.
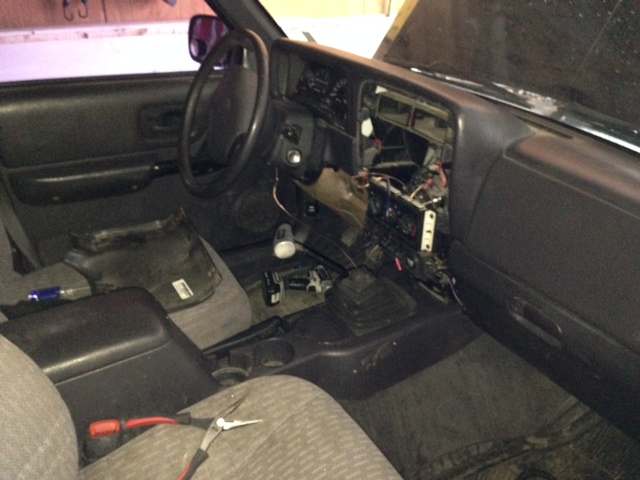
There were three broken door-jamb switches, and one missing, which meant fishing the wiring up out of the body. I used some baling wire down through the switch hole and out through the door wiring hole (after removing the rubber boot from the body side) which I also used to find the switch wiring by poking around blindly with my finger. Once I had both through the lower hole, I wrapped the baling wire securely around the weather shielding on the end of the switch wire, and pulled it carefully back up and through it's proper hole. New switches installed and an overhead bulb up front, and the doors activate interior lighting. Good.
Still no dash illumination. Found stock fuse diagram online, and made mine match it… dimmer fuse that is supposed to be a 5 was a 15, and blown. Replaced with a 5, powered on, blew the 5.
Pulled the stereo, found a rat's nest of stupid wiring, complete with twist connectors, exposed wire, and defunct amp and sub connections. Removed all of it. Replaced the dimmer fuse again and powered up. Dash lights work. Stereo mount and stock wiring harness clips added to the junkyard list.
Quick bit of reading online diagnosed the airbag light and horn issue as being a bad clockspring.
On to the body, I found that some of trim was worse than I initially thought. Junkyard list updated.
The e brake seems to work but will not stay engaged, it would appear that the ratchet mechanism is worn or miss-aligned. Can't find a diagram or see into it from above, but it appears that there is an access hatch from below. More research is needed but I'm hoping it will become clear when I pull that hatch off as to whether I can fix it or if it will need to be replaced.
Pressure washed exterior, underside, and engine bay. My pressure washer is a small electric model, so it couldn't really do much, but it was a good start. Now I can begin going at it with brake cleaner, oil eater, simple green, and plastic-bristle brushes. I can also begin to monitor for standing leaks… couple drops at the rear main already.
I had seen that the forward pcv valve was cracked, so I had already grabbed a replacement (which didn't rattle when I shook it. is it supposed to rattle?). The old pcv shattered as I tried to remove it, again and again. Finally got it by using two long needle nose pliers opposite of each other. Even though I was being very careful, I concerned that I may have dropped bits of it down, but I didn't see anything when I inspected. The grommet should probably have been replaced at the same time, but it should be easy enough to pull this fresh pcv when I get new grommets, it will not have had time to corrode. The one in back, which has possible evidence of leakage, will probably shatter and disintegrate in a similar fashion when pulled. Ugh.
Changing the t-case, transmission, and diff fluids, the coolant, and an oil change is up next, along with a front end inspection. I'm hoping it's more build-up than blown-up at the ball joints and tie rod ends. Hoping the axle seals are not leaking. Hoping that it's not losing any coolant. Hoping I don't find rounded-out, over-torqued bolts.
If it looks like I do in fact need an entire front end, rear main, axles seals, head gasket, as well as the extended brake lines, tires, clockspring, rear springs, possibly the LCAs, shocks, stereo, trim, etc that I already know it needs, than it may not be worth keeping as the daily driver / camping rig that I want it to be.
I will edit with pics when I have more time to spend online, but what do you guys think?
Of course, I should have know better. To start with, it had 230k. The front tires were pretty worn and the rears were worse. The dash and main cabin illumination didn't work, the trunk-ajar and airbag lights were on, the horn didn't work, the bumper had been cut open to fit fog lamps inside it (which were speaker-wired to a loose, floating switch which was semi- jammed into the console trim, and did not work).
The headlights worked though, and did the tail lights, brake lights, running lights, license-plate light, reverse lights, vanity lights, maps lights, turn signals, hazard flashers, and t-case selector light. There were cheap LEDs plugged into the 12v power source, which illuminated the dash. The aftermarket stereo functioned through the main door speakers and rear soundbar speakers, but the little tweeter in the passenger door fell out when I poked at it. There was oil and crud covering everything.
The next day, in the sunshine, I took an actual look at what I had gotten myself into.
Oil build-up everywhere, especially around the oil filter area, the head gasket, the manifolds, the rear main, the t-case supports, and rear diff. Massive grease build up on the upper ball joints and tie-rod ends, looks like the steering stabilizer is leaking.
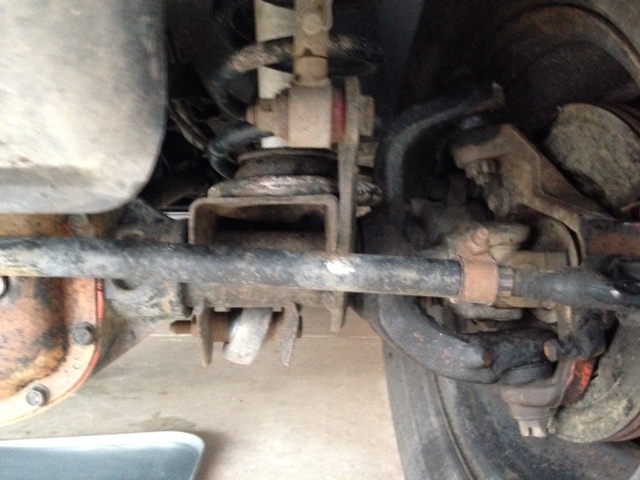
Rear shocks need replacement, the skyjacker lift uses blocks in the back and the original rear brake line which is too short, and I'm sure will tear out upon articulation. Up front, the LCAs are nice beefy rods, but the rod ends are not sitting straight as I think they should, and are instead at about an angle. At least it has a nice set of sway-bar disconnects.
Left LCA from the front:
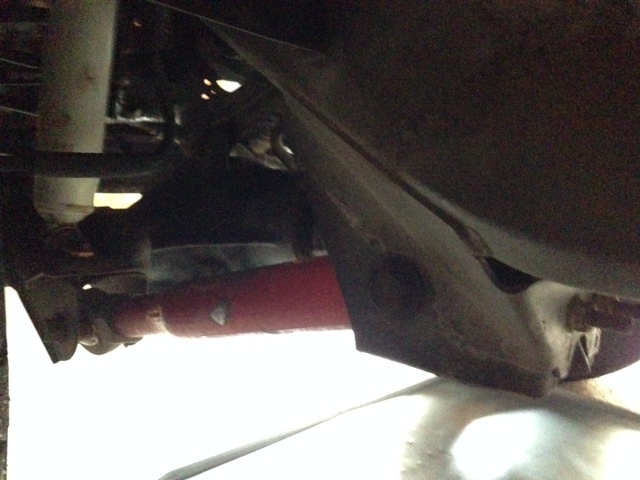
Left LCA from behind:
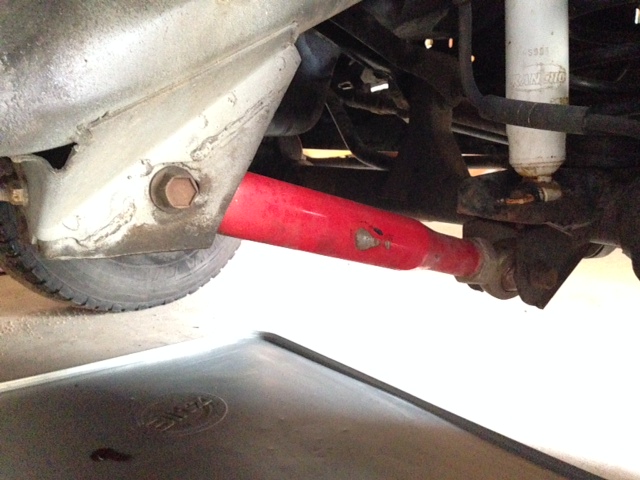
Right LCA from behind:
Took it to get an emissions test, which it passed. Went to DMV and got some temp tags, filled the tank and reset the trip computer to begin MPG tracking.
I attacked the electrical system first.
Cleaned battery contacts, found corrosion in the first several inches of positive battery wires, was able to salvage the wires going to the fuse block, but I will need to buy a new one for the starter. I guess I should pull the old one out first, and measure it.
Replaced broken body-ground connector.
Removed all traces of the previous fog lamps and stupid switch.
Removed all traces of corroded hack job of a trailer wiring setup, discovered that one rear taillight assembly was held in place with jb-weld which had to be removed before I could get to the wiring. Left taillight assembly added to junkyard list.
The tailgate multi-switch was unplugged and damaged so that it no longer stayed in place… but it still worked, so I plugged it in and the cargo light came on. Then I locked it into the "closed" position with a small clip, and the cargo lights went off, as did the tailgate-ajar indicator on the dash. Good.
There were three broken door-jamb switches, and one missing, which meant fishing the wiring up out of the body. I used some baling wire down through the switch hole and out through the door wiring hole (after removing the rubber boot from the body side) which I also used to find the switch wiring by poking around blindly with my finger. Once I had both through the lower hole, I wrapped the baling wire securely around the weather shielding on the end of the switch wire, and pulled it carefully back up and through it's proper hole. New switches installed and an overhead bulb up front, and the doors activate interior lighting. Good.
Still no dash illumination. Found stock fuse diagram online, and made mine match it… dimmer fuse that is supposed to be a 5 was a 15, and blown. Replaced with a 5, powered on, blew the 5.
Pulled the stereo, found a rat's nest of stupid wiring, complete with twist connectors, exposed wire, and defunct amp and sub connections. Removed all of it. Replaced the dimmer fuse again and powered up. Dash lights work. Stereo mount and stock wiring harness clips added to the junkyard list.
Quick bit of reading online diagnosed the airbag light and horn issue as being a bad clockspring.
On to the body, I found that some of trim was worse than I initially thought. Junkyard list updated.
The e brake seems to work but will not stay engaged, it would appear that the ratchet mechanism is worn or miss-aligned. Can't find a diagram or see into it from above, but it appears that there is an access hatch from below. More research is needed but I'm hoping it will become clear when I pull that hatch off as to whether I can fix it or if it will need to be replaced.
Pressure washed exterior, underside, and engine bay. My pressure washer is a small electric model, so it couldn't really do much, but it was a good start. Now I can begin going at it with brake cleaner, oil eater, simple green, and plastic-bristle brushes. I can also begin to monitor for standing leaks… couple drops at the rear main already.
I had seen that the forward pcv valve was cracked, so I had already grabbed a replacement (which didn't rattle when I shook it. is it supposed to rattle?). The old pcv shattered as I tried to remove it, again and again. Finally got it by using two long needle nose pliers opposite of each other. Even though I was being very careful, I concerned that I may have dropped bits of it down, but I didn't see anything when I inspected. The grommet should probably have been replaced at the same time, but it should be easy enough to pull this fresh pcv when I get new grommets, it will not have had time to corrode. The one in back, which has possible evidence of leakage, will probably shatter and disintegrate in a similar fashion when pulled. Ugh.
Changing the t-case, transmission, and diff fluids, the coolant, and an oil change is up next, along with a front end inspection. I'm hoping it's more build-up than blown-up at the ball joints and tie rod ends. Hoping the axle seals are not leaking. Hoping that it's not losing any coolant. Hoping I don't find rounded-out, over-torqued bolts.
If it looks like I do in fact need an entire front end, rear main, axles seals, head gasket, as well as the extended brake lines, tires, clockspring, rear springs, possibly the LCAs, shocks, stereo, trim, etc that I already know it needs, than it may not be worth keeping as the daily driver / camping rig that I want it to be.
I will edit with pics when I have more time to spend online, but what do you guys think?
Last edited by JBV; 01-28-2014 at 03:26 PM. Reason: add photos

 01-28-2014, 01:43 PM
#4
Junior Member
Thread Starter
 01-30-2014, 03:38 PM
#7
Junior Member
Thread Starter
In the course of solving my dash light issue, I pulled all the fuses from the kick panel fuse block, and replaced them according to a neighbor's manual, as there was no diagram anywhere on mine. This was a good thing for the issues I had experianced to this point.
It also meant that I removed the #10 fuse, which the manual says is Empty.
Now, this is apparently an error on the part of Chrysler, as I have discovered.
Upon starting the jeep I immediately threw a CEL and two codes, PO443 and P1491. My cheapo Actron pocketscan will read the codes, but will not erase them. Same thing with my ELM+DashCommand app. After searching the forums, I discovered the mis-print issue, wihch showed that my two codes were both related to the same circuit, which now had no fuse. I added a 15a minifuse to slot 10. I tried to clear codes again with my scanner, and the PO443 went away, but the P1491 and the CEL are still there. It was very cold out when I checked for operation of the fans, but they kick on with the A/C, so I'm sure the relay is still good. These codes are clearly a direct result of the missing fuse, which has now been replaced. Do I simply need a more advanced scantool to kill the CEL because the P1xxx codes are manufacturer specific and my current scantools are bottom end? Is there a better wifi-scanner app? Any suggestions? It seems that some people use Torque ($6 for iphone), some use REV ($40 for iphone).
I am kind of tempted to buy the craftsman scan tool that is carried at my local Ace, but for $100 bucks, I would be sorely disappointed to find that it fails as well.
Trending Topics
01-31-2014, 12:21 AM
#10
Seasoned Member
Join Date: Jul 2013
Location: Atlanta
Posts: 362
Likes: 0
Received 0 Likes
on
0 Posts
Year: 1995
Model: Cherokee
Engine: 4.0
Why waste time trading up to a nicer XJ?
You may not even find one in your range, plus with the time you'll end up waiting until you found the right one, you could have yours fixed, and gain a bunch of knowledge and experience from doing so.
I say keep yours.
You may not even find one in your range, plus with the time you'll end up waiting until you found the right one, you could have yours fixed, and gain a bunch of knowledge and experience from doing so.
I say keep yours.
02-01-2014, 10:01 AM
#11
Junior Member
Thread Starter
2WDUnderachiever, that's a good point. Time spent wrenching and learning is much more valuable in the long run than time spent chasing down Craigslist postings all over the state to find a 'better' xj.
02-01-2014, 10:45 AM
#12
CF Veteran
Join Date: Apr 2012
Location: Essex England
Posts: 2,218
Likes: 0
Received 0 Likes
on
0 Posts
Year: 1997
Model: Cherokee
Engine: 2.5 td
That's okay, I'm aware that I got a little screwed. Not too bad though, I think. The old truck had 350k, sticky lifters, a failing fuel pump, and burned a quart of oil every 300 miles along with the 12mpg it averaged on gas. It was a tired old thing, that I had used well. My cost of ownership on it came out to $100 per 1000 miles of hauling.
2WDUnderachiever, that's a good point. Time spent wrenching and learning is much more valuable in the long run than time spent chasing down Craigslist postings all over the state to find a 'better' xj.
2WDUnderachiever, that's a good point. Time spent wrenching and learning is much more valuable in the long run than time spent chasing down Craigslist postings all over the state to find a 'better' xj.
02-01-2014, 03:46 PM
#13
Junior Member
Thread Starter
I am still curious about people's experience with other scan apps, but for now all of my CEL issues have been resolved with a very simple cleaning of the OBD2 port under the dash. The "clear codes" command was not getting through to the computer.
02-10-2014, 08:19 PM
#14
Junior Member
Thread Starter
Little update on my xj:
Had a very successful junkyard run, found almost everything I was looking for. They only had automatics, so I did not find the shift boots that I need. My upper boot (the one you see) only had one tear, so I stuck it together using ShoeGoo. That seemed to work pretty well, so I used more to rebuild the middle boot (under console, seals cab from drivetrain) which was in two pieces with many tears. It was tricky to avoid sticking the accordion folds together, but I now have something that should hold up for at least a little while, maybe untill I can find new replacements that don't seem to be available.
Ebrake assembly has been replaced since I could not figure out how to repair the original, along with the cracked console hold down. Made a "sheath" for the rear air duct out of foil tape to replace the missing foam connector.
Junkyard also yielded a Taillight housing, hatch switch, PS interior door panel, one of the a/c caps, fog lamps, center vent blades, lamp covers, speaker bar speaker covers, clips for the loose trim bits, and a stock airbox. Grabbed the shifter **** off of a Pathfinder that was in the Chrysler section. Wasn't sure it would fit; it does, threads right on.
Pulled the brakes front and rear, measured, and brought a rotor and drum in to the parts store with me after seeing here on CF that my 99 is a "funny" year for brake sizes. It was good that I did, because I had measured stud length (1 1/8"), and this particular store only had the overall height in the computer, a choice between 3 1/16" and 3 3/16" tall. I needed the shorter one. I then pulled open the other box he brought me as well, to be sure. It had been mislabeled/mispacked, and was the taller one. I made them bring out their whole stock of both, and picked through them to find a matching correct size. The difference between drums is more obvious; my c8.25 rear uses the 9" drums. The 10" d35 drum would not possibly fit into the 9" box. I measured anyway. Made them comp me the spring kit, which turned out to be necessary: busted and rusted spring bits came falling out when I pulled the old shoes.
Did the valve cover gasket, managed to shatter both ccv fittings in the process. Too cold in my garage to put any sort of torsional force onto plastic, or even try to pull on rubber tube. NAPA says both ccv fittings are the same, quadratec's diagram and other people's engine pics shows a differently shapped vent (back of the valve cover) and breather (front of the valve cover). Anybody know if I can use two of the same fitting, front and back? 3 bucks from NAPA today if they are the same (the rear, vent, generic Chrysler PCV), 12 bucks sometime next week if I need to order from qt (if the 'breather' has restrictions or one-way valves or something).
02-18-2014, 01:13 PM
#15
Junior Member
Thread Starter
NAPA says both ccv fittings are the same, quadratec's diagram and other people's engine pics shows a differently shapped vent (back of the valve cover) and breather (front of the valve cover). Anybody know if I can use two of the same fitting, front and back? 3 bucks from NAPA today if they are the same (the rear, vent, generic Chrysler PCV), 12 bucks sometime next week if I need to order from qt (if the 'breather' has restrictions or one-way valves or something).
There are two different fittings, grey elbow in back and black elbow up front. They are the same casting, but the grey one has an additional plastic restrictive fitting glued inside the bottom. This inner fitting can be cut or drilled out if you are unable to locate the black elbow.
There are three part numbers cast in each elbow, one for the black, one for the grey, and for a blue elbow (which must be for some other Chrysler/dodge application). If you can find one elbow, you should be able to get the part numbers off of it for the one you need.