
APN Header Install On 99-01 Cherokee Quickie (Pictures Included)

Thread Starter
Junior Member
Joined: Nov 2013
Posts: 88
Likes: 0
From: Arlington, VA
Year: 99
Model: Cherokee
Engine: 'The Invincible' 4.0
Just finished the hassle of installing an APN header on my 99 XJ that has the updated intake manifold. After a hard time finding grind point pictures I took a few of my own. Hope this helps some of you guys out. 
Old vs. New Intake Manifold
(Picture borrowed from interwebs)

The one on the right like mine requires grinding on the #1 and #6 runners. These are found on some 99 and all 2000-2001 Jeep Cherokee XJ's.
The reason you have to grind/file is so the nub holes on the intake manifold will slide into the nubs on the block. If it doesn't line up correctly you are going to have a massive vacuum leak.
(Picture borrowed and modified)
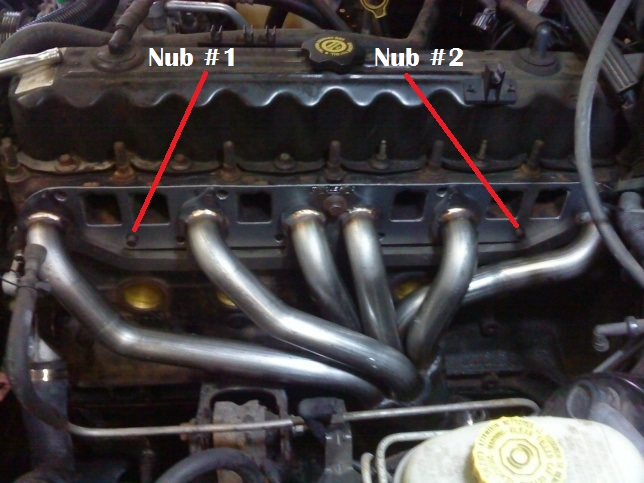
Looking at your manifold ON the block, runner #1 is on the left at the front bumper and runner #6 is at the firewall. For runner #1 I had to grind down the casting only, not the runner. For #6 I had to grind the actual runner itself.
Casting:


Runner #6:


I wish I could tell you how much I had to take off exactly but I am not sure since I had to grind, test fit, grind, test fit, etc. until it finally worked.
To make sure it was on the nubs I first installed the exhaust manifold/header and tightened it down to spec (25 ft/lbs). Then I mounted the intake manifold, pushed it hard against the block and then pushed up the left and right sides. If it slid up completely on one side and not the other or both I knew it wasn't on one or both pins.
After I FINALLY got it on both pins I held it in place and kept pushing it up to make sure it was on right while a buddy tightened down two of the top manifold bolts. After that I was set to put on the rest, which I then torqued down to 25 ft/lbs.
The bottom 4 manifold bolts aren't fun but I found out that memorizing where the holes are before mounting it back on helped significantly. This will also help you locate them when taking 'em off.

I also found I was able to get to first bottom two (The two left of exhaust ports #2 and #3) with a socket and extension. The last two (the two right of exhaust ports #4 and #5) I could only get to by reaching behind the header/exhaust manifold with a wrench. I couldn't torque these down properly so a half turn past a grunt had to do.
It was a B**** overall but well worth it in the end compared to my old cracked header. Make sure you have a 6 pack in the fridge before you start too because you are going to need it when you’re done. Good luck.
Old vs. New Intake Manifold
(Picture borrowed from interwebs)

The one on the right like mine requires grinding on the #1 and #6 runners. These are found on some 99 and all 2000-2001 Jeep Cherokee XJ's.
The reason you have to grind/file is so the nub holes on the intake manifold will slide into the nubs on the block. If it doesn't line up correctly you are going to have a massive vacuum leak.
(Picture borrowed and modified)

Looking at your manifold ON the block, runner #1 is on the left at the front bumper and runner #6 is at the firewall. For runner #1 I had to grind down the casting only, not the runner. For #6 I had to grind the actual runner itself.
Casting:
Runner #6:
I wish I could tell you how much I had to take off exactly but I am not sure since I had to grind, test fit, grind, test fit, etc. until it finally worked.
To make sure it was on the nubs I first installed the exhaust manifold/header and tightened it down to spec (25 ft/lbs). Then I mounted the intake manifold, pushed it hard against the block and then pushed up the left and right sides. If it slid up completely on one side and not the other or both I knew it wasn't on one or both pins.
After I FINALLY got it on both pins I held it in place and kept pushing it up to make sure it was on right while a buddy tightened down two of the top manifold bolts. After that I was set to put on the rest, which I then torqued down to 25 ft/lbs.
The bottom 4 manifold bolts aren't fun but I found out that memorizing where the holes are before mounting it back on helped significantly. This will also help you locate them when taking 'em off.

I also found I was able to get to first bottom two (The two left of exhaust ports #2 and #3) with a socket and extension. The last two (the two right of exhaust ports #4 and #5) I could only get to by reaching behind the header/exhaust manifold with a wrench. I couldn't torque these down properly so a half turn past a grunt had to do.
It was a B**** overall but well worth it in the end compared to my old cracked header. Make sure you have a 6 pack in the fridge before you start too because you are going to need it when you’re done. Good luck.
Last edited by Bangarang; Jun 24, 2015 at 08:17 AM.

Member
Joined: Dec 2013
Posts: 113
Likes: 0
Model: Cherokee
Encouraging. I have a '99 motor for my '01, I would like to pursue an aftermarket header, but also need bungs for o2 sensors. I've not found a tuner that would allow me to disable rear o2 sensors though...
Is there enough meat on the APN to hold a bung?
Is there enough meat on the APN to hold a bung?
Herp Derp Jerp

Joined: Nov 2011
Posts: 18,251
Likes: 17
From: Parham, ON
Year: 1999
Model: Cherokee
Engine: 4.0L OBD-II
Nice writeup! Makes me think about doing mine! Thanks!
If you have the dual mini cats your PCM needs those present, and all 4 O2 sensors behaving normally, to function properly.
If you have the dual mini cats your PCM needs those present, and all 4 O2 sensors behaving normally, to function properly.
Member
Joined: Dec 2013
Posts: 113
Likes: 0
Model: Cherokee
In the ford world, you can score up an SCT hand-held tuner and turn off the rear o2's.
So far all I've seen is the superchips handheld which does not list this ability.
Trending Topics
Herp Derp Jerp
Joined: Nov 2011
Posts: 18,251
Likes: 17
From: Parham, ON
Year: 1999
Model: Cherokee
Engine: 4.0L OBD-II
Regardless, removal of the cats is a federal offense and discussion of such is banned on this forum.
Thread Starter
Junior Member
Joined: Nov 2013
Posts: 88
Likes: 0
From: Arlington, VA
Year: 99
Model: Cherokee
Engine: 'The Invincible' 4.0
I just used my fingers to pinch the inside and outside of the runner when grinding. I would want to say it's a little more than 1/4 inch thick.
DO IT! No just kidding don't do it...NO WAIT DO IT! I did the motor mounts and transmission mount at the same time and it was a nightmare. If you don't need to change those then the hardest part is getting those rusted manifold-to-down pipe nuts off.
Last edited by Bangarang; Jan 21, 2015 at 01:50 PM.
Herp Derp Jerp
Joined: Nov 2011
Posts: 18,251
Likes: 17
From: Parham, ON
Year: 1999
Model: Cherokee
Engine: 4.0L OBD-II
Fall 2011 I did the Dorman-type replacement, I know something is leaking again... but yes at least the bolts have been moved in the last few years.
Member
Joined: Dec 2013
Posts: 113
Likes: 0
Model: Cherokee
Do you have a copy of the FSM? I'd like to see it. This seems weird for OBDII.
Herp Derp Jerp
Joined: Nov 2011
Posts: 18,251
Likes: 17
From: Parham, ON
Year: 1999
Model: Cherokee
Engine: 4.0L OBD-II
Unfortunately it's a copywritten work so have to say you'll need to find your own. I found mine via Google, some find theirs via eBay.
Here's what it says though:
OXYGEN SENSOR—PCM INPUT
DESCRIPTION
The Oxygen Sensors (O2S) are attached to, and protrude into the vehicle exhaust system. Depending on the emission package, the vehicle may contain either 2 or 4 sensors. On non-California emissions packages, 2 sensors are used: upstream (referred to as 1/1) and downstream (referred to as 1/2). On California emissions packages, 4 sensors are used: 2
upstream (referred to as 1/1 and 2/1) and 2 downstream (referred to as 1/2 and 2/2).
OPERATION
An O2 sensor is a galvanic battery that provides the PCM with a voltage signal (0-1 volt) inversely proportional to the amount of oxygen in the exhaust. In other words, if the oxygen content is low, the voltage output is high; if the oxygen content is high the output voltage is low. The PCM uses this information to adjust injector pulse-width to achieve the 14.7–to–1 air/fuel ratio necessary for proper engine operation and to control emissions.
An O2 sensor must have a source of oxygen from outside of the exhaust stream for comparison. Current O2 sensors receive their fresh oxygen (outside air) supply through the wire harness. This is why it is important to never solder an O2 sensor connector, or pack the connector with grease.
Four wires (circuits) are used on each O2 sensor: a 12–volt feed circuit for the sensor heating element; a ground circuit for the heater element; a low-noise sensor return circuit to the PCM, and an input circuit from the sensor back to the PCM to detect sensor operation.
Oxygen Sensor Heaters/Heater Relays: On a certain non-California emission package, the heaters on both sensors are fed battery voltage from the ASD relay which is controlled by the PCM. Refer to ASD relay for more information. On another non-California emission package, the heaters on both sensors are fed battery voltage from the two O2S heater relays. The O2S relays are also controlled by the PCM. On the California emission package, the heaters on all 4 sensors are fed battery voltage from the two O2S Heater Relays.
The O2 sensor uses a Positive Thermal Co-efficient (PTC) heater element. As temperature increases, resistance increases. At ambient temperatures around 70�F, the resistance of the heating element is approximately 6 ohms. As the sensor’s temperature increases, resistance in the heater element increases. This allows the heater to maintain the optimum operating temperature of approximately 930�-1100�F (500�-600� C). Although the sensors operate the same, there are physical differences, due to the environment that they operate in, that keep them from being interchangeable.
Maintaining correct sensor temperature at all times allows the system to enter into closed loop operation sooner. Also, it allows the system to remain in closed loop operation during periods of extended idle. In Closed Loop operation, the PCM monitors certain O2 sensor input(s) along with other inputs, and adjusts the injector pulse width accordingly. During Open Loop operation, the PCM ignores the O2 sensor input. The PCM adjusts injector pulse width based on preprogrammed (fixed) values and inputs from other sensors.
Upstream Sensor (Non-California Emissions): The upstream O2S sensor (1/1 sensor) is located in the exhaust downpipe before the catalytic convertor. It provides an input voltage to the PCM. The input tells the PCM the oxygen content of the exhaust gas. The PCM uses this information to fine tune fuel delivery to maintain the correct oxygen content at the downstream oxygen sensor. The PCM will change the air/fuel ratio until the upstream sensor inputs a voltage that the PCM has determined will make the downstream sensor output (oxygen content) correct. The upstream oxygen sensor also provides an input to determine catalyst efficiency.
Downstream Sensor (Non-California Emissions): The downstream heated oxygen sensor (1/2 sensor) is located near the outlet end of the catalytic convertor. The downstream sensor is also used to determine the correct air fuel ratio. As the oxygen content changes at the downstream the PCM calculates how much air fuel ratio change is required. The PCM then looks at the upstream oxygen sensor voltage and changes fuel delivery until the upstream sensor voltage changes enough to correct the downstream sensor voltage (oxygen content). The downstream oxygen sensor also provides an input to determine catalyst efficiency.
Upstream Sensors (California Emissions): Two upstream sensors are used (1/1 and 2/1). The 1/1 sensor is the first sensor to receive exhaust gases from the #1 cylinder. Both of the upstream O2S sensors are located in the exhaust manifold just before the mini-catalytic convertors. They provide an input voltage to the PCM. The input tells the PCM the oxygen
content of the exhaust gas. The PCM uses this information to fine tune fuel delivery to maintain the correct oxygen content at the downstream oxygen sensors. The PCM will change the air/fuel ratio until the upstream sensors input a voltage that the PCM has determined will make the downstream sensors output (oxygen content) correct. The upstream oxygen sensors also provide an input to determine mini-catalyst efficiency.
Downstream Sensors (California Emissions): Two downstream sensors are used (1/2 and 2/2). The downstream sensors are located in the exhaust downpipes just after the mini-catalytic convertors. The downstream is also used to determine the correct air fuel ratio. As the oxygen content changes at the downstream the PCM calculates how much air fuel ratio change is required. The PCM then looks at the upstream oxygen sensor voltage and changes fuel delivery until the upstream sensor voltage changes enough to correct the downstream sensor voltage
(oxygen content). The downstream oxygen sensors also provide an input to determine mini-catalyst efficiency.
Member
Joined: Nov 2013
Posts: 211
Likes: 1
From: Indiana
Year: 1999 Sport Road Rash Monstaliner
Model: Cherokee
Engine: 4.0L I6 Power Tech Engine
really wish I had found this thread before attempting putting on the APN header on my 99. It is a header even though they say manifold!
Either way, I found out the hard way where I had to grind on the intake when I tried to start up the vehicle with a rather large and significant vacuum leak. I didn't want to take the entire piece out again so I loosened the bolts and moved the intake out of the way and hammered down the 6th pipe just enough on the top for the intake to fit over it. The 1st runner I did grind however. Now it fits!
Either way, I found out the hard way where I had to grind on the intake when I tried to start up the vehicle with a rather large and significant vacuum leak. I didn't want to take the entire piece out again so I loosened the bolts and moved the intake out of the way and hammered down the 6th pipe just enough on the top for the intake to fit over it. The 1st runner I did grind however. Now it fits!
CF Veteran
Joined: Apr 2008
Posts: 2,340
Likes: 8
From: Burlington, NC
Year: 1994...mostly...
Model: Cherokee (XJ)
Engine: 4.0L I6 HO, Lot's of Bolt Ons
So the question of the day:
APN header vs OEM (w/ Bellows) replacement?
APN header I'd have to grind to make fit while the OEM will bolt right up.
Other than the feel good feeling of it being aftermarket, any significant gains over a direct OEM replacement?
APN header vs OEM (w/ Bellows) replacement?
APN header I'd have to grind to make fit while the OEM will bolt right up.
Other than the feel good feeling of it being aftermarket, any significant gains over a direct OEM replacement?